Category: Tools & Workshop

  • Minimizing Jig Saw Blade Drift for Cleaner Thick Panel Cuts

    You don’t spot jig saw blade drift while you’re cutting— You discover it when the panels hit the workbench and the edges won’t line up. That’s the moment you realize: cutting thick panels isn’t the satisfying “slice and stack” routine it looked like on the first couple sheets. Whether you’re running lengths of 32mm MDF or breaking down butcher block, those early success stories lull you into a rhythm. Then the friction creeps in. The saw starts to fight you just a bit more with every cut. Joints that should be seamless now need aggressive sanding. You spend longer clamping and re-trimming than actually assembling. Suddenly you’re second-guessing your grip, your setup—even the wood. But the real culprit, slowly compounding in the background, is blade drift worming its way down each cut, turning finishing work into a rescue effort.

    How Blade Drift Sneaks Into the Workflow

    On job one, it’s invisible. Two or three panels come out straight. You move with confidence—until your fifth thick cut, and the panels refuse to sit flush. Joints get rough, the grain tears, and it never feels like a single “bad move” caused it. You blame shaky hands, a glitchy saw, a deadline-induced caffeine jolt. The reality: a blade that’s been slowly flexing off its line, lost in the noise and vibration of repeat use.

    Fatigue starts small but snowballs fast. Each round, you press just a touch harder. The saw vibrates longer, the handle runs hot, and what felt like muscle memory turns into unconscious overcorrection. The blade starts to warm, bend, and walk. Slow enough that you can miss it on sheet two—glaringly obvious when you’re sanding out misaligned seams three hours later.

    Blade Drift: Small Lag that Compounds with Every Pass

    True blade drift doesn’t announce itself in a single bad cut. It’s a series of minor setbacks—the flex in a blade, a kerf that’s too wide, the urge to push faster when the saw stutters. What really goes wrong?

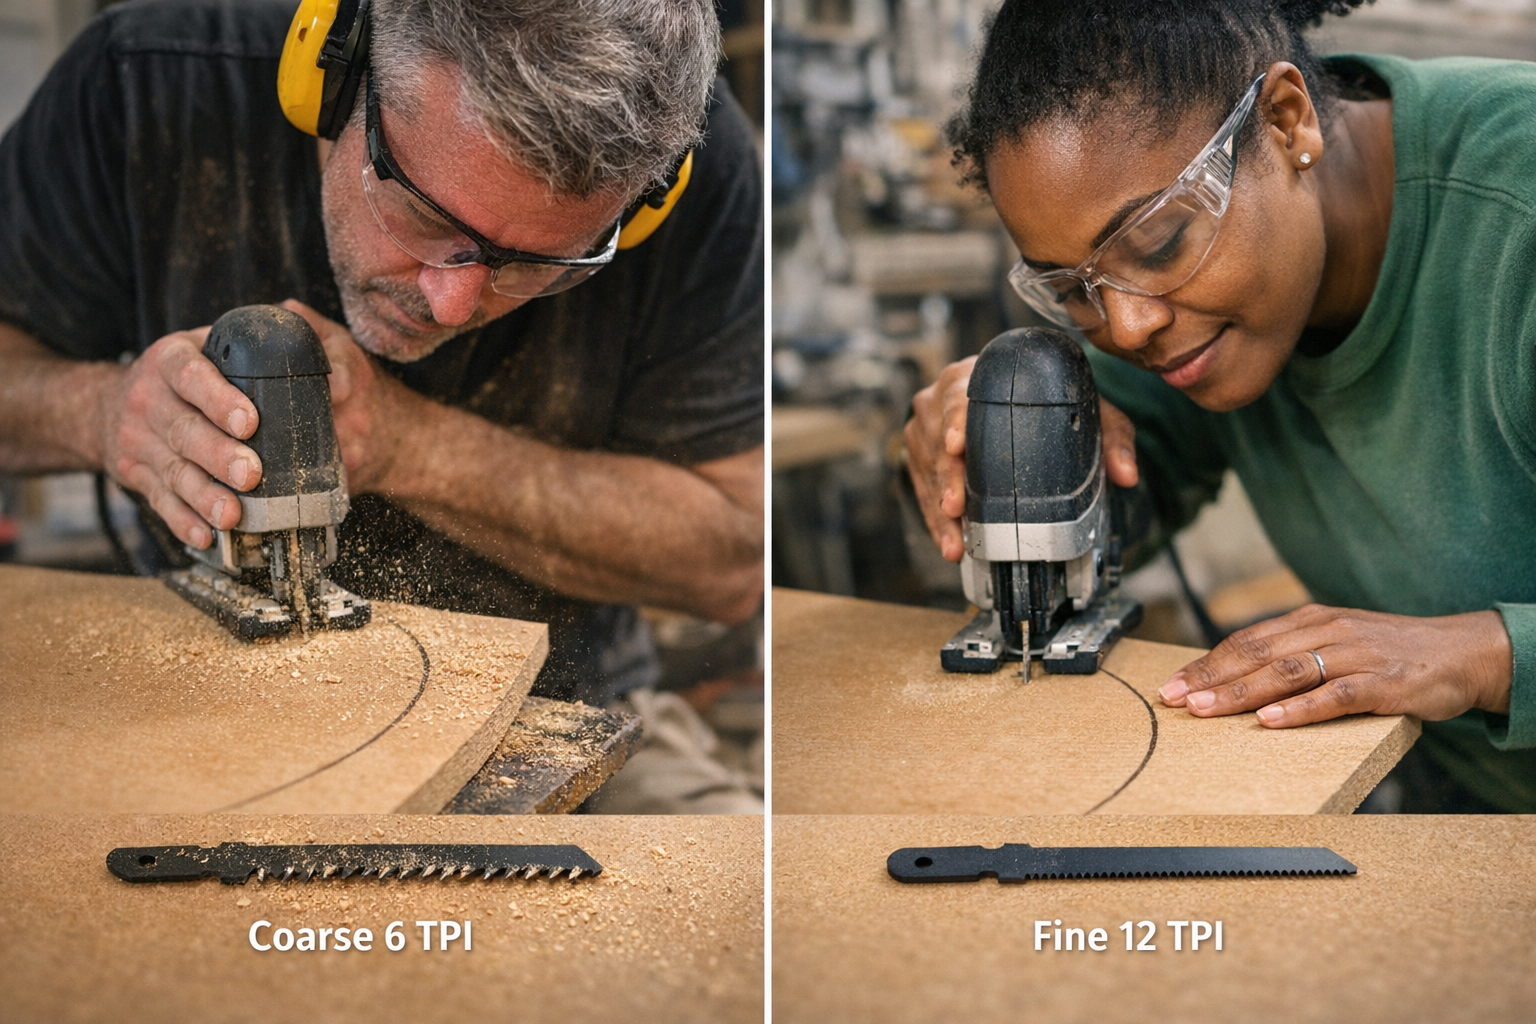
    • Stiffness rules the line. Soft blades feel fine early, then bow and veer on thicker material. A stiffer blade traces the layout you intended—panel after panel.
    • Kerf width isn’t just a number. Wide kerfs cause more friction, more vibration, more heat, and more wandering. Narrow kerfs glide truer and avoid the rough, scorched edge that only gets worse with each round of cutting.
    • Repetition is the silent thief. The longer you cut, the more lapses appear. Stiffness in your hand, wandering focus, and a dull blade invite mistakes that don’t show up until it’s assembly time.

    The result? What looked like a “good enough” blade on panel one gives you a ragged, misaligned gap by panel five—no matter how many minutes you lose at the sander trying to fix it.

    In the Shop: Where Drift Disrupts Build Flow

    The real hits show up mid-project: six slabs of butcher block, each topping 35mm, all queued for cabinet tops. With every panel, the early satisfaction wears thinner. On piece four, the jig saw starts to judder, the motor seems to strain, and the cut swerves—sometimes only half a millimeter, but enough to break the groove on a joint. You feel the blade catch and hesitate. Just one wrong choice—a generic, floppy blade midway through the stack—can sabotage your afternoon. In one case, chasing convenience cost the builder an extra hour: switching to a bargain blade meant recutting, resanding, and resigning himself to filler. Multiply this by every “just get it done” shortcut, and the backlog grows: wasted material, missed deadlines, cut corners you can’t hide after the last round of shellac.

    Choosing Blades: Why Similar Isn’t the Same

    Buying blades by the label is tempting. “Hardwood,” “precision,” “fine cut”—all sound right, but not every package tells the full story. Two blades of the same length and tooth count might behave worlds apart once you hit serious material. Softer steel flexes under pressure, wide kerfs bog the cut, and low-grade teeth dull out halfway through your run. Once vibration sets in and the saw turns jumpy, the best you can do is wrestle the workpiece and hope the sander covers your tracks.

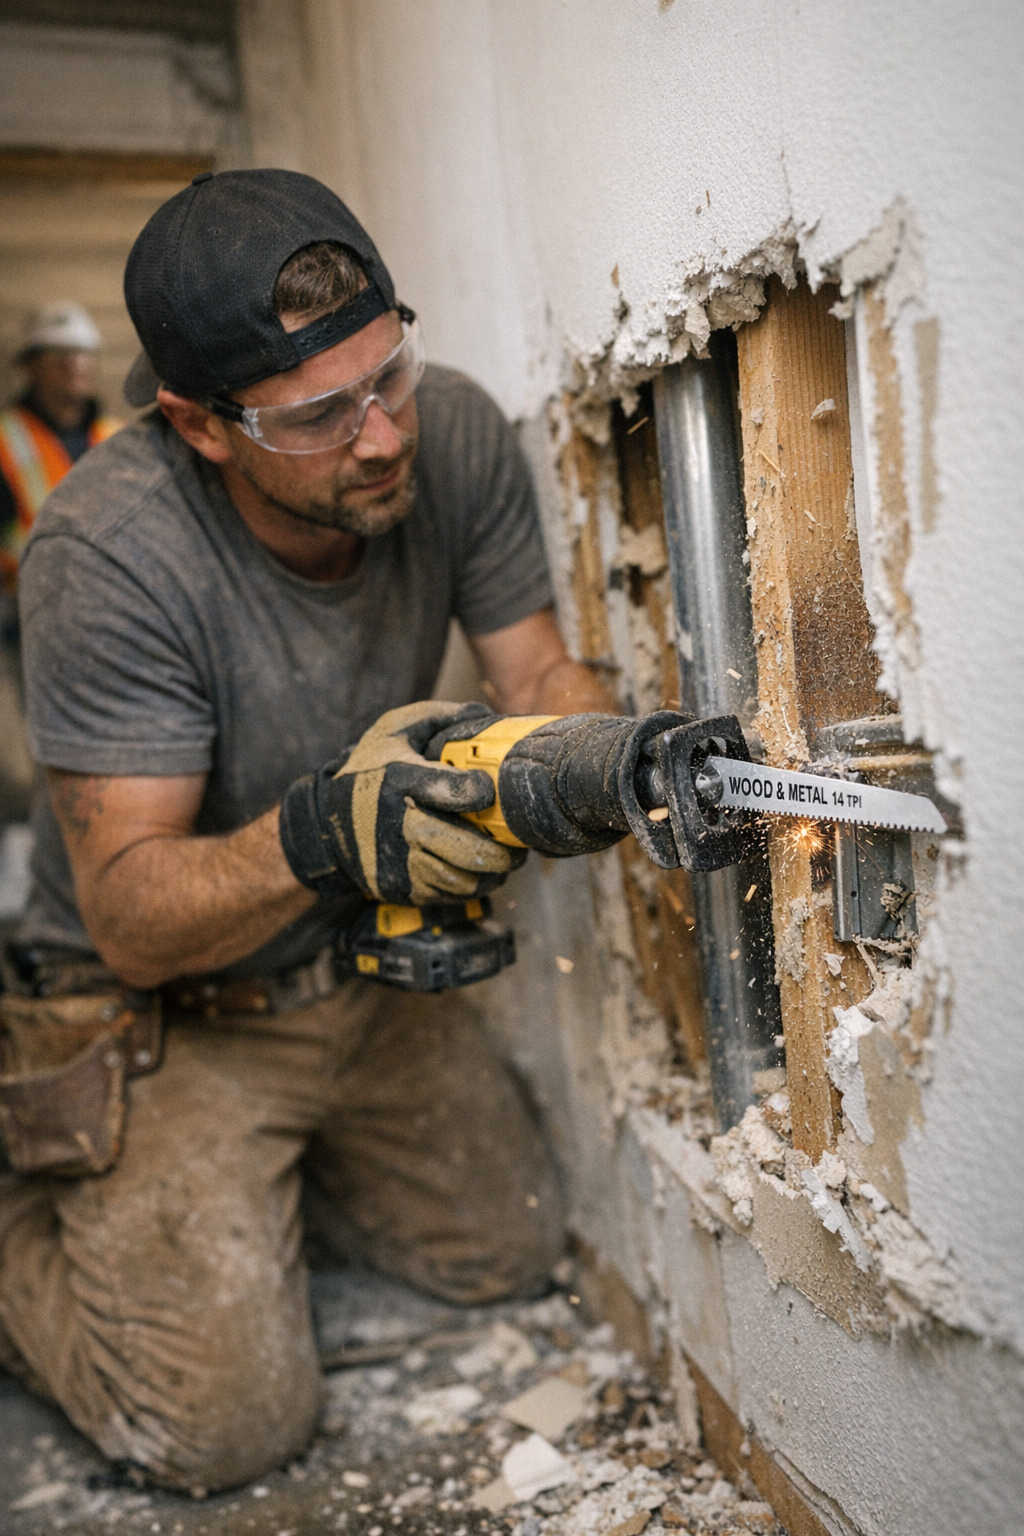
    Test for real payoff: Check the specs—look for high-carbon or bi-metal designs, and aim for a narrower kerf every time. Run two blade types on scrap before you commit them to your workpiece. Sometimes, the winner is a surprise—the stiffer, “slower” blade outpaces the flashy label once you’re on the fifth thick cut.

    When Your Setup Works for You—Not Against You

    Get it right: stiff blade, narrow kerf, and a conscious drop in feed rate. Don’t force the saw. If your machine allows, set orbital action low—enough to eject sawdust, not enough to send the blade thrashing. Suddenly, even tough oak panels part clean, edges barely need more than a finishing pass with a sanding block. On a five-piece job, your drift is barely a hair’s width. Not flawless, but finally predictable—and predictable saves hours.

    You can’t fake a perfect seam, but you can stack the odds. Fewer repairs. Less time hunched over a sander. Enough consistency that the last cut is almost as sharp as the first—without gambling on luck or muscle memory.

    Warning Signs: The Subtle Feedback You Can’t Ignore

    Drift never announces itself with drama. It’s the small signals that matter:

    • Unexpected resistance halfway through a cut
    • Edges rougher on the underside than the top—gaps you didn’t see on pass one
    • The saw shudders more, demanding two hands when one used to be enough
    • The blade or motor housing surprisingly hot after long runs

    These signals build slowly, and they’re almost always the first sign you’re heading for misalignment. Ignore them, and you’ll spend the evening wishing you hadn’t.

    Shortcuts That Cost—and Tweaks That Deliver Every Time

    Slow the pace to stay in control. Pushing harder for the sake of speed forces the blade sideways, especially in thick stock. Reduce orbital setting when depth matters. If you’re burning through a stack, check the blade after every few panels—a small nick or warp at the tip can quietly ruin the next run of cuts.

    Stock extra blades—and use them. No blade handles repeated thick-panel jobs forever. Swapping to a new blade keeps cuts crisp and control intact. If the job list runs long, invest in bulk—not just for peace of mind, but to match blades to wood and panel thickness without hesitation.

    Precision Pays—Especially Under Deadline

    Preventing blade drift is a discipline, not a one-off fix. The reward isn’t gold-plate perfection—it’s a stack of panels that actually fit by shift’s end. The mistake with drift is letting minor slip-ups snowball: a nick here, a gap there, and suddenly the project runs late or finish quality suffers. Stay alert to the tool’s feedback—resistance, heat, vibration. Cut with a blade that actually matches the job, and stay ruthless about switching out tired hardware. That’s how you end the day closing panels clean, not fighting endless rounds of sanding to hide what drift slowly ruined.

    Explore practical jig saw blades and worksite accessories at Gumboll

  • Why Thirty-Second Resets Transform Workshop Storage Efficiency

    Why “Organized” Setups Break Down So Fast

    The first day a storage makeover goes live—racks assembled, mobile carts perfectly aligned, bins labeled and stacked—it looks like order has finally landed. But fast-forward a week or two, and reality creeps in. The cart that once hugged the wall is now parked in the middle, always in the way. You wedge a bin out from under a shelf, only to realize there’s nowhere to set it down. That easy-access corner starts collecting orphaned screw packs and paint cans. The promise of simplicity is replaced by small, draining obstacles: shuffling equipment just to reach a cabinet, returning a tool only to find everything’s too tight to slide it in. The fix that was supposed to speed you up now takes extra time, every single reset.

    The Practical Reset Test: Is Your System Actually Useable?

    This is the truth no catalog photo shows: if it takes longer than thirty seconds to put something away or clear a section, your “system” isn’t holding up under real use. Order can survive a few rounds, but daily routines push layouts in ways pretty pictures never predict. That thirty-second mark isn’t arbitrary—it’s the difference between a setup that quietly works in the background and one you avoid whenever possible. The longer the reset, the more you’ll cut corners, pile up “just for now” overflow, and sidestep the area entirely. You start to resent the space that’s supposed to make things easier.

    Where Setup Friction Really Builds

    Take what seems like a small win: a modular rack that finally clears floor space. It feels right until the slots tighten and returning a saw or drill means balancing it on the end, out of place. That mobile cart? On day one, it glides between work zones. But now its turning radius means swinging it wide just to open a cabinet, or nudging it out of the path over and over. Each detour or awkward step is a few seconds lost. Spread across a project or weekend, you’re losing genuine working time—just from a footprint that almost fits, or a route that almost stays clear. Resetting stops being a non-event and starts feeling like a penalty.

    The Moment a Setup Shows Its Weakness

    Most storage solutions don’t fail at installation—failure becomes obvious on the fifth time you need to restock, late at night when you just want to clean up, or during a rush to find the right gear. What reveals the flaws?

    • One section that always overflows—junk, tools, spare fasteners—because it’s closer or easier to dump things “just for now.”
    • A cabinet that looks tidy, but forces you to extend your reach well past comfort, straining against crowded shelves for every simple return.
    • Mobile units technically clear the floor but force you to sidestep, roll, or even pick up equipment just to reach what’s behind them.

    On the surface, everything looks fine. But beneath, slow resets and awkward movement start stacking up. Go past thirty seconds on a routine reset and the whole workflow gets slower—by inches, then by yards.

    The Slip: Watching Efficiency Unravel Over a Weekend

    Here’s how it played out in real life: I set up a combination of wall-mounted storage for tools and a sturdy, low-footprint cart for fast-access hardware. Day one, all’s well—everything goes back where it belongs, open floor space, nothing in the way. By Sunday? The cart becomes a magnet for spare screw boxes and cable ties—random overflow that doesn’t “fit” anywhere else. The upper rack turns into a balancing act just to reach commonly used screws, while returning tools means walking the long way around the now-in-the-way cart. What was seamless for three resets becomes a gauntlet by the fourth or fifth—the signs of friction multiplying until avoiding the setup entirely almost seems easier.

    Design for the Thirty-Second Return

    The turning point isn’t more storage—it’s building everything around a fast, frictionless reset window. If putting something away, clearing a bench, or restocking a bin ever drags beyond thirty seconds, that section’s layout needs rethinking. Here’s what changed my setup:

    • Unblocking main paths: I moved the cart and reconsidered shelf depth, so neither blocked my go-to routes.
    • Simplifying actions: Every motion—returning a drill, grabbing a bit, sliding a bin—became a one-step process, achievable with a turn or short reach.
    • Fixing spillover traps: Corners that caught overflow got assigned clear, open spots. When overflow appeared, it was fixed in real time, not left to grow into another pile.

    Fast resets keep disorder from snowballing—even after repeated use, there’s no sludge of awkward workarounds to slow you down.

    Identifying and Breaking Real-World Chokepoints

    When a space feels off—when a cart lives in your direct path, or the same shelf overflows again and again—you know the setup’s costing you. More bins or hooks won’t fix it; adjusting the flow will. Hunt for:

    • Footprints—large or small—that edge too close to main walk zones, breaking up natural movement.
    • Overflow magnet areas—low shelves, ends of carts, that become “temporary” but end up permanent holding zones.
    • Reset points—bins or cabinets—where you always have to rethink how to stack, slide, or sort, instead of simply returning things.

    Targeting these pain points doesn’t just clean up the layout—it frees up both physical space and mental bandwidth. The usual friction disappears before it starts.

    How to Keep Resets Effortless

    • Preserve open space. Never overfill racks or cabinets. Leave gaps so you’re not forcing tools back in, even when you’re in a rush.
    • Time your resets. If putting anything away starts to drag, trim, rearrange, or split up sections until every action hits that quick thirty-second mark.
    • Attack overflow at the source. The moment you spot a pile-up zone, adjust the layout so it never becomes a dumping ground. Fix layout friction, not just symptoms.

    The Difference Between Looking Organized and Working Seamlessly

    The setups that really last aren’t polished photo shoots—they’re the behind-the-scenes workhorses that reset as fast on the fiftieth use as the first. What matters isn’t cramming more in, but creating layouts that you can clear, recover, and start fresh—without friction getting baked into your everyday routine.

    When maintenance becomes second nature because of design, not daily effort, you get your time and space back. That’s what separates a layout that “looks” organized from one that actually works—again and again, for the long haul.

    View practical modular storage solutions at StackNest

  • Why System-Based Storage Outperforms Motivation-Driven Closet Setups

    The real test of any closet or shelf isn’t how good it looks after you’ve cleaned it—it’s how it holds up the next time your morning is running late and you need to grab the right pair of shoes in the dark. That’s where most storage “solutions” get exposed. What starts as a picture-perfect setup quickly runs into the mess of daily life: clothes tumbling from stacks, baskets collecting everything but what they’re supposed to, every search for a missing hat turning into a small avalanche.

    If your storage only works when you have time and motivation, it’s not really working. The difference between a tidy shelf and a functional one becomes obvious in those repeat moments—when you’re moving piles just to get a shirt, or shoving shoes aside because the bin’s already full. Organization should survive real life, not just the Sunday evening reset.

    When “Organized” Shelves Start Slowing You Down

    The appeal of neat rows, matching bins, and folded piles is undeniable. At first, there’s a sense of calm—everything in its place, labels facing forward. But that order rarely survives the week. On a busy Thursday, you’re reaching over two storage boxes just to hunt down a kid’s soccer cleats, sending a pile of sweaters sliding in the process, or tossing shoes back in a rush and ruining the line.

    “Project organizing” feels productive—stacking, sorting, labeling, and admiring the result. But what happens when you’re trying to put away groceries with one hand and keep a child from tripping over a pile of boots with the other? The system falls apart not all at once, but in small, daily breakdowns.

    How Categories Disappear—One Reach at a Time

    Uniform bins promise clarity but, by Friday, most become grab-bags. The container that started with just hats picks up loose gloves, stray receipts, and someone’s headphones. Each hurried morning or tired evening erodes the original order. That means more searching, more reshuffling, more time spent rooting through shelves just to find the right scarf—or the second glove buried at the bottom.

    The problem isn’t laziness; it’s the friction in the setup. You shouldn’t have to take out an entire basket just to retrieve a pair of socks, or re-stack a pile of shirts so they don’t topple while you dig for one at the bottom. What you gain in visual neatness, you lose in speed and clarity.

    The Everyday Clues Your Storage Isn’t Keeping Up

    There are patterns you’ll start to notice—subtle ways your “organizing” system is resisting you instead of helping:

    • Stacks of folded shirts collapsing halfway through the week, because real use is never top-down
    • Shoes creeping out of bins and spreading across the floor as pairs get separated and space dwindles
    • Baskets turning into dumping grounds for anything homeless—yesterday’s mail with backpacks and mittens
    • Shelves loaded from front to back, so every retrieval means shifting the whole row forward
    • The creeping realization that, even after a weekend of cleaning, you’re just days away from clutter taking over again

    Entryways: Mess Finds You Fast

    Shared spaces expose storage flaws quickest. If grabbing a school bag means moving three pairs of boots, or if hats, scarves, and water bottles merge into an indistinguishable pile by Wednesday, your system isn’t keeping up. Maybe everything looks calm after Sunday’s reset, but by midweek routines, order dissolves. Shelves become landing zones, bins overflow, and the “categories” you set slip away with every rushed exit or muddy shoe drop.

    Why Motivation Can’t Beat Everyday Wear and Tear

    The problem with project-style organizing is that it depends on big bursts of energy—and those never arrive when the house is chaotic. True storage solutions don’t count on your motivation; they make staying organized the path of least resistance. A system that works means you can put things away quickly and grab what you need without setting off a chain reaction of clutter.

    Shelves with built-in dividers or tiered sections make every category obvious and accessible—a pair of shoes has a true “spot,” bags don’t pile up on boots, and gloves aren’t lost among scarves. Low-profile separators keep items from migrating; using sections prevents stacks from merging into one indistinct heap. You shouldn’t need a two-handed effort to extract a sweatshirt or dig for keys. Well-defined storage turns retrieval and resets into one-move actions, not clumsy reshuffles.

    What does this feel like in practice? There’s no hunt, no restacking, no mini clean-out every time you need something. Everything returns to its space quickly, whether you’re resetting for the next day’s commute or just clearing the bench in five minutes before guests arrive.

    Real Improvement: Stays Useful, Not Just Tidy

    You’ll know your storage is working when you aren’t dreading the reset. Instead of stuffing baskets until they’re overflowing or stacking shoes wherever there’s space, you guide them back to a defined section—one that actually fits, holds shape, and keeps categories from blending. The shelf still looks organized—more importantly, it acts organized—after repeated use and three rounds of laundry.

    As a quick, daily check: notice where you still find yourself shifting one group of items just to access another. That’s usually the spot that needs a divider, an extra tier, or a clearer boundary—not more effort from you, but smarter design for repeat situations.

    “Stored” vs. “Usable”: The Real Difference

    The long-term payoff isn’t in magazine-perfect photos. It’s in how often you find yourself not fighting with the setup. Spaces built for easy, repeatable grabs and easy returns stay sane, even when family routines are unpredictable and messy. Organizing projects run out of steam the moment daily life starts erasing their lines; system-based storage stays grounded because it’s made for how things are actually used.

    If you’re constantly rearranging a shelf, or if grabbing one thing scatters three others, it’s time to switch focus from surface “order” to real, daily function. Your closet or shelf doesn’t have to be perfect—it just has to work, reliably, when routine life is at its most chaotic.

    See smarter closet and shelving systems designed for life in motion at ClosetWorks.

  • Choosing the Right Jigsaw Blade for Precise Curved Cuts Every Time

    Nothing derails a cut—or a whole project—quite like a jigsaw blade that refuses to play along with your template. The first gentle sweep through birch ply feels promising, until the curve tightens. That’s when the blade stiffens, buzzes, and leaves a jagged track behind. Push harder, and you’ll see familiar signs: the blade bending outward, the saw motor sounding strained, and the “curve” quickly veering off your pencil line. If you’ve tried fitting panels or shelves with hand-cut arcs, you know this pain—wobbly edges, splintered veneer, and more time spent fixing than cutting.

    When the Blade Fights Back: What Actually Happens Mid-Cut

    Curves rarely look intimidating on paper. But in the real workshop, fitting a tight scribe for a cabinet or cutting a patch panel that needs to mate perfectly exposes just how unforgiving curved cuts can be. Most people pop in the standard jigsaw blade—the one fresh from the tool case—and assume it’s good enough. As the saw rounds the bend, though, you watch the line start to wander, no matter how steady your grip. Getting a clean, usable part feels less like carpentry and more like damage control.

    On actual jobs, this drift means more than a scruffy edge. The piece won’t nestle into place. Joints are uncooperative, and you end up sanding and test-fitting, sometimes until the fit goes loose. The struggle isn’t about your skill—it’s almost always about the wrong blade working against you.

    Curve Cuts Demand the Right Blade, Not Just “Any” Blade

    What sabotages you halfway through a cut is the blade itself—specifically, its width and tooth design. The typical 6 TPI blade (the default in most kits) is wide, aggressive, and eager to blast through straight runs in pine or spruce. Slide that same blade around a 40mm inside radius in MDF or plywood, and resistance ramps up instantly. The blade bows, the kerf drifts wide, and chips tear out along the edge. Try to bull through multiple curved cuts and suddenly every part needs extensive sanding. Small pattern slips balloon into sanding marathons, driving up fatigue and frustration.

    Swapping to a blade designed for curves—narrower, with 10–12 TPI—flips the script. Instead of wrestling for control, you watch the saw glide steadily around templates. The blade tracks predictably, and the dust comes off fine, not in chunks. When you compare both cuts, the curved-blade edge is ready for finish work with minimal touch-up. The time you claw back from sanding is real—and so is the drop in muscle fatigue.

    Reality Check: Fitting a Panel Without the Guesswork

    Picture yourself tracing out an S-curve on a shelf blank to clear pipes or baseboard. Run it with the kit blade: it bites hard, motor groans, splinters fan off both sides, and the fit is off by a mile. Slap on a 12 TPI, narrow profile blade for the rerun. Now the jigsaw hugs the template without skittering. The cut’s edge is smooth, the test fit just happens—no grinding, no filler, just a panel that drops in flush. One pass, one light sanding, done.

    What Changes When the Blade Suits the Curve?

    The difference turns up everywhere: how much control you feel, how steady the saw sounds, and how fresh your arms and wrists are by cut three or four. The right blade means it’s the tool—not your hands—handling the curve. You don’t have to muscle it around radii or course-correct constantly. The saw keeps a true line; you’re not compensating for flex or hoping a sander will rescue a rough corner later.

    Across a project, these savings multiply. Fewer stop-and-sand breaks, fewer ruined parts, and way less physical strain. In a shop, those “little” moments add up. The right blade isn’t luxury—it’s how you keep small jobs from swelling into exhausting, error-prone slogs.

    Spot the Warning Signs: When Your Blade Is Losing the Battle

    Watch for these telltale signals that your blade isn’t cut out for the job:

    • Escalating vibration as you round corners or switch grain direction.
    • A fuzzy, torn edge forming mid-arc—especially noticeable in MDF or laminate.
    • Visible saw marks or bottom-face blowout appearing right off the line.
    • The cut line bulges away from your tape or pencil mark, denying even a careful guide.

    These aren’t minor annoyances—they’re clues you’re losing time and risking a bad fit. Don’t accept a tool fighting you as “normal.” Swap blades before cleanup becomes the biggest task.

    Field Your Questions: Curve Cutting Answers from Real Shop Time

    How do I choose a jigsaw blade for tight curves?

    Always look for narrow blades with a higher tooth count—ideally 10–12 TPI. These blades flex less in tight turns and deliver cleaner results, especially on radii under 50mm or on materials likely to chip. For broad, shallow curves or thick framing, sure, the standard blade can handle it. But for finish-level work or fragile faces, fine teeth and a slim profile win every time.

    Why do my curves always tear out or finish rough?

    Most often, it’s a coarse or wide blade grinding against the material rather than slicing through it. Plywood in particular hates aggressive blades—they rip fibers and leave ragged edges. Instead, slow your feed, let the blade do the work, and reduce saw speed. Don’t try to “overpower” a bad blade choice.

    Does adjusting my jigsaw’s speed or orbital setting matter?

    Definitely. Pairing a narrow, fine-toothed blade with slower saw speed and minimal orbital action produces the cleanest edges, especially around intricate templates. You get less chip-out in hardwoods and a silky finish in laminates. If clean curves matter, always try reducing both before blaming your skills.

    Workshop Tips for Smoother, Easier Curve Cuts

    • Follow the blade’s lead. Let your feed rate match the blade’s ability to turn—not the other way around.
    • Keep one or two sharp curve-cut blades at the ready and swap instantly when resistance crops up.
    • Double-mark important arcs—use pencil and masking tape—so you catch drift immediately, especially where a visible veneer edge matters.

    You don’t need a drawer full of specialty blades. A basic set of curve blades, alongside the stock types, pays for itself in hours recovered and repairs avoided.

    Recognize Blade Trouble Before the Mess Grows

    It’s easy to stick with a blade that “sort of works,” especially mid-project. But the cost piles up—crooked lines, aching hands, endless sanding. Whenever your cut starts veering or the saw begins to chatter, that’s your cue: pause, switch blades, and let the tool carry its weight. Stepping back for a moment beats losing time—and materials—to a fixable problem.

    Find jigsaw blades and accessories at Gumboll

  • Why a Simple Reset Rule Keeps Your Workspace Functional Every Day

    Set up a garage, workshop, or utility space, and you know the initial satisfaction: every shelf snapped in, bins stacked, tools racked in clean rows. But the real test comes weeks later—once normal projects and everyday mess start rewriting your layout, one shortcut and pileup at a time. A setup might look perfect the first day, but when you walk in midweek, rushed and juggling hands full, how well does it stand up to real-life use? That’s the real question of storage performance.

    The Real Challenge: Routine Use, Not First Impressions

    In the beginning, modular carts roll smoothly, wall panels gleam, and every tool has its numbered spot. But the moment jobs get busy, reality intrudes. Need your sander? You set it down “for just a minute” on a cart—then never move it back. Slide a bin to open the cabinet. Nudge a rolling chest sideways so you can squeeze past. A good plan on paper starts eroding every time you have to move two things just to get at a third.

    The signs are everywhere: corners morph into dumping grounds, overflow baskets settle into main walkways, and wall hooks once lined with tools transform into extra shelves for boxes and gear “waiting for later.” The more you adjust your movement to avoid blockages, the slower everything feels. Showroom order fades fast; daily function starts to drag.

    Where Friction Builds Up—And How Fast

    Little obstacles quickly become walls. Maybe it’s the cabinet that always catches your hip because you have to angle around it, or the rolling cart permanently parked across your main path because there’s nowhere else for it to go. Pretty soon, your setup isn’t serving you—you’re serving the setup, reshuffling bins and sidestepping baskets just to get started.

    It’s deeper than not having enough storage. The true issue is the return flow—the ability to bring the space back to ready without a restructuring marathon every Saturday. When every task involves juggling, shifting, or detouring around awkward footprints, even the best-planned layouts grow tiresome. That’s how what promised smooth access turns into slow frustration.

    Overflow Creep: The Silent Space Stealer

    The constant enemy? Overflow that appears quietly and never seems to leave. It’s the “later” pile—leftover hardware, half-used rolls of tape, project scraps balanced on a bin for just a day or two. But as soon as one session ends and another begins, nothing’s actually cleared. The piles migrate: a bin mound by the wall, stray gear teetering on a cart, a bag wedged into a corner that was supposed to be open.

    Instead of a clear area, you end up weaving around makeshift stacks, stretching to reach what used to be directly in front of you. Overhead shelves become landing pads for random overflow. Corners you thought would boost capacity instead just collect things nobody wants to deal with. The cost? Your main routes shrink, work slows, and you start avoiding your own setup.

    The Reset Rule: What Separates Usable from Unraveling

    The secret behind workspaces that actually stay clear is surprisingly simple: a minimal, truly doable reset routine. Not a complete overhaul, but a short, repeatable step you can manage every time—even when you’re in a hurry or done for the day. It’s less about neatness and more about preventing drag: identifying where stray tools or overflow bins belong (even temporarily) and making sure key movement paths are always open for next time.

    In practice, it could be as basic as this: at the end of a session, anything left out goes to one designated catch-all spot next to the exit. Quick scan, five items into the overflow zone—then you’re free. The workspace isn’t museum-grade pristine, but you aren’t starting the next job clearing a runway. The crucial difference? Resetting no longer feels like work; it’s just routine, no matter how chaotic the project was.

    How to Tell If You Need a New Reset Rule

    You don’t need a full-on mess to spot a setup problem—just small patterns that signal friction:

    • Constantly shifting a cart or basket just to open a path or cabinet
    • Finding random tools or supplies stranded in areas they don’t belong
    • A recurring pile in the same dead corner, never quite cleared
    • Avoiding certain zones because “temporary” clutter keeps lingering a little too long
    • Resetting the space feels like an intimidating commitment, not a quick evening wrap-up

    When you notice movement slowing, routes narrowing, or stalling before a task because of blockages—your storage needs less organizing and more routine resetting.

    Why Hardware Alone Falls Short

    It’s easy to believe another wall rack or set of bins is the answer. And yes, modular gear helps showcase a catalog-level workspace—at first. But when there’s no fast path to clearing overflow, even the nicest wall panels end up buried under “on hold” gear, and rolling bins morph into roadblocks. Tools and supplies have a place to live, but getting them back there feels like a mini project every time.

    In the end, storage only works if it supports constant return to clarity. Otherwise, you’re stuck in the classic shed trap: gear technically organized, but in practice, always one pile away from chaos, and momentum lost to endless reshuffling.

    How to Build a Reset-Resistant Layout

    1. Create a Single Overflow Zone

    Designate just one spot for overflow—a visible, convenient area by the door or the main walkway. When a session ends, only this spot needs attention. You avoid the spread of piles and keep the rest of the space functional.

    2. Guard Your Main Artery

    No matter how you arrange storage—rolling chests, racks, bins—commit to never blocking the core walking route. Protect it: if you have to wrestle a cart or step over a basket to get through, the risk of friction and buildup multiplies.

    3. Redefine “Good Enough”

    You won’t always have time for deep resets. That’s normal. Make it your pattern to do the five-minute version: stash what’s loose in the overflow, realign anything left astray, move on. The art is routine return, not visual perfection.

    Real Use: The Only Test That Matters

    Setup success isn’t measured by how impressive it looked the first day, but by how smoothly you can walk in, start work, and reset the space—even after a stressful week. If the layout lets you return to baseline with minimal effort and almost no thought, friction stays low and the workshop remains an asset rather than a source of dread.

    The best storage never stops you in your tracks. Its real promise isn’t perfect rows, but routines that hold up when you’re tired, distracted, and in a hurry. Every setup fails eventually if resets are too hard—but the right reset rules keep your space useful, no matter how often chaos visits.

    Explore practical storage setups at StackNest.

  • Why Storage Systems Fail Over Time and How to Fix Them for Daily Use

    Why “Organized” Can Still Mean Frustration

    The photo-ready closet is a siren song. Rows of matching bins, almost military-perfect folds, and a shelf that practically dares everyday life to mess it up. But give it a month—sometimes just a week—and that glossy “after” look often starts working against you. Socks end up buried behind bins that block your reach. The “tidy” stacks soften, lean, and collapse as you fish out a single shirt. Shelves become slow, awkward obstacle courses instead of helping hands. Somehow, clutter returns—not as a mess you can see at a glance, but as a string of tiny slowdowns, shortcuts, and silent frustrations that linger in your routine.

    This is the trap: setups that solve for appearance on day one, but not for how you use your space twenty days—or two hundred days—later. A closet system that seemed perfect on a Saturday afternoon routinely starts to buckle by Wednesday, when the bin you need is under three others, or you have to reshuffle an entire stack just to grab gym shorts before work.

    When Looks Deceive: The Downside of Fast Fixes

    The “Organized” Illusion. It’s tempting to grab a set of bins, snap on some lids, and call it done. Deep bins promise to hide chaos. Tall stacks create the momentary high of order. But under weekday pressure, these fixes unravel—because perfectly contained isn’t always perfectly usable. Most of us don’t have the patience (or time) to unstack and restack bins just to reach the daily basics—and the more steps it takes to get to what you need, the more temptation there is to leave things out “for now.”

    Picture the hallway closet before work: In a rush, you swing open the door hunting for your gym bag, only to face a wobbly tower of bins. Each one you move threatens to unmake the careful order you spent a weekend creating. By Thursday, stray gloves lurk at the back, scarves are balled up in corners, and the shelf loses its logic. If grabbing one thing means shifting three others, the system has failed real life—no matter how good it looked the day you finished.

    Where Storage Starts to Slow You Down

    The truth leaks out in seconds lost: delays you only notice when they add up. Need a hat? Now you’re pulling lids off opaque bins, rooting blindly, and causing an avalanche by the third try. Soon, the lids stay off, overflow takes over, and the idea of “resetting” the shelf feels heavier every day.

    Open baskets sound like freedom, faster access, and ease—but if there’s no divider, they devolve just as quickly. Small stuff sinks to the bottom; headphones twist into glove tangles. Within weeks, what was “organized” morphs into a mixed catchall you dig through instead of use.

    How “Perfect” Setups Fall Apart in Routine Use

    Every system shines—until you use it. Take the classic shelf of folded t-shirts: crisp lines on Monday, slumped stacks by Friday. Every time you grab a shirt in the middle, the neat pile sags or slides, and you’re restacking after a single pull. Or the tidy row of shoes by the door that, after three busy days, has extra pairs creeping up the wall, lost mates hiding behind boots, and the “zone” evaporates under rush hour reality.

    Spotting the Real Issue: If you catch yourself constantly restacking, moving items just to reach a basic, or sighing at the sight of a shelf that should make life easier, you’re not failing at organization—the system just isn’t matching your daily moves.

    Small Tweaks, Big Gains: Making Storage Actually Work

    Real fixes aren’t grand gestures. In one hallway closet overhaul, swapping deep bins for shorter trays and adding a vertical divider changed everything: the gym bag became a one-reach grab, not a rescue mission buried behind tote bags. Hats and gloves finally kept to their lanes. With trays only one item deep, nothing disappeared—and even at the end of a long day, the quick reset felt doable, not draining.

    This change didn’t turn the closet into a magazine spread. But it did make roles clear, cut down on stuff left out “for now,” and nearly erased the old habit of stacking things wherever there was room.

    Why Storage Logic Fades—And How to Prevent It

    The biggest culprit? Expecting rigid structures to fit routines that always shift. Too many bins, and it takes three steps to put anything away—so you don’t. Slicing categories too thin means you stop sorting altogether. Real homes reward flexibility and visibility: fewer, open containers with clear boundaries and easy access. They aren’t always photogenic, but they hold up through hectic mornings and messy weeks.

    Design for Habit, Not Just for Show

    The gold standard isn’t the shelf that impresses visitors, but the setup you actually want to keep using. Choose containers based on real grabs and put-backs. For your everyday routine, use open trays and baskets—dividers where needed—so you see what’s there and can return things without hesitation. Keep lids and closed bins for out-of-season sweaters or backup bedding you reach for a few times a year, not for the things you need at 7 AM.

    Keep an eye on the warning signs: that pile growing on top of a bin, the object that won’t quite fit its box, the repeated detour around an overfilled basket. These are clues—use them to fine-tune, not overhaul. Often, the smallest tweak (a divider, a shorter tray, a shelf lifted two inches) delivers the most relief, making daily access easier and keeping clutter from sneaking back in.

    Make Your Storage an Ally—Not an Obstacle

    No one’s routine is picture-perfect, and no storage system will always stay that way. But a setup with smart visibility, honest boundaries, and fewer steps does more than just look good—it operates in sync with you. Whether it’s your primary closet, the rush-hour entry zone, or that kitchen shelf you raid five times a day, storage that truly works makes busy, messy weeks feel a little smoother. Instead of frustration hiding beneath the surface, you get support you can count on—even when life gets messy.

    Find practical closet systems, shelving, trays, dividers, and more at ClosetWorks.

  • Choosing the Right Reciprocating Saw Blades for Mixed Material Cuts

    If you’ve ever burned an afternoon forcing a reciprocating saw through a messy tangle of wood, nails, PVC, and metal brackets, you already know: using the wrong blade isn’t just slower—it’s an invitation to ruined cuts, wasted materials, and a forearm cramp before lunch. Real job sites rarely hand you clean, single-material runs. A neat line can turn ugly in an instant—one hidden screw, a quick hit of electrical conduit, and suddenly the saw stalls or veers off course. You can almost predict it: the ragged ends, the numbing vibration, and the steady drag that piles up minute by minute. The store wall might make all blades look similar, but when you’re deep in a remodel or an urgent patch, the wrong match is the kind of mistake you only make once—or pay for twice in repairs.

    Where It Goes Wrong: Mixed-Material Strain on Saws

    Blades claim “multi-material” or “demolition” on the packaging, but the streets are different. Out in the dust and sweat, you’re breaking through wood studs, biting into drywall, skimming plastic, then suddenly crunching into buried hardware. Every layer means new resistance, new friction. Blades made for a single material throw off more than just noise—expect handle rattle, heat where it shouldn’t be, and seams that will haunt you on final inspection. Not just chips and splinters—sometimes full-on blade deflection, chewed drywall, and the slow, creeping calamity of a cut gone sideways.

    The “universal” blade, it turns out, is often only universal in making more work. It splinters or staggers at transitions, riding up over metals, bogging down in plastics, wandering off your pencil line. What looks like a five-minute fix balloons into rework, wasted stock, and fatigue in your grip long before quitting time arrives.

    It’s the Details—Not the Packaging—That Separate Blades

    Line up any hardware display and it’s easy to be fooled: flat blades, bright labels, assurances of “versatility.” In the real world, the difference reveals itself in seconds. A high-quality bi-metal blade rated for “wood with nails” glides through a stubborn stud—even when a nail interrupts your path. No vile chattering, no scorched dust cloud, no forced blade stop. But swap in a course-toothed wood blade, and the minute you clip metal, every vibration in the handle spikes, the cut staggers, and you’re left easing the tool back onto your mark while the job grinds to a halt.

    In-Job Friction You’ll Know by Heart

    The retrofit run: Routing wire behind drywall, you’re up against pine, calcified gypsum, maybe steel corner bead. The right blade slides through with one controlled stroke—even a hit of aluminum only slows, never stalls. The wrong blade catches, wobbles, and the exit wound is jagged: nothing a round of filler can hide. Now you’re fixing as you go, not finishing.

    Emergency patch turns marathon: You gamble on a “universal” blade through spotty framing, old fasteners, and mismatched woods. The result? Saw chatter, pauses to unclog teeth, seams that force extra planing—or worse, a finish you have to sand for half an hour just to blend. Your sweat soaks in before you’re even done with the first pass.

    What Really Improves With the Right Blade?

    Most crews earning their scars settle on a sweet spot: a moderate-tooth bi-metal blade—around 14 TPI—specced for “wood with nails” and “light metal.” The difference is vivid from the first stroke. Instead of hiccups every time you hit a screw, the saw just hums through. Your pencil line actually survives transitions, not just the easy lumber. Cleanup shrinks from endless sanding (ten-foot boards knocked down to fluff) to a couple of clean passes with a block. Sheet alignment lines up tight, so you spend the next hour assembling, not improvising repairs to crooked panels.

    Control improves hour by hour: No more yanking or riding the trigger, no desperate wrist work to steer the saw back on track. With the right blade, you’re steady through surprises—less fatigue means steadier hands by afternoon, and more eyes on layout instead of fighting vibration. Material loss dips, scrap piles shrink, and at the end of the day, the cut list is shorter because your first passes actually count.

    When Your Blade is Telling You Something—Listen

    A blade rarely fails without warning. Feel for sudden extra buzz as you sink from wood into metal, or if the saw just starts fighting the material harder than usual. Notice a faint burnt smell, or see blackened streaks in the dust? That’s the heat rising—teeth dull, the blade binding, and the finish suffering in real time. Ragged seams, smoke on layer changes, or the tool suddenly tracking off mark are red flags. Don’t stubborn through “just this last cut.” A two-minute blade swap can save an hour—especially if the alternative is tearing out a warped or burnt piece you’d hoped to keep.

    Universal Blades: Quick, But Not Quality

    Sure, universal blades are tempting when you’re flying blind or racing the clock. But they rarely cut clean—expect more chipping in soft woods, seam tearout, vibration in the hand that builds across the day. You can feel quality slipping: seams that never sit flush, finishing work that never seems to end, and wrists that ache before coffee wears off. Across dozens of cuts, that shortcut only stretches the job.

    Adapt or Accumulate Mistakes—That’s the Real Choice

    Mixed-material work is unpredictable—that’s the point. The best results go to those who spot trouble early: is the blade kicking more? Do seams roughen as you move through a new fastener? Pros don’t wait for disaster—they swap blades before small hiccups pile up. Your first few cuts are the signal. Miss it, and you can spend all afternoon sanding patched seams and hiding imperfections. Catch it, and you keep the job moving—less waste, fewer wrist breaks, a finished face that actually passes a close-up inspection.

    Shop blades, tools, and gear designed for real jobsite challenges at Gumboll.

  • Why Defining Your Storage System Before Buying Organizers Matters

    The urge to finally “get organized” in a garage, workshop, or shed always starts out hopeful: a Saturday trip down the organizer aisle, ready to conquer clutter for good. You buy the matching bins, sturdy racks, and stackable trays, load them onto every shelf and pegboard, and for a brief moment, it looks like real progress. But then you try to use the space—the real way you use it. That’s when things start to slide. The order looks convincing, but friction creeps in: bins block each other, wall racks swallow what you need, a rolling cart lodges itself in your main route for the third time this week. The space seems sorted but everyday tasks get messier, not simpler. Practical setups rarely need more containers—they need better flow.

    How “Organized” Can Still Mean Awkward—And Why It Keeps Happening

    It’s easy to feel done once everything looks uniform. But looks don’t fix the underlying problems. A stack of trays might line up on the bench, but by midweek you’re digging through the wrong one to find your favorite screwdriver. Hooks meant for tools turn into tangled parking for garden hoses, always at the wrong height. The rolling cart’s wheels jam in the only walkway that actually gets used, so you push it aside, rerouting yourself around obstacles you only created last weekend.

    This is the everyday cycle: a space that photographs neatly, but disrupts your routine. The problems never show up at setup. They show up later—on the third time you twist through a blocked path or move stacks just to access what’s hiding at the back. Everything technically fits, but nothing moves smoothly. You end up shoving containers an inch this way, a box that way, trying to make the arrangement adapt to your habits, instead of the other way around.

    Real Routine Interrupts: How Setup Creates Unexpected Barriers

    Working in smaller areas makes these gaps painfully clear. You mount a pegboard and sort bins by category, but soon you’re playing Tetris: always shifting something to get what you really need. The most-used tray ends up four feet away because it looked better there, not because you ever grab it from that angle. Unused wall space turns into a dumping ground for random cords, while the floor’s corners gather overflow—a bag of nuts and bolts, a grime-streaked tarp. These slowdowns are subtle, but constant—especially with dirty hands, a time crunch, or a chilly garage where one extra step is one too many.

    The friction is cumulative. In the evening, cleanup turns into awkward shuffling: stacking mismatched bins that don’t nest, sliding gloves onto any open surface, piling odds and ends onto a cart you have to relocate for the third time. Week after week, what started as order quietly morphs into constant mini-resets that steal your time and block smooth movement.

    Why Looking the Part Doesn’t Make a Space Work

    The visual payoff of a coordinated setup disappears the first time you need to unhook three things to access one. Trays that nestle perfectly together are a headache once you realize the items you use most are buried or blocked. Every reach-around or awkward maneuver is a reminder: organizers chosen for the sake of looking “tidy” often get in the way of real, repeated use.

    There’s a real cost here. Bad wall layout means tools drip onto the floor, oversized racks gobble up working space, and neglected corners fill with overflow that slows every task. The more you shuffle and shift, the less satisfying the “system” becomes—if it even counts as a system at all.

    The Hidden Gaps Routine Always Exposes

    The weaknesses surface during rushed mornings, sudden weather, or whenever your hands are full. That narrow storage path in the shed? Always blocked by a rolling cart you have to drag aside just to access drawers. Baskets tucked under benches? Great until you need one fast, crouching and re-sorting in an awkward huddle. What works in a catalog photo collapses under repeated, real-life cycles—the ones you didn’t plan for, but repeat every week.

    Shift Your Mindset: Design the System, Not Just the Storage

    The real fix doesn’t come from more containers. It comes from stepping back and mapping how you actually use the space. Walk the whole area. Where do your hands land first? Which path does your body naturally take? Where is movement always interrupted, and which stretch of wall or bench inevitably collects overflow?

    Building a system means prioritizing effortless reach and uncluttered movement. That could mean a wall rail at standing height, holding trays that slide out without blocking anything else. Or modular panels that shift as your needs evolve—freeing you from a fixed rack that always pinches the same high-traffic spot. Instead of containers dictating your routine, the system adapts to you. The right layout clears paths, zones, and corners that would otherwise turn into storage purgatory.

    Practical Upgrades: What “System-First” Actually Changes

    When each organizer is chosen to slot into a bigger blueprint, the difference is immediately obvious. Tools you use weekly have their own tray, at a height you can reach in one motion—no reshuffling required. The wall system keeps overflow off the floor and finally kills the pile in that always-messy corner. End-of-week reset stops feeling like an all-day battle; each tool and glove lands where it belongs without friction, so you can actually finish and move on.

    It doesn’t look like a showroom. It feels like work goes faster and cleanup finally snaps into place. Nothing’s perfect, but the endless shuffling stops, replaced by a setup that lightens the load instead of building new obstacles.

    Spotting a Layout That Still Needs Work

    Does a cart block your walkway every time you open a cabinet? Does wall space look busy but nothing’s actually in reach? Do bins stack to awkward heights, or do categories keep bleeding together as you tidy?

    These are the tells: when the “organization” keeps breaking down into weekly rituals of restacking, redirecting, and re-sorting, the underlying system just isn’t right. Only when you can move through the space cleanly, grab what you need instantly, and return things without inventing new routines, do you know the setup is working with you—not against you.

    Turning Intentions Into Lasting Improvements

    If you want a space that stays organized, stop letting organizers dictate the plan. Start with movement, daily reach, and the ability to reset quickly—choose solutions that serve those needs. Usually that means fewer containers, smarter wall systems, and layouts that don’t require acrobatics to keep in shape.

    Organization stops being a battle the moment your setup feels frictionless—when trays draw out, carts park clear, and bins return to their spots without a second thought. That’s the shift: a workshop, garage, or shed that stores what matters, supports your real habits, and finally makes the whole project worth the effort.

    Shop StackNest for smarter workspace systems

  • Choosing Between Open Shelves and Closed Cabinets for Closet Storage Efficiency

    Closets unravel faster than anyone admits. Shelves look pristine on move-in day; every row of T-shirts, jeans, or sweaters says you’ll be the person who always knows where everything is. But within a week, the truth sets in. Each quick reach pulls a sleeve out of place or collapses a stack. What should’ve been “grab and go” becomes “search and rescue” as clothes mingle, piles slide, and yesterday’s neatness becomes today’s barely-contained chaos. The friction isn’t just cosmetic. The daily grind—finding, returning, reshuffling—chips away at your morning and adds one more invisible obstacle before you walk out the door.

    Open Shelving: Fast Starts, Messy Finishes

    Open shelves invite bold organization—until the real world intervenes. That first week, there’s no barrier: you spot your favorite shirt, snatch it, and the closet feels like an efficient extension of your routine. But by Thursday, that stack of T-shirts sags, half folded and half slumped onto yesterday’s jeans. A single stray item—a gym towel, a ball cap—slides in and suddenly your “T-shirt section” is just a general pile. Every movement tries to be one-handed and quick, and in the race, categories blur. Before long, the entire shelf is contested ground.

    The upside—immediate access—is also its downfall. Open shelving turns small slips into big messes. One rushed grab leaves shirts spilling into sweaters; a couple of forgotten refolds later and half the closet is in disarray. Instead of one shelf for each category, you end up defending shelf borders from accidental invasions every time you reach for something tucked in the back. Minor disorder grows visible and persistent, demanding regular resets most people never get around to.

    Closed Cabinets: Calm Outside, Chaos Inside

    Closed cabinets give the illusion of control—at least until you open them. Doors shut, clutter disappears, and from the outside, everything looks calm. For anyone craving less visual noise, cabinets seem like a peace treaty. And in tight spaces or high-traffic entryways, that’s no small benefit.

    But function tells a different story. Simple retrieval becomes a chore. Need a shirt near the bottom? You’ll move two stacks to get at it. Looking for a rarely-worn sweater? It’s buried behind months of accumulated “someday” clothes. Over time, out-of-rotation items slink to the back: a single jacket gets lost behind bins, socks vanish behind spare shoes, and entire categories quietly mix until you’re not sure what you own. Cabinets protect from dust, but also hide the warning signs—disorder multiplies unseen, until “just grab that thing” turns into a mini excavation.

    When Out of Sight Means Out of Control

    The surface order of cabinets discourages touch-ups, and that’s the trap. Because clutter isn’t visible, you let things slide; then, when you finally hunt for the winter hat or last clean hoodie, half the contents spill onto the closet floor. Cabinets make it easy to hide problems, but harder to maintain a functional sort. You don’t see the blend of categories or the collapse of folded stacks until you’re knee-deep in stuff you forgot about.

    Why Routines Break Even the Best-Laid Storage Plans

    Most storage “systems” fail where daily habits collide with ideal setups. Maybe you start with jeans, tees, and hoodies in distinct rows on a shelf. After a week, jeans have invaded the T-shirt section, and the original logic is long gone. Or you fill a cabinet with winter gear in April and, months later, aren’t sure what’s in the back anymore—just that it’s in the way when you’re hunting for an everyday item.

    Routines are ruthless: kids jam clothes wherever there’s space; adults toss scarves or bags on the closest shelf. The result? Shelves that crowd too fast, bins that become grab-bags, and closets where each section gradually loses its role. You start with “zones,” but by mid-month, you’re just hoping things don’t fall on your feet. Resetting everything after each use isn’t realistic—a true system should survive imperfect routines, not collapse under them.

    Divide and Contain: Practical Fixes That Actually Stick

    You don’t need a renovation, just a few targeted shifts. Start with shelf dividers: a vertical insert here doesn’t just separate stacks, it prevents jeans from tipping into shirts and keeps the edge of your shelf from morphing into a jumble. With real walls guiding each pile, stacks retain shape longer and category lines stop drifting. Instead of re-folding everything after each morning, you just nudge a sleeve back inside its zone—small, fast corrections instead of full resets.

    Segmentation gives your closet structure its backbone. For deep shelves, store light, high-use items upfront and keep heavier, rare-use pieces at the back, so the stacks in front don’t tip. In kids’ closets, label bins (“Socks,” “PJs”) so even in a hurry, putting things back mostly right is realistic. Consistency matters more than precision, and small changes—dividers, bins, labels—create pockets of order that survive rushed routines.

    Mix and Match: Stacking the Odds for Lasting Order

    One storage style rarely solves all problems. Pair open shelves (for everyday items) with closed cabinets or deep bins (for what you use less often or seasonally). Overlay dividers or bins inside both. This mixed approach cuts down the “closet domino effect”—where one broken section brings the whole system down. Open shelves stay resettable and visible, while cabinets swallow clutter you don’t need right now—without turning every retrieval into a hunt.

    Clues Your Storage Isn’t Working—And What to Do Next

    How do you know you’re heading for trouble? If you’re constantly reshuffling the same stack or losing track of what goes where, those are red flags. The shelf you restack every two days, or the cabinet that absorbs things you never find again—these are cues, not failures. Tweak high-friction zones first: add a divider, assign a bin, or shift categories so “hot spots” get special treatment without reorganizing everything at once.

    The real test is resilience, not perfection. When a closet lets you put things back close enough after a busy day—and makes it obvious what belongs where—chaos stays contained. What matters isn’t how flawless your closet looks for a photo, but how easily it bounces back from daily use.

    Making Storage Work for Your Life, Not Just for Show

    Open shelving shines for speed, but demands frequent touch-ups or clever dividing. Cabinets offer peace to the eye, but can quietly sabotage daily access if left unmanaged. Most lives need a blend, plus smart zoning inside each section. Watch for trouble spots in your routine—crowded shelves, mixed bins, or perpetual reshuffling—and adjust with practical fixes instead of chasing closet perfection. The goal is not showroom neatness, but a closet that never slows you down, no matter how hectic the week.

    Find practical storage systems designed for real daily use at ClosetWorks.

  • Mastering Reciprocating Saw Control for Cleaner Demolition Cuts

    There’s a familiar thud of disappointment that hits every time your so-called “clean cut” turns into another repair job. You line up your reciprocating saw, start strong, and by the end of the cut, you’re patching splintered edges or filling gaps you didn’t plan for. The frustration isn’t just about rough lines—it’s about wasted time, extra cleanup, and the nagging sense you’re wrestling the tool instead of working with it.

    Why Good Cuts Go Bad as a Project Progresses

    That first pull through drywall is effortless. The blade hums, the dust drifts, and you’re reminded why demolition sometimes looks easy on camera. But as the day stacks up—moving from open space to awkward angles, from fresh wood to mystery studs loaded with old nails—that sense of control starts to fade. A shoe that’s floating a quarter inch off the workpiece doesn’t seem like a big deal at first, but several cuts in, the difference is hard to miss: lines wobble, vibration doubles, and you’re reaching for patching compound yet again.

    It’s not about getting one cut perfect. The real challenge shows in the third stud, the fifth section of drywall, the endless parade of oddball framing. Over a long session, neglecting shoe pressure turns minor wander into a recurring headache—especially when every “just a little off” line adds up on finishing day.

    When Shoe Bracing Fails, Repairs Stack Up

    Picture the scene: You’re halfway through a window demo, shoe pressed firmly on the sill. Then you hit a patch of buried fasteners, your grip slips, and for just a moment, the shoe lifts. That’s all it takes—suddenly the blade kicks, tracks off line, and you’re left staring at ragged plywood and splintered trim. One lapse in pressure becomes a half-hour erased, with repairs eating into any progress you thought you’d made.

    The problems multiply. With each floated pass, heat builds in the blade, fasteners deflect the cut, and the tool jerks in your hand. By afternoon, what began as basic demo feels more like triage: chasing crooked cuts, filling torn-out openings, and sanding away the evidence. Bracing isn’t just a technique—skip it, and the mess compounds fast.

    Shoe Bracing: The Simple Shift That Pays in Precision

    The pros know the difference: steady, deliberate shoe pressure. Anchor the saw’s shoe flat against the surface every time, and you gain control back from the tool—managing vibration, steering the blade, keeping the line from drifting with every kick or snag. It transforms cuts from jagged prodding to smooth, predictable progress—even when fasteners try to jerk you off course.

    Take a simple experiment: ten quick cuts through framing old pine, some with the shoe braced, some floating. Where you hold steady, deviation hugs the line—barely 2mm of drift, even if you clip a hidden brad. Float the shoe on that same series and it’s a completely different story: wander, splinters, and up to 6mm swing per cut. That difference might sound small, but multiply it over a hundred feet of framing, and your finish work adds up fast—painfully so when sanding arm fatigue kicks in.

    Scenario Check: Cutting in Tight Spaces Behind Tile

    Bathroom renovations bring the worst: cramped angles, hardback tile, and rusted lath nails that defy clean cutting. Here, even one dropped bracing hand on the final inch means the blade veers, chipping more backing than you planned. Apply focused shoe pressure with the other hand close for balance, and you’ll feel the tool settle and the cut smoothing out. That discipline—feeling the shoe, not just the vibration—saves full sheets of tileboard and keeps you off the phone for another last-minute materials run.

    Blade Choice: Where Speed Can Ruin the Finish

    No trick of technique rescues a bad blade—what you load matters. Low TPI blades are made for fast, aggressive demolition in soft woods, but every jump in speed risks more harsh chatter, chipped edges, and flex when you meet hidden nails. For finishes that’ll actually disappear behind paint or tile, higher TPI steel is the unsung hero: a little slower, but the result is fewer ragged ends and less of those “whoops” edge moments that nobody enjoys patching. Use the rough stuff for raw framing, save the finer teeth for visible lines—your putty knife and sanding block will thank you.

    Spotting Cut Drift Before It Becomes a Disaster

    The signs show up fast: sudden blade chatter, dust collecting thick on the good side of the line, or those early inches where the blade starts pulling away before you even reach the far stud. Any of these should trigger an immediate pause—a habit check to reset your shoe, realign, and change grip before you commit to a full cut you’ll regret.

    Reset, Every Time: The Five-Second Demolition Habit

    Taking five deliberate seconds before each cut—flattening the shoe, bracing your stance, breathing—pays in ways you’ll notice later, especially under tough work conditions. Whether you’re overhead, cutting at odd angles in tight soffits, or pushing through repeated stud walls, that constant reset fights off slip-ups. The result? Less rework, fewer patch jobs, and less wear on both you and your tools.

    Winning the Cleanup Game: How Bracing Shifts the Whole Day

    Tool control is more than just a good habit—it’s the hidden secret to finishing jobs with clean edges and less dust. Braced shoe pressure means fewer seams to fill, less material chewed up, and a noticeable drop in that end-of-day fatigue that sets in after too many fix-its. Stay disciplined with every cut, and the reward is real: straighter lines, shorter cleanup, smoother finishes, and more time to move on, instead of circling back for another round with the sandpaper.

    See the practical lineup at Gumboll for jobsite-ready saws, blades, and accessories built for real-world repeat work.