Blog

  • How Visible Storage Limits Transform Everyday Organization and Clutter Control

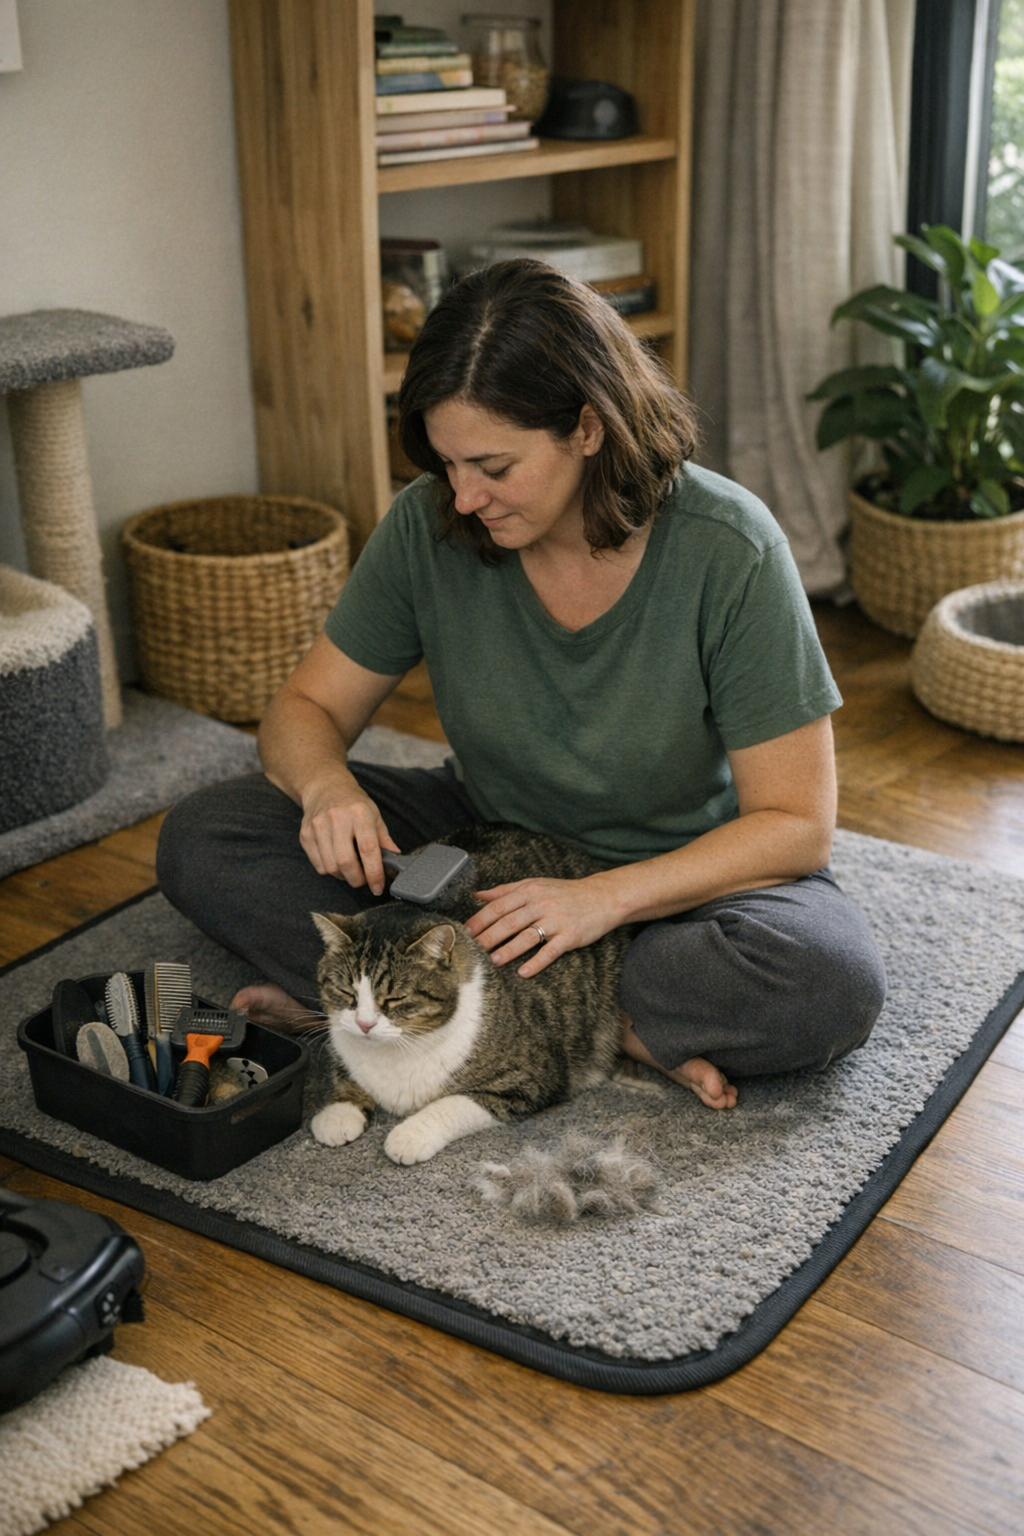
    There’s a familiar frustration buried in even the neatest closets: the daily scramble for what you actually need. Stare at a row of matching bins or stacks of folded clothes, and everything looks under control—until you reach for one glove, or that bottom sweater, and realize you have to dig, lift, or reshuffle just to get it. Week after week, the seemingly organized zone turns into a slow-moving mess: piles slouch, categories cross, and the undercurrent of disorder seeps into your routine. The surface order is a mirage; underneath, the system quietly fails at the one thing it should make easier—grabbing what you need quickly, again and again.

    When “Tidy” Storage Turns Into Hidden Chaos

    It usually starts small. A winter scarf gets dropped on top of an overstuffed bin. A last-minute grocery tote is wedged awkwardly behind a row of folded pants. As long as you can close the closet door, it feels fine—until the next round: a second scarf, a third pair of gloves, maybe a baseball cap tossed onto what was once a neat pile. Before long, searching for a specific item means shifting, moving, or completely toppling other things out of the way. Each attempt to stretch the system’s capacity chips away at its clarity, and you lose track of where anything actually lives.

    Opaque bins and tightly packed shelves promise a calm exterior, but they’re notorious for breeding mixed categories and “out of sight, out of mind” overflow. It’s not the container’s fault—it’s that hidden clutter always finds a way to spread if nobody can see it spilling out. Small habits, like squeezing socks into the corners of an already-full basket, eventually build into a routine of reshuffling and guesswork, not true organization.

    The Real Cost of “Looks Organized”

    The problem sneaks up on almost every well-meaning storage setup. Shelves crammed to the edge and lidded bins overflowing rarely announce their issues right away. Instead, you start noticing small symptoms: it takes longer to find a clean towel, you fish around blindly for the right hat, stacks refuse to hold their shape for more than a couple of days. The reset that was supposed to take three minutes turns into a ten-minute headache every Sunday—or worse, gets skipped completely, letting clutter pile up for weeks.

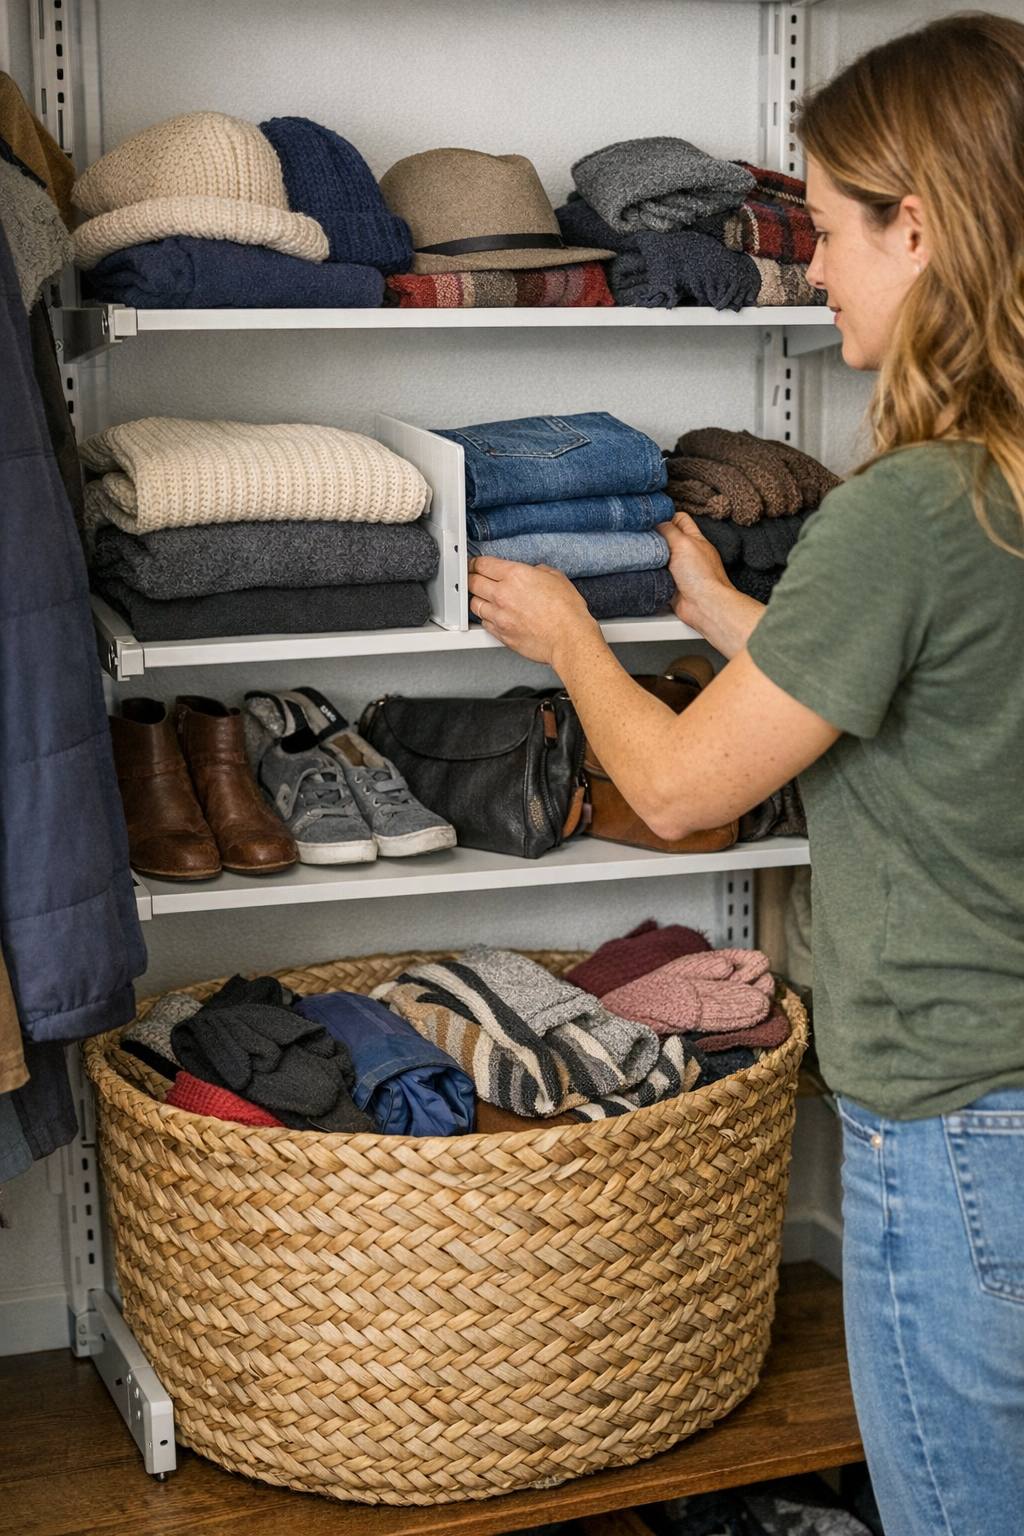
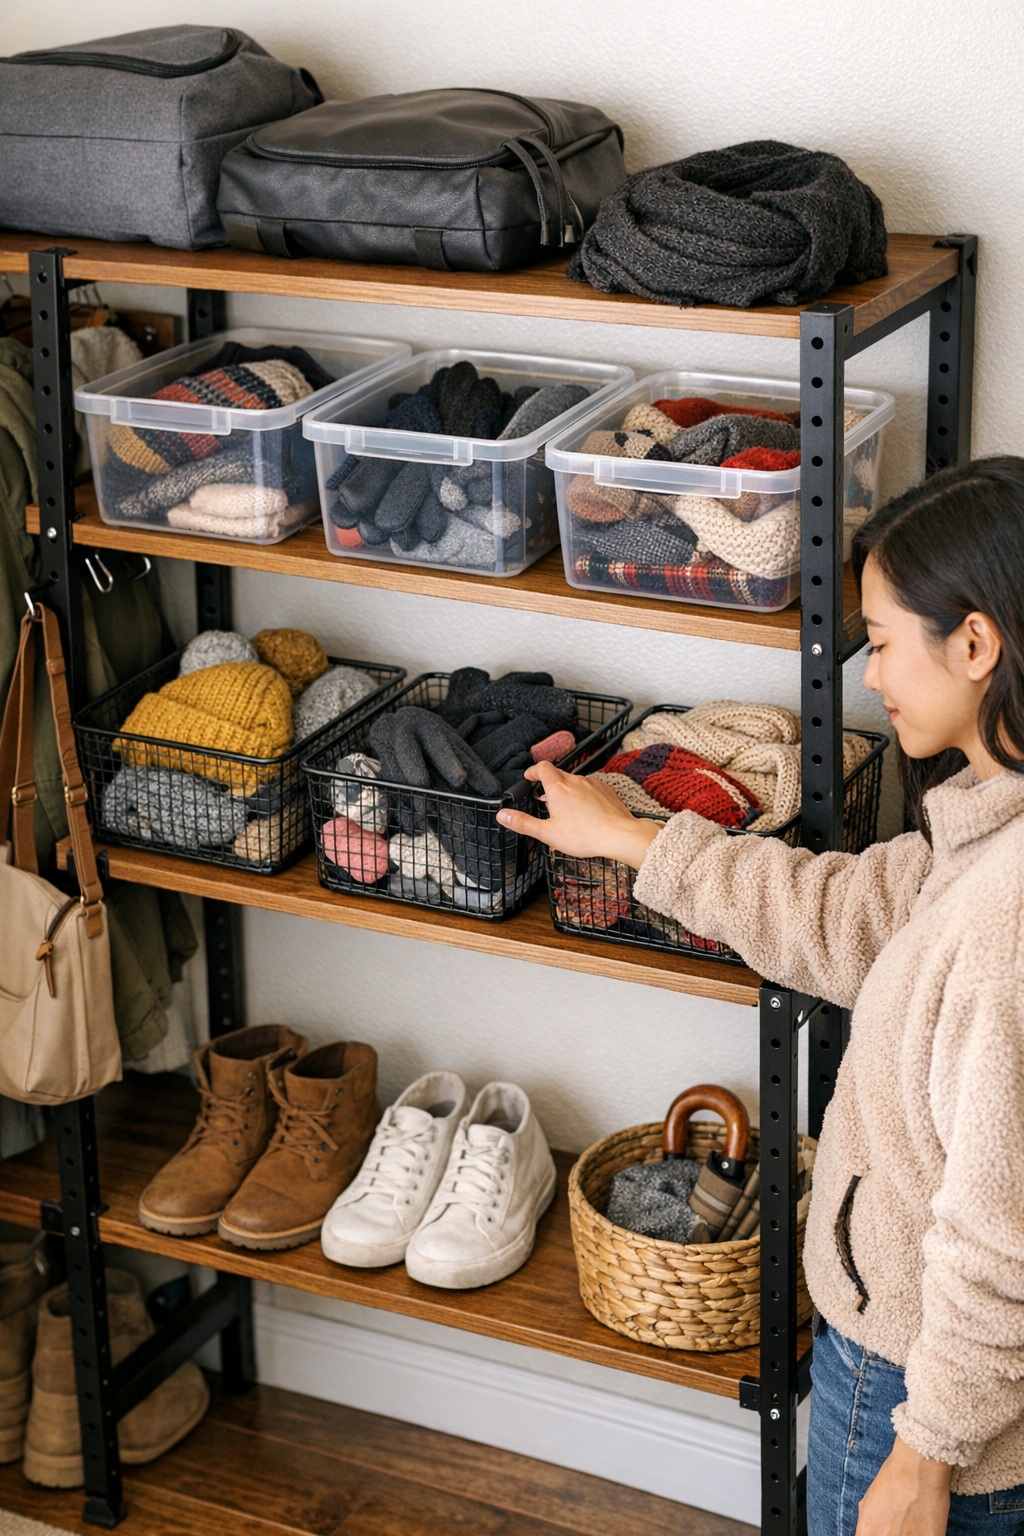
    Imagine the classic family hallway closet. In November, bins for hats, gloves, and scarves look identical—neat and uniform. Fast forward to January: you’re late, hunting for a matching pair of gloves, and realize they’ve slipped under a jumble of scarves. Half the contents of each bin have wandered over to the next category. The weekly reset—dump, sort, refold, stuff—becomes a battle, not a routine. And yet, the closet still looks photo-ready when you shut the door, hiding the slow diffusion of disorder underneath.

    Why Visible Limits Put You Back in Control

    Open baskets or clear-front bins give you instant feedback on what’s happening inside your storage. These containers don’t allow quiet overflow—when something breaks the boundary, it’s obvious immediately. Slide in one extra beanie or add a fourth hoodie, and it’s impossible to ignore the pile creeping above the edge. You’re gently pushed to choose: pull something out, or make space for what just got used. The result isn’t rigid minimalism—it’s a daily nudge to keep categories intact and avoid the “buried beneath” syndrome that plagues closed bins.

    The real difference shows up during normal, rushed use. Instead of waiting for the Sunday reset, you spot trouble instantly—a scarf dumped in the wrong spot gets moved, a glove basket that’s too crowded demands a quick edit. Boundaries between hats, gloves, and scarves hold steady because overlap can’t hide for long. The reset shrinks to a glance and a nudge, not a full excavation. It’s not perfection, but it’s maintenance you don’t dread, and speed you actually notice during weekday chaos.

    Micro-Adjustments that Make Order Stick

    Swap deep, opaque bins for open, shallow baskets, and suddenly the shelf works differently. You see when the glove pile is starting to tip, not after half of it lands on the floor. An overloaded basket is instantly obvious, so you weed out a stray pair before backup starts. Forget a weekly overhaul—the fixes happen each time you return something. This little friction keeps chaos from ever building up in the first place.

    Quick improvement: Big, readable labels (“Hats,” “Gloves,” “Scarves”) at the front of each open bin make it even less tempting to dump things randomly. Even young kids (and distracted adults) are more likely to get items back in the right spot if every category is obvious at a glance.

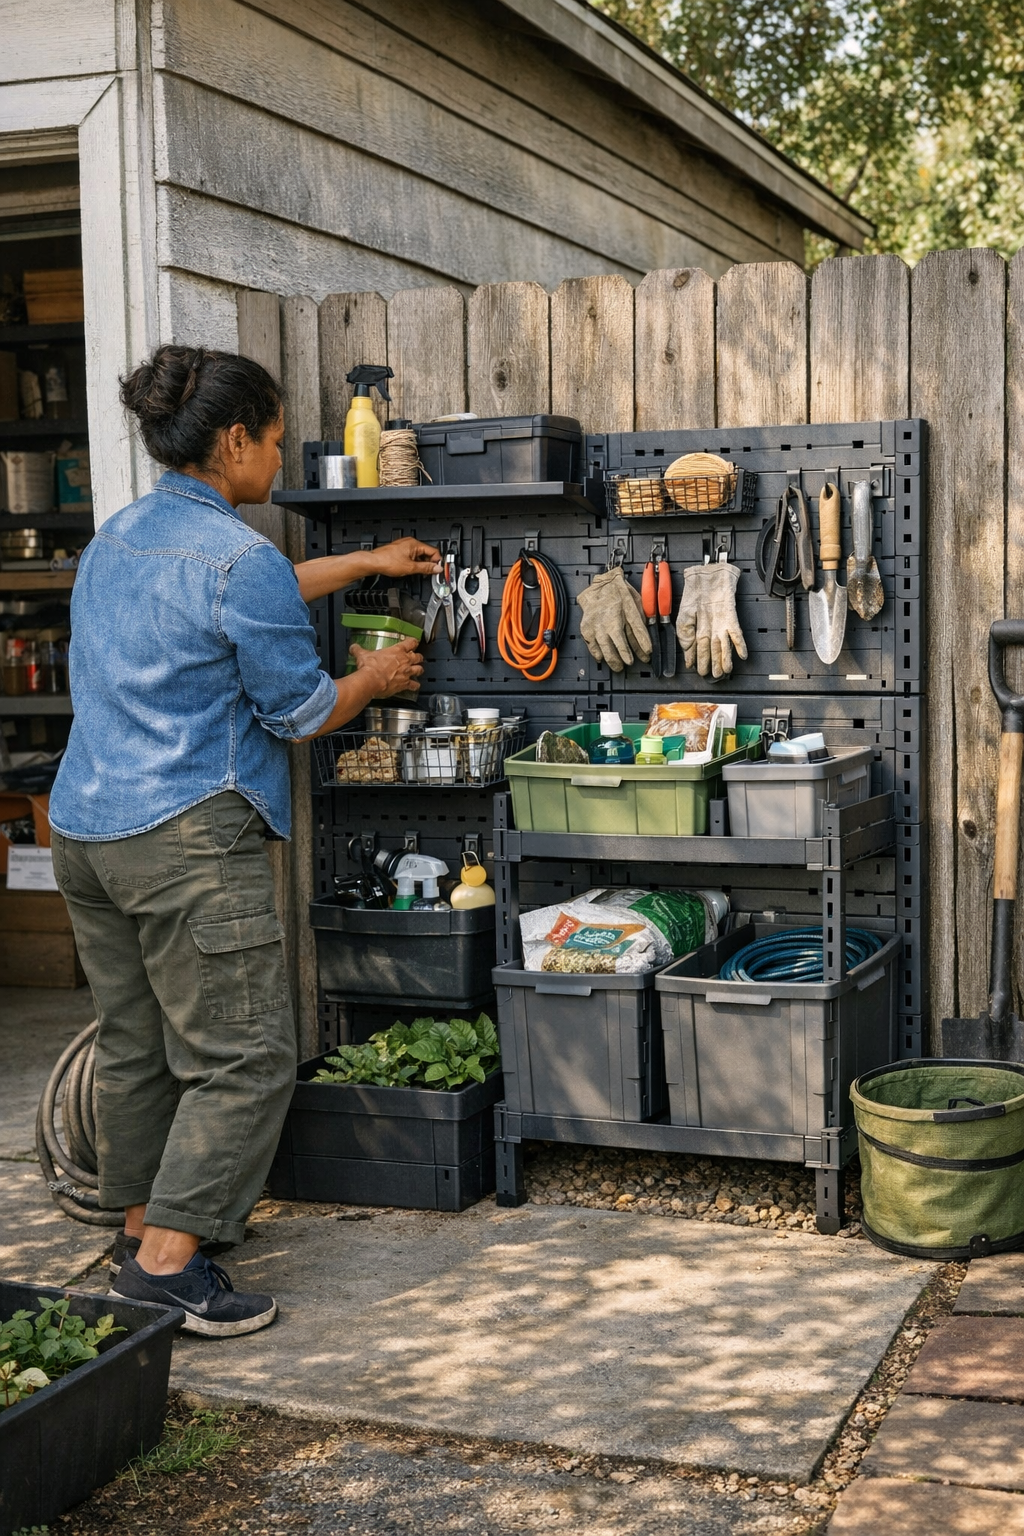
    The Spaces Where Visibility Is a Game-Changer

    Storage friction is sharpest in zones you touch daily. Entryway shelves where shoes collapse into a pile by Tuesday, kids’ cubbies that become black holes for stray socks, linen closets where towels sink beneath teetering stacks—these are the places where open or clear storage does its best work. Each time you dig or shift to get what you need, you get a free—and immediate—alert if things are piling up.

    You’ll see it under the bathroom sink too. When baskets hide everything, extra bottles, tubes, and boxes sneak in until the drawer jams. With a shallow see-through bin or a lower-profile tray, you spot the extra toothpaste or unused bottle right away, and either use it or toss it, not shuffle it around for months. The same goes for laundry rooms: clear limits stop the “just stuff it in” approach from quietly turning utility shelves into catchalls.

    Not Everything Needs to Be on Display

    Some things simply aren’t for everyday viewing—off-season shoes, extra blankets, or emergency supplies. Closed bins still have a crucial place for dust control and less-used gear. The trick is to keep your daily rotation visible and finely limited, while letting closed storage hold only what’s truly “back stock”. If grabbing something from a lidded bin feels like opening an archeological dig, that’s a sign it’s time to prune—not just to press down and force a little more in.

    Set the Right Boundaries for Your Routine

    The goal isn’t to show off every item you own, but to make staying organized almost automatic. In high-traffic zones, reach for open bins or transparent containers that make overflow impossible to miss. Use closed bins only for items you don’t need weekly, and make those bins a last stop, not a dumping ground.

    You know you’ve found the right setup when putting things away is simple and getting them out is just as quick—no shuffling, no rebalancing, no mental inventory required. The real mark of an organized shelf isn’t the pretty surface, but how it behaves when the day is rushed and routines are strained. When weekend resets get shorter and daily pick-ups get easier, you’re not just organized—you’re genuinely in control of your space.

    Clutter creeps in quietly when you let boundaries fade. Baskets and bins with visible limits keep your system honest, making small daily corrections feel natural instead of exhausting. Let your storage show you when it’s full, and you’ll spend less time digging and more time actually using the things you keep.

    See more practical storage solutions at ClosetWorks.

  • Identifying Power Tool Battery Issues Before They Slow Your Workday

    The slowdown always hits mid-task—not with a bang, but with a drag: the saw that starts clean but bogs halfway through a sheet, the drill that lags on the last few lags, the sander that fades before the surface is glassy. You checked everything: battery charged, blade sharp, fresh bit. Still, the cut struggles, the drive stalls. Most days, it’s not your setup or your hands—it’s the unseen mismatch in batteries and chargers that look identical in the bin, but perform worlds apart once work gets serious.

    When Similar Equipment Creates Subtle Headaches

    Batteries and chargers seem interchangeable, especially when your toolbox is stacked with the same brand and voltage. Clip in, snap shut, green light—back to work. But over a week of ripping, fastening, or continuous sanding, invisible differences crawl to the surface. That’s when you spot:

    • Torque dropping inconsistently—no pop left in the drill as you chase lag bolts into hard studs
    • Saws that hit resistance mid-panel, leaving you with ragged edges and more splinters than progress
    • Batteries giving up before the last board, forcing you to swap and restart with sore hands and tighter deadlines

    These aren’t dramatic meltdowns. They’re the nagging snags and slowdowns that make everything a little bit harder. The steps get doubled: sand again, cut again, refill with fresh batteries and hope for better luck on the next pass.

    Why “Fully Charged” Doesn’t Mean Ready

    Go by the lights—charged, ready, matching shape—and it should all work smoothly. That illusion sticks around until you’re deep into real work: boring holes through dense joists, grinding awkward welds, cutting stubborn MDF. Suddenly, that “full” battery fades before the job’s done, or the charger proves it fills the battery, but not to full power.

    What’s happening? Age and repeated cycles wear batteries down, sometimes unevenly. Some fresh-from-the-box batteries underperform right away. You won’t spot a weak cell by sight or charge indicator. Only with real pressure do the cracks show—a tool that hesitates, a cut that demands extra muscle, a finish that’s dustier and rougher than it should be.

    Worksite Reality: Where the Weak Links Hide

    Imagine swapping in a “good” battery mid-job. Sander hums, then sags just two boards later—the result: streaks, patches, and extra work smoothing what should’ve been done in one pass. Or powering through grinding only to find the disc bogs and vibrates more, your forearm aching after half the run. These little failures aren’t accidents. They’re signals: a cell that’s lost its edge, a charger that leaves batteries half-hearted, invisible until the work pushes them to their limit.

    The Domino Effect of Weak Batteries

    Picture this: halfway through routing grooves on a tight framing schedule, everything’s lined and measured. Suddenly, one pass struggles, the saw’s pitch drops, motor strains. The edge comes up splintered. Not only do you have to recut—now you’re testing batteries, swapping chargers, losing flow and patience. The cost isn’t just time, but control and precision: rushed corrections, uneven fits, and the fatigue of doing the same task, twice.

    For anyone building or remodeling day after day, this scenario isn’t theory—it’s what slows down real jobs, more often than most will admit.

    The Check That Changes Everything: Output Voltage

    It wasn’t more charging or swapping that caught the bad batteries in our shop—it was checking output voltage after heavy use. Any pack that fell below 17.8V after a demanding run was retired, no matter how fresh it looked. Chargers that brought batteries up to “full” while delivering less voltage made the replacement list, too. The difference? Tools held steady through each cut; boards came out clean, not burned. The rhythm of the day smoothed out, with less time wasted fighting fading packs.

    Sharper Habits—Catch Fails Before They Cost You

    • Ignore the charge lights: Focus on how your batteries actually perform under load, not just off the charger.
    • Watch for lag: If your saw drops pitch or your driver strains right after swapping, you’ve found a battery or charger holding you back.
    • Check with a meter: After a full job, use a simple voltage check. Packs outside spec are draining speed, control, and your endurance.

    You don’t need to geek out with diagnostics. You need to spot the habits—extra effort, slowdowns, chunkier finishes—that point to power slipping away, long before total failure.

    Reliable Power Pays Off—Ignore It and You Pay Twice

    Two 18V batteries, both from the same brand, can leave you worlds apart: one drives all day; the other sputters by noon, leaving rework and roughness behind. You pay for every mismatch—every time a cut goes rough, a finish needs a second pass, or a screw strips out before sinking flush.

    Those end-of-day corrections aren’t just extra steps—they’re a slow grind that wears out your focus and your finish. A single voltage check added to your shutdown routine—right after you sweep up and hang your drivers—shaves off repeat work and frustration, leaving you with cleaner edges and less fatigue across the week.

    Don’t let identical-looking batteries and chargers quietly chip away at your precision and momentum. The real return isn’t in a logo or a warranty—it’s in every tool, every cell, earning its place by delivering what your work demands, job after job.

    http://gumboll.myshopify.com

  • How Flexible Cable Management Enhances Daily Desk Workflow Efficiency

    A desk can look immaculate at first glance—cables hidden, surfaces clear, every tool in its place—yet by mid-afternoon, small interruptions pile up. You shift your mouse or slide your keyboard, only to feel a snag from a cable tucked tightly beneath. Try reaching for a notebook or pivoting your monitor toward a colleague, and a resistance tugs back with just enough force to break your rhythm. When physical friction starts to show, you realize: a setup that looks clean isn’t always built to move with you. Surface order isn’t the end point—a workable setup means your cables, storage, and gear actually keep pace with the real, repeated motions of your workday.

    Cable Friction: Why Tidy Isn’t Always Functional

    It’s easy to believe that hiding every cable means you’re done. Under-desk trays sweep cords out of sight, floor boxes reduce visible mess, and desk-edge clips keep lines in check. But clean lines can mask growing trouble. If a cable tray holds wires in place too tightly, you’ll feel every chair adjustment through your mouse or keyboard. A charger cord drags across your planner. Floor boxes achieve visual order but may pinch cables or crowd the already limited room your feet and chair need. Desk clips offer fast access for swapping chargers or devices—until spinning a document means bumping into a snagged wire that steals desk space or yanks a gadget off balance.

    The gap between “cleaned up” and “actually functional” gets wider the more hours you put in. A strategy geared for appearances often fails the moment your workflow requires flexibility or quick rearrangement.

    How Setup Choices Play Out in Real Work Hours

    A setup that made sense on paper can become a barrier as tasks shift. Picture a small workstation: keyboard perched above an under-desk drawer, power strip at the back edge, a monitor squeezed between your planner and a file tray. Slide the keyboard even slightly, and a cable trapped beneath a drawer unit stops the movement short. Move the monitor, and the HDMI cable jerks taut, threatening a disconnection. By the time you’ve switched devices for the sixth time or tried to clear space for notes, under-desk storage units and cable paths feel less like organization and more like silent obstacles.

    These aren’t dramatic failures, but they drain momentum: a mouse cable caught on a drawer lip, a surface clip that bends until it snaps off, a power cord that won’t stay routed and instead spills across your footrest. Even the neatest-looking desk can develop its own quiet resistance the more you interact with it.

    Where Resistance Builds: Everyday Snags

    • Connecting a backup drive, only to find the cable’s reach forces your laptop and notebook into competing corners.
    • Pivoting the monitor for a quick glance with someone beside you and watching the cable pull the whole screen askew.
    • Moving from typing to notetaking but a phone charger drags across everything, scattering reminders and tangled notes.

    These moments aren’t disasters, but they make clear: a setup rigged for “showroom tidy” doesn’t always survive the routine of real work.

    What Actually Shifted My Workspace from “Neat” to “Usable”

    For months, my under-desk cable tray promised a tangle-free office. By week four, frustration set in—the more I moved, the more my desk fought back. The fix wasn’t just swapping products, but changing the smallest detail: switching to a flexible cable sleeve and leaving a simple palm’s width of slack where cables dropped below the surface. Suddenly, I could adjust the lamp for a late call, move the monitor toward the window, or even kick my chair back without triggering a ripple of cable snags or lost tools.

    That little bit of slack made the desk feel cooperative, not rigid. There was no more clumping beneath the chair, no surprise monitor slides, and no scattering of pencil cups from a cable popping loose. The improvement was less about hiding clutter and more about letting the setup bend with each routine movement.

    Small Details, Larger Difference

    Slack management isn’t the headline, but it’s what lets a cable sleeve earn its keep across a week of shifting tasks. Just enough give means you aren’t untangling cords after every device swap or hunting for a charger buried behind a drawer. The aim isn’t a perfectly staged desk, but one that endures the hour-by-hour changes you actually make.

    FAQ: Common Cable Management Friction Points

    How do I know when cables are actually slowing me down?
    If you feel any catch, tug, or forced reroute when you move your mouse, monitor, lamp, or keyboard—and this happens more than once or twice a day—it’s your workstation telling you the setup isn’t keeping up. Frequent micro-interruptions mean it isn’t just a cosmetic issue.

    Which is better for routine use: desk clips or cable trays?
    Desk clips make device swaps fast but keep cables in sight, and rapid hand movements can pull cords at odd angles. Trays and boxes sweep clutter away, but if there’s not enough slack, every everyday shift—grabbing a notebook, moving a chair—feels forced. The right choice depends on your device habits, but the test is simple: does your main routine flow without interference or workarounds?

    How often should I revisit cable routing?
    Every time you add a device, unplug a charger, or start noticing a cable migrate from its map, it’s time. If a cord drops where your feet rest, catches on a drawer, or gathers dust midweek instead of staying put, your setup needs attention. Overlooking these cues turns small frictions into weekly productivity drains.

    Visible Order vs. Reliable Motion: What to Watch For

    A desk that looks organized isn’t always easy to work with. Cable trays can turn into cable traps. Floor boxes solve one tangle only to create a new navigation zone for rolling chairs. Reliable workspaces aren’t judged by how invisible the cabling is, but by whether you can move between keyboard, screen, and notepad without a single disruption.

    The line between “tidy” and “truly usable” comes down to small, practical tweaks—a forgiving sleeve, slack at the drop point, a clip positioned for actual reach. Over time, these changes cost nothing in appearance but pay back every adjustment without drama or delay. Real organization is the setup you don’t have to think about when moving from one task to the next.

    Explore the full WorkBasic collection

  • How Wall-Mounted Storage Transforms Shared Outdoor Spaces Efficiently

    Every outdoor corner and backyard edge quietly exposes its storage flaws faster than most people admit. You organize tools, stash gloves, line up bins—then watch as every family habit and shortcut collides in the same cramped spot. It doesn’t take long: one evening of quick drop-offs, one rushed cleanup after mowing, and the so-called “system” hits gridlock. A pathway that looked clear Monday now bottlenecks with bikes and garden clutter, forcing anyone who needs the hose or trash bin to wade through yesterday’s compromises. This isn’t just about the stuff you buy—it’s whether your setup can handle real return flow with real people moving through real routines.

    When Floor Bins Fuel the Blockages

    The fix-it instinct kicks in. People buy bigger chests, add deeper bins, convinced that more storage will make the overflow disappear. In single-user worlds, maybe it helps. But with a small yard or shared side zone, deep bins just become another beacon for tomorrow’s pile. The lid clogs up with tangled extension cords and half-dry towels. By Wednesday, propping a shovel or leaning a bike nearby means blocking the front of the bin altogether. The more stuff you cram in, the harder it becomes to actually put away the next thing—until returning a broom or watering can means shoving, restacking, or simply tossing it in with a silent promise to “fix it later.”

    Every retrieval or return becomes slower, not simpler. The person who still cares finds themselves emptying the bin entirely to dig out gloves or ease the lid closed one more time. That “reset” doesn’t last. You know it’s inevitable: things will spill out, corners will collect stray tools, and that feeling of a fresh setup collapses under another ordinary week.

    Why Wall Panels Shift the Routine

    The solution doesn’t come from squeezing more onto the floor. The real difference shows up when you intercept clutter before it lands. Modular wall panels—posted right along the fence, by the side door, or on a garage edge—become breakpoints in the return flow. Hooks catch loppers and bags on the way in, shallow trays snag those gloves that never seem to find a bin. Instead of asking people to move things twice, the system meets them where they drop gear. No wrestling lids, no reorganizing just to get through. The question of “now where?” disappears one item at a time, right at the point of use—not after everything’s in a heap.

    The best setups aren’t just mounted somewhere—they’re right in the slipstream of activity. Hooks where sweaty helmets come off, shelves at kid height, trays at the edge of the patio where those sunglasses actually get abandoned. Suddenly “putting something away” is less a negotiation and more a reflex. The payoff is immediate: fewer blockages, less finger-pointing, and the end-of-week cleanup shrinks to a slight reordering, not a full-on overhaul.

    A Typical Saturday: How Clutter Creeps In

    Picture three people doing yardwork late morning. Pruners dropped for lunch, gloves abandoned mid-project, a hockey stick mixed into the pile for “just a second.” Someone wedges the new compost bucket beside the chest, cutting off the path to the gate. By evening, anyone rolling a bin or walking through is forced into a sidestep shuffle, lifting bikes out of the way or bending over spilled tools just to cross. When finally asked to “reset the yard,” everyone feels stuck—where do these things even go, if the bin is buried and the last hook is at the far end of the fence?

    Now, swap that chaos for a fence-line panel with three hooks and a slim rail. Pruners snap onto a hook as soon as the job’s paused. Gloves get stashed at eye level—no lid lifting, no rooting through bags. The hockey stick? Visible, reachable, and neatly out of the pathway. Midday and evening, the main movement line stays open. Cleanup is a walk-and-hang, not a chore of riding herd on tumbled piles. Bit by bit, the setup fights the urge to “just drop it anywhere.”

    What Blockages Actually Show

    Almost every area feels “fixed” after a weekend tidy—until the routine restarts. Real warning signs appear fast:

    • Anytime you move one thing to put away another—or can’t return something without restacking.
    • Wall rails or hooks exist, but sit stranded in a corner, never collecting the actual overflow.
    • Certain spots always develop as the dumping ground: bucket, ball, broken trowel, last week’s forgotten shears.
    • Everyday routes kink up by Tuesday. One bin, one bike, and you’re blocked again.
    • Returning items feels tedious enough that the most-used path becomes a catchall zone within days.

    These are the pinch points that break the illusion of order. The system isn’t failing because you own the wrong products—it’s failing because it can’t keep up with how (and where) people actually interact with the space. If each routine makes the setup a little bit worse, resets never last. Frustration, not flow, becomes the real daily reality.

    Making Returns Almost Automatic

    Real improvement shows when returning something is the path of least resistance—not another step to dread. Modular wall panels and fence setups thrive because they shrink the mental gap: snap, set, done. With these right at exits and key routes, “cleanup” dissolves into dozens of tiny, almost automatic actions. Hang up a spade while stepping past. Drop a helmet at eye level while heading inside. Even messy housemates find these pathways hard to ignore.

    This isn’t about perfection—someone will always skip a step now and then. But these setups draw clear lines against the major resets. Floor space stays walkable. Bins and bikes stop blocking every project. The long arm of clutter has fewer places to take hold, and the need for three-hour weekend resets fades into the background.

    Smart Tweaks: Less Piling, Smoother Movement

    Small shifts make a visible difference: move away from deep bins and increase visible, accessible wall storage near your busiest entryways. Hooks at multiple heights make options obvious for both adults and kids. A shallow shelf or mini bin on a panel snags the sunglasses and garden gloves that usually get drowned in larger containers. Each returned item becomes a streamlined action, not an excavation through stacked clutter.

    • Mix and match hook types—long, short, angled—so nothing sits awkward and untouchable.
    • Rethink wall space as traffic space: are the exits actually clear, or is visibility just hiding deeper reset problems?

    The good kind of setup doesn’t just “look neat.” It keeps corner drift in check and gives random items a default destination before they become someone else’s headache. Movement opens up, resets last longer, and the outdoor zone stops functioning as storage limbo.

    Past the Illusion: “Organized” Isn’t Always Functional

    A chest under the eaves. Baskets lined in a row. The obligatory rack by the shed. From a distance, every space seems workable. But if the system crumbles the first time routines collide, the only result is a cycle of shuffling and stale arguments about whose turn it is to “finally put away the mess.” Outdoor organization that matters isn’t about visual calm—it’s about setups surviving the real week, not just the reset. The difference shows in the spaces that stay open, the pathways people use without thinking, and the clutter that never gets a chance to settle.

    Visit TidyYard to explore practical storage options that support real outdoor spaces.

  • How Adjusting Your Dog’s Bed Placement Can Improve Sleep Quality

    When bedtime for your dog turns into a series of restless pacing, circling, or post-lights-out hallway checks, it’s rarely just a harmless quirk—it’s usually a problem with the way you’ve set up the dog’s sleep zone. You kill the lights, climb into bed, and brace for the end of the day—only to hear those small but unmistakable signals: paws on the floor, hesitation at the threshold, a return trip to a “finished” setup that’s supposed to work but keeps leaking time and comfort. For many dog owners, these micro-interruptions are so familiar they go unnoticed: the dog leaves her bed minutes after you settle, hovers for another pass, or refuses to stay down when you most need the night to actually end. The routine that looks calm in theory falls apart in practice, leaving both you and your dog caught in a loop of repeated adjustments, slow resets, and sleep that never fully lands.

    Why “Almost Settled” Feels Like a Repeat Offense

    It’s not just the harmless circling—what starts as a minor quirk turns into a nightly drag. You switch off the TV, dim hall lights, and signal bedtime, but instead of stillness, it’s a fresh surge of steps: the dog pauses, listens hard at the door, hesitates at every distant creak. One more circle. Sometimes it’s a full reset—dog up and standing, ears trained on the hallway—just as you try to wind down. Most owners assume it’s just energy or habit, but when the same friction appears night after night, it starts cutting into the point of the routine itself. Unfinished rest piles up: mornings stall, evenings feel longer, and you start to recognize these interruptions not as “just dog stuff,” but as a sign that your setup is leaking comfort and time at the one hour it’s needed most.

    Owners get used to these stop-and-restart cycles. Some shuffling is normal, but when your dog abandons the bed soon after you settle in, or keeps resetting for a “better spot” that never quite works, there’s nearly always a practical block in the arrangement—not just unexplained dog behavior.

    What Bedtime Friction Really Costs

    Most setups fail first in small ways: a well-made bed set near a walkway, the spot just catching spillover from hallway light, or the resting area positioned where footsteps and after-hours sounds pass through. The space looks together but feels unsettled, and everyone pays for it the next day: slow starts, extra pauses, a heavier drag on the entire morning routine. The “almost settled” effect doesn’t just end at night—it lingers. Repeated exposure to these micro-disruptions slowly weaves discomfort into your daily reset, blurring the difference between dog space and household flow until both are held back by invisible snags.

    When your dog stands, hovers, or leaves the bed repeatedly, that energy isn’t just spent on movement—it’s time shaved from real rest and from your own reset, multiplying the cost as days stack up. A setup that works in theory but fails in the moment turns a quiet night into another round of late routines, unrealized calm, and barely recovered mornings.

    Gaps in Setup: Why Bed, Location, and Use Aren’t Just Visual Choices

    Reaching for an easy answer—such as blaming exercise or dog age—misses the actual pattern: most friction starts and ends with the physical setup. Too many beds are placed for a tidy look, not for how sound and footsteps actually move through the home after dark. A resting zone laid out in the “logical” spot—next to a door, near a hallway, or where returning from a walk feels quick—becomes a target for every after-hours disturbance. Even the best, most comfortable bed underperforms if it’s a single soft bump from kitchen doors, evening TV, nighttime water bowls, or the return sweep after a post-walk towel-up that leaves things slanted or off-reach.

    Neat-Looking Isn’t the Same as Easy-Settling

    The classic mistake is setup for appearance: bed pushed against the baseboard, dog gear stacked for a clear floor, all in “out-of-the-way” spots. The result is physical drag—every post-walk wipe is just out of reach, late-night noise crosses the resting area, and movement through the space interrupts settling instead of supporting it. Your dog doesn’t throw obvious tantrums, but the signs are there: more circles, restless shifting, fixing and re-fixing blankets, sneaking to laundry baskets or cold corners, always searching for that one missing piece in the so-called “relaxation zone.” Over time, the disconnect between looking organized and actually helping the nightly reset grows too obvious to ignore.

    Turning Friction Into Flow: Where Setup Fixes Really Work

    The difference isn’t magic—it’s measured in inches, wall proximity, and how well the resting area is shielded. Beds anchored with one edge against a wall, tucked away from main traffic, deflect surprise noise and signal real safety. Instead of running environmental interference—catching every late kitchen trip or phone-illuminated step—your dog gets a clearer perimeter and fewer reasons to monitor the household all night. The number of resets drops. Where you used to watch a slow-motion parade of turns and pauses, you now see one clean circle, then stillness. “Almost settled” becomes “actually down.”

    Proof in Adjustment: What Changes When You Move the Bed?

    After too many nights of failed sleep, trying a simple move—cornering the bed, setting its back flush against a wall, shifting dog gear closer to reach—immediately cuts out most circling and edge-hanging. The physical signals change. Where your dog was once alert to every stray step in the dark, she now curls up and holds position, even as hallway noise continues. The setup doesn’t eliminate every variable, but by removing the key friction points, evenings hold together: the night finally ends when you want it to, and “just one more lap” stops being a nightly obstacle for both of you.

    How to Tell If Your Setup Is Still Failing the Daily Test

    Watch for concrete signals that your flow stalls, even after cleanup and arranging:

    • Multiple circles or long pauses before lying down—beyond a quick orientation
    • Instant response to hallway movement, noise, or shifting light
    • Dog leaving and re-entering the bed within a few minutes of settling
    • Repeated pawing or blanket reshuffling as if something is always off
    • Frequent attempts to switch resting places—ditch the bed for other corners or hidden zones

    Treat these as practical signals, not odd behaviors. They mark real missed connections between your routine’s design and the everyday reality of how your dog—and you—move through sleep resets. The trouble isn’t the dog; it’s the blind spots in a visual setup that doesn’t match the pressures of real life.

    The Bedtime Reset That Actually Works—What Changes Make a Real Difference?

    The most useful adjustments aren’t complete overhauls but targeted, practical tests:

    • Reposition the bed away from cross-traffic flows. Hallways or door zones act as traffic conductors, carrying every late trip or echo right onto the bed.
    • Anchor the bed against a wall or solid surface. This creates safety cues—your dog needs fewer checks, fewer circles, and can relax into a defined space.
    • Pick a buffer zone if possible. Even if you can’t get the perfect quiet corner, reducing direct lines of sound and light pays off fast, smoothing out both your routine and your dog’s rest.

    Reset is about matching setup to the pattern of actual use, not just first-day impressions. Most dogs settle faster—sometimes within a couple of nights—when the area stops letting small frictions interrupt the process. Some outside noise or occasional visitors will always throw in the odd tense night, but the repeated drag of restless rhythm fades once the core friction points are handled by where and how the setup lives in your daily routine.

    Why One Fix Outlasts a Hundred Tweaks

    When a bed shift finally aligns with your home’s real flow, the effect shows up quietly but repeatedly. Better setup makes evenings shorter, mornings less fractured, and lets both you and your dog off the hook for endless tinkering. It’s not about buying the best-looking bed or filling the area with more gear; it’s about seeing what actually prevents smooth resets night after night. With friction gone, your dog drops into rest with less performance, you reclaim time, and the cycle of “almost settled” fades into the background noise—no longer the last thing standing between you and a functional routine.

    If the Routine Still Fails, Check What Else Is Sneaking In

    If you’ve moved the bed, anchored it, and blocked the main traffic points—but nightly friction remains—look for less obvious disruptors: shifting lighting that doesn’t stay off, household traffic that never fully quits, or routines that create unpredictable waves of noise after the supposed “reset.” Even the best setup can’t compensate for an unpredictable end-of-day sequence where pads, le

  • Why Physical Boundaries Are Essential for Lasting Closet Organization

    If you’ve ever organized a closet, only to watch it fall apart in days, this will sound painfully familiar: You spend a weekend turning chaos into order—stacks of folded jeans, sorted sweaters, shoes lined up, bags and scarves each with their own spot. For a moment, it works. But almost instantly, daily life starts to unravel it. A single reach for a shirt tips an entire pile. Shoes drift from their line. Scarves collapse into the bags’ territory. By next week, your careful categories are a vague, blended mess—slower to use, harder to reset, and quietly, endlessly annoying. Why does every “fresh start” slide back into friction so easily?

    Invisible Boundaries—The Silent Saboteur

    Every storage space without real, physical boundaries becomes vulnerable to the way we actually live. Open shelves tempt items to blend, especially when multiple people share them. Without defined edges or barriers, clothing and accessories naturally drift across lines, nudged by each quick grab or hurried put-back. Pulling a sweater out from the bottom row? Odds are you shift the jeans stack, lean a shoe, or send a scarf sliding. Days later, what once looked clear is now a teetering, shapeless mix that’s harder to sort—and slower to fix—each time you need something.

    The same pattern echoes in bedrooms and entryways. That tidy sweater stack on an open shelf? Rummage for one shirt and the pile slumps, spreading sideways. Two days of normal use, and what began as separate zones is now a jumble to dig through. The effort builds: you need two hands just to retrieve a shirt without toppling everything, and “resetting” means starting from scratch, not simply straightening what’s there.

    Scenes from the Mudroom: Where Organizing Tricks Fail

    Picture the busy mudroom shelf: hats on the left, gloves in the middle, scarves on the right, maybe a catch-all basket beneath. In the haste of a weekday morning, someone grabs a hat and nudges the neighboring scarves. On Wednesday, gloves blend into the scarf zone; by Friday, stray items spill off shelves or bury themselves in the floor basket. What started as an orderly system is now a mixed pile. The frustration isn’t the stray mittens—it’s the slow creep from “each item in its place” to “everything everywhere,” just from living normally.

    It’s never a dramatic collapse, just a steady erosion: Each reach shifts lines a little farther. By the weekend, any sense of roles or sections is erased. Resetting feels like a full reorganization, not a tidy-up—so it gets put off, and function lapses until the next major overhaul.

    What Lasts: Real Boundaries, Not Just Space

    If the problem is items seeping across invisible lines, the solution is giving each group true, physical boundaries that hold up to real use. Not more shelf inches, not another giant basket—just clearer, more visible separation.

    Something as basic as a three-inch shelf divider works wonders. Stacks hit a wall and stop; sweaters and shoes can finally share a shelf without blending after every retrieval. When you reach for a shirt or slide out a bag, you don’t spill into another zone. Shelves recover quickly from everyday use—the “reset” is a ten-second adjustment, not a five-minute excavation. The gain isn’t perfect order, it’s simple stability and obvious zones you don’t have to think about.

    When Bins Become Black Holes

    Don’t assume every container brings order. Oversized bins and deep catch-alls actually invite chaos if left open inside—especially in mudrooms and closets. Shoes and scarves begin as neighbors but end up mixed, small gloves vanish beneath boots, and finding anything means digging through the whole jumble. Even decorative baskets become mini-chaos zones if they lack sub-dividers or interior trays. The rule: If you can’t instantly see and name what’s inside—that space is primed for clutter to spread.

    Simple Tests and Smarter Boundaries

    1. Do you lose track of “where things go” by Friday?
    If your setup only makes sense in that after-clean snapshot, but you’re mentally guessing by week’s end, boundaries are missing. A closet, entryway, or shelf should “announce” what belongs where—without a label or a moment’s pause.

    2. Why does empty space get cluttered faster?
    Uncontained shelves invite items to drift, expand, and spill. It’s separation—not size—that matters. Each reach, if unchecked, blurs categories until every reset feels like starting from scratch all over again.

    3. Can you have too many dividers?
    Definitely. Micro-compartments or fiddly inserts just create new headaches. Efficient storage means clear, broad boundaries—“a section for hats,” not “slots for every color.” If you dread putting things away, or resets feel slower, you’ve over-divided. Test by living with your new boundaries; good ones will speed up resets and reduce daily friction, not create more steps.

    Making Organization Stick in Daily Life

    Design for quick resets, not showroom moments. True order survives the hectic mornings, not just the Instagram “after” photo. Dividers, trays, and sectioned bins let everyone—kids included—restore order in seconds. No instructions needed, no searching for the “right” spot, and no hesitation.

    If you keep seeing sections blur, drop in a divider. Even lightweight barriers—a vertical insert, a low-sided bin, a clear acrylic tray—stop migration and pay off fast. Check where your setup sags the most after a regular week: That’s your best place for a small, strategic upgrade.

    Beyond the Look—Holding Onto Function

    Spaces that merely “look” organized rarely hold up. The real drain is not the mess itself but the frustration of fighting entropy every week—the shirts spreading sideways, the gloves sinking to the bottom, the mystery socks on the floor again. Room doesn’t fail; boundaries do. Every time you catch yourself reshuffling categories or doing a mini-reset just to reach what you need, that’s a nudge to rethink separation, not space.

    Truly functional organization is built for the cycle of use: grab, return, repeat. A few minutes spent installing shelf dividers or sizing tray sections can save you dozens of half-hearted resets—and keep every zone more visible, accessible, and fast to fix for good. The goal is not frozen perfection, but a closet or entryway that rebounds from real life, day after day.

    Find real-world storage solutions that make a difference at ClosetWorks.

  • Why Packing for Easy Access Beats Maximum Storage Efficiency in Travel

    The difference between a carry-on that “looks organized” and one you actually want to dig into at the gate isn’t obvious until the airport tests every choice. Zip your bag closed at home and you’re proud of the neat rolls and lined-up pouches. Fast-forward to the first security line: the charger you thought was smartly packed is now buried, your passport is wedged under a stack, and retrieving anything triggers a quiet scramble—forcing half the bag open under time pressure while trays push up and travelers shuffle around you. You realize it’s not messy, just slow. What worked in your hotel room is working against you—one pocket at a time.

    The Hidden Cost of Storage-Focused Packing

    Social media is full of “satisfying” carry-on photos—every shirt crisp, pockets shut, order everywhere you look. But compression isn’t the same as usability. The tighter you stack and pack, the more every future reach becomes its own event: friction on top of friction, especially when you actually need quick access.

    Think about the first checkpoint: bins rattling forward, shoes off, the person behind you pressing closer. If your main essentials—laptop, passport, ID—are trapped beneath layers of rolled shirts, charger bricks, and a shoe pressed against a pouch, every retrieval turns into a mini unpack. A layout that looked sleek and tidy now works against you, blocking quick reach, requiring awkward reshuffles, and breaking your momentum every time you move from line to line.

    Where Travel Momentum Hiccups: Checkpoints and Chokepoints

    Breakdowns in flow don’t arrive with fanfare; you notice them as a series of tiny, repeated stalls. Reaching for your passport becomes a two-step detour as you unstack layers or nudge aside zippered pouches. Down an aisle, retrieving headphones means shoving a sweater and zipping around cables. Security trays, boarding lines, overhead bin grabs—the illusion of packed order keeps getting peeled back.

    Here’s reality: Just because a bag “looks” tidy on a bench does not mean it works under real pressure. Each slow unzip or pouch shuffle doesn’t just cost seconds—it piles up over a trip, taxing your focus and flow. Small retrieval delays, repeated across checkpoints and boarding routines, add up to a persistent drag on every segment of airport life.

    Repeated-use Scenarios: Where Organization Breaks Down

    Security Trays: Clothing Layers Become Access Hurdles

    Picture yourself rolling into the security checkpoint. You need your electronics out, fast. Both are blocked by shirts crammed for space and a dense charger pouch—a setup that made sense at 6 a.m., but now demands a cramped, rushed search. Cables snag, pens tumble, clothing shifts. Suddenly you’re blocking the conveyor, forced into awkward hurry or letting your order collapse as you repack in a rush.

    Boarding and Seat Entry: When Bags Don’t Flex

    Boarding: it sounds routine until you juggle ticket, snack, device, and ID. Outer pockets bulge from over-compression, or the item you want is under a layer of barely-contained order. Every “just one thing” grab mutates into a partial unpack, with repacking slowed by corners that were tight by design. The result isn’t just inconvenience; it’s a public moment where smart storage becomes a private liability.

    In-flight Retrieval: Quick Essentials Turn into a Project

    Settled into your seat—then remember gum, earplugs, or the e-reader. They’re not where you want; they’re midpoint in a vertical stack. Instead of a quick zip, you’re half-standing in the aisle, pulling out layers, bumping elbows, or swinging your bag down—turning a one-handed grab into an in-flight project while your neighbor waits and space runs out.

    What Looks Packed Isn’t Always Easy to Use

    The most common mistake? Packing to hide mess often hides ongoing hassle. A bag that looks calm pre-trip can dissolve into chaos when every “grab” means disturbing half your kit. This isn’t a packing laziness problem—it’s a structural flaw that’s invisible until you face the same stuck zippers, reset pouches, or stacked-over essentials again and again. The first trip you might just feel slow; by the third, you’re strategizing how to repack for access you can trust mid-movement.

    You put your charger in a spot that made sense—logical in theory, but always an extra step deep when you need it on the fly. The same with a passport or boarding pass: guaranteed to wedge between snacks, headphones, or an oddly-shaped pouch as soon as you stand in line. The more order you create visually, the more you risk building friction into every future access point.

    The Access-First Adjustment: Practical Tweaks That Change Movement

    How do you actually cut down these micro-stalls? Build your packing order around actual use, not visual calm. That means isolating your high-frequency items—passport, phone, charger, headphones—into outward-facing, uncluttered pockets you can reach with one hand even when the overhead bin’s full or the aisle is blocked.

    Use structure, not just space: Give each frequent-access item a home that’s never shared with bulky storage: passport and phone nested vertically by themselves; charger and cable separated into a shallow top pocket. This keeps retrieval friction away from your core setup, so every access feels like a direct reach, not a mini repack. You’re not packing less—you’re packing for movement, and the difference reveals itself at every gate, bin, or seat.

    Recognizing and Avoiding the Most Common Packing Pitfalls

    • Compression overkill: When every millimeter is packed tight, the smallest retrieval means triggering an accidental unpack cascade.
    • Pouch overflow: Mixing tech, documents, and comfort items in one slot looks controlled, but leaves you unprepared when you must grab just one of them—fast.
    • Edge illusions: Outer-pocket items can still be blocked if those pockets become dumping grounds for overflow bulk—proximity isn’t the same as access.
    • Order without function: If you’re forced to unzip, reshuffle, or pause every time you need something, the organization is cosmetic. Flow matters most when the pressure’s on.

    Living with the Setup: How the Right Pocket Placement Changes Everything

    The shift is visible under stress—where travel design is meant to function, not pose for photos. At security, your ID, wallet, and device come out in one motion, not a layered excavation. Board the plane: your ticket lives in the same slim slot every time. Mid-flight, you grab headphones or a snack with a targeted reach—no neighbor disturbance, no half-opened bags, no wardrobe cascade.

    Airport travel finally feels like moving forward, not sideways—moving with your bag, not fighting its layout. What changed? You didn’t drop essentials; you just separated the high-frequency retrievals from the static bulk, ending the cycle of forced resets and fumbled repacks. Organized doesn’t mean untouched: it means packed for how you actually move, not just how you like your stuff to look at the start.

    Building a Carry-On for Real Airport Rhythm

    What sets a carry-on apart isn’t “max packing”—it’s the ability to match supply with demand in real time. The best setups prioritize movement: each key item assigned a frictionless pocket, each access designed around travel’s routine stress points. Your bulk gear still belongs in main space, but everything you need on the go stands apart, immune to pouch blockages and panic zips.

    This is where a carry-on stops being just a container and starts behaving as an in-transit tool. Micro-disruptions fade; retrieval, boarding, and repacking become background—not bottleneck. Every checkpoint, line, and aisle exposes the difference. The payoff isn’t a perfect Instagram shot; it’s the flow that can only come from structure made for the way you actually move.

    Find travel tools and layout inspiration for your next carry-on at CarryOnSupply.

  • Why Matching Connector Sizes Matters for Reliable Indoor Lighting Fixtures

    When your hallway throws shadows across the floor, your bathroom mirror edge blurs with steam, or your kitchen counter loses definition after dusk, it’s rarely just the bulb or the fixture style at fault. It’s often the connector size—the part that marries fixture to wall or ceiling, holding light exactly where your routine needs it. A mismatch here, and you’re guaranteed a slow creep of problems: loose fits, gathering dust lines, flickers on every pass, a once-unnoticed gap that nags every time you wipe the counter or hear a door slam.

    Why the Right Connector Size Shapes Real-World Lighting

    Connectors are the hidden backbone of flush mount and semi-flush ceiling lights, hardwired wall sconces, and any task fixture meant to hold up under real life. When the size is right, the fixture sits crisp against the surface—no daylight peeking through, no spongy give when you swap a bulb, no edge for steam or dust to claim. The moment the connector is even slightly wrong, routine use exposes it: a hallway fixture shifts whenever the door closes; a bathroom right above the mirror fades from clean line to blurred edge after just a week of showers; dust collects where the gap grows wider every time you clean.

    In spaces where lighting isn’t just décor but navigation—stair turns, tight hallways, laundry corners—the smallest connector misfit becomes a daily interruption. Maybe your fixture looked perfectly flush at the start. After a week of footsteps or a month of cleaning, you start seeing tattle-tale shadows where the ceiling and fixture no longer quite meet. Flickers creep in—not total failure, but enough to hesitate at the top step or glance back at the switch, wondering if the light’s about to fail for good.

    Everyday Friction: Where Issues Sneak In

    Hallways That Gradually Lose Their Clarity

    Cross the hallway after dark expecting one clean, shadow-free surface—and suddenly, one side falls away, the line where ceiling meets wall blurred. A slightly undersized or sloppy connector lets the fixture sag just enough that the wash of light is lopsided. With each slammed door or vacuumed floor, it drifts further: thin shadows along the baseboard, flicker from a loosened wire, and a subtle, nagging confusion when your feet don’t land where you expect. Light designed to reveal now hides hazards and adds uncertainty where clarity is needed most, especially at stair turns or corridor bends.

    Bathrooms and Laundry Rooms Pay the Toll Fastest

    Moisture never misses an opportunity. In a bathroom, a flush mount with the wrong connector lets steam sneak into the seam after every shower. Dampness warps paint, dust cements into stubborn borders, and the ceiling edge never quite looks clean again. You flip the switch and get a jitter of hesitation—not enough for a call to maintenance, but enough to notice every morning. In laundry rooms, connectors that can’t handle vibration will wobble the fixture loose; lids banging, baskets brushing by, and machines rumbling amplify tiny gaps into clear tilts or outright droops. The more you use these spaces, the more the flaw asserts itself: fixtures angled off, covers loose to the touch, cleaning always a battle with unreachable grime.

    The Subtle Ways Connector Mismatch Interrupts Your Routine

    Bad connectors become a built-in chore. If you’ve reseated a loose fixture, wiped at a dust line that clings no matter what, or paused at a hesitant flicker after closing a door, you’ve felt the impact. A small misfit ripples: a fixture that pulls away under each minor touch, extra seconds lost to cleaning stubborn corners, a quiet worry about exposed wires behind a tilted cover. In rooms meant to support daily movement—kitchens, bathrooms, busy hallways—these aren’t minor annoyances, but friction that slows your routine.

    Repeated use compounds the damage. Every bulb change, every cleaning, every time the fixture is jostled, the imprecise fit deepens. Instead of fading into the background, the light calls for constant correction—tightening, straightening, second-guessing if you’re about to see it flicker or slip out of place. With time, the risk spreads from cosmetic to function: exposed wiring, poorer resistance to dampness, a fixture that surrenders to gravity and routine alike.

    Two Fixtures, Two Outcomes: What Lasting Fit Actually Looks Like

    Put two flush-mount fixtures side by side on the same landing. The one anchored with the right connector stays sharp, flush, and bright—every bulb change is simple, every pass on the stairs is clear and free of distraction. Its spread is even, its shadow lines are where they should be, and it stands up to slamming doors and running feet without give.

    The other, installed with a mismatched connector, ages fast. At first, nothing is obvious—by week two, a tilt begins. By week four, dust lines betray the gap, and every passing footstep rattles a loose cover. It sneaks up: the stairway still looks bright, but movement feels less sure, and comments about the “dimmer” feeling begin even while the bulb is fine. This isn’t just visual—it’s a subtle erosion of routine comfort.

    How the Right Connector Fixes the Cycle

    Once frustration reaches a point you can’t ignore, swapping in the proper connector resets the experience. Suddenly the fixture is part of the ceiling again, zero sway as baskets pass or shoes bang stairs. There’s no more hunting for new dust lines, no pulse of worry over exposed wiring, no flicker after a steamy shower. Cleaning is faster, the room stops demanding your attention, and light finally acts like background support rather than a tiny, daily hassle.

    The change isn’t dramatic—it’s decisive. What stands out is the absence of “checking if the light is still tight,” the return of steady mirror clarity, and the end of shadow-tracing at corridor edges. The right connector doesn’t just finish the job; it takes the frustration out of repeated use.

    One Real-World Tip That Pays Off

    If you’re not sure whether your connector is right, don’t judge on day one. Check after a few days’ routine—watch for a wiggle, check for dust lines, or pause if you see that first hairline shadow after cleaning. These are your warning signs: address a small gap now, and you’ll skip months of daily annoyance before it cascades into a real problem.

    For flush mount, semi-flush mount, wall, and practical task lighting solutions built for everyday spaces that stay reliable with daily use, visit LightHelper.

  • Why Ribbed Boot Trays Keep Entryways Drier and Cleaner Longer

    No one really notices their boot tray—until a week of rain turns your entryway into a soaked obstacle course. By day two, that shallow rectangle by the door stops looking like “containment” and starts acting like a bottleneck: shoes stay damp, water pools, and every new arrival means mangling the lineup just to find your own pair. It’s less about “looks” and more about blockage: wet clutter creeps beyond the tray, mud drags further inside, and reset gets slower every round. If the tray doesn’t handle moisture, everything else in the threshold gets harder—cleaning, moving, even just getting out the door without stepping in yesterday’s puddle.

    When a Neat Entryway Breaks Down—Fast

    Step inside with wet boots and the idea seems tidy: shoes corralled, moisture caught. But that order snaps under repeated real use. Most flat trays work for a single drop, but after a real-weather week, they stall: shoes never actually dry, you’re sidestepping pooled water to reach the back of the row, and just pulling one pair free can slide the entire lineup off-center. Reset feels less like a quick fix and more like wrestling damp, sticky mess into shape before anyone gets frustrated and leaves muddy prints mid-hallway. Even with careful placement, the wet zone works its way past the tray: edge grime forms hard lines against walls, water finds the seams, and every reset feels overdue by the time you even think to start.

    Ribbed vs Flat Trays—The Actual Difference

    The design looks minor until you live with it. Ribbed trays lift soles up so water runs off instead of up, which means shoes can actually air-dry even as the tray keeps containing the runoff. Flat trays turn each pair into its own puddle; by end of the week, every grip tread is soaked, and mud bakes in underfoot no matter how many times you wipe. Cleaning isn’t just extra—flat trays make it feel endless, as stagnant water makes quick resets impossible. With ribs, the grime lines up along the channels—a single wipe clears most of what flat trays trap for days. This isn’t just preference; it’s the root cause for why some entryways clog and others stay on pace.

    How Too Much Moisture Blocks the Routine

    Here’s how bottlenecks stack up over a week of real use:

    • Three pairs squeezed onto a tray after back-to-back rainy arrivals; each one leaves more water pooled beneath the last.
    • Next morning, someone grabs shoes in a rush—shifting the line, leaving wet tracks, sometimes catching a loose edge and spraying slush beyond the tray.
    • Later, another round—damp shoes overlap, the runoff spreads, and what was one clean path becomes a dense line of obstacles.
    • Midweek, a dropped bag or backpack claims a corner, turning “temporary” overflow into a semi-permanent roadblock and narrowing the passage down to a single awkward step.

    With a flat tray, neatness collapses: the water lingers, air stays humid under shoes, and any attempt at a reset fights uphill. Odors and outlines creep out. Wipe once and you’re just smearing damp grime around; wait, and it hardens into an edge that’s always visible against the floor. After enough cycles, even small entries start feeling claustrophobic—everyone is stepping around each other just to cross the threshold.

    Why Ribbed Boot Trays Shift the Routine

    Swap in a ribbed tray and the friction drops. Water drains into the channels, not back up to shoe level. Even when pairs crowd together, the tray surface dries out faster, so shoes aren’t pressed into lingering moisture. The magic isn’t in appearances—it’s that grime collects as narrow bands, whole messes stay contained, and cleaning switches from a dreaded event to a one-motion job: one swipe, one tilt, and either the tray or your routine resets without the wait. Over time, busy entries survive the onslaught: rotation becomes possible, shoes come and go without dragging last week’s grit or humidity into the house. You’re not wrestling with the floor—just moving shoes in and out as intended, with resets becoming part of the flow instead of a block to it.

    Invisible Reset Pressure—Where Flat Trays Fail

    Not all mess is visible. If a transition zone feels “off,” it’s often because the reset isn’t really reset—standing water, unmoving grime, pairs taking longer to dry (and so piling up longer), and a half-wet edge you start walking around instead of using. Flat trays amplify this: cleanup gets put off, then grows into a task big enough to avoid. The routine sags—shoes stack deeper, clutter works its way outside the tray, and small delays turn into a full threshold block by the end of each week.

    Ribbed trays quietly defuse that loop: runoff escapes to the channels, soles dry faster, and messes don’t dig in. The difference registers less in how “neat” the area looks than in how easy it is to recover—resets become small, steady, and mostly self-sustaining, not postponed chores that snowball into problem zones.

    Real-Use Adjustments That Matter

    The shift doesn’t require a new mudroom—just swapping to a ribbed tray, and leaving even a small (half-centimeter) gap to let you drain water or clear mess without disrupting the rest. This one tweak turns cleaning from a multi-step scramble into a non-event. Instead of scrubbing pooled residue from stubborn corners, grime collects in lines you can wipe or rinse out almost automatically. A weekly reset drops to two minutes—drain, towel, done. The entry stays functional, never quite perfect, but always clear of those slow, mood-killing backlogs that accumulate any time you let a flat tray “do its job” for too long.

    When Frictions Multiply

    If your entry handles more than shoes—backpacks, gear, coats, umbrellas—all sharing one tight spot, these “small” differences turn into real blockages. Flat trays don’t just slow you down—they turn the threshold into a sticky pause point, forcing you to stack or sidestep more often. The ribs in a better tray let air circulate, keep the mess contained, and make it possible to re-use the same patch over and over without the usual drag or buildup.

    Other Use Cases—Not Just for Wet Footwear

    The ribbed vs flat divide isn’t limited to muddy boots. Pet bowls that spill, tools caked in wet leaves, even sports gear or rain jackets—anything that needs to drop, dry, and move again gets a better shot when there’s airflow and drainage. The air gap lets moisture escape instead of stagnating all week, and the structured channeling means pet mess or gardening residue doesn’t cement itself to the entry floor. The real test isn’t what the tray looks like at rest—it’s how well it handles repeated “in, out, and back again” cycles with minimal reset in between.

    Quick Tips for Ongoing Entryway Resets

    • Leave a small gap behind the tray: You’ll drain water and wipe grime more easily when you aren’t wedging the tray at wall’s edge.
    • Swipe along the ribs for fast cleaning: A towel, brush, or even just your hand clears buildup from the channels without a full lift and wash.
    • Keep temporary drops to one side: When bags, sports gear, or extras need a place to land, cluster them—don’t scatter—so the main route stays open during high-traffic days.

    Why Setup Details Matter More Than First Impressions

    Most entry storage promises order, but order fades unless the setup fits the traffic. Flat trays hide the first mess, then lag behind the pace of daily use—moisture lingers, routines drift, and eventually the entire entry slows to a crawl. Ribbed trays solve at the flow level: letting airflow and simple movement keep cleaning light, thresholds usable, and resets part of the natural routine, not a mounting effort you keep putting off.

    See practical transition-space setups at Betweenry.

  • Why Keeping a Fixed Grooming Spot Simplifies Indoor Cat Care

    Indoor cat grooming routines rarely fall apart all at once—they unravel with every loose brush left in the wrong room, every stretch of fur drifting from the hallway to the sofa, every reach for a comb that’s somehow not where you need it. Grooming “wherever” sounds flexible until you’re finding lint rollers under the coffee table and brushing hair off your own bedspread for the third time that week. What begins as convenience turns into a daily circuit of tracking, hunting, and chasing collapsed routines across your living space. This is where the setup itself starts to matter—especially in a home built around StillWhisker’s world of practical, repeat-use, and layout-aware solutions.

    When a Floating Grooming Routine Falls Apart

    Most indoor-cat owners improvise: grooming tools get parked wherever there’s free space—maybe the kitchen, maybe next to the laundry, possibly wherever the cat rolled over last. The allure is obvious: no fixed station, instant access, brush when and where you can. But the cost is counted later. You spot the first patch of fur on the sofa after a hurried weekday brush. A comb disappears for two days, only to resurface behind a stack of magazines. Bristles inch their way into play corners, rest mats, even feeding zones—no part of the room is off-limits because the routine never anchors. You’re forced to clean wider, remember more, and reset across the entire house instead of one controllable area.

    The disadvantage creeps in slowly. Cleaning no longer means one sweep and done; instead, fur starts surfacing in places you never meant to use. That sense of order dissolves fast—irritating messes resurface beneath furniture, on recently cleaned carpets, or on toss pillows that only moved once. The “anywhere works” plan quietly multiplies your work, demanding more searching, more bending, and more repeat passes the longer it runs unchecked.

    How Rotating Setups Sabotage Shared Spaces

    It only takes a few days for grooming leftovers to invade every room. Compact homes suffer most: a single stray brush near the window today means fur waiting on the curtain tomorrow. Shifting “the grooming spot” wherever is free means you trail mess from sunlit corner to door mat, leaving behind hair, bristles, and the memory of a job half-finished. Instead of one controlled zone, you inherit constant layers of clutter: today’s vacuum round catches what was dropped yesterday, and even small apartments start to feel interrupted by the chase.

    This isn’t just stray hair stuck to a throw—every moveable setup creates more zones to patrol. Grooming becomes a scavenger hunt and every surface feels up for grabs. It drags out your daily reset, delays your actual cleaning, and asks for more patience than you thought necessary. You lose pace, lose time, and lose the sense that you’re ever caught up.

    Why a Permanent Grooming Spot Changes Everything

    The smallest decision—anchoring grooming to a single, easy-care spot—stops fur drift before it starts. Instead of splitting your focus and effort, you claim control in one defined zone. Brushes, combs, and wipes park there; a mat rated for actual shake-out takes the hits from loose fur. Nothing slides around when the cat moves. Cleanup collapses to one swift step with no side trails into other rooms. Tools have a landing pad, and so does every shed hair.

    Dog owners have long understood the reason for a designated “wipe paws” station. StillWhisker’s world translates that logic indoors: a fixed grooming corner where everything begins and ends. Now, brushing becomes a four-minute sequence: grab a tool, work over the cat, scoop up fur, shake out the mat, set everything back. Nothing escapes to the carpet. Nothing doubles back to show up two rooms away days later.

    What This Means in Daily Life

    There’s no mystery hair creeping under the bed or landing on a guest’s coat. A simple mat under your cat’s favorite window or by the hallway—chosen for shake-out speed—catches virtually everything in one go. Grooming tools never stray, because they live within reach. Cleanup shrinks to a single step: shake, brush, or toss the mat in the wash. The next session, everything’s ready. You don’t lose time digging through junk drawers—or end up finding the right tool only once the fur has already spread somewhere new.

    Over weeks, the difference gets clearer: fur and tools stay contained, and you’re running a short, closed loop—not an endless cycle. The rest of your living space holds together longer. You’re not cleaning harder; you’re just cutting off the spread before it starts.

    Spotting (and Avoiding) the Usual Pitfalls

    The “easy spot” is often a trap. Cozy corners, thick rugs, sun-warmed sofas—they invite grooming in the moment but snare fur for days. Deep carpets grab every strand. Beds and throws soak up leftovers between vacuum runs. Even if a spot looks ideal once, it can falter fast: hard to sweep, slow to vacuum, impossible to fully clear after a cat barrels off mid-session and takes clumps to a new spot.

    The right permanent setup is:

    • Within easy reach for both owner and cat—no dragging tools or wrangling the animal into awkward spots
    • Not in beds, lounging nooks, or main rest areas (fur doesn’t belong where sleep happens)
    • Placed on a washable, shake-out-safe mat—never thick carpet or heavy throws that hold fur hostage
    • Backed by a non-slip layer so you’re not chasing both a shifting mat and a moving cat
    • Right beside a storage tray or caddy, so nothing gets stranded or lost between sessions

    Shift a grooming station a few steps outside your cat’s play or feeding zone and watch cleanup tension drop. Fur stops contaminating food bowls. Loose bristles don’t sneak into stacks of toys. Resetting becomes predictable—the session ends with its own built-in cleanup rather than a mess that leaks quietly into the rest of the house.

    Repeated Scenes Where Setup Makes Life Easier (or Not)

    Small pain points multiply when flexibility is your only routine:

    • Reaching for a brush and it’s not there—it’s still lost in yesterday’s room. Grooming gets postponed, and so does cleanup. Later always demands more effort.
    • Wrapping up a session just to discover hairs on the hallway rug and sofa. Even after cleaning, you’re left tracing the spread to spaces you didn’t mean to use.
    • Stepping in leftover fur during a reset, then doubling back with a vacuum. The section you finished now means another round—extra steps, more delay.
    • Noticing your cat asleep on the mat hours after grooming ended—still shedding there. The “permanent” area helps, but only if it lives where cleanup stays easy and maintenance doesn’t fall behind.

    Each frustrating scene grows from the same root: temporary or unfixed grooming structures leave you with scattered work, lost tools, and friction that drags into the next routine. The problem doesn’t announce itself—it builds up behind the visible calm.

    The Difference Between “Looks Clean” and “Works Clean”

    Plenty of setups look fine right after a reset—but breakdown shows when routines overlap and rooms serve double roles. Fast resets slide; the “floating” grooming zone promises order but turns cleaning into a relay race just to keep up. Setting a fixed zone doesn’t just clean the surface; it puts a ceiling on future effort. Instead of forever restarting, you slot grooming and cleaning into one tight loop, with no sprawl into daily routines or unexpected corners. Less repeat work. Fewer frantic searches for a lost comb. And more time before your whole living space starts to feel off.

    Practical Steps to Centralize the Cat Grooming Zone

    Find the Natural Fit

    Use the places you already share: a window ledge, a hallway edge, anywhere with hard flooring that isn’t the direct line of traffic. Avoid grooming on sofas or dining chairs—fur lingers where you want comfort. If your only option is carpet, layer a washable, non-slip mat. It’s about making cleanup automatic, not about reinventing the space.

    Bundle the Tools

    Group everything together—brushes, combs, spray, wipes—in one tray or hanging caddy within arm’s reach of the grooming spot. The key isn’t spending on fancy storage, but on keeping the process so tight that setup and cleanup can’t grow into chores themselves. If it stalls for ten seconds or more, it breaks under weekday pressure.

    Contain Loose Fur (and Clean Up Fast)

    Choose mats that actually respond to the problem: shake out, toss in the washer, wipe down—no draping with towels that double laundry loads or fail to dry. Silicone or waterproof mats work for some, tough textile mats for others. Avoid heavy, layered fabrics and anything that requires a full reset to avoid odors or stains. Cleanup should be a side