Category: Lighting & Work Setup

  • How Adjusting Monitor Height Transforms Your Workspace Efficiency

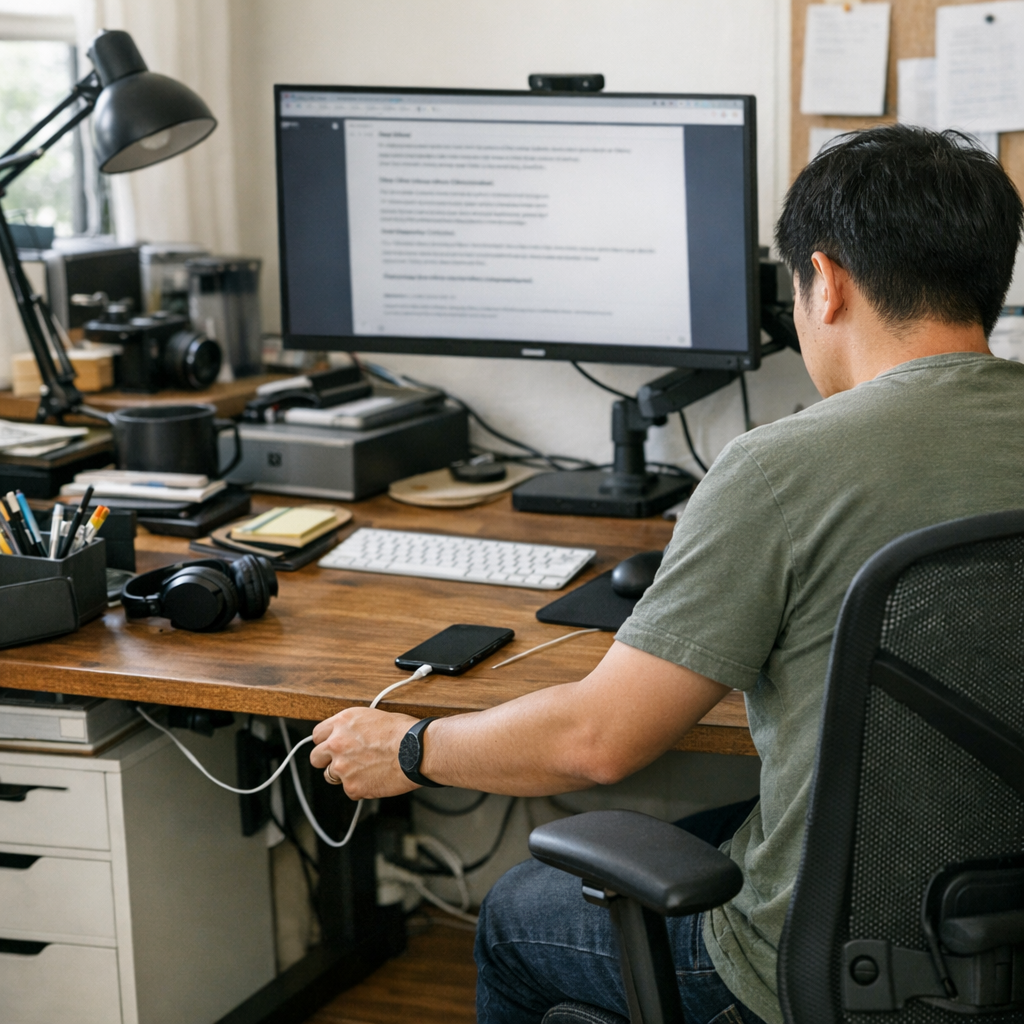
    A desk that looks organized can still slow you down. The surface is spotless at 9 a.m., but by the second or third workday, the cracks show: your neck clenches from a screen set too low. Reaching for a notebook means scraping past cables, a phone charger wedges itself between your best pens, and that “clean” look hides a growing reluctance to sit back down. The real issue is not clutter you can see—it’s the design bottlenecks you feel every time you trade typing for notetaking or juggle devices, with every cable drag, crowded edge, and missed reset adding friction. The wrong setup isn’t just inconvenient once; it interrupts your workflow over and over, especially when quick access and fast switches are part of your daily routine.

    When Neatness Stops Short of Real Usability

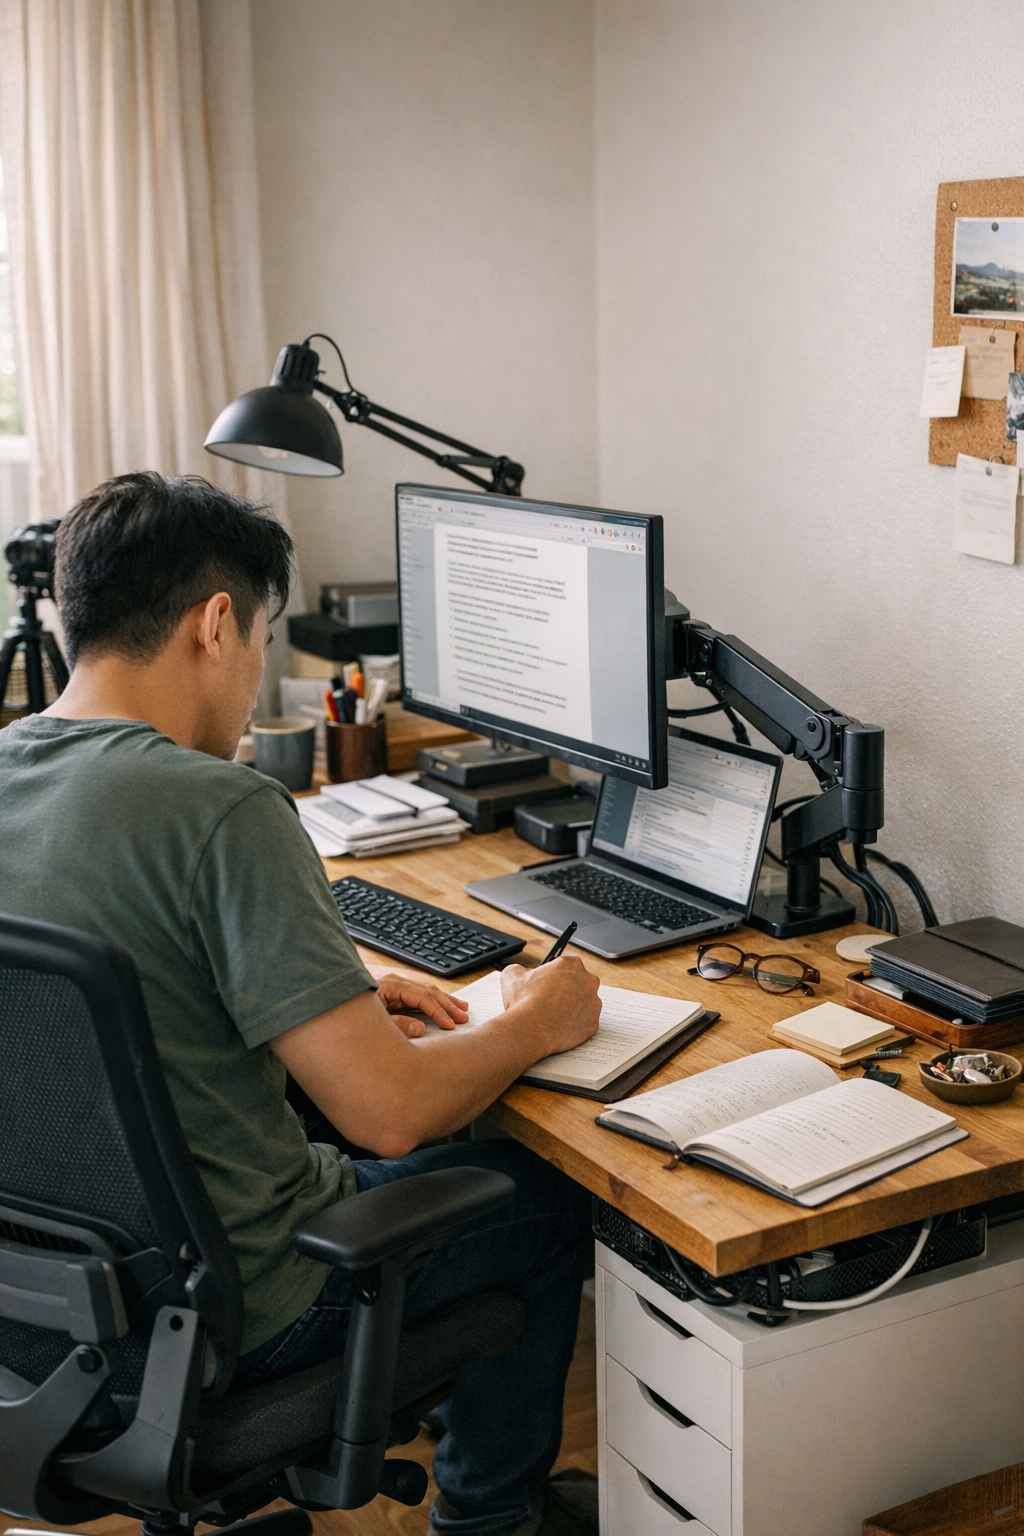
    Spend a day or two at a desk that looks neatly arranged and the same frustrations start to return. A flat-footed monitor base sets the tone: everything seems placed just right—until you find yourself leaning forward for a better look. The monitor eats up the rear half of your desk; your handwritten pad now competes with a power block or cable coiling too close. Real work becomes a sequence of micro-adjustments: shifting a charger to reach a sticky note, moving your elbow to avoid cord rub, or propping up your phone at the last open corner. The effect adds up. By midweek, the desk is officially “clear” but working at it feels slower, less inviting, and you catch yourself hesitating before every session.

    Recognizing Friction as It Builds

    These snags aren’t isolated. If you reach over the same charging cable every time you want a stapler, or have to maneuver your laptop for a comfortable writing spot, your desk’s physical arrangement is fighting your workflow. These interruptions multiply quickly in setups that look tidy but ignore repeated motion. A so-called clean desk has a cost you notice more with every switch—until a single shift in structure delivers relief you only realize after the change.

    One Small Change, Many Improvements

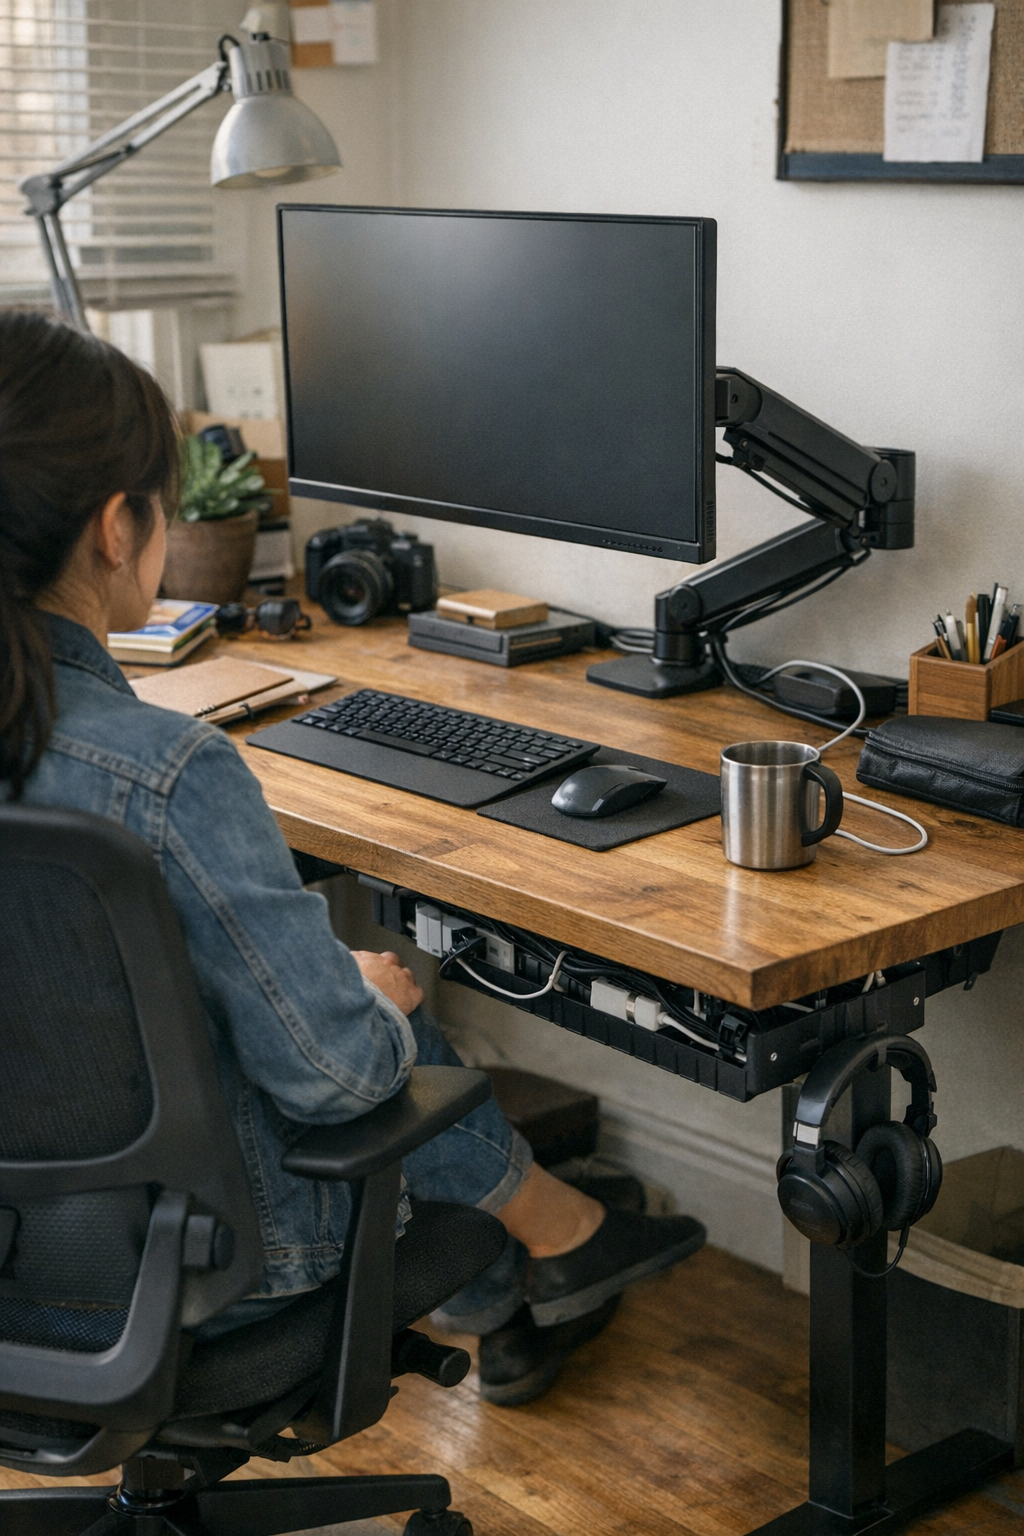
    Monitor height is a pivot point for real usability. Raising your screen with a monitor arm moves more than just pixels—it immediately relieves neck tension and reclaims the back strip of desk that a stand once blocked. Suddenly, cables that used to snake forward get tucked into a cable tray behind the monitor, out of the path of your mouse or notebook. The difference isn’t just tidier cable lines—it’s the way you recover usable space for trays, notepads, or a docking station right at hand instead of fighting for every inch. What once passed for “efficient enough” reveals itself as an obstacle factory the moment you experience truly open, available workspace.

    Desk Depth: Where It’s Won and Lost

    On a compact or shared desk, every centimeter at the back counts. With a fixed, standing monitor and crowded base, usable desk space melts away fast—chargers land in the center, organizers and trays drift into places you don’t actually reach. Instead of sweeping the desk clear for a task, you find yourself untangling a charger, nudging the lamp aside, or pausing every time you need something tucked behind the screen. The result: surface “order” stops mattering when the desk’s depth feels rationed and every task asks for another workaround.

    Living with a Setup That Actually Matches the Work

    Switching to a monitor arm and cable tray turns daily friction into quick, repeatable relief:

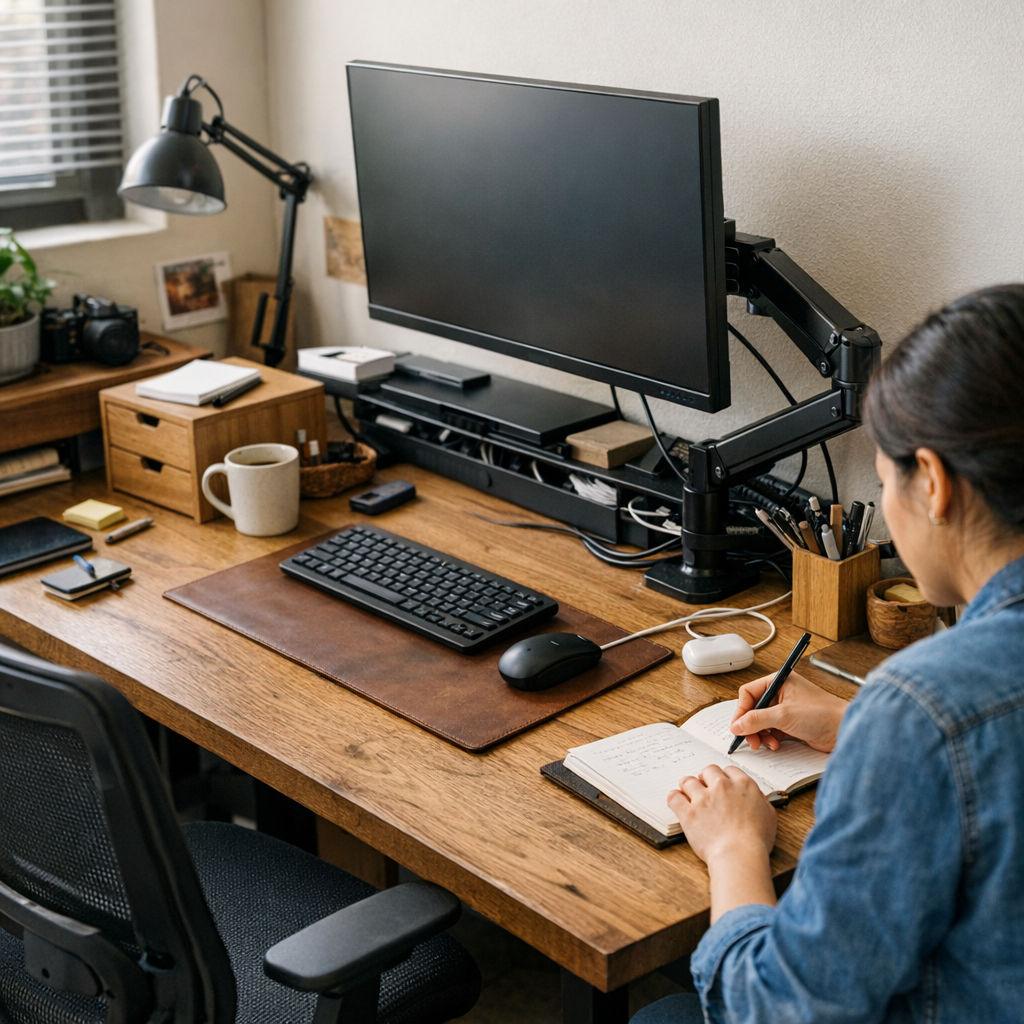
    • Handwritten notes fit beside the keyboard—no more navigating a charging cord just to jot down an idea.
    • Cables tuck neatly behind the monitor, not running through your writing zone.
    • Organizer trays and storage boxes move forward or back as needed, never blocked by awkward hardware.

    Returning to this desk, resets are a non-event: no search for a free outlet, no detangling charger bundles, no shifting piles to reclaim your working area. The monitor glides forward for a spreadsheet session, then pulls back so you can spread out papers or charge a device—smooth hand-offs, not constant rearrangement. “Organized” stops being a look and starts feeling more like flow.

    Real-World Example: The Midday Reset

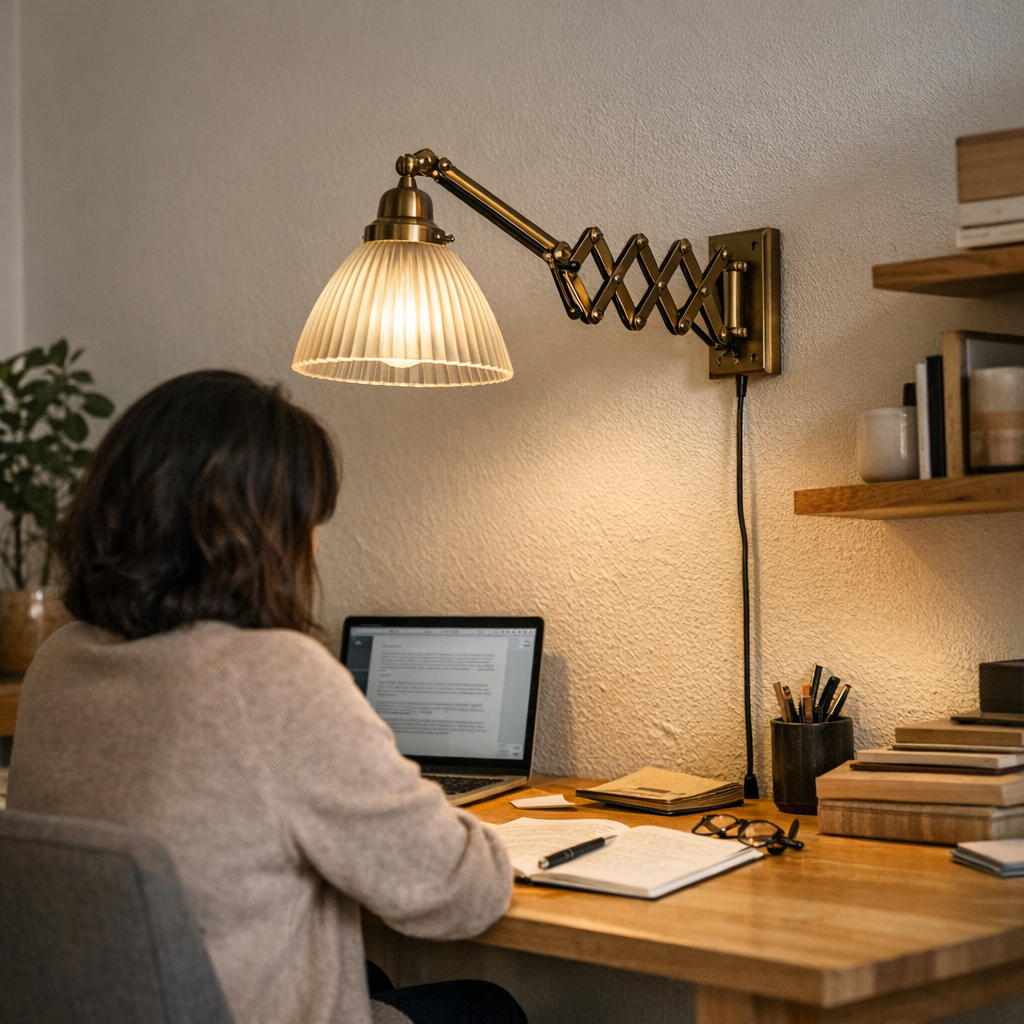
    If your day shuffles between digital and paper tasks, even one thoughtful adjustment pays off every time. Picture this: after lunch, you come back and want to draw a quick diagram or leave yourself a note. No cable to move. No screen base stealing half your reach. The notebook lands exactly where you need it, not on top of a charger tangle. That absence of correction—no workaround, no body contortion, no pause—quietly becomes the real advantage, lightening your work rhythm without any conscious effort.

    Early Warning Signs Your Setup Needs a Shift

    Spot these repeated signals that layout, not clutter, is costing you actual work time:

    • You twist, crane, or shift in your chair to properly see the monitor.
    • Chargers and USB cables creep into your main workspace by the afternoon.
    • Storage trays or organizers end up out of reach, sliding behind the screen or a cable knot.
    • Every work session starts with ten minutes of minor resets just to regain a clear surface.

    Those patterns aren’t solved by adding bins or baskets. They mean your desk’s structure is at odds with your workflow. The fix is not just hiding more cables—it’s changing the physical logic: lift the screen, route the wires, free up the places you actually use.

    FAQ: Small Questions that Signal Big Friction

    What happens if my monitor stays too low?

    Low monitors invite neck strain, collapsed posture, and faster fatigue. They push storage out of reach, make cables harder to manage, and turn basic task switches into repeated workarounds.

    How do cable trays make a real difference?

    Cable trays pull wires away from the working edge, keeping your surface ready for fast transitions. No more mid-task tangle, no more charger creeping under your pad—just a reset surface and stress-free reach, session after session.

    When is it time to rethink my setup?

    When you keep skirting cables, moving gear, or adjusting posture for the same tasks daily, it’s time. Real efficiency is the setup that lets you transition—work, write, charge—without making space for every step.

    Workstations: It’s Not Just About Looks

    The real test isn’t immaculate appearance—it’s whether your desk lets you work on your terms, without repeated reset, reach-around, or silent frustration. The right structure matches your routine: monitor at the right height, cables under control, organizers and tools clearly accessible. Fix the structural choke-points, and the entire week smooths out. You’ll feel what’s missing: that steady drag of minor interruptions and the slow erosion of momentum from a desk that only ever looked tidy.

    Explore the full WorkBasic collection

  • Optimizing Shared Spaces with Smart Ceiling Light Placement

    Linear vs. panel ceiling lights: the biggest difference usually surfaces after you move past the first week—once work spreads out, cables migrate, and the smooth, symmetrical fixture overhead can’t keep up with the room’s real rhythms. That panel, so clean in pictures, leaves one side of the counter in shadow and the corners unclaimed as people gravitate toward the center for survival brightness. Meanwhile, the urge to haul in extension cords, prop up extra lamps, or nudge your chair to dodge glare starts to feel inevitable, no matter how sleek the original plan looked.

    Where Looks Slip and Friction Creeps In

    The appeal of a flush-mount panel or slim overhead rectangle is all about eliminating the mess of cables and forgetting the chaos of scattered plug-ins. But after a few normal days—papers sprawled, laptops charging, team discussions—the flaws show up as lived-in inconvenience. It isn’t that the fixture is broken; it’s that the simplest ceiling setup ignores where light fades out. The “clean” look overhead can unravel at ground level: distant desk edges sink into shadow, group work clusters in hotspots, extension cords snake between seats, and those side-table lamps you thought were gone creep back to fill the gap. The fixture may hang straight and tidy, but the everyday lighting pattern is full of blind spots.

    When Surface Lighting Falls Short in Real Life

    A centered ceiling panel makes for a tidy diagram but rarely aligns with the action below. Picture the daily routine: the main table runs the length of the room, but the brightest beam falls onto the walking path or halfway across someone’s notes. People at the far edge lean forward, shift chairs, or play musical seats for a temporary lighting upgrade. The result? The room doesn’t stay clean for long. Personal lamps reappear, wires resurface, and the initial effort at order is chipped away by workarounds and clutter hiding in plain sight.

    Shift to a linear fixture, lined up directly over the working zone, and the equation changes. Run it lengthwise, not just centered, and shadows along the far edge disappear. Task coverage follows the table, not the ceiling pattern. The difference isn’t just light distribution—it’s eliminating the cycle: no one fighting for a “good spot,” fewer random fixes, and less eye strain by the end of the day.

    Spotting the Trouble Before It Settles In

    The “wrong fit” rarely jumps out at installation. It’s the subtle daily workarounds—documents drifting into dimness, arms stretched to shield screens from reflection, cables sneaking back for emergency side lighting. The room looks handled at a glance but feels unfinished the moment you’re chasing usable light or tidying up somebody else’s extension cord.

    Small Changes, Big Difference: Aligning Light to Routine

    One overlooked fix: match the fixture to the active zone, not the architectural symmetry. In a recent office reset, replacing a centered panel with a continuous 2.4-meter linear above the main table snapped the lingering shadow from the table edge into full visibility. The old tide of personal lamps vanished, and cable creep stopped. Was it flawless? Not completely; a faint dim strip near the doorway lingered. But the “make do” improvisation everyone tolerated simply faded out, replaced by a layout that held up against real use patterns.

    Lighting should move with people, with habits, with the shifting nature of the surface—not just fill a checklist or land in the ceiling’s geometric center.

    Uneven Coverage and the Return of Clutter

    Even a top-spec fixture fails if it’s undersized, dropped in the aesthetic sweet spot, or simply not built for the real way people use the room. Too-short linears or panels that only bless the center leave new busy zones in the dim. More users multiply the problem—edges darken, corners get cold, and the scramble for power and useful visibility restarts. The tension doesn’t come from installation but from the drag of adding “patch” after patch—extra lamps, creative cable trails—until the setup feels more complicated than what it replaced.

    Why the “Clean Look” Isn’t Always the Best Use

    A recessed fixture wins on cable control, but if it can’t visibly light the actual surface in play, the workaround cycle resumes. That first impression of polish breaks down by week two as the routine outpaces the overhead plan. Spot the mismatch before the extensions and table lamps multiply—otherwise, “clean” turns into “constantly corrected.”

    Reducing Cable Chaos Before It Starts

    Cable creep is relentless in shared or shifting workspaces. The moment someone can’t see clearly, their own fix—an extra lamp, a new extension—finds its way in. Soon, cords tie up walkways and clutter the floor. The way out: select fixtures with built-in cable guidance or keep installation tight overhead, directly above the main surface. Wire management up and out of the way blocks the chronic extension-cord drift and preserves the look (and safety) longer than any quick rearrangement.

    The best “clean” is the one that doesn’t unravel the moment the routine gets busy again.

    Recognizing and Addressing the Good-Enough Illusion

    It’s easy to be lulled by how finished a room looks right after setup. But when the floor is retaped with cords after a few weeks, or you’re shifting lamps yet again, “good enough” shows its limits. An overhead panel can function for balanced, square rooms or small focused tasks—but in longer, group-oriented, or single-axis surfaces, linear fixtures step up with coverage where people actually work and move. The difference is felt not in the installation, but in having less to fix every week.

    Quick Tips for Fixing Daily Lighting Strain

    • Inspect the real working zone, not just the middle: Sit or stand where the activities actually happen. Can you see every inch of your task surface, or does shadow block the edge?
    • Spot cable creep early: If new power strips or extension cords appear by week four, your overhead approach is missing a stretch of usable space.
    • Don’t accept “almost right” fixture placement: Sometimes moving a linear, choosing a longer fitting, or carefully rotating the light makes the whole surface workable—no major overhaul needed.

    Final Note: Match Lighting to Use, Not Just Appearance

    Lighting setups that survive the first month often reveal what actually matters—how much improvisation is still needed. If you keep finding temporary solutions accumulating underfoot or at the far end of a table, it’s time to question whether the lights fit the true repeat pattern. For project tables, shared desks, or daily-use surfaces, aim for fixtures and supports that manage cables and give real, even coverage, even if it means bending symmetry or revising that tidy-looking plan. Everyday usability always outlasts a first impression.

    http://www.lightsupport.myshopify.com

  • Preventing Glass Diffuser Cracks Through Smart Fixture Placement

    A cracked glass diffuser is rarely an accident—it’s a warning from the room. Where your ceiling light meets everyday movement, the first sign isn’t always a shatter. It’s a faint fissure at the rim, a patch of glare that’s grown sharper, or a subtle dull spot after a week of cleaning. Ignore these changes, and what started as minor damage becomes a chain of regular interruptions: glass chips near the closet, uneven shadows across the hallway, or light that seems bright but leaves work surfaces dim and awkward to use. The problem isn’t the glass itself—it’s a mounting, a placement, a choice that fails under the friction of real routines. And the wrong fixture in the wrong spot turns every pass-through, arm-reach, or bump into hidden stress. Most owners miss these signals until the fix becomes a scramble, not a choice.

    Trouble Spots: Where Glass Diffuser Cracks Begin

    Lighting durability is shaped by the room’s pressure points, not just ratings or catalog look. A flush mount ceiling light appears neat overhead, but in everyday pinch zones—narrow hallways, cramped laundry aisles, or humid corners near a shower—the risk multiplies. Glass installed directly in the path of baskets, swinging doors, or storage bins absorbs hit after hit: a closet opened too fast, steam collecting along the surface, or a hamper brushing the edge again and again. Each encounter is small—a brush from an elbow, a sway in airflow from the door, a forgotten swipe during cleaning—but together, this routine contact seeds stress lines and weakens the diffuser’s edge. The glass isn’t failing all at once; it’s being slowly worn down by movement the fixture was never placed to avoid.

    Cracks don’t show up because of a single dramatic mistake. They build up invisibly. That thin line at the rim, that bit of glass that suddenly reflects more glare, or a patch that looks more clouded after wiping, all reveal that a fixture is absorbing the room’s habits. Ignore them, and you’re not just risking a break—you’re signing up for scattered shards underfoot, uneven lighting, and hours wasted on cleanup and replacement.

    Matching Fixture Type to Real Room Flow

    The right diffuser doesn’t just look flush or stylish—it survives the daily routine. Too often, though, ceiling fixtures go wherever there’s enough overhead space, not where they remain clear of crossing arms, bin lids, and laundry swings. That flush mount by the closet seems harmless until a supply run nudges the diffuser every time. Chores tap, jostle, and unsettle glass that should be out of reach. The result is a creeping web of stress that isn’t visible day one but spells early failure, extra spend, and uneven spreads of glare or shadow just where you most need clarity.

    Contrast this with semi-flush mounts or wall sconces: raising the fixture by even a few inches, or shifting it off the main path, means every loading, crossing, and cleaning motion clears the glass. The change is easy to overlook at installation but blindingly obvious the first time a supply basket passes by with nothing to catch, or when a damp-rated fixture outlasts steamy cleanup without spider-web cracks spreading from the edge. What looks like a minor shift—three inches off the usual arc—quickly becomes the thing that saves you from the next splintered clean-up or lopsided light cast over the hallway floor.

    Routine Scenes: Signs You’re Headed for a Crack

    Crossing the Hallway—One Subtle Bump at a Time

    A flush mount centered just a foot from a closet door is set up for slow motion trouble. First week: smooth glass, sharp light. By week three, the edge of every laundry basket nudges the diffuser. It’s nothing forceful—a swipe rather than a thud—but after a few cycles the rim grows dull, a faint fissure appears, and shadows start scattering unevenly across the floor. Every open closet door gives the glass another small rattle. That micro-crack, invisible at first, becomes the reason for a sudden break right as you’re restocking the closet or grabbing towels in a rush.

    Bathroom Corners and Laundry Tangles

    Utility rooms and small bathrooms punish poorly placed glass twice as hard. A flush mount near a mirror or above cabinet runs endures temperature swings, humidity from repeated showers, and stray hits from stacking and unstacking supplies. Even careful use wears at the edge: damp air seeps in, fine stress lines multiply, and residue sticks where you can’t quite reach or clean. That gleaming fixture from the spec sheet quickly dulls and starts scattering both light and frustration—leaving you with more cleaning, less usable light, and, eventually, a cracked glass replacement schedule.

    The Difference a Small Adjustment Can Make

    Replace a cracked glass diffuser once and it feels unlucky. Replace it twice, and the cause isn’t hidden—placement matters more than the fixture’s polish. Push a semi-flush three inches out of a swinging arc, or mount a wall sconce just above bin-height, and the everyday friction stops. Now, you walk under the light, reach for the closet, mop, move baskets—without causing a hairline split by accident. Even if the fixture drops slightly lower, there’s no jagged edge waiting overhead. Glare softens. That background worry—the constant “Will it break again?”—starts to fade from your routine.

    Especially in spaces people actually use, this small structural move is the difference between dependable lighting and a maintenance headache. Clean-up loses its risk. The diffuser stays clean, the light spreads evenly, and your focus returns to the room—not the next round of repairs.

    The Value of Chosen Placement in Real Use

    Lighting placement isn’t just a nice-to-have—it’s the line between invisible reliability and constant friction. Move the diffuser clear of door arcs, bin sweeps, and main circulation paths, and the rate of cracks and unexpected failures plummets. Watch for these stress points during installation, not after the second glass swap.

    Critical signals include:

    • Glass aligned with swinging doors or covers—prime crash spots.
    • Fixtures exposed to repeated humidity, steam, or surges in airflow.
    • A need to clean, reach, or maneuver close to the glass after every use.

    If any are true, cracks aren’t a matter of “if”—they’re queued up for “when.” Spot these now and you sidestep a cycle of repairs, lost visibility, and daily inconvenience.

    Fixture Choices That Hold Up to Repeated Use

    Semi-flush, wall-mounted, and task-oriented lights outperform flush mounts in real-world traffic zones. Set above head reach or moved along the wall just out of circulation, they avoid the worst of everyday impact. Even if you opt for a damp-rated fixture to handle humidity, it won’t withstand repeated brushes or bumps if installed in the routine’s line of fire. Reliable lighting means matching fixture type and placement to what your room actually demands—not just what fills the space cleanly on paper.

    Real-World Tip: Stay Ahead of the Weak Spots

    If you’ve replaced a glass diffuser more than once, that’s your room asking for a fix. Figure out what in your routine keeps colliding with it—door swings, mopping patterns, basket handling. A two-inch move outside a pathway, or mounting above cabinet height, makes all the difference. Notice new lines, a loosening rim, or dullness after each bump: these are early warnings, not background wear. Act before a visible crack forms. When uncertain, mount the light just above hand level or outside the reach of daily traffic—not directly overhead in a high-use corridor or utility zone.

    The change might not feel dramatic on day one. But over months of closet crossings, laundry cycles, and late-night cleaning, the right placement delivers—glass intact, lighting steady, and no more apartment-pausing repairs. That’s the gap between light that just happens to be there, and light you don’t have to think about at all.

    Browse practical indoor lighting options at LightHelper.

  • How Reducing Desk Clutter Enhances Daily Workflow and Comfort

    The gap between a desk that looks organized and a workstation that actually works shows up fastest midway through the week—right when routines stress-test your setup. At 8 a.m., the surface checks every box: matching trays, cable sleeves lining the back edge, drawers tucking clutter out of sight. But by the third reach for your charger or the fifth switch from keyboard to notebook, the friction surfaces. You dodge around a clip cup to scribble notes, nudge a storage bin with your elbow, or reroute your mouse cable—again. That so-called “clean” desk exposes its flaw: order that interrupts flow is just new clutter in disguise. The desk looks calm, but the workflow stutters.

    Where order starts becoming a source of friction

    More storage always sounds like the solution—no tangled cords, no scattered pens, drawers tucking everything neatly below eye level. But every layer promises control and delivers distraction: under-desk drawers tighten leg space, so you’re forced to rotate, perch, or stretch. Monitor risers and cable trays promise structure; in repeated use, they creep into your workspace, nudging against your mouse hand, cutting your writing area, or making you reach further for anything not staged front and center.

    Friction builds quietly. Need to unplug a laptop? First, wrangle the cable box open. Want your notebook? Slide past two organizer edges to reach it. During each work session, micro-delays stack up—and the layout that seemed logical now demands small, constant adjustments. A strategy that once promised efficiency now parses every move into extra steps, more scanning, more resets—especially when you’re busiest, or shifting between meetings, emails, and real-deadline work.

    The workday in repeat: small interruptions add up

    By Friday, the “pristine” desk from Monday has shrunk. Move your laptop to free up camera space, and it bumps a storage bin hard against the edge. Monitor sits perfectly centered on its riser, but your wrist perches off a sharp corner during note-taking. That cable sleeve—meant to organize—now pulls, snags, or needs repeated tucking every time you add or swap a device. What’s supposed to streamline instead produces static: layers of order slowing basic movement, and making every reset heavier than it looks on paper.

    Every action choreographs itself around edge lines: reaching for a sticky note means tracing a path around bin corners. Dropping a pen means angling past the stacked tray. Even the simple act of sitting shifts—a drawer edge presses at your knee, and you adapt posture unconsciously. The difference hits hardest after lunch resets or back-to-back calls: an “organized” desk is easy to admire, but harder to work in when everything blocks the direct path to action.

    The turning point: what changed when visual weight was reduced

    Fixing friction didn’t mean shuffling boxes, but stripping the desk back—removing, not just rearranging. One oversized organizer gone: now a notebook slides aside in one gesture, not three. Ditching a bulky riser for a monitor arm cleared a whole zone behind the keyboard—charging cords dangle just long enough to grab, not so long they tangle, and you stop reaching around covers just to dock your phone. Removing even a single item shifted the rest: finally, your dominant hand had true open space, quick actions happened in the direct line of sight—not forced around a container or interrupted mid-reach.

    With density reduced, movement followed. No more bumping a cup or tray at every transition—typing, writing, mouse movement became continuous rather than punctuated by dodges. Most surprisingly, the left-hand zone—where a stack of sticky notes and pen holders always waited—when emptied, became the “instant transition” spot; nothing blocked the most-used line on the desk, and every task sped back up. Accumulated frustration—the kind you barely notice except in its absence—finally faded, replaced by smoother resets, less searching, and fewer micro-shifts each time you started over.

    The hidden costs of “hiding” clutter

    The myth: hide everything and you’ll have a perfect setup. The reality: tucking away cables, notebooks, or accessories usually means every plug-in, grab, or device swap slows down. Neatly concealed breaks rhythm—every access comes with an extra open-unthread-return step. Visual weight isn’t just about tidiness—it’s about whether your workflow stops for its own systems. As containers stack and drawers fill, each layer saps directness, shaves seconds, fragments focus, and adds small posture shifts that wear down comfort across longer sessions.

    FAQ: Navigating visual weight and workstation habits

    Isn’t hiding cables and accessories always better?

    Only if you rarely use them. Gear you move in and out daily—laptops, tablets, headphones—suffer most when you have to untangle cable sleeves or open storage just to connect. Inconsistent access usually slows you down more than a little visible clutter ever would.

    How do I recognize when my desk is carrying too much visual weight?

    When you pause to find routines—having to push past containers to use core tools, re-scan the surface before every task, or slide items aside just to begin—it’s a signal your setup is now working against, not with, your pace. If desk resets feel like rearranging a display, not prepping for real work, friction has taken over.

    Does streamlining always mean less storage?

    No; it means better placement. Sometimes the fix is moving a drawer so your legs don’t knock it all day, letting a monitor arm float the screen for more surface, or leaving one cable visible right where you unplug by habit. The focus moves from hiding to smoothing the most frequent actions—so the desk works with your patterns, not against them.

    Finding the balance: clarity over perfection

    What keeps a desk usable is never just how little sits on it, but how directly your hands, eyes, and devices work together in cycles. Comfort is cumulative: every subtraction that makes resets faster or avoids extra steps returns more value in repeated daily use than a photo-perfect moment ever could.

    No one wins for “best hidden cable” if that cable delays you hundreds of times. The real test is how quickly your workspace returns to neutral, and how easily you can reach what’s next without thinking about storage. A lighter-feeling arrangement—even if some elements stay visible—delivers steady relief over time. That sense of ease multiplies, far outlasting the first-hour impression of tidiness.

    Explore the full WorkBasic collection

  • Why Adding Wall Lighting Transforms Rooms with Overhead Fixtures

    A ceiling light claims to finish a room, but it rarely finishes the job you need. Even in an uncluttered space, overhead-only lighting quickly reveals harsh gaps: shadow creeping over your desk as evening hits, the corner armchair left straining your eyes, workstation edges barely visible unless you lean and chase lamp positions. The cable mess might be gone—until you start dragging in floor lamps, clip-ons, or power strips, all in search of real, usable light where the clean ceiling fixture keeps falling short.

    Ceiling-Only Lighting: A Setup That Stops Short

    A single ceiling fixture promises order. No wires tangle across the floor, sightlines stay unbroken, and the room looks architecturally “done.” But the appearance is deceptive once you try to work, read, or relax at the room’s edge. Sitting at a side desk, you’re forced under a band of shadow. Typing late, the desktop feels consistently underlit and uneven. So the cycle starts: a floor lamp lands by your chair, a table lamp appears for the far end, then another along the wall—a patchwork escalation that never truly covers the gaps. The space stays tidy in theory, but whole work zones and room edges stay awkwardly dim in practice.

    Where Overhead Lighting Falls Short in Everyday Use

    Overhead fixtures spill general light downward, but the beam misses real-life surfaces: desktops along the wall, alcove workstations, or shelves where you fumble past shadows. The edges and corners always feel off, no matter how strong the bulb. The room’s center glows, but shift your seat closer to a wall and your own shadow—plus the shadow of the furniture and shelving—moves right across the task spot you actually use.

    Another problem: glare becomes hard to avoid. Angle your chair wrong and that neat ceiling fixture highlights everything except your work, even reflecting right into your eyes when you glance up. No visible cables, but just as much arranging and readjusting now happens at the activity layer—not in the fixture plan above your head.

    Adding Lamps: Patchwork Solutions, New Problems

    The typical fix is to gather more lamps—one for the chair, one beside the desk, another clipped to shelving—each with its own cable that starts to show up before the light does. You get a burst of coverage, but at a cost: visible cords everywhere, an overcrowded surge protector, and a creeping sense that you’re working around the lighting instead of with it. Cables angle from power strips through open pathways, and walking across the floor now means navigating a maze of cords and unstable lamp placements.

    Each added lamp brings its own problems. Bump a chair and the lamp shifts, casting an instant shadow where you just cleared one. Glare spots shift to new surfaces—never quite aligning with where your eyes or hands need help most. And that “dark spot”—often the same workspace or reading corner you aimed to fix—never fully goes away, proving that you can multiply lights but still miss the actual solution.

    Why Effective Wall Lighting Changes the Routine

    Wall-mounted fixtures address the recurring mismatch: a space that looks finished but never feels resolved. Instead of endless plug-ins, a well-placed wall light pushes targeted brightness straight to the chronic dim zones, without adding clutter or giving up floor space. The difference isn’t theoretical—it’s obvious the first week you actually live with the change.

    Take a family room where only the ceiling light is fixed. The space looks clean until regular life kicks in: homework on a side desk, evening reading against the wall, or game night at a deep table edge. Shadows return to every surface you care about, and you end up back at square one, dragging a lamp around and unplugging cords just to open a cabinet or shift a chair. The whole lighting “plan” becomes nightly maintenance. Install a wall light above desk height and angled toward the seating or table edge, and the routine flips: the reading chair stays lit, the workstation edge is clear, the path is open—all without the cable sprawl or rearrangement ritual. Now the fixture supports how you actually use the room, not just how it looked at move-in.

    Placement and Setup: Details That Decide Everyday Comfort

    The real gain isn’t from more light, but from smarter light—delivered by placement. The sweet spot: mount a wall fixture above eye level, below the ceiling, so the beam stretches across both your task surfaces and adjacent seating without flooding the space. High placement misses the desk and drops shadows; low placement throws glare back at seated eyes. Mistakes show up fast: place a fixture too close to the corner and one half of the shelf or wall glows while the other is back in the dark. The right wall light is all about coverage that matches routine use, not just architectural lines.

    Supporting Elements: Keeping the Setup Reliable and Clean

    Support details decide whether your lighting becomes invisible—or a daily distraction. Flimsy brackets and loose wall mounts don’t only look precarious; they wobble after a week of accidental bumps, pulling the wire further into view and breaking the sense of stability. Cable runs left to dangle turn even well-placed lighting into a visual tripwire—especially in shared spaces or high-traffic zones. Tidy, solid support and controlled cable routes are what keep the actual space working: you move freely, adjust furniture, and the light never becomes part of the room’s daily struggle.

    Real World: Before and After the Move to Wall Lighting

    On the surface, ceiling plus wall lighting seems like a minor adjustment. But swap out scattered plug-in lamps for a focused, supported wall fixture, and the daily differences stack up. Reading in the old shadow corner stops coming with a head-throbbing squint. The desk’s edge—once a routine guess in low light—is now visible at a glance, making work, crafts, or night reading feel possible instead of patched. The cables you used to shuffle, dodge, or re-tape against the floor slip out of sight or disappear entirely. Both the floor and your line of focus feel less interrupted—more space to use, less clutter to manage or explain.

    Most telling: when the setup slips, you catch it immediately. Cables in the open, new shadows at the workspace, bracket shake—the setup’s daily feel goes off before things even look wrong. These are signals: move the fixture, change the bracket, rethink the cable path. Wall lighting lets you tailor the room to fit you—so lingering mess is a warning sign, not something you have to just accept.

    Tips From Repeated Use: What Makes the Difference

    • Test light placement with real routines, not just by standing back. Sit, work, and read where you actually need brightness—notice where shadows land and glare begins, before putting holes in the wall.
    • Prioritize cable control from day one. Even the best fixture makes the space harder to use if the cord slips out, sways loose, or bunches up near a desk or walkway.
    • Use sturdy, well-matched support for every wall fixture. In shared, busy, or family rooms, a weak mount becomes clutter fast—bracket shake, lamp tilt, or cable tug all show up quickly and start to undo the solution.

    Results That Hold Up—Not Just Look Good

    Real wall lighting isn’t about style or first-impression neatness. It’s about the routines becoming easier—the desk edge finally clear, the reading chair finally relaxing, the floor finally open for people and cables out of mind. When lighting is set up to support what you actually do—and hardware, cables, and coverage match that routine—focus shifts to the things that matter, not the setup getting in the way. If you’re still shifting lamps, fighting glare, or ducking cables, the space is asking for change—make the fixture serve you, not the other way around.

    For products and support that help you actually see and use your space better, visit LightSupport.

  • Why Choosing the Right Indoor Lighting Fixture Saves Time and Stress

    If you’ve ever knelt behind a washing machine to recover a vanished bolt or found yourself groping for a wire cap at the base of a cold stairwell, you know lighting installs aren’t just about style—they’re about real, persistent friction. The difference between flush mounts, semi-flush fixtures, and wall-mounted lights feels academic until you’re squinting at a ceiling in a tight hallway, watching small hardware skitter out of reach. A fixture can seem perfect on a product page, but once you’re kneeling on tile at 7 a.m. with a screw embedded beneath an appliance, the real implications show up: simple maintenance stalls, workarounds stack up, and the wrong choice keeps biting back.

    The Domino Effect of Lost Lighting Hardware

    In actual rooms—above laundry counters, jammed against mirror walls, tucked under cabinets, crowding narrow hallways—dropped screws don’t just disappear, they reroute your entire routine. The two-minute bulb swap stretches to thirty minutes as you hunt for a part that’s slipped behind a washer or vanished beneath baseboard. Suddenly, a routine fix turns into a mini project, with exposed wiring or loose covers left lingering until you can dig out the missing piece. The fallout isn’t just inconvenience: the fixture stays unfinished, a shadow spreads across a work surface, or a loose fitting turns into a safety uncertainty you notice too late.

    Routine Lighting Maintenance: The Real Test Zone

    The real test of lighting isn’t on install day—it’s every routine maintenance round after. Laundry rooms with damp air, vanity areas with awkward grip, or stairwells where a step-stool barely fits: these reveal how flush mounts can bury vital fasteners up against the ceiling or wall, out of direct sight and beyond easy reach. The practical moment is never glamorous: slippery hands, a poor angle, and gravity combine, and now you’re reaching blind for a screw that matters more than it seems. Once the cap is gone—wedged under a cabinet or lost behind the machine—you rethink “simple” lighting. With flush mounts, this isn’t a one-off: every cleaning, every bulb change, the setup keeps refueling the same hassle.

    Looks Versus Real-Life Use

    Side by side, flush and semi-flush fixtures can look nearly identical—but the use difference is impossible to ignore after a few cycles of real work. Flush mounts give a seamless, low-profile look that works right up to the ceiling but hide their hardware, forcing every twist of the cover into a guessing game. In a crowded vanity or above a laundry run, there’s nowhere for fingers, nowhere for dropped parts except into trouble. Semi-flush and panel designs, by contrast, add just enough clearance for hands and tools—giving you line of sight to each connection, space for a controlled grip, and a much lower risk of runaway screws. On day one, this is invisible; on day one-hundred, it’s the gap between quick swaps and repeat crawling.

    A Laundry Room Scene: When a Small Drop Snowballs

    Picture a damp laundry room, heat rising from the dryer, and you’re wedged into the space between counter and wall. You need to change the LED above the far edge. The flush mount’s cap, slippery with condensation, flips from your hand—bounces once—and vanishes behind the machine. Productivity stops. That little part halts your day, now demanding a flashlight, a coat hanger, or a contorted tilt of a heavy appliance. In bathrooms, a single wayward wire cap behind the vanity can leave the mirror light dead for days. Stairwells make it risky—one fallen nut skips steps and turns recovery into a safety hazard, with poor lighting compounding the danger.

    Breaking the Lost-Part Cycle: A Field-Tested Tweak

    After enough lost parts, one adjustment cuts the repeat drama: put a thick towel or folded mat on the floor or countertop right under the fixture before any work starts. This turns hardware escapes from a chase to a catch—no fastener rolls out of sight, no part bounces straight to the void behind machines. In laundry rooms, simply folding a towel to meet the fixture edge keeps everything within view. In tight halls or bathrooms, a defined catch zone snaps the chaos back under control, letting you finish the fix and move on, not just start another search session.

    Real-World Tip: Prep the Maintenance Area

    Always set your own work boundaries—no matter how quick the job feels. Tile, grout, and trim eat dropped hardware alive. A towel or piece of cardboard on the floor is a small setup for a major payback: you get parts back instantly, kill the creep of delay, and reclaim lost minutes every time gravity strikes.

    Why Fixture Type Repeats the Story

    Flush mounts naturally choke access. Each cover removal holds a hidden dare: will a screw or bracket fall somewhere only a full-room upend can reach? Over time, frustration sets in—not because lighting isn’t bright, but because simple upkeep keeps getting sabotaged. Needed cleanings and quick swaps get postponed; dust collects, shadows spread, and the light that looks right overhead feels increasingly wrong in day-to-day use.

    Semi-flush and panel fixtures—looser-fitting, with just an extra inch of drop—unclench the process from the start. That space is not cosmetic—it translates to steadier hands, fewer hardware fumbles, and easier lineup of cover and socket every time. In rooms where space is already tight—under cabinets, by stair railings, facing narrow corridors—that difference multiplies. It’s the quiet detail that keeps daily routines smooth instead of sabotaged.

    The Bigger Picture: Lighting That Actually Supports Your Routine

    It’s tempting to treat ceiling and wall fixtures as one-time set-and-forget—until they start breaking momentum at every routine pass. Good lighting isn’t only about lumens or finish: it’s about a fixture handling your routine without spitting parts behind appliances or forcing contortions for a bulb swap. In entryways, corridors, over worktops and mirrors, the wrong fixture keeps generating friction you don’t need. When setup syncs with how you actually move and work—hands steady, hardware visible, maintenance fluid—the whole space gets easier, not just brighter.

    Everyday Proof: Lighting Frictions that Add Up

    If you catch yourself pausing an extra beat at stair turns, leaning in to banish mirror shadow, or dodging bright glare that never seems aimed right, odds are the fixture type is fighting your routine. Pretty silhouette means little if the shadow keeps creeping on your countertop, or you need to fix, prod, or improvise every few weeks. The right fixture reduces these interruptions—making your space feel grippable, visible, and reliably usable, not a series of stops and workarounds.

    Reducing Routine Hassle, One Small Fix at a Time

    The real cost of poor lighting isn’t aesthetic—it’s the wasted time, the forced reroutes, and the sense that your home resists you instead of backing you up. Trade flush-mount friction for semi-flush ease, lay down your catch mat, and treat lighting as part of your working rhythm. Small tweaks accumulate. Over weeks and months, this adds up to less crawling, less squinting, less lost motion—rooms that run with you, not against you. When maintenance becomes routine again, not a setback, even the smallest fixtures change how every corner actually works.

    Find ceiling and wall lighting that supports your real routines—not just your style—at LightHelper.

  • Why Movable Monitor Arms Transform Late-Night Workflows and Desk Comfort

    The real test of a desk setup isn’t how tidy it looks at 9am—it’s how well it holds up to late-night edits, sudden task changes, and the reset chaos after every work session. You start with a fixed monitor riser, everything squared away, cables tucked out of sight. It seems controlled. But when that “clean” setup meets reality—late reports, side-by-side notebooks, video calls that spill past sunset—the neat structure turns on you. Suddenly, you’re stretching for a pen behind your monitor, awkwardly twisting for a charger just out of reach, or digging cables out from behind a riser that’s supposed to be invisible. The desk that looked perfect at a glance now slows you down with every extra minute at the screen. Instead of supporting your workflow, it pushes back, highlighting every shortcut you took for the sake of appearance. This is the point where aesthetics and actual function split—reminding you the real issue isn’t messy cables, but an inflexible setup that resists the work you actually do, not just the work you meant to do.

    When ‘Basic Order’ Starts Slowing You Down

    The reality: order on paper often collapses once the desk is in daily use. You find yourself nudging your task chair sideways to dodge the shadow from a poorly placed task lamp, piling books under your monitor for a last-minute angle shift, wrangling cable bundles that looked tamed for three days before spilling back across your keyboard. These are not personal failures—they’re signs the desk is too static for your routine. Each reach across a crowded surface, each off-center wrist flick to avoid a cable, each break in your posture for a task the setup can’t flex to fit—these are micro-interruptions that accumulate. None are dramatic, but over a week, they eat at your focus and patience, marking every transition with small, stubborn friction.

    If all you do is short, single-focus sessions, that stationary riser might seem fine. But stretch into multitasking: referencing notes alongside your keyboard, shifting position for a call, copying from paper to screen, or stacking devices for a multi-app workflow. The cracks in your workstation show up fast: blocked elbow clearance, no way to shift the screen to follow your posture, glare you can’t chase away, and cables that return to block your reach. What worked for a staged desk photo can start failing before Friday’s second reset.

    How Monitor Movement Maps to the Work You’re Actually Doing

    Movable monitor arms don’t just improve posture—they shift the entire desk experience from fighting the setup to focusing on the task. Need to haul the screen toward you to zoom in on detail? Slide it sideways to clear a space for sketching, or angle it to kill that afternoon window glare? With a good arm, these become half-second moves. The barrier between switching from keyboard to notebook or opening a device beside the display disappears; one-handed, you adapt the screen instantly—no fumbling, no awkward stack of books, no shoving a riser just to fit a charger or phone next to your mouse mat.

    In desk setups where every inch counts—especially in smaller workspaces or with crowded desktop organizers—you see the value immediately. Pushing the monitor out of the way reclaims instant writing room, and integrated cable routing means no hungry cords getting yanked or spilled across your hands. It’s not for show; it’s for not having to untangle the same cord, not getting snapped back by a half-stretched charger, not hunching your shoulders to avoid a monitor that won’t budge. What you really notice? When work starts running late or comes in waves, the desk finally feels like it’s matching pace with you.

    Desk Looks vs. Desk Performance: The Subtle Shift

    A desk can look clean and still block your workflow at every step. Lined-up risers and bundled cables photograph well. But across real cycles—device swaps, cleanups, and interrupted routines—the “system” breaks down. Cables slink back into view with every new connection. The monitor’s stuck at one height, forcing makeshift props the second your viewing angle sours. And when you actually need desk space—for notebook work, new projects, or even a stray breakfast plate—a fixed stand eats up room, refusing to budge as the work sprawls.

    Switch to a movable arm and suddenly the desk stops dictating the terms. You pull the display close for detailed markup, push it away to make space for lunch, or swing it aside to sweep free a buildup of paper scraps. End of day and you want a fast reset? No cross-armed shoving, no cable tugging, no slow choreography just to get a blank surface. The small cleanups recover their speed—and your work doesn’t have to detour around a rigid display.

    What Actually Changed When I Made the Switch

    Swapping an unyielding riser for a movable monitor arm didn’t make the desk perfect—just quietly easier, over every reset, without drama. No more improvising with stacks of sketchpads to fix an angle. No more twisting sideways to combine keyboard and drawing pad. Fewer cable snags, even with back-and-forth moves when the session ran long. The real difference crept in: less pause and fuss between tasks, less time lost untangling, fewer obstacles pushing me off track when the desk should have faded into the background.

    It didn’t erase friction altogether. Some days, clutter still piled up. But when I returned in the morning, the cables hadn’t wormed into my working zone. The monitor was right where I left it. Resetting meant straightening my work, not wrestling hardware or chasing cords. Over enough long evenings, that consistency meant fewer crisis cleanups and more time spent on actual work—not arbitrary desk negotiation. The interruption stopped being the fixture; it became the exception.

    What Signals It’s Time to Upgrade?

    • Reach-arounds keep happening. If you scoot your chair to get at a notebook because the monitor won’t budge, your setup is slowing you down.
    • DIY glare fixes are the norm. Still stacking books or using binder clips to force your screen’s tilt? Those workarounds signal your setup doesn’t flex when you need it.
    • Cable creep is chronic. When cables repeatedly invade your writing space or drag across your hands—no matter how often you tidy—the display structure is outmatched.
    • Persistent posture strain. If neck twinges or awkward lean stick with you after most sessions, the desk is dictating position, not following your natural shift.

    FAQ: The Real Desk Details

    Why choose a movable monitor arm over a simple riser?

    A movable arm adapts: screen height, angle, and distance shift along with your task and posture. If your setup demands frequent transitions—switching between notebook, keyboard, and multiple devices in limited space—the difference shows up in how little you stop to reconfigure and how rarely the setup holds you back.

    Does frequent adjustment cause cable wear?

    Not if cables run through the arm’s built-in channels. Integrated routing keeps cords secure and off the active work surface—no constant dragging or accidental pinching. Loose riser setups let cables spill into your working area or snag on the first quick screen move.

    What should trigger a switch from a fixed display?

    Notice the reset pattern: if you catch yourself repeating the same fixes for posture, cables, or monitor aim more than once per week—especially if the desk looks tidy but functions stubbornly—your display structure probably needs an upgrade.

    Final Workstation Reality Check

    What matters most isn’t a desk that looks empty, but a workspace that stays friction-free through resets, rotating tasks, and late-night returns. When friction builds, it rarely announces itself; it accumulates quietly each time you lose a second or break your flow to work around static gear. A movable monitor arm can quietly erase that buildup: faster access, calmer posture, clean resets. The real evidence isn’t in a snapshot, but in the background calm of a desk that doesn’t demand to be managed—no matter how unpredictable the next session gets.

    Explore the full WorkBasic collection

  • How Wall Lighting Completes Rooms Left Dim by Ceiling Fixtures

    Even with a modern ceiling light blazing overhead, a room’s edges can feel unfinished—especially where you work, read, or search for that missing item. Anyone relying on ceiling-only lighting in a mixed-use space—whether it’s a home office, shared dining zone, or a worktable—knows the irritation: side walls fall into gloom, desk edges get half-lit, shelves hide detail in shadow. Instead of a single, clean solution, you end up with an endless routine—leaning forward to catch more light, moving books to less-dim spots, straining your eyes just to read a label. The frustration isn’t theory; it’s found in every corner you avoid, every shelf you squint to scan, and every time you notice more hardware or tangles than clear visibility. The gap between a “finished look” and actual daily ease is wider than most upgrades admit—and it shows up fast in the real world of indoor lighting and lighting supports.

    The Problem That Sneaks Up: Dim Edges and Persistent Shadows

    Ceiling-only lighting keeps the architectural lines clear, but the weakness shows when you’re in the room, not watching from a doorway. Sit at a table: under the fixture, brilliant. At the edge—where your notebook or dinner plate actually sits—it’s shadowed, and your own arm blocks crucial light. Reach for a book on a high shelf and its spine is nearly invisible; items blur into the wood grain. Shelves, corners, and sidewalls quietly resist your routines. Each added user casts more overlapping shadows, making shared zones feel crowded and awkward even when the room looks organized.

    What’s really at stake is contrast: neat ceiling above, unresolved edges everywhere else. Even seemingly small frustrations, like a desk lamp cord snaking above the baseboard, or brackets clashing with nearby outlets, jump out—because the light itself never fully claims the space. The result: a layout that looks tidy from the center but fights every purposeful use along the periphery.

    Ceiling Fixtures: Clean Look, Real-World Limits

    The appeal of a flush-mount or panel fixture is clear. No clutter, smooth ceiling lines, and nothing obstructing the room’s design flow—that’s the promise. But after just a few days, weak zones start demanding attention. The workstation’s far edge sits in soft dimness, forcing you to drag your chair or stack notebooks in the scarce brightness near center. Side walls swallow up details and swallow your patience. The ceiling plan appears resolved from a distance, but puts real friction in the path of daily use—forcing workarounds, odd angles, or regular re-positioning just to see clearly.

    It isn’t that the room looks incomplete. It’s that every small task—writing, sorting, cleaning, or just finding an object—runs into the same hidden barrier: light focused on open air, not where hands and eyes actually work. Repeated adjustments—leaning over the desk, twisting a screen, tugging a lamp—signal a solution that’s architectural, not practical.

    Wall Lighting: The Practical Fix for Unused Zones

    Ceiling fixtures rarely conquer vertical surfaces, room edges, or shelves built flush to the wall. Wall-mounted lights and directed task fixtures hit these blind spots precisely where ceiling lighting fails—casting light across the surfaces and margins where daily routines live and break down. The effect jumps out in compact multipurpose rooms: a wall bracket above a sink, a light tucked behind a narrow bookcase, an LED strip running under a floating shelf. Suddenly, the “unseen” zones flip from murky obstacle to usable, visible asset. Now, every routine—reading, meal prep, organizing—flows with fewer pauses, fewer makeshift solutions, and no constant urge to re-light the scene.

    Small Example, Big Difference

    Installing a slim bracket fixture above the midpoint of a shelf changed everything. The real win? Not just brighter space, but a bracket tucked nearly flush to the wall, hardware fading into its surroundings, and a cable routed behind the shelf—gone from view even at a glance. No more guessing which spot would stay dim. Now, every item stands out, whether it’s an evening reset or a rushed search for a charger. Shared meals, reading, or end-of-day clearing all happen without dragging a lamp closer, shifting piles to the light, or tripping on rogue cords. The shelf’s edge went from always overlooked to automatically useful, with the hardware itself vanishing into routine.

    Lighting Support Done Wrong: New Friction Appears Fast

    But not every fix works. Mount a wall light too high and you swap one blind spot for another; too low, and glare hits you in the face instead of the task zone. Select brackets that clash or run cables carelessly and the setup starts shouting for attention—the bracket, not the light, becomes the lasting distraction. Plug-in lamps or stick-on puck lights promise instant results, but quickly slide, dangle, or cast moving shadows as you keep tweaking their position. Each fix passes the “neat install” test for a moment but falls apart when daily use exposes persistent shadows, uneven coverage, or the slow creep of visible hardware. Clean mounting matters, but how that support fades from notice under repeated movement is what actually keeps friction away.

    The Long-Term Payoff: Everyday Use That Just Works

    The true payoff of blending ceiling and wall or shelf lighting isn’t stylistic—it’s structural. Eliminate barely-lit desk edges and evening work sessions go from workaround to habit; hide cables behind the bracket and surfaces pop clear of distraction. When wall lights and low-profile brackets are installed with real use in mind, the invisible payoff is a room you barely have to think about: you stop dragging lamps, stop losing storage to “shadow zones,” and stop trading tidiness for shaky utility. The right supports disappear in plain sight—no re-adjustments, no excuses, just surfaces and shelves ready for whatever the day stacks on them.

    It’s always tempting to declare victory at installation, but a week later, those rushed choices show up—glare lines where you work, misplaced outlets, wobbly clamps. Lighting supports that match the real flow of movement and storage erase that low-level resistance. The absence of annoyance, not the appearance of polish, is what finally feels like a finished space.

    Practical Tips: Getting the Setup Right From the Start

    Lead with real uses: Place fixtures where hands, eyes, and traffic genuinely go. A wall lamp sitting directly above the table’s working edge, a slim fixture hugging tight to the underside of a shelf, or an LED panel hidden just out of sight—these stop discomfort before it starts. Each choice should face its actual routine, not an idealized layout from a distance.

    Control cable paths before they control the view: Power cables routed behind surfaces, cord covers color-matched to the wall or furniture line, and restraint on visible outlets make the difference between light as a presence and light as a distraction.

    Test, live, then adjust: Don’t trust a “finished” install until you’ve used the space across a week. Watch where shadows recur, which angles force odd movements, and how brackets hit in daily motion. Sometimes moving a fixture or bracketing in a few centimeters solves a shadow or eliminates a recurring cable snag permanently.

    Where Lighting Support Really Pays Off

    The change is visible right at the margins: That once-dim shelf clearly displays every item. You work across the entire desk without nudging closer to the ceiling light. Dining zones pile on dual roles—eating, working, reading—no longer fighting for the brightest seat. Hardware and support pieces blend quietly out of sight, and lighting stops being a puzzle to solve every evening. The goal isn’t showroom perfection—it’s living without the friction that broken setups create, even in a room that otherwise looks “done.”

    When you match fixtures, supports, and cable management to how you actually use every square meter, the line between what looks right and what lives right finally disappears. It’s the simple, lasting difference that well-chosen lighting support can make—out of sight, but shaping every routine.

    http://www.lightsupport.myshopify.com

  • Transform Your Workspace with Balanced Ambient and Task Lighting

    The right ceiling light can make a room look finished in a single flip of the switch—but after a few workdays, the cracks start to show. That new flush mount floods your space with light, but by day three, you catch yourself sliding your laptop an inch to the left, shifting paperwork back to center, or squinting to dodge a stripe of glare across your monitor. The room seems bright, but clarity disappears at the desk edge; shadows under shelves don’t budge; and the mirror still leaves half your face in the dark. This is the real gap between “illuminated” and actually “usable,” and it doesn’t reveal itself until you repeat the same routine—and run into the same friction—over and over. In the world of indoor lighting, an apparent fix often hides the stubborn limitations of the wrong fixture choice.

    When Overhead Lighting Leaves You Guessing

    Step into most workspaces and they look ready: ceiling fixtures spread brightness wall to wall. But within hours, you’re back in the loop of small annoyances. Flush-mount and basic ceiling lights promise coverage, but leave precision behind. Glare lines show up where you need screen focus. You reach for a pen at the desk edge and it’s faded into a patch of shadow. Even with all lights on, certain zones—corners, shelves, cabinet edges—resist clarity. Every minor annoyance adds up: pulling a receipt into the center just to read it, adjusting your chair to catch a stray angle, or twisting the monitor to escape a hot spot. It’s not darkness, just a slow, steady drip of inexact lighting that keeps routines off-balance.

    This is the cost of lighting designed for brightness, not for real task behavior. As the workweek drags on, interruptions mount: squinting, shifting, pausing to get the setup “just right,” only to find the same weak spot tomorrow.

    Ceiling Fixtures: Coverage Without Control

    Flush mounts, semi-flush fixtures, and broad panels succeed at blanketing a room in ambient light. But they’re wide, not targeted. Shadow lines stubbornly track under cabinets and along shelves. Sinks, counters, and desk perimeters absorb just enough darkness to make you move items mid-task. In kitchen zones, you discover the counter never glows evenly—you chop vegetables under a broad central glare, but every edge is tinged with shadow. Home offices and utility rooms tell a similar story: each surface with a different height splits the light, leaving half-visible paperwork or dim tool drawers. The sense of “almost there” lighting never fully lands, and muscle memory starts compensating for poor visibility before you even notice you’re adjusting.

    The Cost of Repetition: Routine Frustration

    Poor lighting rarely sabotages a space all at once. It erodes comfort through repeated, avoidable distractions. You drag paperwork away from a murky desk edge for the tenth time. The washing machine controls are shadowed every evening, so you fumble with settings you knew by heart. In hallways, ceiling light pools above while your feet feel their way through a corridor that seems to darken just where you cross between rooms. Not one of these moments stops the day cold, but over a week, they stack up as constant, unnecessary friction. Maybe the room “looked” done after the last fixture went up, but by Friday, you’re leaning in closer just to finish ordinary tasks—proving the wrong fixture isn’t subtle; it’s quietly exhausting.

    How Directional Lighting Changes the Routine

    Aim a light the right way and the room’s habits change. Add a wall sconce, under-cabinet light, or an angled task fixture. Place it where hands cross paperwork, beneath a cabinet, or beside a bathroom mirror. Shadows disappear from working edges. Glare on screens fades out as light comes from the right direction, not just the ceiling. Clear visibility stretches to the corners, not just the desk middle. Instantly, you notice:

    • No more losing pens, receipts, or tools to the gloom at the edge.
    • Left and right sides of the surface match the middle in clarity.
    • Mistakes caused by missed details or hidden objects drop off—routine actions run smoother because nothing is buried in shadow.

    The routine shifts. You stop nudging items into a sweet spot. Corners hold up under close work. Bathroom grooming no longer means angling toward the window or leaning over the sink to avoid half-lit cheeks. It isn’t dramatic; it’s just one less thing breaking your flow, all because light finally matches the way you use the room.

    Scene to Scene: Real-World Lighting Friction

    Stair Turns That Keep You Pausing

    Standard ceiling fixtures brighten the stairwell air, not the actual treads. Every turn, your foot hesitates. You half-step, scanning for that next tread because the edges are left in a dim valley. Install a wall sconce low enough to target the steps, and suddenly, every riser is outlined—safe, clear, no hesitation.

    Mirrors and Shadow Faces

    Overhead lights create a mirrored split: one cheek lit, one in dull half-shadow. Shaving, applying makeup, or checking a spot—all interrupted by the same shadow arc, day after day. Vertical wall lights flanking the mirror erase this imbalance, replacing harsh contrast with soft, even visibility where it actually matters.

    Under-Cabinet Shadows: The Counter That Never Glows

    Countertops disappear beneath upper cabinets, no matter what’s overhead. Chopping or scrubbing under that overhang means hands cast hard shadows. Loading laundry at night? You miss buttons. Snap in a slim under-cabinet fixture and the edge glows evenly—no more guessing, shifting, or chasing the light left to right.

    Key Moves for Everyday Clarity

    Add targeted lighting where repeated routines stall. Use ceiling fixtures for ambient coverage; support them with wall sconces, vanity lights, or under-cabinet LEDs to attack the trouble spots: glare, persistent shadows, and half-lit surfaces. Run a quick test: hold a paper flat across your main work area and watch for shadow lines. Wherever detail fades, reposition your task light until no corner is lost. This isn’t a quest for more brightness—it’s a push for usable clarity, achieved by fixing the frustrating zones ceiling light can’t touch. Adjust beams and directions to dodge screen reflection and mirror glare; shift the location early so you spend zero time reworking finished routines later.

    Why Fixture Type Matters Over Time

    As days and weeks stack up, the wrong fixture leaves a fingerprint: tense shoulders, more shifting, and a creeping sense that the space fights back. The difference between a “lit” room and a clear, task-ready one is visible and felt, day after day. Pair ambient with directional lighting and that friction falls away—you move without seeking light, and every corner operates at the same level as the obvious center. When you notice fewer interruptions and no longer work around your lighting, that’s when the room is finally working for you—not just lit, but ready for whatever comes next.

    For clearer work areas, better hallway routes, and mirrors that show what you actually need to see, see more practical lighting options at LightHelper.

  • How Cable Management Transforms Floating Monitor Arm Efficiency

    The floating monitor arm promises a desk that looks clean—screen lifted, surface emptied, fewer visual blocks. But fast-forward one workweek, and the minimal setup only solves half the real problem. The open area beneath the monitor becomes a catch-all: loose charger cables roam back, notepads drift, and the simple act of resetting after a quick break turns from a one-step move into a messy series of nudges and untangles. Neat in theory, friction-filled in repeated practice. If your main surface still attracts migrating devices and tangled lines, a monitor arm swap alone won’t deliver the workflow reset you expected—and every “clean desk” photo starts hiding a quieter, more persistent hassle underneath.

    Desk clarity—why the “clean look” isn’t the whole story

    At first glance, lifting your monitor makes the desk feel wider, clearer, more inviting. There’s open space, better lighting, and nothing blocking your keyboard. But the gap beneath the monitor doesn’t stay empty. Within days, your phone cradle inches closer to the display cables, charging blocks dangle just within reach but never get tucked away, and power adapters collect near the desk’s back edge. It’s the same desk, just with new clutter patterns. What looked streamlined resets to clutter with every cycle—each quick coffee break, every meeting break, every time you need to reach for something mid-task.

    The repeated friction isn’t dramatic—it’s the small, constant interruptions: reaching under the monitor for a notebook, clearing a charger out of mouse-cable range, shifting a pen off a trailing cable. Each move chips away at the “instant reset” the visual upgrade promised.

    Subtle chaos—where resets start to stall

    Resets should be automatic—sit down, shift the mouse, dive back in. Instead, stray cables slide across the working zone, folders wedge under the monitor, and you find yourself pausing for tiny rescues. On a busy day: sharing your screen means swinging the monitor, only to bump a repositioned notebook or catch the wire of a device left in the way. A chair pulled in after lunch nudges an abandoned mug into mouse space. Even grabbing a pen can mean brushing against a power cable you thought was finally managed.

    What starts as a clear runway gets congested between every call or focus switch. The surface might look organized, but resets slow as the desk repopulates with tools and chargers that have no fixed location—and every delay repeats, eating focus and momentum.

    What becomes obvious after real use cycles

    It’s easy to mistake more desk space for better workflow, but repeated use reveals the gap: so-called “free space” becomes resting ground for whatever doesn’t have a designated zone. Now that the monitor arm has freed the main area, cables and devices reclaim it, no longer pinned or forced out of reach. The effect worsens during heavy-use—tight deadlines, device rotations, or marathon calls—when every second counts and every micro-interruption adds up. The desk stays outwardly tidy, but work speed stutters as you push past predictably misplaced odds and ends again and again.

    Anchored solutions—how a single tweak can change the reset

    The turning point comes when every cable and daily tool finally gets an assigned route or home—off the main surface. A cable tray fitted below the back right edge corrals all power and display lines; nothing hangs into your reach, nothing drags at your hand during resets. Slack is managed, not loose, and immediate tugs and snags disappear. Suddenly, post-meeting resets become quick: slide a pen, shift a notebook, and your workspace returns—no slow drag from collecting cables, no hunting for chargers, no cleaning up the same mess for the third time today.

    Recognizing when your reset needs an upgrade

    Small slowdowns repeat until you no longer notice them—unless you watch for these telltale signs of structure decay:

    • Cable drift across the desk—Cords and wires that keep returning to your main work zone mean resets are always interrupted.
    • Recurring tool creep—If the same accessories migrate to your writing or mouse-moving space, your workflow structure is leaking.
    • Floating notebooks and pads—Papers that have no fixed spot get swept away and regathered, slowing each transition.

    Floating monitor arms aren’t the solution by themselves

    Raising a monitor improves how your desk looks, but not how it functions—unless you back it with disciplined anchoring for everything else. True improvement comes from combining a monitor arm with cable trays, under-desk organizers, clip sleeves, or small drawers that convert “empty space” into reliable stations for everyday gear. When every cable is routed, every repeated-use item knows its place, resets shift from cleanup back to immediate use.

    The floating arm is only the beginning. Structure is what finishes the reset.

    Quick workstation checks—fast signals for desk friction

    • Do you need to move the same device or cable out of the way—every single time you sit down?
    • Are cables, chargers, or adapters drifting back across your working zone after every round of “tidying”?
    • Does your desk look open, but feel just as slow to reset as when it was cluttered?

    If “yes,” visual reorganization isn’t enough—structural tweaks like cable management trays, under-desk organizers, or anchored tool holders make a difference you’ll actually feel every work cycle.

    Why repeated use changes which features matter most

    First impressions flatter, but it’s the week-after test that reveals what fails. Ergonomics and clean lines only matter if resets are truly faster, distractions reduced, transitions smoother. If every “declutter” still requires shifting something out of your way, the desk is just dressed up, not genuinely improved. Over time, small hardware—like an under-desk tray, a cable box bracketed out of leg space, or a drawer that doesn’t block your reach—trumps any surface tidiness for real daily efficiency. The real investment is in the move you never have to repeat.

    The difference between a desk that works and a desk that just looks organized comes down to this: Can you jump back in without thinking about what needs to be shifted, untangled, or found? If not, it’s time to rethink the underlying structure—and commit to changes that make every reset easier, not just prettier.

    Explore the full WorkBasic collection