Blog

  • Choosing Between Wire and Solid Shelving for Bedroom Closets That Last

    Step into a freshly installed closet, and everything looks under control—at least for now. Shirts stack into crisp rows, socks and tees fold neatly into place, and whether it’s wire or solid shelving, everything feels visible and simple. But the first week of real use—actual laundry cycles, rushed outfit changes, the half-awake scramble for “just one more sock”—reveals which setup holds its promise. The small, daily inconveniences that sneak in after that initial sense of order are what really decide whether the closet works for you or against you.

    How Tiny Storage Frustrations Multiply

    In those first days, it’s almost impossible to spot the difference. Both wire and solid shelves stand empty of clutter. But the habits that follow—tugging out last-minute undershirts, grabbing a favorite top from the middle of a stack, stuffing pajamas away when you’re late—all push your shelving system beyond its showroom calm.

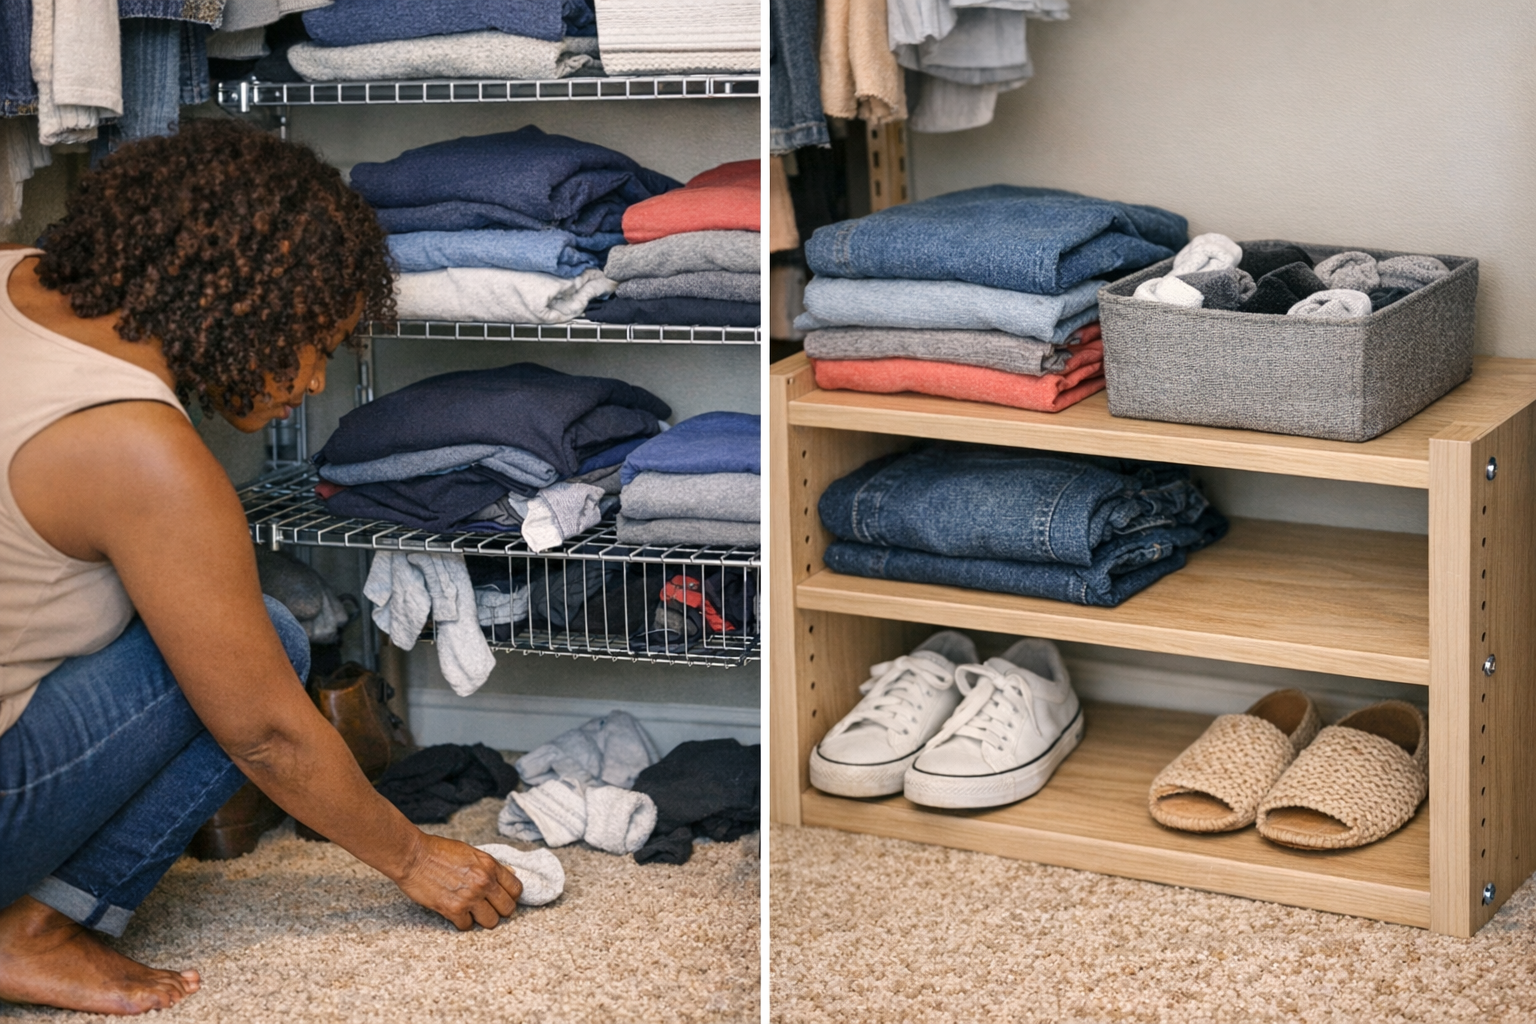
    With wire shelving, these pressures show fast. Socks nudge through the grid, sliding halfway out of sight. T-shirts, especially the soft ones, settle between the wires and make the whole pile slope and sag. The closet still looks organized at a glance, but the process is messier: reaching for one shirt topples the next, while a single sock slips through to hide beneath the lowest shelf. You end up crawling on the floor almost daily—not for a deep clean, but just to recover whatever fell overnight.

    Solid Shelves: Fewer Gaps, But New Trade-Offs

    Switch to solid shelving, and those gaps disappear. Everything from jeans to gym shorts stacks flatter, and grabbing a piece from any part of the pile doesn’t collapse what’s left. Socks and smaller items can’t disappear through the shelf, and you’re spared the routine of fishing fallen clothes out from awkward corners.

    But nobody gets a free ride. Solid shelves collect dust and lint, especially under stacks that barely move week to week. Resetting is less about tracking down wayward clothes, and more about wiping down surfaces—still a minor friction, but one that quietly accumulates if you’re a “fold and forget” type. Yet for most, this is a fair trade: it means the shelf stays reliable, even when you’re rushing through yet another Monday morning reset.

    Where Closet Routines Really Slip

    The test isn’t how organized your closet looks after a deep clean—it’s what happens as life gets busy. By the end of each week, even “perfect” stacks start to slide. Favorite shirts migrate to the front and the rest get buried. In a rush, you pull an item from the bottom—now every fold above slides out of place. On wire shelves, the problem is amplified: thinner socks vanish beneath the grid until you’re left with single strays and half-stacks, and that tidy line you reset on Sunday is scrappy by Friday.

    The cycle repeats every time you dig for something specific: a workout top at the back, a pair of thick socks for winter, a T-shirt buried under sweatshirts. Each grab risks another cascade, another stray, another moment spent putting things back rather than getting dressed.

    Real Scene: Socks and the Extraction Drama

    Picture the speed round before work: you reach for socks stored on wire shelving, and the last pair clings to the grid. As you pull, the pile shifts, a sock falls, and now you’re on the floor again, scanning under the shelf, grasping for what dropped. What should have been a two-second reach becomes a three-step rescue. If your mornings already feel rushed, this minor hassle quietly chips away at your patience.

    Now imagine the swap: On a solid shelf, you reach, lift, and nothing escapes. The rest remain steady, and you’re out the door in half the time. Over a week—the cumulative effect is obvious. If multiple people use the closet or if mornings are a blur, those seconds compound into real time reclaimed, less fluster, fewer rogue socks to puzzle over at night.

    A Simple Fix for Everyday Friction

    Some improvements take minutes to install but save hours over months. Dropping a shallow basket or bin onto a wire shelf instantly stops small items from slipping out of sight. Now socks, underwear, and delicate shirts drop into a defined space, not onto the floor. Your shelves stay visually organized, but the routine—grab and go, pile stays settled—finally matches your real-life habits. Instead of constantly resetting, you reset once, and the system quietly holds.

    Quick tip: If solid shelves aren’t an option, a set of affordable liners or stacking bins can transform wire shelving. Piles stop collapsing, small things stop escaping, and your daily reset becomes quick and predictable instead of a recurring obstacle course.

    Does Your Storage System Actually Work for You?

    Wire and solid shelving aren’t just different materials—each shapes your daily rhythm. The right setup isn’t the one that “looks” perfect on install day. It’s the one that makes your space resilient to repeated grabs, quick reshuffles, and last-minute wardrobe changes—without piling up silent annoyances.

    If you catch yourself constantly tidying, fishing for dropped items, or wondering why the space looks organized but acts like chaos, it’s a sign something needs to shift. Sometimes it’s a matter of swapping shelf types, other times it’s simply adding the right basket or liner. The real payoff: smoother mornings, less disruption, and more time doing anything but reorganizing. One small change can pull your closet back into alignment with the way you actually live.

    Explore the full ClosetWorks collection

  • How Frequent Flyers Organize Carry-Ons for Seamless Airport Movement

    Every carry-on looks neat until you actually start moving through the airport. You pack your bag so everything has a place—passport zipped in, charger packed, headphones stowed. It appears under control while you’re standing still. But the real sorting test hits at the security checkpoint, in a boarding crowd, or squeezed into an airplane row. That’s when once-tidy pouches get in your way, quick access turns into a hidden search, and your smooth start collapses into delays. The difference between “organized” and “operational” isn’t visible on your hotel bed; it’s felt the third time you reach for the same essential and find it buried again. The layout that survives isn’t the prettiest—it’s the one that moves at airport speed.

    When “Organized” Isn’t Enough: Carry-On Friction in Real Use

    Most travel friction isn’t obvious clutter—it’s a bag designed to look sorted, yet bogging you down as you actually move. A sanitizing wipe slides over your boarding pass. A charger pouch swallows your passport. Headphones tangle, cables twist, and suddenly you’re two steps behind at the checkpoint, fumbling fast while the line advances. Friction isn’t about fitting more; it’s about stalling out when pressure hits. If your setup makes you unzip the same pocket twice or re-stack pouches to grab a document, you’re already losing time—and building up quiet frustration.

    Movement Changes Everything: The True Test of Carry-On Setup

    Carry-on layouts that look impressive “at rest” often fall apart in motion. The flattest packing and most layered organizer become liabilities the moment you need to grab a laptop at security, or reach for earphones in a cramped seat. What began as a 10-second retrieval becomes a tray-top mini-chaos: wrong pouch first, charger detour, cable drop, unplanned repack while elbows are tight and the line waits. Even a neatly zipped pouch system turns into a repeated repack ritual if every item’s stacked behind something else. Perfection fades when routines repeat.

    Real-Life Moment: The Layered Organizer Letdown

    You set up a mesh organizer with labeled sleeves, tight closures, and elastic bands. It looks dialed in. But on the plane, reaching for a simple e-reader drags out spare cables, lens cloth, and “just-in-case” meds—now scattered on your tray table. Before coffee service, you’re hurrying to restore order. This choreography was never visible in the packing photo, but in flight, it costs you time and adds one more task to a cramped routine.

    Speed and Separation: What Frequent Flyers Do Differently

    Seasoned travelers aren’t obsessed with “max packing.” They pay attention to vertical external pockets and real item separation for essentials—passport, sanitizer, boarding pass—each with its own upright home. No more burying travel docs under pouches or wedging headphones at the bottom. The upside becomes clear during real choke points: lined up for boarding, standing at security, or moving fast as overhead bins fill. A single-motion reach replaces the old slow stack-and-search, especially where travel flow punishes hesitation.

    Not Just for Show: How Pocket Placement Plays Out

    Directly moving documents and cables into a vertical front pocket shaves time every time. You reach forward, not down and behind. Boarding passes stop slipping into pouch gaps. Each movement returns the same way: up front, one reach, one return, no detour behind zipped tech pouches or hidden sanitizer. The pattern turns a potential traffic jam into a barely-noticed step, even in a rush. The structure edits the chaos out of your route.

    Hidden Slowdowns: When “Tidy” Masks Travel Trouble

    The trap is real: “Tidy” rarely equals “ready.” Your carry-on looks calm before you leave, but friction shows up at every forced pause. Overstuffed mesh sleeves make every grab harder. Deep, catch-all pouches force you to dig past tangled extras. When travel picks up, each retrieval means shifting or dropping something that shouldn’t have been touched in the first place. There’s no time buffer when a crowd surges at the gate or your seatmate blocks quick access. Each wasted second feels heavier the more often you repeat the cycle—and by your return leg, minor delays have multiplied into low-level travel fatigue.

    A packed-tight organizer, praised in theory for “order,” now means extra layers to unpack and reassemble. Even if you don’t lose items, you keep repeating the same delayed motion until the return trip feels like a chore. True travel readiness means friction drops and essentials move with you, not against you, at the pace of the journey, not just the packing plan.

    Real Carry-On Problems: Scene by Scene

    Document Roulette in Security Lines

    The first pause is small—passport wedged behind a sanitizer. By the third pause, tension is up: sorting through repeat layers mid-queue, unlocking a pocket with one hand while the line compresses behind. With documents always up front—separated, vertical—you flow right through. Miss that, and each retrieval becomes a replay of the last trip’s error, burning seconds when movement matters most.

    Tray Transfer and the “Wrong Pouch First” Routine

    That critical “tray transfer” moment—pulling out a laptop or tech—shows how wrong pocket order costs time. You reach for one pouch, get the wrong item, land in a half-unpacked shuffle, repack, and then repeat with something left on the plastic tray. Crowded security? That’s when you realize your sorting system relies on stillness, not speed. Every missed grab means running behind as trays stack up and staff nudge you forward.

    Seat Entry and Overhead Bin Hurdles

    Inside a packed aisle, tight layouts break. You need headphones or meds from the lower pocket, but layers are compressed. Now you’re balancing your bag in cramped space, opening wide just to pull one thing, and struggling to repack cleanly before a row fills or the overhead closes. Functional setups keep essentials accessible even during narrow entries or awkward repacking—reducing the repeated hassle that a “perfect” packing job introduces in motion.

    The Repeated-Use Difference: Small Choices, Big Impact

    What actually makes a carry-on functional? Not elaborate mesh or tightest fit, but structure that stands up to motion and pressure. A high-utility setup comes from:

    • External vertical pockets—for one-move handoffs, especially at trays and gates
    • Sharp separation of comfort and document items—so you never trigger accidental repacking
    • Consistent pocket logic—same move each time builds real travel rhythm

    With every trip, the contrast sharpens: a well-designed carry-on shrinks your reset time whenever bags open and close under stress. “Looks organized” is useless if it extends the same interruptions from check-in to boarding, over and over. The setups that survive are the ones that don’t force repeated “fixes”—just one movement, every cycle, every line, every seat change.

    Does Tighter Packing Always Help?

    Real use proves it: compression is often the enemy. The more tightly you squeeze things, the worse your access—layers slide, items stick, and chargers hide behind repacked pouches. By the last leg of your trip, the cost of digging out one cable or finding snacks has added up. Static neatness hides weaknesses that only travel exposes.

    Travel That Moves with You

    Every carry-on setup looks good when undisturbed. The real dividing line is how it handles repeated access, movement, and crowd pressure. Upright pockets, clear separation, and predictable retrieval flow aren’t about aesthetic—they cut down distraction, reset, and hand friction across every checkpoint, aisle swing, and repack. You don’t need magical order. You need travel that interrupts you less. The next time you pack, ask: where does wasted motion actually appear, and which setup will survive five real retrievals—not just the first one?

    Ready to reset your carry-on for real-world ease? Visit CarryOnSupply for practical travel tools designed for movement, not just order.

  • Why Photographing Wires Before Disconnecting Prevents Lighting Issues

    Swap out a ceiling or wall light in a hallway, stairway, laundry, or bathroom—and small mistakes follow you for weeks. One wire in the wrong place, no photo backup, and the room looks finished but works wrong: a stair switch that does nothing halfway up, hallway zones stuck lit or dark, a mirror that glares in the wrong direction. The light is on, but the routine stumbles.

    Small Wiring Misses = Ongoing Lighting Friction

    Lighting feels simple on the surface—flush mount in the laundry, semi-flush in the hall, a vanity bar over the mirror. But under the ceiling plate, wire positions blur together fast. Skip the photo, trust your own memory, and what seemed routine ends up with the hallway switch triggering a distant glow, or the laundry counter trapped in shadow at dusk. You flick one switch, the wrong end lights up, and everyday movement is a little more awkward. It doesn’t scream to be fixed, but it sticks around.

    A missed wiring detail isn’t just a nuisance on install day. It weaves into every repeated use: missed steps at a stair landing, a well-lit room that still pulls your eyes away from the real work, or the daily glare from a mirror sidelit instead of evenly balanced. The lighting isn’t broken—but it calls for another mental note, another workaround, every single time.

    Where Lighting Mismatches Hurt Most

    Stairways: Switches That Drop You Into Darkness

    Think of a stair landing wired for a two-way switch. It works for one trip, then night falls, and carrying laundry up, you flip the bottom switch—nothing happens above. The top switch lost its control, the landing stays half-lit, and every climb feels off-balance. For stairs, coordination matters more than raw brightness. That gap shows up most clearly when your hands are full, and you hesitate mid-step, feet feeling for an edge you can’t see.

    Corridors and Laundry: Partial Illumination That Breaks Flow

    Install a flush ceiling light in a hallway or laundry zone and, at first, everything looks covered. But routines expose the cracks: you pivot at the washer, hunting for the dryer’s edge in harsh shadow, or cross the hall and find one wall fading into a gloom the switch can’t reach. A miswired or misremembered setup doesn’t block use, but it adds friction—forcing a head tilt, a shuffle, or a narrowed field every time you pass through.

    Bathrooms: Glare, Shadows, and Disrupted Routine

    Bathroom lighting exposes wiring slips brutally. One swapped wire, and the vanity strip throws glare to the left, shadow to the right—or vice versa. Shaving, makeup, face washing: nothing is truly visible, and the mirror becomes a guessing game. The room glows but fails on clarity, turning small routines into small frustrations you can’t unsee once you’ve felt the difference.

    One Sharp Photo—The Fastest Insurance Against Repeat Error

    Before loosening any screws, take a clear photo of how your current fixture is wired. Most ceiling and wall setups have three or more wires crossing tight box spaces—white neutrals tucked behind black travelers, grounds twisted and wedged, sometimes extra wires from old renovations. Later, when dust falls in your eyes and a wire slips loose, that single photo turns chaos into easy order. Your future self gets one glance and knows exactly what goes where.

    The payoff is not dramatic at first. But after days of normal use, the difference stands out: both stair switches control the landing every time, laundry lights the countertop—not the ceiling, mirrors stay evenly lit instead of flaring or shadowing, and hallway trips don’t need workarounds. The lighting setup disappears into the background, supporting every routine without breaking flow.

    Reduced Guesswork, Reliable Movement—Lighting You Stop Thinking About

    The win is quiet but constant: fewer wiring errors mean fewer daily interruptions. Stairs feel safer, hallways support movement, bathrooms keep faces visible, and the laundry fades into the background where it should. Old patterns—flipping the “wrong” switch, dodging a shadow, tilting for clearer light—fade away. The room is just usable, every time, with no extra thought.

    Pro-Tip: Make the Pre-Disassembly Photo Your Habit

    Ten seconds now prevents weeks of reworking, testing, or living with awkward zones and mismatched switches. Whether swapping a flush mount in the laundry, putting up new vanity sconces, or adjusting corridor lighting, that photo beats every mental plan. The habit is simple, but it protects every routine in your lighting zone from avoidable disruption.

    For flush ceiling lights, wall lights, vanities, utility room fixtures, and more practical lighting solutions: LightHelper

  • Why Open Storage Beats Moisture Absorbers in Entryway Design

    Closed shoe benches and sealed cabinets look clean—until the first slush, rain, or muddy boots hit. The real test for entryway storage isn’t how it hides mess at a glance, but how it handles moisture, overflow, and the daily repeat of feet and bags coming through. If you’ve ever popped open a bench after a wet week and caught the smell of trapped damp, or found shoes sticking instead of drying, you’ve seen how quickly the wrong setup turns “organized” into high-maintenance. A neat facade collapses fast under real entryway pressure—when one drop zone becomes the bottleneck between outside, inside, and whatever mud or motion just arrived. In most homes, it’s not the weather that wins; it’s the routine that exposes every hidden flaw in storage design.

    When “Contained” Spaces Quietly Collect More Than Clutter

    Closed benches and cabinets promise order—until daily use proves otherwise. After just a couple of rainy afternoons, open the lid: shoes are soft and musty, gloves still damp, and the inside smells worse than the sidewalk. The moment you shut moisture in, you break the reset routine. For households with even moderate traffic—think two quick arrivals before dinner—the so-called tidy storage becomes a slow-moving trap for sweat, rain, and forgotten gear. Items pressed together stay wet, not just unseen.

    Miss a day? The pile grows. Now it’s not just one soggy pair—bags, jackets, umbrellas, and gym kits stack up, and air barely circulates. Lids and doors might hide the buildup, but inside, dampness turns into a backlog. Instead of staging the next morning’s launch, the storage becomes a graveyard until someone digs it out, wipes it down, and starts over.

    The Real Signs of Storage Struggling on a Normal Day

    These problems don’t just show up in storms—they creep in through everyday routines:

    • The shoe line mushrooms sideways: After one muddy drop, the neat row pushes outward; clutter that used to be invisible starts spilling into walkways.
    • Bags don’t make it in, they land near: The so-called bench becomes a parking lot—what was supposed to “contain” overflow now collects it on top and around, shrinking usable space each day.
    • One return blocks the zone: Slide in an umbrella or backpack and you’ll find yourself reshuffling three other things, blocking the path for anyone following. The passage narrows every run.
    • Reset times balloon: Even after a quick wipe or grab, things feel damp or carry a stale odor. It may look passable, but every entry feels slower and less ready for real use.

    Moisture Hides Easily—But So Does Routine Friction

    It’s easy to miss how quickly friction builds. A typical weekday: early risers stash wet coats and boots in a cubby; a couple more arrivals stuff in backpacks and extra shoes. By the evening, the storage is sealed and full, looking orderly from the outside but inside, everything is damp, clammy, and starting to smell. The next day, you reach for “dry” shoes—still cold and wet. Crowded setups trap humidity, so instead of drying between cycles, the whole entryway accumulates a low-level stickiness that never fully resets. The threshold, instead of flowing, starts to jam.

    The harder you work to make things look neat, the slower it feels. Moisture absorbers max out. Clutter slides out as you add one new drop. The entryway swings from clear to bottleneck overnight—and the room’s “reset” only completes when someone does a hands-on rescue, pulling soggy gear out for emergency drying or a hard reset that interrupts the whole routine.

    Why Airflow Is the Quiet Hero in Everyday Entry Zones

    Airflow is the real difference-maker—not just for order, but for fast recovery. Storage that lets air circulate—slatted benches, open racks, vented cubbies—doesn’t just look different: it keeps shoes from stewing and gear from going stale. This matters even more in tight entryways, narrow apartment halls, or shared transitions where every inch faces repeated pressure. With the right structure, gear dries in hours—not days—and overflow can’t hide or build up off your radar.

    Reset moves from chore to routine. Drop wet boots on a slatted bench: by dinnertime, they’re dry underneath and ready by morning. If more gear crowds in, you see it right away—no surprises, no invisible backlogs. Reset isn’t just an occasional rescue; it’s a quick, visible scan as you walk through, making clutter management automatic instead of reactive.

    A Practical Example: Slatted vs. Sealed Bench

    Swapping a solid-lid bench for one with airflow slots changed everything. No more damp stink or surprise sticky patches pooling inside. Shoes and gear actually finished drying before the next use—especially after busy weekends. It meant no last-minute rescue operations, no mental inventory checks, and one less threshold stall with arms full of bags and umbrellas. The difference wasn’t just cleaner air—it was less mental drag and faster flow.

    Common Solutions and Where They Fall Short

    Moisture absorbers: They work for the occasional puddle but fail during routines with regular wet gear or multiple people. One rainy week, and you’re back to swapping out packs or ignoring the silent mold risk. They keep up only when real movement doesn’t.

    Sealed bins/cabinets: Great for hiding piles, lousy for handling water. They slow you down, trap damp, and demand full resets more often. Over time, they make the whole entryway feel like it’s stuck—clean on the surface, but behind schedule underneath.

    Tips for Reliable Entryway Flow

    • Choose storage that breathes: Look for slatted or open racks, wall cubbies with gaps, or benches that dry as they hold. Every shoe and bag should touch air, not just each other.
    • Let mess and backup show: With open fronts or ends, you spot crowding the moment it starts—reset is a single motion, not a periodic deep clean.
    • Keep reset intervals short: In busy seasons, empty overflow daily or every other day. Quick turnaround beats slow air-out and keeps odors down.
    • Go vertical when crowded: Wall-mount solutions and vertical cubbies preserve floor space and keep the airflow route open instead of blocking the threshold.

    How Better Structure Changes Everyday Movement

    The entryway isn’t just a spot to stash and forget. The real standard is how easily you cross it on a messy day—shoes dry, bags accessible, nothing slowing the route from door to next room. Closed setups hide mess, open and vented ones keep action moving. The difference appears the twentieth time you run through, not just the first. Does your threshold reset, or does it stall out?

    If your storage system leaves things looking “ok” but never truly ready, it’s time to move beyond the contained-and-clogged stage. Airflow and order work together to turn that tight entryway from a slow-motion disaster zone into a daily flow point. For more ways to make your entryway or threshold zone genuinely easier to use every day, see Betweenry.

  • Why Using One Cat Brush Simplifies Grooming and Reduces Mess

    Every indoor cat owner sooner or later runs into the same snag: grooming setups that look organized, but break down during real, repeated use. The friction shows up faster than expected—a calm session on the mat turns tense when you need to swap brushes, and suddenly your cat ducks out, leaving half their coat unfinished and loose fur drifting across the floor. What seemed like a controlled routine quickly becomes a round of chasing down missed fur, searching for the right tool, or trying to lure your cat back after a fumbled reset. If this keeps happening in your space, the weak point probably isn’t cleaning skill or laziness—it’s that the setup doesn’t stand up to the everyday shifts, mess, and interruptions that indoor life brings. StillWhisker exists for exactly this: the difference between setups that just look sorted, and setups that actually hold up after the third, tenth, or thirtieth real run-through.

    The Trap of Tidy Grooming Spaces That Don’t Hold Up

    A neat stack of brushes, a spotless mat, a matching grooming basket—these seem like signs of a fixed routine. For the first session or two, the illusion holds. But very quickly, friction leaks back in. The visual order breaks down the moment you need to change tools—especially for indoor cats who notice the smallest changes in scent, texture, or position.

    The moment you grab for a different brush, the system slips. Your cat, now alert, pauses or slips off. You’re left mid-session negotiating with a cat that remembers disruptions, and fur has already slipped off the mat and under a chair. “Organized” doesn’t mean “less hassle” if every real run-through reveals small resets, tool searches, or moves your cat reads as stress signals. Even tightly packed grooming corners crumble if the routine itself makes cat and owner start over every time.

    Why Tool-Switching Creates Grooming Friction—And More Mess

    Rotating brushes or swapping in “just washed” tools seems like variety, but for your cat, every switch is a disruption. Each new brush brings a strange texture, grip, or scent. Suddenly, what feels like “choice” for you adds “uncertainty” for them. Small shifts—an unexpected bristle, a missed scent—become reasons for your cat to hesitate, scoot back, or leave altogether.

    That’s when the trouble accumulates. Sessions get cut short. The mat’s clean edge no longer contains the fur, which turns up at the rug, under tables, or even scattered well outside the grooming corner. Instead of grooming being a single, contained flow, it splinters into searching: hunting for tools, coaxing your cat back, then trying to catch up on cleaning fur trails across the rest of your floor. These are the real costs hiding behind a tidy starter setup.

    One Familiar Tool: More Predictable Sessions, Less Post-Grooming Cleanup

    The move that actually makes routines hold up? Stick to a single, familiar grooming brush—same touch, same scent, always in reach. When there’s no switch mid-session, your cat settles faster and stays longer. The routine feels familiar; you get fewer darting exits, fewer episodes of scattered fur, and more sessions that end with an actually brushed cat, not just the easy half finished.

    The result is easier to see around the mat. Stick with the same tool, and stray hair barely leaves the boundary. Post-grooming, there’s no running under the couch with lint rollers or hunting for missed clumps at the far edge of the room. Cleanup resets to a single step—fold the mat, quick-wash the brush, move on—instead of ballooning into another thirty-minute side project. The right tool, kept reachable, keeps the mess trapped, and keeps the process background, rather than a recurring main event.

    Real-World Example: The Brush Goes Missing, the Routine Stalls

    It’s evening—you set out the usual mat, ready to brush, but the familiar tool’s gone. There’s two backups in the drawer, neither quite right. You grab the “close-enough” brush, but on the first stroke your cat stiffens and bails. Fur’s now loose on the mat, trailing into corners. You finally find the original brush, but your cat’s on guard, and you know you’ll have to coax them back later—if they even let you. The alternate tool slowed you down, scattered the mess, and made what looked like a simple reset into a drawn-out task you’ll feel again under bare feet tomorrow.

    “Organized” Stations Can Hide Repeated Reset Trouble

    Many cat owners take pride in a well-sorted grooming nook—brushes stacked by type, everything tidy in a basket, mat by the chair. But here’s where the friction creeps in: if you reach for an alternate tool just because it’s there, or the preferred brush winds up behind a pile of towels, the entire space becomes a stage for workarounds. Sessions drag when you spend more time searching for gear than brushing or keeping a wary cat from slipping away. The grooming area looks pristine at a glance, but fails when you try to move fast or keep the flow going for two sessions in a row.

    The lesson? Shelf order isn’t function. An area that “looks” fixed still leaves you chasing hair trails or scrambling for the proper brush. Less mess on the shelf can mean more trouble across the rest of your house.

    The Mat Boundary: Why Grooming Flow Has to Contain the Mess

    Even a perfectly-placed mat is nearly useless if fur routinely escapes the first few minutes in. A routine that constantly pauses or derails—whether from a tool swap or a shifting cat—guarantees stray hair will scatter where it’s hardest to clean up. Fur under the edge of the rug, around table legs, or in the spot you’re about to use next is usually a sign that consistency broke down, not just that your cat sheds more. Losing track of the tool or having to dig out a replacement mid-brush throws the predictable flow out the window—leaving you with unfinished fur, a cat that comes back slower, and a recurring cycle of “catch-up” cleaning to make up for small interruptions.

    Commit to one brush and one spot, and you’ll see more sessions where all the fur stays put, your cat actually returns willingly next time, and yesterday’s cleaning job isn’t undone by a fresh trail. The difference isn’t theory—you’ll spot it in how much less fur drifts out, and how much less you resent the reset after each session.

    Practical Observation: Cleanup Supplies Matter, But Routine Wins

    Stashing wipes or lint rollers nearby does help, but you’ll still find the main mess isn’t from missed cat spots—it’s from routine breakdowns that spill fur into the next room. If the flow stays tight, cleanup is a minor step. If it breaks even once—a missing tool, a switched brush, a lost rhythm—suddenly you’re chasing fur you never meant to let loose. The wipes feel too far away not because the supplies moved, but because the routine itself got interrupted.

    How Cats Read Scent, Texture, and Routine Faster Than You Do

    Indoor cats pick up on changes much faster than we do. Even a slightly different brush grip, a new washing scent, or a shifted grooming mat is enough for them to pause or pull back. The first sweep of a swapped-in tool brings hesitation—and that means more exit attempts, more partial grooming, and more fur carried off into shared living space. Noticing this pattern means less time wondering why it keeps happening, more time stopping the cycle at its actual source.

    Shifting the grooming area only adds to the uncertainty. What feels like a convenient move to you can reset your cat’s comfort level to zero. The breakdown spreads—first to the session, then to your living space as fur turns up in new places every time.

    Keeping the Structure Predictable: One Brush, One Spot, Quick Reset

    The grooming setups that last are almost always the most boring: single brush, same place, same reset routine. It isn’t fashionable, but it’s the one pattern that cats and owners both settle into. The reliable tool stays visible, freshly cleaned, and always within arm’s reach—ready to use before your cat rethinks their plan. When you put effort into consistency instead of variety, you get fewer interruptions, more finished coats, and dramatically less post-session mess.

    After each use, a quick wash clears the brush, and you’re immediately set for the next time. The background work shrinks back to a footnote instead of a full reset. Instead of chasing yesterday’s fur, you move straight to actual care.

    When Setup Looks Fixed But Still Interrupts Your Day

    It’s easy to end up with a setup that appears resolved—a brush always laid out, a mat aligned near a corner—but still drags at the margins. Maybe the brush is “accessible” but half-tucked under a chair leg, so you hesitate to grab it before work. Maybe the mat needs to be shaken out in the hallway, adding steps you didn’t count on. The obstacle isn’t always obvious; it’s the two-second delay, the hidden tool, or the reset that spirals when one piece isn’t predictable—or immediately reachable—at the moment you need it.

    The real fix comes from spotting and solving that specific weak point

  • Why Your Shelves Fail Under Pressure and How to Fix Them

    The first day always feels like a win. Shelves stand proud, bins line up, and the floor finally shows daylight. But by Wednesday, you start seeing the cracks: that sturdy shelf you trusted has a subtle lean, the rolling cart has migrated—again—into your walking path, and the wall rack’s perfectly ordered screwdrivers are wedged oddly as overflow gathers. Look closer and the clean install already feels less like an upgrade and more like a daily negotiation.

    First Impressions Fade—Routine Always Wins

    Any new setup can look organized on day one. It’s what happens on day eight, and day twenty, that matters. Think about the real flow: grabbing a sander mid-project, returning a heavy toolbox after a full afternoon, coiling hoses or cords back onto hooks. If your system resists sagging, wobbling, or collecting piles, you glide through each step. But when a shelf flexes as you return a drill, or you must nudge a cart sideways for the third time that week, you’re feeling the very first signs your setup is falling behind your actual use—and slowing you down without you even realizing it.

    These aren’t just minor annoyances. Over time, every awkward reach, every stutter step around a misplaced bin, is friction against your routine. A setup that looked flawless quickly becomes something you have to manage and work around, rather than one that quietly supports your workflow behind the scenes.

    The Real Test: Looks Organized vs. Works Organized

    Walk into almost any newly arranged workspace and the differences are invisible. Rows are even, levels match. But what you don’t see at a glance is how each system will hold up after dozens of cycles of use. Will those wall shelves stay rigid when loaded—and reloaded—with power tools? Does the utility cart return to a neutral spot, or does it creep until you’re boxed in every night? Does “a place for everything” mean quick access three weeks later, or do you start stacking things wherever they fit just to keep the surface clear?

    A shelf that’s anchored and supported not only looks right—it feels stable no matter what you return to it, no matter how often. You set down a heavy bin and nothing budges. But if the shelf gives even a little, you’ll unconsciously shift items to safer ground, doubling up on a more stable section and leaving the flexing edge to sag further. Over time, those little adjustments break the logic of your original zones—things migrate, corners become dumping grounds, and resets take twice as long because nothing fits back where it began.

    Catching the Real Trouble Spots Early

    The slow creep toward clutter isn’t a dramatic event—it’s small, repeated moments that build up. You notice a single spot collected with tangled extension cords, or a corner bin filling with odds and ends that don’t fit anywhere else. Maybe you wedge the rolling cart in front of a cabinet “just for now,” until it becomes a fixture you work around all week.

    Each of these is a blinking signal. When you stretch to reach a tool blocked by something that never finds a true home, or you find yourself shuffling items on a soft shelf so they don’t tip over again, your setup is fighting your routine instead of shaping it. The system isn’t failing with a bang—it’s leaking time and movement with every cycle.

    How Repeated Use Wears Down Weaknesses

    Fast forward to a busy weekend: you’re cycling between workbench tasks, swapping tools, and restocking parts on the fly. The first hour with a new system feels seamless—everything is where you want it. But as the workload builds, weak spots show themselves. A shelf sags on the end and suddenly drills and tool cases are left in a teetering pile; you hesitate to return them as intended. Instead of resetting by habit, you’re stuck improvising—a little more with each round, until you’re spending as much time managing storage as working on projects.

    That’s the gap between “looks tidy” and “stays functional.” Sometimes, the fix is simple: reinforce a shelf midpoint, re-anchor a wall bracket, or split a zone that overflows too easily. Even a minor adjustment—when aimed at the exact spot that’s tripping you up—can restore the flow enough that resets go fast and the system supports you, not the other way around. The trick is to act before today’s small workaround becomes next month’s constant friction.

    Warning Signs Your Setup Isn’t Really Working

    Is your storage system lagging behind your routine? Watch for these telltale symptoms:

    • One cart or bin always seems in the way, and you’re shifting it every time just to get through.
    • A shelf edge flexes or feels spongey as soon as you put a heavy tool back, making you avoid it for the rest of the day (or week).
    • “Temporary” piles or overflow corners are quietly becoming permanent setup features.
    • Returning items at the end of the day turns into a puzzle—pieces no longer fit, zones blur, and you’re left restacking or settling for wherever there’s room.
    • The wall is covered, but you’re still left searching for real, reliable access—because surface order hides underlying chaos.

    The Reality Check: Pressure-Test Your Setup

    Don’t wait for routine to grind your layout into frustration. Pressure-test it now: load the heaviest things where they belong, shuffle items in and out just as you’d do on your busiest day, park carts where you naturally leave them. Does the whole system keep its shape—no sagging, no accidental bottlenecks, no “junk corners” starting to form? If not, make adjustments: add support, re-space shelves, clearly define each zone, so you reset by instinct, not struggle.

    This is the difference between a setup you live with—and one that actually works as hard as you do. The goal isn’t perfection; small fixes make a world of difference if they let you move, return, and retrieve without friction piling up. The less time you spend managing the setup, the more you get out of every work session.

    Turn Daily Annoyances Into Smoother Flow

    No layout is immune to a little friction, but the right adjustments can reclaim wasted steps. Well-anchored shelves stay reliable under stress. Carts that park out of flow keep pathways clear and returns easy. Distinct wall zones block overflow from bleeding into other areas. Setups that score high on easy reset—where quick, single-motion returns are the norm—don’t just look better. They feel better, every single cycle you go through.

    The real payoff isn’t measured in how neat things look after a big clean, but in how little you think about the storage on your busiest day. Fewer stalls. Smoother movement. Zones that hold. That’s a system performing for real life—a setup that finally matches how you actually use the space, not just how you pictured it the day you installed the shelves.

    http://stacknest.myshopify.com

  • Why Visible Car Essentials Improve Your Daily Driving Routine

    An organized car isn’t always a usable one—especially when you’re sprinting to the driver’s seat, arms weighed down, only to fight with a charger cable you can’t reach and a console that eats small essentials. The illusion breaks in actual use: running late, juggling groceries, or sweating through another school drop-off, your “clean” interior turns on you. A neat setup after a weekend reset somehow stalls your routine by Thursday, when tangled cords, drifting organizers, or blocked tray access add seconds and stress to what should be hands-free, one-move stops. This is where the difference between a DriveWellSupply-style setup built for repeat use, and a standard tidy-up, shows up in real life—when you most want your car to work for you, not against you.

    Why Car Organization So Often Lets You Down

    Too many car interiors start out crisp—with cables wrapped away, gear zipped out of sight, and every surface wiped down. But a logical layout at rest rarely survives the week. Real-life return: you swing into the driver’s seat after errands with a dying phone, only to find your charger coiled up behind the seat back or looped through that impossible-to-reach console wedge. What made sense in “reset” mode creates invisible struggle under everyday pressure.

    Clutter isn’t the real enemy—predictable friction is. The moment you hide high-use items in the name of neatness, your own setup starts sabotaging you. It shows up at the seat edge, under the dash, or anywhere you repeatedly stretch and fish during ordinary drives.

    The Difference Between Seeing and Guessing

    Day after day, the gap between looking organized and feeling in control is measured in lost seconds and fumbled movements—like:

    • Five-minute parking turns into three minutes spent rescuing a charging cable snagged under a sliding water bottle or buried in a deep pocket.
    • Low battery means digging through a zipped pouch or under receipts wedged by the seat lever—right when you least want to be distracted.
    • The seat-side tray looks intentional, but after two sharp turns, it’s migrated enough to make hand sanitizer a knuckle-bruising ordeal every time the light goes green.

    Every missed grab, bent wrist, or extra pause isn’t just annoying—it is structure failure in motion. Momentum collapses. What was supposed to streamline your drive does the opposite once the cycle repeats.

    Hidden Friction: Where Order Creates Its Own Problems

    Chasing “invisible” clutter by stashing everything behind closed bins or in deep zip pouches often does you no favors. Do you actually have clean, fast access to your must-haves, or has the urge for tidiness buried what you touch the most?

    Repeat use exposes where order backfires:

    • Charger cables routed discreetly under the mat, only to be trapped and pulled tight when a thermos rolls over them—now even a quick plug-in means both hands and a full bend.
    • Seat-edged organizers shift after a week of actual drives, so a simple tissue grab becomes a clumsy pat-down of the floor mat while traffic crawls.
    • Trunk bins corral loose bags, but now loading groceries means shoving containers aside—every “order” upgrade comes with a new mini obstacle.

    Visual calm in the parking lot often equals physical hassle the moment your routine speeds up—extra steps stacked up during rushed mornings, sudden storms, or mid-errand pit stops.

    Repeated Use: The Real Test of a Car Setup

    The real verdict on any car setup comes after a full cycle of busy use—never right after cleanup. “Looks great on Sunday” can become “works against me by Thursday” the instant you’re forced to re-do a motion you barely noticed on paper.

    Return-to-Car Routines: Where Setup Makes—or Breaks—Your Flow

    Trace out a typical dash-through sequence:

    1. Door pops open, arms full (bags, dog leash, kid’s backpack).
    2. Phone lands in your lap—charger should be within one smooth reach but is instead juggling for position with a sliding tote or lost under a floor mat fold.
    3. Keys, wipes, or sanitizer: either where you expect (waiting in a seat-side tray) or missing in action, orphaned in the glovebox after your “big organizing fix,” forcing a rethink mid-routine.

    Every extra hunt or awkward bend slices flow out of your day. A smart layout lets you skip steps, not add them. The wrong structure, no matter how neat it looks, turns pressure moments into fumble drills.

    Course Corrections: Small Tweaks That Actually Improve Use

    The fix isn’t looser rules—it’s accessible design. Replace a zipped-up pouch with an open pocket for wipes and suddenly cleanup happens in-the-moment, not “later when parked.” Anchor charger cables above the center console (not routed blindly under carpets) and repeat plug-ins go from juggling act to automatic. The true value shows after a week—nothing has to be reset, repositioned, or redone after normal mess. The best car setups aren’t the ones that look impressive—they’re the ones that don’t slow you down, even after the third round of stops in a single day.

    Real use exposes quiet failures: by midweek, cables slip under the seat, seat protectors shift, trunk dividers rattle aside, and your essentials start slipping away from “right at hand” to “where did I put that?” The visible clutter may be gone, but the function keeps misfiring where it matters—during real, repeated use.

    When Lesser Setups Quietly Fail

    The comfort of a “fixed” car fades fast when your week exposes the weak link. The charger skips loose, seat pockets sag, and even emergency tools or pet travel kits migrate from their “safe” spot to a low-friction, high-annoyance zone. A setup like this doesn’t just hide clutter—it dulls your routine, making quick actions just slow enough to skip or ignore.

    If you find yourself “waiting until home” to plug in, or ignoring a mess because it means interrupting your route to dig through over-packed organizers, your structure has quietly turned against you. Real convenience means gear that stands ready for daily use—not just a surface that looks sorted while parked.

    From Static Order to Real Flow: Designing for Repeated Success

    The goal isn’t a magazine-perfect car—it’s a setup that tracks your reality, one everyday loop after another. When the phone slides easily into a dock, the charger cable sits where your hand lands, cargo stays fixed in the trunk corner, and nothing blocks your grab for wipes, you feel the difference. The best organization quietly disappears: no contorted arms, no under-breath swearing, no “I’ll clean it up later” habit. Order should move with you, not make you work for it—especially during those pressure-point routines that test setups again and again.

    The best structure is the one you forget—because it never slows you down. If your car feels in sync with your habits, no matter how messy the week, that’s the order that actually counts. Practical flow always wins over neatness-for-show. It’s what makes the next drive less of a reset and more of a return to motion.

    Find practical solutions for smoother daily drives at DriveWellSupply.

  • Optimizing Linear and Panel Ceiling Lights for Functional Workspaces

    The wrong lighting setup looks solved until you actually use it—then every missed spot, exposed cable, and awkward glare becomes a daily obstacle. You notice it during late-night reading sessions, when one corner of the desk sits in shadow no matter how you adjust. You feel the friction in busy afternoons spent shifting your chair just to escape harsh glare, or every time you try to hide a cable that keeps creeping back into view. That flush ceiling light looked right in the install photo—until the real routines exposed the gaps: a dim workspace edge, a cable you can’t ignore, and a room that runs on constant small workarounds.

    Setups That Seem Fine—Until You Actually Use Them

    First impressions hide the daily compromise. A clean, low-profile panel or linear light disappears against the ceiling but reveals practical failure fast. Mount a bracket a bit off, leave a cable in the open, or center the fixture instead of lining it up with where people actually sit, and you’ll start seeing these problems almost immediately:

    • One side of the desk always trapped in shadow, forcing your laptop to the middle.
    • Direct glare on your monitor every afternoon, no matter how you angle the screen.
    • Cables trailing where your arm rests, impossible to route out of sight or mind.

    The tidy install wears thin by midweek. Extra lamps pile onto surfaces. USB cords stretch across shared areas just to reach the last spot that still needs light. People quietly claim the least uncomfortable seat, and each workaround is a signal the setup serves the photo more than the people using it.

    Why Panels and Linears Outperform Bulbs—But Only If Installed for Real Use

    Panels and linear ceiling lights are built to throw light wide and even, covering reading zones, desk surfaces, edge tables, and shared work areas where bulbs can’t reach. But their advantage depends completely on how they’re integrated with the space. A fixture “centered” to the room but out of line with the actual desktop leaves the far edge dim. A cable dropped thoughtlessly into your task zone becomes a snagging hazard—a minor flaw that grows more irritating with every use.

    Real Example: A Finished Desk That Interrupted Every Routine

    Picture a shared study area: new flush-mount panel, perfectly level, exactly in the architectural center. On day one, it looked done. On day two, anyone moving to the desk’s edge realized the reading light cut off—one third of the work surface in shadow. The desk middle was usable, the edges needed grab-and-go fixes: personal lamps, stick-on LED strips, extension cords routed awkwardly below. By the week’s end, the room looked finished in photos but forced users into a rotating strategy of switching accessories and shifting seats, trying to get basic visibility and avoid eyestrain. The supposed solution introduced daily frustration in a place meant for focus.

    The same supports got repositioned and replaced again and again. The drag—unpacking a lamp, moving a bracket, stretching another cable—was minor each time, but stacked up to an environment that always felt one move away from right.

    Cable Management: The Subtle Difference Between Calm and Clutter

    Exposed cables and ill-placed brackets do more than bother the eye—they get in the way. A linear fixture that should unlock the workspace is undermined by a cable that dangles into your armspace or snags behind your devices. Every visible wire or support bracket that interrupts a hand movement, catches a sleeve, or shifts with every minor adjustment is a reminder the installation stopped at looks, not use.

    Route a cable to hug the wall and it disappears from focus and from daily risk. Mount a bracket that follows the furniture, not just building symmetry, and you prevent mid-task interruptions that sap concentration hour after hour. When these details are missed, every extra cable or lamp appearing over time signals the “solution” was just a pose—never a real fit for the space’s pressure points.

    How an Aligned Bracket and Tucked Cable Changed the Scene

    One practical change: shifting a linear light so the lit edge matched the desk’s actual working edge, not the room’s geometric center. Upgrading to a bracket that directed the cable flush along the wall instantly cleaned the desk zone—no more bumping cords, snags, or visual tangle. Edges grew as usable as the middle. Side tasks and group sharing improved. The result wasn’t just visual order but fewer mid-task disruptions, less on-the-fly lamp rearranging, and a setup people finally stopped noticing—because it started doing its job.

    The True Cost of Overlooking the Details

    Minimalist fixtures still introduce daily friction if not properly aligned with repeated use. The space might “complete” a design checklist while leaving users juggling distractions every hour: stray cables, misplaced beams, or unstable support hardware. These minor faults cut into focus, project flow, and comfort.

    Real use exposes the gap between planning and practice. Mount a fixture only for ceiling balance or photographic symmetry, and daily routines pay for it: patching clarity with extra accessories, re-aiming or unplugging lights, living under chronic glare. The mistakes show up as lost clarity, ignored workspaces, and chronic, quiet frustration—all because the setup fit the plan, not the pattern of real activity.

    Tips That Hold Up in Real Spaces

    • Prioritize surface zones over ceiling lines: Mount lighting so it follows where people actually work—desk edges, table boundaries—not just the room’s geometric order.
    • Make brackets and wires disappear in use: Any cable or support visible or touchable during normal tasks will become a fixture of everyday distraction.

    Everyday Improvement vs. One-Time Visual Fix

    The real win from panel and linear lighting comes when every bracket, cable, and light line supports real routines—not just the initial look. Clean mounting is just the start. The difference appears when the setup fades out of attention: no distracting glint when you move, no constant cable shuffle, no need for stacked fixes or resigned seat changes. When you do notice stray wires, shifting sight lines, or persistent “workarounds,” those are cues that a setup detail misses actual life, not just the design goal.

    LightSupport focuses on making those details right—for setups that work not just on install day, but for every hour of real, repeated use. Visit LightSupport

  • How Simple Storage Habits Prevent Rust on Oscillating Power Tools

    Your multitool is supposed to make jobs faster, not add new headaches. Yet if you’ve ever grabbed yours after weeks in “dry” storage—maybe from the cold garage or the back of a crowded van—then struggled to slot in a blade or felt a stubborn hitch changing a sanding pad, you already know the secret enemy: hidden rust. It’s rarely blatant. First comes a slight drag fitting a new accessory, then a sticky clamp that should snap, now fighting back. Pretty soon, a project that should flow starts leaking minutes and draining your patience. Tool performance fades not in a dramatic breakdown but through tiny setbacks—less speed, sloppier cuts, more fatigue by the hour.

    Why “Dry Enough” Storage Fools You Every Time

    It’s easy to think a cool, dry shelf will shield your kit. But real workshops don’t stick to neat rules. Even bone-dry air lets condensation form on cold steel after a night’s temperature drop. And tool metal loves to hold moisture—maybe sweat from last session’s quick grip, maybe summer humidity that lingers for hours between tasks.

    The problem: you don’t see it until it matters. A paper-thin smear of corrosion on blade seats and clamps saps the “quick change” right out of your multitool. That extra force needed to seat a blade? It isn’t just nuisance—it translates directly to lost accuracy, awkward grip angles, and amplified hand fatigue every session. Sometimes, rust sets in less than a week if dust and sweat ride into storage. The tool looks fine but behaves all wrong when you need real control.

    A Few Extra Seconds Change Everything: Wipe and Oil

    The proof is easiest to spot in side-by-side use. Grab two multitools—one tossed onto the shelf after work, the other wiped and oiled before storage. The first time you swap a fine-tooth blade, the neglected tool seizes up, misaligns, or sends you searching for extra torque just to lock it in. The oiled tool feels instantly different—clamps close with a smooth snap, accessories drop into position, and you don’t burn energy wrestling tiny details on an already tight job.

    Picture trimming a door casing flush against tile: if your blade mount grabs, your line slips or the multitool stalls just as you reach the edge. Or switch to detail sanding for cabinetry: every extra gram of resistance magnifies your error and roughs up your finish. Rust quietly trades away the very precision the multitool was meant for, multiplying correction work later. It isn’t dramatic failure; it’s relentless, creeping friction that chips quality and extends your to-do list.

    Where It Really Hurts: Friction at Every Step

    Resistance isn’t just psychological; it’s measurable. A sticking quick-change slot can chew up bits and blades, untighten mounts mid-use, and push your grip into unsafe wrist contortions. Miss one oiling, and you’ll find every accessory change takes longer, every pad eats more grit, and every failed line means sanding out mistakes you could have avoided. That half-minute fighting a stuck part while a drill or multitool runs at your heels adds up; so does the fatigue from every rougher hand motion forced by hidden corrosion.

    Rust doesn’t limit itself to the showpiece tools, either. Drill chucks start to skip when mounting bits. Changing to a spade bit or countersink means jiggling through resistance instead of a snappy shift. Even adjusting clamping guides—anything with bare steel—becomes effort, especially under jobsite pressure where every second counts and a misaligned bit spells rework.

    Not Just Surface Trouble: How Moisture Lingers

    Sawdust, sweat, and stickiness are stealthy allies of rust. Woodchips from a humid cut, greasy fingerprints after a long install, dust packed into slot corners—every one traps moisture right where rust loves to start. Metal left bare, even after a quick cloth-off, gives corrosion a foothold before you notice a single brown fleck. By the time you feel resistance, blade tips may already be chipped, and accessory fit can drift just enough to force extra sanding or bad cuts, draining both accuracy and tempo.

    If you move between locations—garage, basement shop, jobsite trailer—those temperature swings and bursts of damp air set up fast. One overnight reset, and accessory slots can transform from smooth to sticky before you ever see it coming.

    The Three Second Habit: Quick Oiling, Lasting Results

    There’s no magic: just seconds of real prevention. After the usual dust-off, a light spray or dab of mineral oil on mounts and contact faces throws up a barrier, buying time against moisture. This isn’t fussy maintenance; it’s the difference between days of glide and days of grind. Across real shops, this step can drop the effort needed to seat attachments by half. Clamp force falls, swaps become easy, and by the next session, your multitool responds with the snap and surety you felt the first week you bought it.

    It’s invaluable on big tasks—a full sheet install, a series of switch changes—but the payoff multiplies on small, late-night fixes and awkward angles where lost control means another late return to the shop. A few seconds of oil is simply a form of time-saving insurance that stacks up over project after project.

    Keep It Doable: Oil Where It Counts, When It Counts

    Focus on high-contact parts, not just surfaces. Skip the urge to polish every inch; prioritize slots, clamps, blade seats, and active fasteners. Build it into your post-work rhythm: brush, wipe, a few drops of oil, then close up. If your workspace is prone to condensation—garage, crawlspace, van—treat every use as a potential risk and oil each time. Climatic control, bone-dry air, or a light session? Maybe weekly is enough, but never skip after a sweaty or high-speed job.

    When your tool “just feels off”—hesitation slotting a blade, shaky clamps, a hitch changing bits—a quick check for orange dust and a steel wool touch-up can buy back smooth performance. If you spot true pitting or ragged edges, call it time for replacement; that damage signals control you can’t recover mid-task.

    Break the Friction Cycle—Project by Project

    If smooth operation is fading, don’t just muscle through—look for rust. Slowdowns—wobbly blades, sticky clamps, pads that chew up scratch after scratch—almost always connect back to moisture and a skipped oil. Start cleaning and oiling and you’ll feel the reversal: effortless swaps, tight cuts, more stamina, and control that lasts the whole session.

    Fast-paced shops, cramped garages, corners overflowing with last week’s scraps—they all tempt you to just “store and forget.” But every fix-up later, every repeat job to correct a botched edge, starts with a few seconds neglected when putting the tool away. Oil isn’t about being precious; it’s straight-up practical, and it pays for itself in smoother cuts, faster battery swaps, and less fatigue on every task.

    http://gumboll.myshopify.com

  • How Containing Cable Slack Transforms Desk Cleaning and Workflow Efficiency

    Cable slack turns “quick cleanup” into a repeat struggle across almost any desk that sees real use. Drag a cloth across your work surface and you’ll find a cord catching the edge of the wipe, blocking what should be a single-pass clean. Move a notebook aside, and instead of clearing space, you watch it snap back as a charging cable drags it into the tangle again. This isn’t rare: in any tight workstation—shared home office, compact apartment desk, multi-device surface—loose cables aren’t clutter, but the main obstacle hiding behind every “organized” look. The friction creeps in everywhere: you delay cleaning, swipe crumbs and dust into cable knots instead of off the desk, and steadily lose patience with a space that always looks clear but never stays usable for long.

    How loose slack keeps coming back

    A desk that looks tidy at a glance nearly always breaks down in motion. Take a common setup: laptop docked front and center, a monitor arm perched above, multiple cables trailing out the back to chargers or an under-desk surge strip. Sitting still, it stays presentable. Open a drawer for a supply, scoot the chair in to work on paper, swap the tablet for a keyboard—and the mess reveals itself. Slack that isn’t pinned or routed properly sags, snags, or drapes itself into the main work zone with every new motion.

    The familiar pattern: you set out to clear a mug, but a cord loops around your wrist; you go for a sticky note, and the power brick lodged under the drawer bars your reach. These snags don’t announce themselves—they quietly slow every switch between tools, every reset after lunch, every cleaning attempt. Over time, friction compounds. Each new reset starts with untangling the same useless pile, and you end up working around the very cables meant to make your setup more flexible.

    Why surface tricks rarely hold up

    Elastic ties, velcro wraps, “just tuck it back” shortcuts—all give you a clean look until the work starts. As soon as you shift position, slide a drawer, or stretch for the far edge to jot a note, those fixes unravel. Cables slowly snake toward the active space, piling in front of accessory trays or bumping the keyboard out of line. Unless slack is routed and anchored, no photo-ready surface stays reliable in real use.

    The difference gets visible within hours. You may have vacuumed the main area, but one charge cable drifting back turns every routine wipe into a dance—lift, dodge, nudge, curse, repeat. It’s not just an issue of visual order. It’s the desk slowing you down, one pointless motion at a time.

    Real containment changes the routine

    The step from neat-looking to genuinely workable is simple: slack must be contained. Under-desk trays, clamp-on cable boxes, and fixed adhesive guides force cords to follow a predictable path—usually along the back edge, exiting in a single spot high enough that drawers and knees clear beneath. In real use, the gain is immediate: you sweep the whole surface clean in one pass, never stalling to unhook a surprise tangle. Plugging in an extra device is direct—no following a meandering cable under folders and pads. Small items—pens, folders, even your phone—stop being yanked around the surface by hidden loops. The difference after a week is obvious: you can switch from writing to typing, clean up after a meal, or rearrange three notebooks with nothing catching you by surprise.

    When surface order isn’t enough

    Desktop cord wraps and desk-edge containers offer a tempting shortcut. But the minute your day involves shifting posture, moving between tasks, or clearing room for paperwork, these don’t survive. A laptop opened wider uncoils a hidden cable; a quick monitor adjustment slides an entire nest of cords forward. Shortcuts unravel fast—leaving cords creeping back into the “clean” area and doubling your setup’s reset time.

    Stable setups require more: Mounting trays or boxes under the work surface, plus adding cable clips at targeted points (just below the rear opening, or where storage units interfere), takes minutes but kills hours of repeated hassle. Once slack is tamed away from the leg space, reset drag disappears—transforming every daily device swap or sweep into a quick, single-step move. The time cost is up front, not every hour you switch context.

    What changed after anchoring cable slack

    After years of half-measures—clips falling off, makeshift “tucks” that didn’t hold—locking every power and data line inside an under-desk tray made the rest of the setup finally work. Notebooks moved freely again. Cleaning didn’t mean pausing to unloop mystery cords. The tray ran across the back edge, and cables dropped out at one controlled exit just above knee height. The daily result: resets sped up, no drive lurched toward the floor if someone shifted a chair, and desk time stopped being measured in friction points. In a shared or multi-device space, this single change does more than any “organizer” on the surface ever could. Anchored cables make their own absence felt—which is the only reliable sign of a desk you can actually trust.

    Everyday questions about cable slack, answered

    Does containing cable slack really speed up cleaning?
    Absolutely—unanchored slack drags itself into active zones, so even a basic wipe becomes a snag-hunt. Use trays or boxes and cleanup is one motion, no detours, no negotiations.

    Cable box or under-desk tray: does it matter?
    Trays work better for frequent device swaps or where you need fast cord access. Closed boxes win where the setup stays constant all day. Both block slack from returning, but trays adapt faster if your gear changes week to week.

    Why do temporary wraps never last?
    Loose wraps or quick ties buy an hour or two—then cables riffle back onto the surface after real movement. No wrap stops dust pileup or random tangles that appear under normal desktop shifting. They’re useful only if you never touch your desk between photo ops.

    The real outcome: an easier desk to trust, every day

    Containing cable slack makes the real difference: less time untangling, less manual “workaround” just to clean or reach across, less hesitation to reset the space at the end of a cycle. With cables locked down, device swaps get smoother, cleaning actually stays one step, and the surface works at its fastest—not just its tidiest. The shift isn’t about perfection—it’s about finally working with a desk that stays usable, even when the day’s shuffle restarts tomorrow.

    Explore the full WorkBasic collection