Blog

  • How Purposeful Carry-On Organization Keeps Travel Moving Smoothly

    The weakest point in any carry-on setup isn’t mess—it’s the sudden interruption when you actually need something fast. The line lurches forward at airport security or a boarding gate, and the “organized” structure you praised at home turns sluggish: a document stuck behind a cable, a charger blocking your passport, headphones wedged too deep, a pouch that adds steps instead of reducing them. The drag isn’t visual clutter. It’s the real-world lag between reaching and retrieving—small, repeated, and costly when every second counts and lines don’t pause for you.

    The Illusion of Organization: When Tidy Packing Turns Against You

    At home, any system feels impressive. Pouches stack up in neat rows, cables are tied, and documents have their assigned spot. But at the checkpoint—elbows pressed, shoes in one hand, ID in the other—this planned order is tested and often fails. What looked like a “time-saving” setup turns into an awkward re-sorting scramble. A boarding pass hides behind adapters, a charging cable stops you from sliding your passport free, tech essentials blend into non-essentials. You end up rifling through organizers you meant to streamline, turning every retrieval into a two-step delay instead of a quick grab.

    This isn’t a cosmetic annoyance. It’s an ongoing slowdown, one that repeats at every checkpoint, every boarding call, every gate transfer. You misjudge which pouch holds which cable, open the wrong pocket for your pen, dig past snacks to find earphones, and quickly lose trust in your original packing logic. Travel flow stalls with every overlapping zone.

    Security, Boarding, and In-Transit: Where Structure Fails First

    Travel exposes friction early and relentlessly. At security, trays move out of reach before you finish sorting. A bag that looked “locked in” at home lets documents slip into unreachable zones, tech organizers tangle at the wrong moment, and visual tidiness means nothing when the scanner line is live. Order deteriorates not in catastrophe, but as a string of small retrievals—each leaving the layout less certain for the next use.

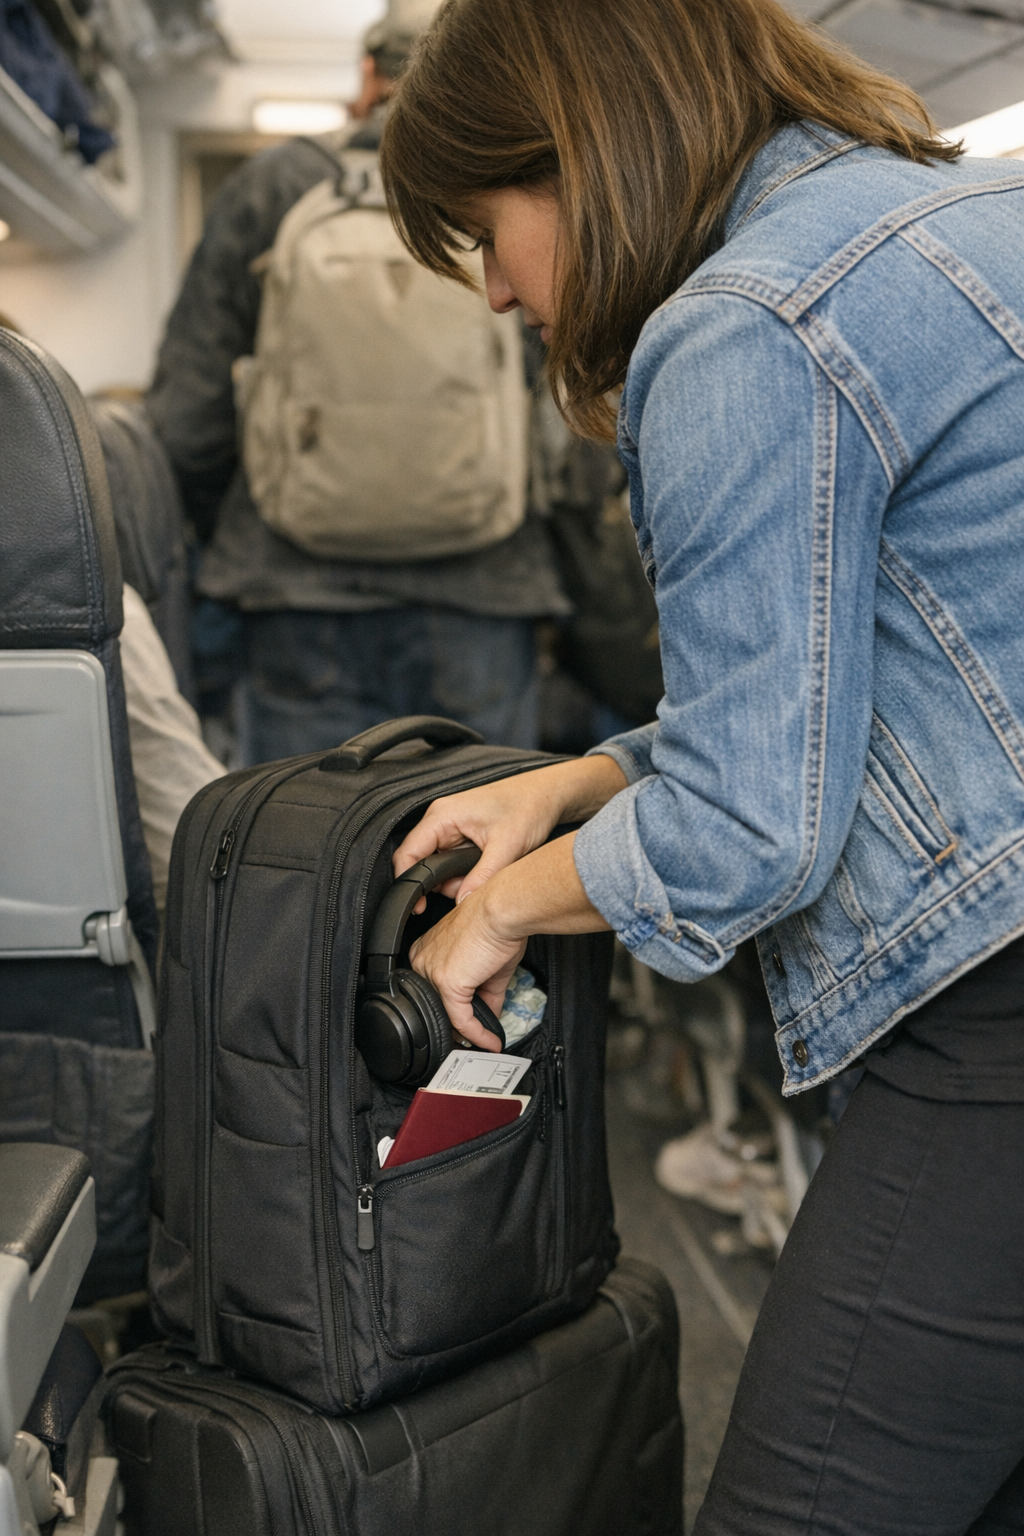
    Picture the ordinary breakdown: You dig for your boarding pass, realize the pouch doubled as a tech kit, and fumble as the line builds. The item comes free, but the neat grid you set up is scattered and in need of repacking—while space, time, and patience are running out just to move another step forward.

    Looking Packed Well vs. Moving Without Delay

    The sharpest contrast comes when a system that “looked” perfect—tightly packed, every slot filled—delivers friction instead of freedom when the conditions shift. Five color-coded pouches mean nothing if you still hesitate each time you need a passport. Tech sleeves built for desktop order resist quick access in a crowded aisle. Something as basic as a stuck zipper (because layers cross over the teeth) turns into a real delay. A “main essentials” pouch that requires a full unzip to reach a single pen loses you momentum.

    Routine frictions hit faster than you expect: Having to remove the bag halfway from an overhead bin just to get one necessary item. Unzipping three compartments to find a snack. Confirming and reconfirming which pouch hides your charging cable—each instance saps your sense of control and increases repacking time mid-journey.

    When One Zone Does Too Much: The Hidden Tangle

    The “everything together” convenience of a multipurpose pouch sinks under repeated use. Inside, cables and papers coil around each other, headphones knot with pens, and what felt efficient at home turns maze-like on the move. Each time you unzip, the structure degrades—more overlapping, more hunting and rearranging. By the time you reach your destination, the single “organization hub” holds chaos, not order, making every needed item harder and slower to grab.

    The Case for Single-Purpose Zones

    The real upgrade in movement comes from separation—not more layers, but more intention. One dedicated, unshared pocket—especially vertical, along the side or on the outer shell—turns a stressful retrieval into muscle memory. One zipper, one motion, always the same spot. Your hand finds documents or essentials instantly, even with the carry-on squeezed under a seat or wedged into an overhead. The fumble and re-sort are gone; essentials return to the right spot after each use rather than drifting deeper into the stack.

    How Packing Choices Echo at Every Travel Stage

    Speed isn’t just about a single retrieval, but echoing consequences at every phase. During arrival, at the gate, boarding, or seat drop, structure choices either strengthen or sabotage your flow. The wrong overlap forces you to pull out half your bag for a passport. Zippers overlap and confuse, so the act of “quick access” now means scanning every pull tab or label. Outside pockets promising fast reach often become too crowded, turning into a slower bottleneck than the main compartment ever was.

    Across a trip, what first felt “organized” gradually exposes its failure: Repacking after each checkpoint takes longer, not less. “Quick-grab” pockets are now slow to sort. The time lost in split seconds at every use adds up, quietly draining energy and mood as the journey unfolds.

    Practical Steps for More Reliable Carry-On Structure

    The fix isn’t more pouches or labels, but changing how zones work under stress:

    • Designate a pocket or slot for travel documents and comfort essentials only—never mingle them with cables or chargers.
    • Prioritize a direct-access pocket that stays easy to reach in an aisle or cramped seat (vertical or edge-side beats hidden interior).
    • Keep tech, snacks, and bulkier items isolated further inside so vital retrieval isn’t blocked by low-urgency gear or cluttered overlap.

    Every time you grab your boarding pass or passport without hunting, without shuffling, without even looking—these moments add up. Travel friction seeps out of the process, and you reclaim both time and focus every time pressure spikes and space tightens unexpectedly.

    Access Over Appearance: The Test of Real Travel

    Actual travel isn’t a photo—it pits your setup against urgency, tight space, and uneven flow. A visually tidy carry-on can backfire when jammed into an overhead or navigated with one hand while the line squeezes forward. Access is what counts, not just order. Every change—boarding, security, seat drop—proves how your setup holds up, or how it slows you down when every second is shared with strangers and moving trays.

    The bag you actually trust isn’t the prettiest or most color-matched, but the one you can open, grab, and close, over and over, without a second thought. No backtracking, no “wait, which pocket?” hesitation, no last-second juggling. When retrieval becomes automatic, stress drops, lines move, and your trip feels lighter. That’s the difference between a setup that quietly accelerates your trip and one that quietly sabotages it, one unpredictable pocket at a time.

    Visit CarryOnSupply for practical tools that help your carry-on keep pace with real travel.

  • Recognizing and Resolving Subtle Tensions in Daily Dog Walks

    If you walk the same path every day, you can predict the exact moment your dog hits the brakes. It might be a familiar gate, a patch of grass, or the spot where the leash always tightens and your pace breaks. At first, you brush off these pauses as minor quirks—until one pause at the door turns into a pattern: the leash snags behind a chair, a towel’s out of reach when you really need it, and a supposedly organized setup starts to feel like a daily obstacle course. These aren’t isolated hiccups—they’re signs that the routine isn’t built for real, repeated use, and every small stumble squeezes more friction into your day with your dog. The surface might look tidy, but the system keeps interrupting itself, and you feel it not just during one walk, but every single time you try to move forward.

    The Repeating Pause: Where Small Friction Starts

    It rarely feels dramatic. One morning the leash chafes your hand as your dog stalls at the same threshold; by week’s end, your shoulder tenses before you even leave. The repeated effect sneaks up: your own routine gets slower, your dog’s bounce at the door fades, and walks stop feeling like a break—they become a sequence of micro-tugs and silent negotiations. The change is easy to miss in the noise of daily life, until reaching for the leash or towel becomes a braced reaction instead of an unconscious motion. Even when you think everything’s in its place, the pause returns, ready or not.

    Most “routine” walks get worse by degrees. What starts as minor leash stalling turns the whole route into a staccato pattern of stops and slow restarts. You’re home before you realize you’re tense, and your dog paces around with leftover energy because the walk never gained a steady flow. No meltdown—just a lingering drag that outlasts your willingness to pretend the setup’s not part of the problem.

    From Street to Home: How Friction Follows You Indoors

    The hesitation you feel outside doesn’t magically reset at the front door. The lag trails you in: dogs that freeze at the threshold also drift before meals, tiptoe around water bowls, and resist entering rooms where items keep shifting into their path. The result isn’t explosive—it’s a chain of small slowdowns that sneak up during the basics: food scoops wedged under last night’s bowls; towels impossible to grab one-handed when mud’s already on the floor; water stations placed for looks rather than for real refill flow.

    Picture your post-walk routine: paws need wiping, but the towel is crammed in the wrong drawer or nowhere in reach. You fumble as your dog hops impatiently, or worse, shakes mud everywhere before you even touch the fabric. The water bowl sits just out of line with the door, so rehydrating after a walk means more steps, more spillage—or a late-night refill that delays the reset you wanted. Toys and cleanup gear don’t just clutter the scene—they block actual movement, forcing you to do the same reshuffle day after day. What looks organized rarely acts organized when daily use adds pressure.

    The Cost of Overriding Routine Pauses

    When you get tired of the stall, it’s tempting to rush: you tug the leash, throw out a sharp “let’s go,” or hustle through the routine just to get it over with. But the friction finds its way back: walks fill with zig-zags and tension, your dog hangs behind with head low, and every step out the door starts feeling like a chore. The cumulative cost isn’t a single bad walk—it’s:

    • Leash fights and awkward detours as you intervene mid-stall
    • Uneven rhythms—never quite walking in sync, always one step behind or ahead
    • A dog reluctant to start moving—ear signals off, tail dragging, feet braced at the doorway
    • Feeding, cleaning, and rest routines that get harder to reset every time you try to smooth things over

    The “pause” becomes a repeating weak point—one you face daily whether you notice it or not. Even with a neat setup, you sense it: the stall returns, routines jam up, and fixes don’t hold because the friction always finds the gap.

    Real Scenes That Expose Routine Weak Points

    This is how it actually plays out: You grab for the leash and hit a tangled loop of harness, last night’s toy, or a bottle of spray wedged just where your hand lands. The smooth start dissolves—your dog paces by the door, you shuffle gear just to reach what you need, and both of you are out of sync before you even leave the house.

    Back from a muddy walk, you spot wipes in their “designated” spot, but reaching them means kneeling or unsnapping a lid at the wrong angle while mud spreads on the mat. Setup details start to matter: if a tool isn’t ready in a single reach, it’s a problem under real pressure.

    Later, prepping food or drifting through the hallway, your dog slows at old trouble spots. Instead of a routine flowing on autopilot, each phase triggers a new “nudge”—not a crisis, just another moment where the setup interrupts instead of helping. The friction’s subtle, but it repeats, and every repeat steals more ease from your day.

    Responding to the Signal: Small Adjustments Defuse Bigger Problems

    Notice the pattern and you see what these moments have in common: the setup isn’t built for real flow. The advantage isn’t in a giant overhaul—it’s in small, specific changes that actually survive daily pressure.

    Try the Intentional Pause

    Stop dragging your dog through stubborn spots. Instead, insert a fixed, relaxed pause—two counts of slack leash at the usual sticking point. Hang back, let your dog sniff, wait out the hesitation with quiet body language. Watch for signs of genuine reset: a softened ear, a loose jaw, calmer stance. Then move forward—no rush, just a restoration of shared rhythm. The pause shrinks naturally when it’s met, not fought. Both sides start moving with less friction; the route resets itself day by day.

    Translating Pause Into the Whole Routine

    The principle isn’t just for the walk—it applies every time routine flow staggers. Stalled at the bowl? Look at the access, not just the placement. Struggling with a crate while holding back an excited dog? Examine whether the latch fights you under pressure. Is the grooming setup easy to deploy with one hand, or do you lose your grip in the rush? Don’t let comfort or visual neatness win over true repeated-use ease. If a tool blocks more than it helps when the pressure is on, it needs adjustment.

    When details like bowl height, reachable wipes, or a one-motion hook for the leash change, hesitation across routines fades. The power isn’t in redesigning the whole system at once—it’s in clearing one persistent block at a time, so routine tasks actually reset themselves instead of accumulating daily annoyance.

    Counters to the Most Common Routine Stalls

    Some friction points show up in every dog household—here’s how to spot and disarm a few:

    • The Leash Tangle: When your leash shares space with harnesses or toys, reaching for it becomes a multi-step effort. A wall hook or strong catch near the door breaks this particular stall—early flow matters most.
    • The Snack or Water Station Shuffle: Bowls placed for looks, not for movement, lead to spillovers, awkward refill angles, or avoidance behaviors. Bowl height, distance from traffic, and direct path access all make a visible difference.
    • Towel and Wipes Out of Reach: After a wet walk, if cleaning supplies aren’t instantly grabbable, the mud spreads and the dog’s patience shrinks. Fix means arm’s-length setups you can hit without bending, hunting, or multi-tasking with a leash wrist wrap.
    • Toy Overflow Blocking Pathways: Toys in human lanes convert every entry into a shuffle. Open bins outside the main beat of movement, not hidden in back corners, keep both cleanup and play transitions quick.

    Tidiness doesn’t guarantee usability. Reduce the stall, not just the mess, and routines actually move forward.

    The Real Cost of Ignoring Small Signals

    Ignore the small delays and the cost piles up—not as chaos, but as routines that cling to resistance. A single hesitant step at the walk mutates into slow room entry, half-hearted rest, feeding time tension, and a day that never fully resets. The space may look “handled,” but if it runs awkwardly, disorder keeps leaking in where the setup gives out under everyday pressure.

    You notice: the entryway stays backed up, beds are hard to move when the dog’s restless, and cleaning supplies only seem efficient—right up until you need them instantly. A setup can check every visual box and still make you work double time just to keep pace with your dog’s real-life rhythms.

    Recognizing the Recurring Weak Point

  • How Small Changes Keep Your Cat Care Routine Smooth and Stress-Free

    Most cat and indoor pet routines break down at one point: the moment you try to do a simple thing—topping off water, grabbing the brush, or wiping a rim—and the tool you need is blocked, missing, or across the room. A tidy feeding corner might look calm in the morning, but actual daily care reveals friction fast: yesterday’s mail piles in, cleaning cloths drift from reach, and essentials end up mixed with kitchen clutter. By midweek, what began as organized devolves into a sequence of small, annoying delays—and every minor interruption turns what should be a quick care reset into yet another pause.

    The Quiet Build-Up in Cat and Pet Routines

    A system that feels under control on day one quickly unravels once routine hits. A fresh water bottle by the bowl, a wipe cloth folded neatly, the brush right where you left it—by midweek, that order rarely survives. Try topping off your cat’s bowl before work, and you find yourself shifting piles, clearing last night’s kitchen leftovers, or scanning for a brush that’s migrated behind a bag of treats. The refill bottle’s no longer at hand; it’s been nudged behind cleaning sprays or left in another room. One missing towel after a hasty wipe becomes a hunt each night. These aren’t single-point failures, but together, they drag the whole process. The routine—feeding, water, quick cleanup—always feels just out of step.

    Each stalled moment—clearing space before you can scoop, crossing the kitchen for water, digging out a cloth—doesn’t cost much time individually. But with every cycle, the feeling builds: the setup isn’t keeping pace, and you’re working around it instead of with it. Your cat notices too—waiting at the empty water bowl, pacing as you sort through countertop clutter, or leaving messes untouched until you find a missing wipe.

    When Surface Neatness Isn’t Enough

    A space can look neat while hiding constant low-level hassle. The bowl, mat, and brush might be lined up on Monday, but by Wednesday, bowls crust over at the edges, fur builds up under the mat, and supplies have drifted just far enough to make “quick” care slow. Each search for a brush or towel adds a minute and a second guess: Is this just untidy, or is the whole routine out of sync? Your pet waits, the feeding area’s less clean, and you’re tempted to skip the wipe or delay the refill just to get on with your day.

    What fails first isn’t obvious: a late-morning missed wipe, a water bowl lower than you meant to leave, or a brush not where it should be. Letting these slide “just for today” means routine care becomes triage, not maintenance—the core setup can’t support efficient resets, and you end up patching problems instead of avoiding them.

    Real-World Examples from Everyday Pet Care

    • The grooming brush you need is wedged behind pantry items, turning a two-minute session into a five-minute search.
    • After a water spill, cleanup stalls because the towel lives in a different room, so a fast wipe becomes a break in flow.
    • Feeding derails when you realize the refill tub got left in a busy corner and now requires a backtrack as your cat circles impatiently.
    • Food crust hardens on the bowl after a late meal, and tackling it becomes an extra chore no one wanted tonight.
    • Muddy dog paws hit the hallway because the foot wipe vanished or never made it back to its spot, and now shared space gets messier than planned.

    These are not major failures, but in steady repetition, they create a friction your routine can’t shake. Every small detour—whether it’s searching for supplies or leaving a mess to deal with later—reminds you the setup still needs real adjustment, not just a tidy surface.

    The Difference Between Looking Good and Working Well

    Looking organized and staying functional do not always match. A countertop cleared of visible clutter can leave the essentials tucked out of reach, shifting effort to hidden resets and late fixes. A brush out of sight keeps a room looking calm but means a grooming session is never quick. The tools you need migrate out of arm’s reach; the space stays presentable but works against you the moment the routine is repeated.

    Some setups shine in their first days—a spotless feeding corner, everything right where it should be. But over time, if each supply needs extra steps to retrieve, or the water bottle regularly runs low before you notice, calm order erodes. It becomes clear: visual neatness can mask a load of extra work, and the system starts to feel heavier each day rather than lighter.

    Specific Tactics to Prevent Routine Interruptions

    You rarely need a total overhaul. Small, persistent shifts matter more: keep water bottles, cleaning cloths, and grooming tools not just close but reliably visible and unobstructed. Hang the brush directly above the mat—never inside a drawer. Station cleaning wipes in a small, open cup beside the bowl, not hidden in a pantry bin. The aim is dead-simple reach—like refilling before empty or wiping the rim before buildup forms, right at the end of mealtime instead of after a delay.

    Adopt a “reset as you go” mindset: after every water top-off, grooming pass, or meal, return tools instantly to their place—not just “nearby,” but back to their hook or container. Get in the habit of prepping the next use now, not later. These small repeats keep the whole cycle moving: bowls cleaner, refills ready, your time spent on care instead of correction.

    Signs Your Setup Needs Adjustment

    Watch for hesitation that keeps returning—your cat pausing at the feeding spot because water’s not there, or you skipping the rim swipe again because the cloth has wandered. If you’re silently excusing missed wipes or repeat quick fixes, the routine signals its own weak points. You don’t need a full reorganization—just spot and close the recurring gap.

    Evaluating Your Daily Flow

    Judge any pet-care setup not on first-day looks but on how easy it is after a normal week—bad sleep, late nights, work delays and all. If you can feed and reset without clearing mail or searching for towels, you’re on the right track. But when any step starts with finding or reshuffling, or when supplies end up anywhere except their visible “home,” it’s time for a change. Focus where you most often reach, hesitate, or improvise.

    Make Routine Comfort Last

    Lasting calm in daily care means making every basic item reliably easy to grab and reset, not just hiding clutter. When tools stay in open sight and resets need zero extra steps, routine friction falls away—leaving more room for comfort with your pet and fewer frustrating reruns of the same small problems. Make small, visible shifts and let function keep pace with appearances.

    Explore everyday-ready solutions for real pet routines at
    CalmPetSupply.

  • Why Securing Your Car Flashlight Transforms Nighttime Driving Safety

    The moment you actually need your car flashlight—whether dropped phone on the floor, sudden roadside check, or one cable gone missing—finding it fast isn’t guaranteed, no matter how “organized” the interior looked this morning. Most gloveboxes and center consoles start tidy, but as soon as the daily loop of groceries, charging, quick stops, and shifting paperwork begins, the real order breaks down. The flashlight you meant to have ready ends up jammed under insurance slips, tangled in charging cords, or rolling somewhere unseen—right when you need light and can’t spare the extra seconds hunting for it.

    Why “Organized Enough” Still Fails After A Few Drives

    At first glance, a freshly tidied car interior feels in control: cables wound up, flashlight stowed, wallet and papers stacked. But that setup cracks after only a few errands.

    Each drive adds its own friction. Papers migrate. Chargers slip loose. And small round tools—especially flashlights—drift on every corner or brake, ending up hidden or pinched at the least helpful moment. It’s rarely total chaos, just a steady slide back to cluttered: a light that’s visible only after shuffling folders, unplugging a cable, or raking your hand through the glovebox in fading light.

    The Real-World Cost of a Wandering Flashlight

    You feel it the first time a routine night stop turns into a scramble. Flashlights left loose create:

    • Receipts or registration cards covering the lens
    • Cables twisting around the grip, binding the switch
    • Loose batteries jamming glovebox seams
    • Random cargo settling on top, blocking fast reach

    Each small shift means the next search takes longer. The “clean” impression from Sunday resets fades by midweek—folders drift, cables pile, and the flashlight is never quite where muscle memory expects it. When you’re digging for it beneath clutter, the quick task—checking under the seat, scoping a parking-lot drop, chasing a faint rattle—drags out, and the frustration is unmistakable.

    Fixed vs. Free: How Placement Translates into Speed

    A flashlight mount seems minor until you’ve reached for the same rolling light five times in one week and lost precious seconds every time. There’s a night-and-day difference in two real setups:

    The Free-Floating Routine

    Park after dark. Reach for the glovebox. In your hand: cable, pen, loose receipts—never the flashlight on the first try. Every new errand shakes items out of place, and each search tangles what you’d just organized. Closing and reopening means the chaos resets.

    The Fixed-Mount Transformation

    Install a low-bracket holder at the footwell or side-console zone—now, the flashlight is always upright, always exposed. Open the door, grab the handle, done. No sifting, untangling, or risking a mini avalanche every time you need it. The mount absorbs daily road movement, so the light stays exactly where you last left it, not buried under the week’s new clutter.

    Small Setup, Big Change: Living with a Mounted Flashlight

    Shifting my own flashlight to a clipped side bracket ended the endless hunt. Morning unloads—bags, tools, fast re-entry—never knocked it loose, and charger cables finally stayed in their own zone instead of intertwining with everything. The biggest shift? Cutting search time from twenty seconds of glovebox shuffle and sighs to less than five, even across weeks of busy nights, parking-lot gear checks, and under-seat cleanouts.

    Not Just for Emergencies

    Most of us pretend the flashlight is purely for breakdowns—but it’s the regular uses that reveal the design gap. Hunting for charger cables under the seat, spotting spilled change, or checking for a dropped SIM card: a consistently mounted flashlight turns from once-a-season backup to a real, every-week tool—no “where did I put it” required.

    The Hidden Friction of Loose Storage

    Loose flashlights don’t just disappear. They also:

    • Block fast access when you’re reaching for chargers or wallets
    • Slide near seat rails and risk jamming adjustment tracks
    • Create fresh cable tangles every time you plug in or disconnect
    • Slip under floor mats, making cleanup noticeably harder

    These minor frictions stack up, even if you barely notice them at first. Clearing one tangle or unclogging a storage slot often means disrupting another—the never-still flashlight makes certain cleanup “wins” short-lived and temporary.

    Building Real Control: What Actually Works

    Lasting order isn’t about constantly resetting your car’s interior—it’s about locking in the core tools so they survive daily routines and all the mess they attract.

    Fixed mounting is what turns short-term neatness into real usability. A mount that:

    • Keeps the flashlight immediately visible and never hidden
    • Stays separate from high-clutter charging or phone mount zones
    • Remains clear of foot movement and re-entry paths
    • Offers one-motion retrieval—grab and go, eyes never needing to follow your hand

    Variable mount positions even help in shared-family cars or delivery routines, letting each driver keep the light exactly where their habits demand. The real payoff: every evening, every mid-errand fix, every swerving stop, the flashlight stays put, no reorganizing required, no trading one convenience for another clutter cycle.

    So Your Car Looks Organized—But Does It Really “Work”?

    The real test isn’t Sunday’s neat layout—it’s Thursday night, after errands and re-parking, when you need to grab that flashlight in a hurry. No shuffling, no digging, no tracking down which corner it rolled into. Once a fixed-mount setup becomes routine, the weekly reset ends. Everything finally stays where you expect, priorities shift from endless tidy-up to quick access, and the driving routine flows instead of stalling on forgotten gear.

    Explore practical car organization and lighting solutions at DriveWellSupply.

  • Why Patience Matters When Installing Ceiling and Wall Lights

    Flush-mount ceiling lights look finished the second you tighten the screws—until daily routines start picking them apart. Walk the same hallway half a dozen times before breakfast, and you’ll notice: what felt sealed and solid on day one can slip, tilt, or shadow as floors vibrate, doors bang, or humidity swells the air. Suddenly, that “done” fixture throws a warped shadow on the bathroom wall, leaves a stair tread half lit, or makes the laundry counter’s far side vanish into dimness—all because a flush isn’t really fixed until it survives real use.

    Why Do Ceiling and Wall Fixtures Come Loose?

    The first warning isn’t always visible. Subtle rattles, unexpected shadows, or a fixture that tilts just enough to channel light at the wrong angle—these are quiet signals of an install that didn’t adapt to the room’s real pressure. The culprits are rarely catastrophic: vibrations from every upstairs step, doors catching drafts and slamming, or a bathroom’s moisture stretching metal and loosening gaskets. In the spaces you actually live in, even small changes—humidity swings, busy movement—chip away at the mounting plate or seal, leading to slow, persistent drift away from the ceiling or wall.

    Quick tightening usually backfires. Squeeze a fixture too hard in one session and it compresses unevenly. The next morning, pressure “settles out”: a skinny trim gap appears, a glass shade lists to one side, or a streak of glare cuts across the corridor. What starts as invisible becomes hard to ignore: shadow lines inch across the wall, reflections in your mirror turn patchy, and even minor tilts become daily aggravations. Not catastrophic, just a steady leak of visual comfort every time you cross the room.

    Real-World Friction: When “Flush” Fails Under Routine Use

    The gap between how a fixture looks on day one and how it works a week later shows up in small, relentless ways. On a stair landing, you step and feel a “cold patch” where one tread falls into shadow because the ceiling light has drifted. In the bathroom, you lean in for close shaving and catch your face glowing unevenly in the mirror—one side harsh, the other dull. In a laundry room, you lose track of socks on the edges because a half-tilted fixture beams past your main work surface. All day, these near-misses repeat in the background—mundane, but they signal the fixture is slowly failing its job.

    That failure isn’t just cosmetic. In tight hallways, a five-millimeter lean from the base means sidelight spills sideways, leaving the walking route uneven and dull at the edges. Movement feels less certain; corners seem to close in. A space can look lit but still perform poorly, disrupting habits with glare, patchy visibility, or new shadows that never should have appeared.

    This is how you spot the difference: lighting that felt right out of the box, but after a week of real-world movement, becomes a visible interruption instead of an invisible aid.

    The Low Hallway Test: Where Imperfection Shows Up Fast

    If you want to catch a weak installation, walk a low-ceilinged hallway after a few days of normal chaos. If the fixture’s base slips even slightly, curved shadows arc down the walls, and once-clear paths flicker as family traffic or steamy air jostle the mount loose. You feel the light “break up” as you move—never fully dark, but no longer smoothing your routine. Spacing feels tighter. The room shrinks around the leftover shadows. In families, this isn’t rare: children slamming doors, regular laundry cycles, a week of changing weather—all test whether the light stays anchored or starts shifting under the pressure.

    Taming the Shift: Why Two-Stage Tightening Works

    The solution is less brute force, more patience. The most reliable fix isn’t super-tightening—it’s a two-step process: mount the fixture just snug to start, then wait at least a day as gaskets, metal, and ceiling settle. This pause lets unseen shifts in material finish on their own, so when you return for a final hand-tighten, the light stays flush without being stressed into failure.

    You see the payoff in fewer headaches. Hallways stay evenly bright; laundry rooms keep all surfaces visible. Mirrors in bathrooms return to even light rather than patchy glare. After this two-step tighten, you don’t face the weekly ritual of hunting down new fixture tilts or shadow stripes. Instead, your lighting remains steady, working with your daily routines—not interrupting them with surprise gaps or wobbles.

    Every Space Has Its Tolerance

    High-humidity spots like entryways, bathrooms, or laundry nooks test any installation. Here, even solid “safe room” installs benefit from patience: that 24-hour wait creates more stability, especially where you can’t constantly retighten. The result is visible—a fixture that simply holds its place, spreads light evenly, and makes the daily routine feel unbroken.

    Practical Lighting Q&A: Getting It Right the First Time

    How tight is “tight enough” for ceiling or wall lighting?
    Tight enough to support the fixture flush, but always with a little room for material settling. Over-tightening on day one almost guarantees rebound gaps or a slow tilt as the parts adjust. “Snug, then settle, then final hand-tighten” outlasts any one-step clamp-down.

    Do I really have to wait before final tightening, or only for tricky rooms?
    You’ll see benefits everywhere, but in vibration-heavy or humid spaces—bathrooms, stairways, entry halls—it’s essential. The pause allows all mounting surfaces and seals to adjust naturally, so you aren’t chasing down annoyances later.

    How can I tell if the mount was rushed?
    Look for quick signs: new shadow lines after a day or two, the start of a trim gap, or a glass shade that “walks out” of alignment. In active rooms, these flare up quickly if skipped—and skipping means you’ll be back under the fixture sooner than you think.

    Beyond Looks: Lighting That Carries Its Weight

    The difference between a room that’s just “lit” and a room that actually helps you see is real: a fixture that holds steady makes stair runs safer, keeps mirror light balanced at all hours, and stops you from squinting for the edge of the counter. When lighting stays where it belongs, the room feels finished every day—not just the day after installation. The real win is simple: light that works invisibly, supporting your routine instead of adding new frustrations.

    http://www.lighthelper.myshopify.com

  • Why Flexible Zones Outperform Fixed Layouts in Small Outdoor Spaces

    The real test of an outdoor setup never happens on day one. A space that looks perfectly organized—patio edged with tidy shelves, a side strip freshly cleared—carries an invisible timer. Come back two weeks later, after rain, projects, and new gear, and the routine reveals what the setup can’t handle: a hose snaking across the walkway, tools wedged together, bins already overflowing into the best shortcut from gate to door.

    The Real-Life Test: When Storage Meets Real Use

    It’s simple to feel satisfied with a weekend’s work—wall units leveled, garden tools lined up, floor space opened at last. But as routines kick back in and the seasons change, the cracks widen. The trowel that barely fits now blocks the watering can. Bike helmets multiply on the rack meant for boots. Movement slows, and suddenly, what started as better flow is now a string of small obstacles: clattering handles, the stepladder lounging in front of the only outlet, plastic bins stacked high enough to tip when you pull the bottom one free. The daily act of returning or retrieving even a single item becomes a negotiation with the arrangement itself.

    Flexible Zones vs. Fixed Layouts: When “Looking Right” Isn’t Enough

    Anyone with a multipurpose outdoor strip—the patio edge doubling as tool storage, that narrow side-yard, or the classic garage threshold—knows the seduction of clean, fixed layouts: a wall grid, permanent shelves, a designated rack for everything. On setup day, it echoes a magazine spread. But new needs arrive relentlessly: a leftover paving stone, an umbrella that won’t stand, another bag of soil, last month’s forgotten plant stakes. Inevitably, one zone starts swelling with the overflow. Suddenly you’re pulling out three bins to reach what’s behind them, or doing a lopsided dance to drag the mower past something that never should’ve been in the way.

    Real scene: “The neat shed” in early spring is all intentions—a crisp path, tools on the wall, buckets nested. Fast forward six weekends: clutters start pooling. Garden hoses don’t fully rewind, soccer balls drift into the walkway, the wheelbarrow migration involves a brief tool-rescue operation every time. By summer, watering the border plants means weaving around a thicket of unsorted gear and side-stepping the permanent pile-up in that one awkward corner.

    Flexible Zones in Practice

    Unlike rigid built-ins, modular racks, mobile carts, and stackable bins absorb real-life shifts. One extra tool? Add another bin, not another headache. Seasonal overflow? Slide out a rack, shuffle zones, keep paths open. Instead of being boxed in by the layout, you move the pieces—so minor changes don’t trigger a full re-organization and the return path to each item doesn’t keep getting longer.

    Why Clutter Creeps—And How Boundaries Snap Back

    The snag with flexibility: when nothing has a border, everything bleeds together. The gloves join the pool toys “just this once.” The overflow bin turns into a universal drop spot. One fuzzy weekend, you’ve gone from sorted to sprawled, with every clear surface up for grabs. Rather than a setup you can reset in seconds, you get scattered piles and an endless round of shifting things from zone to zone.

    Setting Boundaries That Actually Hold

    The flexible setup only works if each zone stays recognizable—tools here, sports gear there, seasonal overflows apart. Visual dividers, color-coded bins, open labels, even bold tape to mark walking paths—all help keep truly movable systems from melting into a single catch-all. When bins have clear fronts, carts are labeled, and the wall is functionally split between “weekly use” and “someday overflow,” clean-up is snappy, not daunting. Walking through, you know what lives where and quickly spot what doesn’t belong.

    Everyday Reset: Small Corrections, Not Total Overhauls

    A month in, the magic is this: the urge for the dreaded “big reset” fades. No more sinking feeling when you see a pile up. Instead, it’s tiny adjustments—slide the overflow bin back where it belongs, reverse a stray shovel, re-stack instead of dump. These 60-second resets clear space for tomorrow instead of becoming a weekend project. Friction isn’t gone, but it doesn’t snowball. You don’t need to fight the setup to keep it functional—just nudge it back when needed.

    Still, flexible zones have their own traps. The cart becomes a drop-off point you stop seeing, or an open bin swallows stray garden stakes until the season’s over. But now, correcting these is easy—move one thing, fix the flow, and the system works with you, not against you.

    Where Conventional Setups Fail: Dead Corners and Blocked Movement

    Weak setups announce themselves in quiet frustrations:

    • You return the garden fork—then realize the hose reel is now blocked until something else moves.
    • Every time you want the mower, you shuffle two bins out of a too-narrow path yet again.
    • That one back corner? Still a magnet for mystery objects, because it’s never gotten a real job in the zone.
    • The impressive wall rack turns boots and buckets into tripping hazards, because there’s no flow after a normal weekend cleanup.

    Fixed layouts turn small resets into big detours. They promise order but force you into roundabout routes or constant reshuffling. A setup can look sharp while still interrupting every routine. Flexible systems, when clearly divided, keep movement open—quick fix, go on with your day. The difference is every micro-adjustment is built in, not a breakage of the setup.

    Real-World Routines: Keep It Useable, Not Just Organized

    • Take one minute after any busy afternoon to put the mobile bin back or re-mark walkways. Small resets fight creep the whole season.
    • Give each flexible zone a visible identity—labels, color, or tape for “this is garden gear, this is toys, this is just overflow.” It matters more as the space gets tighter or more mixed-use.
    • Let overflow roll, not sprawl. The bin or cart on wheels takes the blow, then gets reset—instead of the whole path turning into a tripping maze.

    The Setup That Stays Useful—Not Just Tidy

    A practical outdoor system isn’t about perfect order. It’s about setups that bend with the routines, block out permanent pile-ups, and let you keep moving through—even after a rush, a project, or a storm. The difference between “organized” and “useable” isn’t how things look after setup; it’s how well the system handles all the imperfect, repetitive ways things actually get used—and returned—every week.

    The setups worth building don’t flatten every friction point, but make it easy to see what’s out of place, correct course with a quick move, and find a clear path after the next errand or chore. When the outdoor zone keeps working through the real-life mess, you spend less time shifting, less time searching, and more time just moving through. That’s how a backyard or utility strip stops being a silent frustration and starts making the rest of the home run smoother.

    Visit TidyYard for practical outdoor storage solutions

  • Mastering Heat Gun Temperature Layering for Flawless Surface Finishes

    The fourth time you pass a heat gun over a surface, the job reveals its true nature. What started as fast, flawless layering—on vinyl, pipes, or composite plastics—suddenly gets complicated. The gloss that popped after pass one turns unpredictable by pass four. Edges start to ripple. Gloss turns patchy. The surface, once perfect under fluorescent shop lights, gathers small betrayals: a rough spot here, a hairline bubble there. Every finish flaw adds time at the sanding bench, working overtime to erase mistakes that crept in while you tried to move fast and keep up with the rest of the workbench routine.

    Early Passes Hide the Real Battle

    It’s easy to trust the first layer. Both bargain and mid-range heat guns, straight out of the box, give you steady airflow and set-and-forget control. The job feels predictable—until the real workflow kicks in. Drilling, cutting, battery swapping, and then, by the third or fourth layer, you notice what the specs never tell you: a flawless start doesn’t guarantee a finish you can stand by. Rushing through the first passes encourages carelessness on the next, and that’s when seams turn soft, haze creeps in, and tiny flaws appear in places you already promised yourself you wouldn’t have to sand again.

    Layering Under Pressure: Where Precision Slips

    End of shift. You press a new vinyl seam. Yesterday’s panels looked sharp, but today, fine dust clings to sticky edges and that two-second hesitation with the gun leaves an entire corner too soft. Overlapping jobs mean you’re juggling overhead sanding, bit changes, and a queue of pieces all needing the same tool. The real threat? Sudden, careless temperature jumps—especially swings of 30°C or more between cycles—quietly set you up for streaks, micro-bubbles, and stress lines beneath the top layer. They don’t look like faults at first glance, but run your gloved hand along the seam, and you’ll feel roughness that wasn’t there yesterday. That’s the price of rushing in real-world shop conditions, whether it’s cramped job trailers, an unheated garage, or just pushing to clear a cluttered bench for the next stage.

    What Happens When You Rush the Heat

    Under pressure, it’s tempting to crank the heat to speed things along. You’re swapping dead drill batteries, scraping glue, and stretching the workday. The temptation is real—but the repercussions are, too:

    • Blistered edges—raised seams and random bubbles hiding out until your cleanup pass reveals them, ideally before the supervisor does.
    • Patchy gloss—a band of dullness or streaked surface where air lagged or the temperature crept up far too fast.
    • Sanding purgatory—flaws locked under layered plastic, demanding coarse grit or even a full strip and restart, which ruins flow and morale fast.

    Most of the time, these missteps don’t show up until several batches later, long after the chance for an easy fix has passed. By then, workflow slows and the project starts feeling like a lost cause.

    Small Adjustments That Actually Save Jobs

    The experienced crew learns fast: it’s not about fancy heat gun attachments or spec sheets—it’s about patience and repeatability. Move in tight temperature steps—no more than 20°C at a time—and let each layer settle. It’s a discipline as much as a technique. This rhythm cuts down on rework, keeps seams sharp, and makes end-of-day cleanup less of a chore. When you run a batch of a dozen parts, and your finish sticks, you notice real efficiency: less running back and forth for tool swaps, fewer surprises after cooling, and less fatigue chasing flaws down the line.

    Those small, habitual tweaks—steady increments, regular cool-down checks—quietly beat “maximum power” shortcuts every single time. Workflow stays smoother, and you spend more hours assembling or fastening new projects, not revisiting last week’s mistakes.

    Know the Signs Before It’s Too Late

    A heat gun that’s a little unpredictable is like a dull cutter: by the time you spot burnout, the damage is baked in. What should you actually watch for, before the job’s out of reach?

    • Puffed seams and softened lines—corners lose their edge, particularly where overlaps stack up or the temperature gets left unchecked.
    • Discolored patches—that off-tint or yellowing that tells you heat isn’t settling evenly, especially nasty on white plastics or light panels.
    • Scorched fragments—barely visible at first, but once layered over twice, nothing but a sanding wheel is going to get rid of them.

    Pause after each pass. Use the downtime from other tool changes—bit swaps, battery charges—to give each layer a quick inspection. It saves jobs, saves panels, and saves your nerves on deadline days.

    Getting Reliable Results, Not Miracles

    Great layering isn’t about chasing the latest multi-mode heat gun. It’s about using what you have in a way that fits the pressure and pace of real shop days: keeping temperature jumps in check, respecting cooldowns, and treating each pass as a chance to get it right—not just fast. Every new tool or blade upgrade helps only as much as your basic approach. In the real world, the small habits—tight control, methodical pace, constant checking—are what turn out consistent, professional surfaces batch after batch.

    The takeaway: Don’t let the quick wins of early passes fool you. Stay patient, keep temperature shifts measured, and let each layer prove itself before moving on. It’s a discipline, not a shortcut—and over the long haul, it’s what gets you off the sanding bench and back into real work.

    For tools and equipment built to handle the real grind, visit Gumboll.

  • Why Focusing Desk Lamp Light on Your Hands Boosts Productivity and Comfort

    Most workstation lighting is chosen for the desk’s appearance, not for the work you actually do. But if you sit down to repeat tasks, shift between keyboard and notes, or work through a late afternoon stretch, the gap between tidy light and useful light becomes hard to ignore. A lamp that lights the full surface looks “finished,” but the moment you move beyond that single centered patch—reaching for a charger, flipping pages, dragging a notebook closer—you start battling shallow shadows and surface glare that drain focus and energy hour by hour.

    Lighting for work isn’t about flooding the whole desk—it’s targeting the places your hands move and your tools land, again and again. Broad, even light across your workstation might keep things Instagram-tidy. But it also turns every cable, adapter, or backup pen into constant visual noise, and forces you to chase “good” light for every task shift. Focused, hand-area lighting does more than mute clutter: suddenly, micro-adjustments and side shadows fade out, and switching from one tool to the next stops feeling like a reset. Over a single packed week, you notice it—the difference in how easy it is to clear the desk, avoid fatigue, and stay on track mid-project.

    Desk Light Decisions That Show Up in Daily Routine

    Look at an organized setup: monitor centered, under-desk drawer to the right, everything routed with trays or boxes, cable clips around the back edge. On paper, it’s “solved”—but real work still bogs down. You’re shuffling your chair, tilting a clamp lamp, or propping up sheets just to chase a usable pool of light. Even with smart storage or a neat cable path, supplies drift into the gloom at the desk’s edge. Mid-task, hands stray past the beam and you’re forced to angle your wrist or rotate the whole chair to see a detail clearly. The light you picked for neatness stops matching your actual work path within days.

    This gap becomes routine: pens and sticky notes gather where the lamp hits hardest, while the rest—chargers, reference books—slide into the dim edges you ignore until clean-up. Resetting your desk means dragging everything from shadow to center, not rethinking how you work. The desk looks streamlined—but your workflow keeps running into friction, especially if you’re repeating the same switching and stretching motions every day.

    How Shadows and Glare Fail Real-World Desk Use

    Take the classic late-day scenario: editing a document at a “finished” workstation, lamp posted over the monitor on a tidy riser. The surface glows, but your typing hands cut straight through the beam, making an alternating pattern of glare, dead shadows, and missed texture. Each interruption—squint, chair nudge, lamp adjustment—breaks your rhythm and focus. When you push supplies aside or stack a notebook, your own arm blocks the task light and you lose another minute fumbling for clarity. Over the course of a long session, productivity doesn’t just slow—it fragments, turning lighting into a maintenance problem instead of support.

    These small disruptions add up fast: a workstation that felt dialed in that morning becomes awkward by 3 p.m., after enough rounds of switching lamps or shuffling organizers to escape that shadow edge. Lighting becomes another thing to “fix,” not a tool that you can actually forget about while working.

    Making the Switch to Hand-Focused Lighting

    The real shift wasn’t a new lamp, but a new aim: putting light exactly where hands, tools, and notes actually land—every task cycle, not just for show. Instead of stepping into and out of shadows for every step (glancing at a reference, sketching a section, recharging a device), the work area stays in steady, clear light. Switches—from keyboard to notebook, or from digital to paper—go quicker and break rhythm less. This doesn’t just speed task flow, it lowers the reset burden between sessions.

    Here’s what changes during a week of real use: Placing a clamp lamp arm so its beam stretches directly over your work zone—keeping the base clear of drawers, not fighting against an under-desk tray—eliminates the cable snags and awkward supply bumps that haunted the “centered” setup. Now, tools and notes stay where you actually need them. End-of-day resets shrink: instead of multiple moves, a single sweep organizes the desk. Small clutter stops piling up, and you spend less time repositioning light, more time working.

    Breaking Down the Real Advantages—And the Missed Opportunities

    Hand-focused lighting delivers:

    • Sharper task focus—your “active zone” is always visible, with no shifting shadows or distracting glare
    • Less unnecessary movement—hands rarely pass out of light, so you stop sliding the chair, hunting for a clear spot, or juggling supplies just to see
    • Reduced visual clutter—letting edges of the desk fade soft means loose items aren’t always in the way
    • Quicker resets—once your main work area stays consistent, routine cleanup shrinks from daily chore to a few seconds’ work

    On the other hand, broad surface lighting comes with hidden costs:

    • Random clutter is always in view, whether you’re using it or not, pulling at your attention when you need to focus
    • Frequently-used tools gravitate to the brightest patch, leaving the rest of the space ignored and crowded
    • Simple tasks—like jotting a note or checking a secondary device—start dragging out, because you have to adjust the lamp or your posture every time

    FAQ: Tuning Your Lamp for Real Workstation Performance

    How do I position a desk lamp to avoid hand shadows all day?

    Set the lamp so the beam falls slightly forward and down, right over where your wrists, notebooks, or active devices actually work. The light should cover your typical reach and movement, not just the geometric center. Check by sliding your hand through routine motions; if you hit a shadow or glare, adjust the arm, not your workflow.

    Does hand-focused light work for setups with multiple monitors or shifting work zones?

    If you anchor your routine—keyboard, sketch pad, device dock—focused light helps reduce interruptions and strain. For setups where you move between different equipment or split tasks side-to-side, flexible arms or under-shelf bar lamps make it easier to keep the beam where work happens. The key is quick, one-step adjustability—not a lamp that adds another reset as you go.

    What happens if I skip hand-area lighting and stick to whole-desk light?

    You end up working around the lighting instead of with it: awkward reach, eye fatigue, moments spent dragging a lamp or moving tools back toward the center. The longer your session, or the more your tasks change, the more these interruptions eat into time and energy—especially as the quality of daylight shifts through the day.

    Not Just Tidy—A Desk That Works for You Every Time

    Lighting needs to match the real rhythm of desk work, not just give the surface a uniform glow. A tidy desk is only stage one—if the tools, light, and reach don’t sync with how you actually work, friction sneaks back in. After a week with lighting that follows your workflow—not just your layout—setups feel less crowded, reset time falls, and focus recovers faster. The appearance stays clean, but the real difference is what you notice after several tough sessions: a desk that works at hand level, not just a surface that photographs well.

    Explore the full WorkBasic collection

  • How Weather-Driven Storage Design Prevents Hidden Damage Over Time

    Nothing tempts optimism like a freshly organized garage or shed. Crisp columns of bins, spotless wall panels, every cart and unit just off the floor—it all feels finished, even resilient. But every returning user recognizes the illusion. A busy week, a string of soggy days, and what worked on day one starts working against you. The real test isn’t how slick the setup looks, but how it holds up, day after damp, messy day, to the real push-and-pull of weather and use.

    Why “Off the Floor” Doesn’t Buy You Immunity

    There’s an undeniable appeal to getting storage up and out of the puddles. Bins perched on shelves, racks wheeled just an inch clear of the slab, all suggest that a tidy fix is in place. Until rain or snowmelt inevitably finds a way in. The smallest gap invites a cold pool under those carefully raised bins. Condensation rides up slab floors and clings to shelving legs. With each wet cycle, what looked organized morphs into a humid puzzle—bins tack to floors, wheels grind instead of roll, and suddenly the direct path to your tools is blocked by last week’s emergency reshuffle.

    The pattern is painfully familiar: That tight wall of bins starts dragging in corners. Mobile racks don’t budge when you need quick access. Overflow piles settle in just out of reach, building up with every chore until even the cleanest arrangement now slows your routine instead of streamlining it.

    Where Weather Sneaks In, Function Slips Out

    Every storage area carries its built-in weak spots. Maybe it’s the baskets stacked near the chilly outer wall. Maybe it’s the rolling trunk you regret every time you have to muscle it back into place. These friction points only multiply once water and humidity get involved:

    • Pooled water slips in unseen. Even a minor seam under shelving or a low cart can become a reservoir, quietly wicking moisture up into your gear.
    • Condensation lurks beneath and behind. Walls and bases that seem bone-dry turn out clammy on inspection, pushing rust along the frames and swelling the bottoms of particleboard.
    • Overflow turns into obstacle. Every time storage units clog the main route—from door to bench, or out to the garden—the irritation quietly escalates. Resetting doesn’t happen seasonally; it becomes a weekly battle.

    This isn’t just a yearly inconvenience. Left unchecked, each round of weather makes the system more sluggish. Access slows, paths choke up, and the difference between “looking organized” and being usefully organized grows wider. Bins that used to be easy grab-and-go zones become dead-end stacks. The once-promising setup becomes something you work around, not with.

    Frustration Arrives Before Damage

    The most telling signs a setup has gone sideways aren’t ruined tools or warped panels. It’s the little frictions that show up every time you try to use the space:

    • You end up shuffling two or three bins just to keep the way clear for the door.
    • A quick grab for shears means always squeezing around that same cabinet edge—again.
    • Resetting after a job drags on, as swollen bins wedge together and wheels resist the turn.
    • Overflow “catch-alls” swallow not just spares, but damp towels, dirt, and whatever you haven’t found time to sort—making layout and access worse with every pass.

    Surface order hides these growing inefficiencies. Your system might look crisp in a photo, but live-use tells a different story: flow gets clumsy, resets stretch out, and frustration builds every time a once-bright idea ends in an awkward cart dance. Storage that fits but never truly clears a path, ends up stealing time and momentum with every visit.

    Weather-Smart Setup: Real Tweaks That Hold Up

    So what stands up to the ongoing mess and moisture? It comes down to setups that don’t just avoid the floor—they beat the weather where it attacks most:

    • Lift everything—properly. Raise bins, racks, and mobile units a solid two inches or more. Sturdy blocks or feet, not just thin casters, break the path for sneaky seep and mean nothing welds itself to the slab after a wet weekend.
    • Give your storage room to breathe. An inch or two gap along every wall isn’t wasted space—it keeps condensation from creeping up and prevents mold from taking root.
    • Skip the dead corners and risky seams. That awkward spot behind the chest invites soggy buildup. Leave it open or limit use to gear that shrugs off damp.
    • Go non-absorbent when you can. Plastic bins, powder-coated metals, anything that sheds rather than soaks up moisture. One damp blast shouldn’t mean a season of stuck lids or warped bottoms.

    Spot-test your fixes: After heavy rain, wedge a wood strip or paver under the lowest bins and see which ones actually dry out. The ones that still sweat or cling need a better lift or a new home—no matter how “waterproof” the container says it is.

    Real Life: When “Safe” Storage Trips You Up

    Picture gearing up for spring yard work. A week of rain, and now those bins—raised just an inch, stacked along the far wall—are sticky, lids won’t budge, and the aisle to your spade twists around half-boxed supplies. Each small design compromise from day one now piles up, literally, in blocked corners and awkward footprints.

    The turning point comes with a rethink: Lifting every bin higher than before and refusing to let storage block the main lanes. Suddenly, carts and bins come free without a wrenching pull. Cleanup after every job takes minutes, not a half-hour shove. You spend less time rescuing supplies, more actually using the space—rain or shine.

    Routine Patrol: The Non-Negotiable Upgrade

    No system is ever fully set-and-forget. A weather-hardened setup still needs an occasional walk-through: move a bin, slide out a shelf, open up dead corners. These seasonal patrols keep airflow moving, outsmart slow leaks, and catch issues like early mold before they turn decks and bins into rescue projects. It’s a habit that pays off every time the next big reset never comes, because small adjustments keep the space on track.

    The Setup That Survives Return Trips

    The setups that truly work aren’t the ones that look perfect when freshly installed. They’re the ones where every return trip—rainy, rushed, or routine—feels easier than the last. Where raised bins and clear zones mean fewer reshuffles, and every main path stays open for actual movement, not just display. By treating weather as a regular opponent and leaving room for quick fixes, you’re building a storage system that quietly stands the test of time and the messes you throw at it season after season.

    StackNest

  • Optimize Entryway Cleanup with Strategic Paper Towel Placement

    How many times has a muddy shoe, dripping boot, or paw print made it straight past your entryway cleanup point before you even reach for a towel? Threshold zones are where the mess hits first—and too often, cleanup supplies get stranded just out of reach or buried behind overflow. Every extra step to fetch paper towels lets mud and water drift further, pressing the same pain point every week: the distance between real-world entry routines and where your cleanup tools actually land. If your entryway looks set up but falls apart by Wednesday, it’s not just clutter—it’s reset friction built in by placement that doesn’t match your real movement.

    Reset Friction: The Tug-of-War at Your Entry Door

    After a wet commute or a muddy walk, what actually happens by the door? Shoes get kicked off near the bench. Bags drop wherever there’s an inch to spare. Coats swing onto hooks or get draped across benches. Just one misplaced mop or hidden towel sets the stage for streaks that slide past the “drop zone.” You detour, dig behind bins, unearth a roll from inside a shoe pile—and by then, water has already crept under the rug. Every clumsy workaround—swapping hands between bags and boots, stretching over crowded benches—adds seconds and leaves the threshold losing the race against routine mess.

    More Than Visual Mess—It’s a Workflow Breakdown

    A towel holder mounted too high, squeezed behind bags, or left floating on a shelf doesn’t just look off—it interrupts cleanup where it counts. In practice, a towel drifted behind overflow or lost under a bench means you wipe up only after dirt spreads. Maybe the zone is sorted in the morning, but after a few rounds—school drop-off, dog walk, grocery haul—towels are out of the reset loop. Mess drags deeper into your space and resets slow to a crawl.

    What Actually Changes When Placement Matches Routine?

    Picture this: you walk in with soaked boots and heavy bags. Instead of zigzagging behind storage bins, a wall-mounted paper towel holder sits at bench height—right where you sit (or help a child) to unlace shoes. You pull a sheet mid-process, mop up the puddle before it chases your socks, and keep the flow moving. The difference is immediate: cleanup stops being a chore that lags behind and becomes part of the movement—no separate step, no “I’ll get to it later.”

    Why “Above the Bench Line” Solves for Repeated Use

    Bench-level mounting means towels are in reach as you sit or crouch for shoes, not perched where dirty hands have to stretch or double back. Go too low, and holders get blocked by boots and bags; too high, and you’re up and down, dripping water along the way. Every struggle—mud slipping by, paw prints racing across tile, water sneaking toward a living room rug—gets intercepted before it’s a reset crisis. Cleanup merges seamlessly with whatever task brings you through the door, not tacked on as an afterthought once the damage is done.

    “Good Enough” Entry Storage Rarely Survives the Week

    The temptation to use whatever shelf is free, toss in bins, or add a loose countertop roll is strong—until routine takes over. Most setups work for guests but collapse as soon as the traffic ramps up. If your towels and wipes aren’t anchored exactly where people land, daily use reveals the weak spots:

    • Back-and-forth laps around dropped shoes and bags, just to find cleanup supplies
    • Hands grabbing surfaces while searching, leaving extra smudges and streaks behind
    • Dirt sneaking past the line during a rain cycle, especially when resets fall behind

    By day three, shoes have overflowed, the paper towel roll is wedged behind the bench, and the threshold looks less like a managed drop zone and more like a spreading mess—again.

    Visible Difference When Entry Flow Is at Max Load

    The crunch shows up during high-traffic runs. Imagine three arrivals in 20 minutes: a rain-soaked kid, a dog that shakes off, groceries coming through while everyone fumbles for dry ground. When holders and towels are mounted right at the bench edge, every drip and splash gets handled on the spot—before a single footprint drags it deeper. Loose supplies, on the other hand, turn “just five minutes” of deferred cleaning into tracked-in grit and a shrinking window to reset before the next round. Quick laps turn into full cleanups—and everyone’s late.

    What’s Actually Different After a Placement Fix?

    Good entry setups aren’t just about less apparent clutter; they build in a rhythm. A well-placed wall holder at seated height trims out the most annoying steps: no searching with muddy hands, no trailing grime back over just-cleaned tile, no “reset round two” when someone else comes through. Instead, cleanup happens naturally during the process—more clarity, less mental drag, visible difference before you even think about it.

    How to Anchor Cleanup Where Action Actually Happens

    Stop letting towels, wipes, or rolls drift out of your real path. Mount at bench height, always within a simple seated arm’s reach—never up at shoulder level, never hidden behind bins, never as a loose accessory floating above the drop zone. Physically walk your door-to-bench route and see where your hand naturally lands as shoes come off or bags hit the ground. The difference between one smooth reset and a series of cleaning headaches usually comes down to these few feet—between what seems “away” and what’s actually in the line of movement.

    Practical Entryway Placement Tips That Actually Work

    • Keep the main walk lane wide and clear: mounting holders off to the side avoids blocking a fast path, even if centered storage looks neater.
    • Secure for actual use: wall-mounts that keep towels dry, off the floor, and reachable for both adults and kids outlast floating setups every time.
    • Pick slim profiles: wall- or side-mount holders that fit tight entrywalls and tuck within arm’s reach prevent spread, crowding, or new trip hazards in compact transitions.

    From “Looks Organized” to Works Every Time

    Entry setups that focus on visual order—stacked bins, matched baskets—often collapse when real life starts hitting the threshold at speed. The gap between a tidy zone and a functional transition point is usually where items are anchored. Move a towel holder to the right moment-of-action and you’re not just fighting clutter; you’re closing the slowest, most ignored leak in your whole reset routine.

    This isn’t about making mess disappear. Most of the gain isn’t even visible on a good day—it’s in the weeks when nothing else changes except fewer detours, fewer missed wipes, and faster resets when the weather turns or the schedule stacks up. Entry setups that keep up don’t just look under control—they feel lighter, less interrupted, and built for movement, not just for show.

    http://www.betweenry.myshopify.com