Blog

  • Why Accessible Ground Wires Matter for Safer Indoor Lighting Maintenance

    The real difference between a lighting fixture that works and one that fails isn’t the way it looks on installation day—it’s what happens the first time you have to touch it again. In the actual rhythm of a house—busy mornings, rushed repairs, cleaning routines—a flush-mount ceiling light over the laundry, a hardwired wall sconce by the steps, or a vanity bar above the mirror can turn from “done” to demanding far faster than most people expect. One detail almost nobody notices at first—the ground wire, buried tight with no slack—can make every simple job risky or impossible: pulling at stuck screws in dark stairwells, straining to change a bulb by the mirror, struggling to reach across a damp laundry shelf. If the ground wire hides behind a powder-coated plate or jams stiff inside a wall box with zero give, what started as a “clean” install gets complicated overnight.

    The Hidden Friction Behind Everyday Fixtures

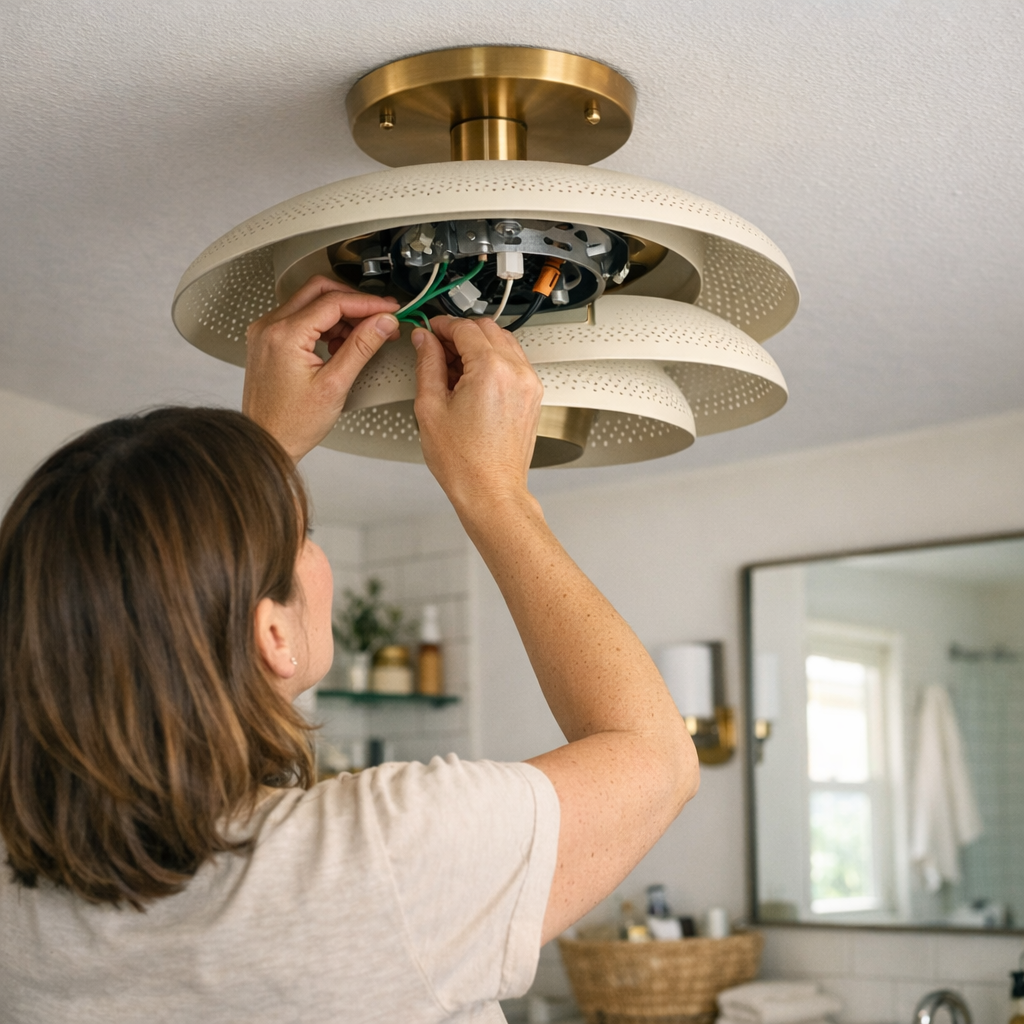
    This problem hides until it doesn’t. A ceiling light sits flush and even over a laundry counter. A pair of wall sconces bookend a mirror—lines sharp, everything anchored neatly out of sight. Only when you try to open the fixture do you discover the catch: ground wire clipped short, stiff, or stuffed behind heavy plates. It’s in the hurried moments—late morning, running to swap a bulb—that you find yourself half-blind, one hand losing grip as the fixture tugs down on its wiring. Cutting corners “just for now” or leaving the ground disconnected isn’t rare; it’s the desperate fix when access stalls. And this chronic strain creeps in fastest in places with regular interruptions: steamy mirrors, low hallway ceilings, vibrating stair turns, utility rooms where every screw seems to rust by month three.

    Real Use Reveals What Installers Don’t See

    Catalog-perfect lighting doesn’t show its limits until regular use exposes the weak points. The day-to-day tells the real story:

    • Mirror sconce, midnight: You lean close and half your face still falls in shadow. You go to adjust, only to find the wiring barely long enough to hold the fixture—your hand trapped, juggling the shade and searching for a connection you can’t even see. If the ground is free and visible, that fix takes one calm minute.
    • Stairway pause, weak light: A flicker draws your eye, and you reach up to check the mounting. When ground access is straightforward, you can detach, inspect, and re-secure without risking a short. Pinned wiring? Most just close it back up or risk a workaround that leaves things worse.
    • Hallway fade: Rows of semi-flush lights seem fine until months of door slams and vibration make coverage uneven. To open a fixture with buried wires, you either call for backup or risk stripping hardware—one misstep, and the next repair just got even harder.

    The cost: every time you jury-rig a solution or put off “fixing it right,” you leave behind a tougher problem for next time—sometimes a safety oversight, sometimes an invisible bottleneck that only gets worse with age and use.

    Moisture, Movement, and the Real Cost of Inaccessible Ground Wires

    High-traffic and damp rooms double the trouble. In a bathroom or utility corner, moisture seeps behind trim and fasteners, accelerating wear. The difference: when a quick moisture check means wrestling with a cramped, short ground, every cleaning, code update, or loose bracket becomes a low-stakes hazard. A shortcut—leaving the ground temporarily disconnected to fit things back—quietly builds a safety risk, especially in rooms with steam, vibration, or sudden fixture movement. As regulations or building codes evolve and hardware ages, what started as a “hidden” flaw increasingly blocks safe repairs and simple maintenance.

    Movement is its own pressure test. Step onto the landing, open a stairwell sconce, or try maintenance on an entry flush mount after a year: vibration and repeated access make all the difference between easy upkeep and another half-finished job. Fixtures with bad ground access turn even a bulb change into a stress point; every shortcut, every postponed tweak, and every forced maneuver adds silent friction to daily life.

    Why Visible, Accessible Grounds Make Every Fix Easier

    If you want your lighting to stay fixable, visible ground wire slack is the most important hidden upgrade. Four inches of reachable ground, positioned above the mounting or accessible near the wall box, means you can revisit, replace, or clean the fixture without turning your next morning upside down. The changes are immediate and cumulative:

    • Five-minute bulb swaps at a fogged bathroom mirror—no risky stretching, no wires yanked from inside the wall.
    • Shade adjustments or moisture checks in tight areas—handled solo, without fingers wedged behind metal or makeshift tools propping a fixture in midair.
    • Simple code updates or fixture replacements over time—done without rewiring short grounds or scheduling a return visit for what should be routine.

    Once you experience zero-fuss access, you notice every spot that’s missing it. It becomes the filter for what kind of lights and mounts you trust—not just for yourself, but for anyone who’ll face that ceiling or wall later.

    Tips and Lived-In Fixes from Repeated Use

    This fix isn’t exclusive to professionals. Whether upgrading a hallway sconce, stringing under-cabinet task lights, or swapping out a ceiling flush mount in a laundry, these habits spare you the usual headaches:

    • Coil ground, never cut flush: Leaving an accessible loop pays dividends with every fast bulb change, cleaning, or bracket inspection across the years.
    • Test final reach before tightening: Gently tug the wire at install—if removal still means disassembling the bracket or scraping hands on sharp edges, add slack before you call it finished.

    Neither step is visible after install, but both mean you avoid balancing fixtures midair or improvising unsafe repairs down the road.

    Lighting That Remains Useable, Not Just Bright

    A room can look fully lit and still let you down: glare on bathroom glass, a shadow line across the prep counter, lost edges along hallways, or a work surface that’s bright but half-obscured in use. So it is with maintenance—polished finishes and high output mean nothing if every fix is an ordeal, or if an unseen flaw guarantees stress next time. Ground wire access isn’t decoration—it’s the line between lighting you live with and lighting that actually supports living.

    Over time, what makes a ceiling light, wall sconce, or vanity fixture feel genuinely useable isn’t “how it looked when new”—it’s whether each return, adjustment, and regular check happens with confidence, not dread. Leave grounds accessible from the start; the small effort up front is what keeps every future change quick, safe, and clean instead of slow, risky, or left undone.

    Visit LightHelper for practical indoor-lighting solutions that stay reliable after installation.

  • Why Consistent Anchor Depth Measurement Matters for Hammer Drill Accuracy

    Depth control doesn’t get respect—until it derails your whole install. If you’ve actually spent hours on anchor holes—drilling for racks, brackets, or overhead hangers—you know how quickly a fast, tidy project slips into a haze of misfires and slowdowns. At first, every hole feels smooth. But after a dozen plunges, cement dust grinds into your gloves, sharp tape marks fade out, and you’re second-guessing every bit of progress. Suddenly the anchors sit proud, don’t seat flush, or bite too shallow. Now you’re reaching for a punch or chisel, halting that early momentum, and muttering about “good enough.” What should be a half-hour run turns into wasted energy, patch-ups, and frustration that nobody budgeted for.

    The Real-World Mess of Measuring Anchor Depth

    Whether you’re mounting heavy brackets in a damp basement or securing a pipe run in a grimy garage, every anchor has to land just right. That should be routine, but on real jobsites, the margin shrinks fast. Shop dust turns that crisp white tape into an unreadable smear before you’re even halfway. The drill’s built-in depth stop, if you bother setting it, can loosen from vibration or just get ignored in a rush. Even a collar, if set in a hurry, has a way of drifting after a few cycles. Every workaround has a weak spot, and small lapses quietly stack up until one “quick” job becomes an afternoon of fixing what the tape or stops missed.

    When Tape Fails—and Morning Shortcuts Bite Back

    Slapping a tape flag on your bit is fine for a handful of holes—but under real pressure, tape slides, gets obscured by cement, or peels off mid-run. By the fifth or sixth hole, you’re squinting at fingerprints and guessing depth by muscle memory. If your hands are slick or the lighting bad, good luck actually seeing any marker. There’s no consistency, and suddenly you’re shoving anchors and hoping they’ll seat. Of course, you hit one too shallow—so now you’re cleaning, prying, maybe running a new hole, and losing flow as your arms and patience give out.

    Collars and Stops: Feel Without the Guesswork

    Swap tape for a true depth collar and it’s a different job. The second you feel that collar touch concrete, you know you’ve hit target—no peering through dust, no second-guessing. It’s tactile, not visual. You can check depth by feel, even if visibility is shot. Proper stops or collars don’t win awards for perfection. They win by making every hole routine: line it up, drill till you hit resistance, move on without hesitation. The payoff is measured in smooth installs and projects that finish on pace with the first anchor every time.

    Scenes the Shop Floor Knows Too Well

    The difference shows up when you’re working at awkward angles or with your head pressed beneath a shelf, nose full of dust. Try keeping a tape mark visible when drilling overhead—concrete snow falls, your marker is gone in seconds, and now you’re guessing. Or drive anchors next to a web of old patched holes; you can’t afford a slip, but you also can’t clearly see your bit. The “quick fix” holes become repeat offenders—anchors end up proud, you reach for a hammer, and you know you’ll be explaining it later.

    This is where a fixed collar saves time and nerves. You don’t have to see the mark. The bit stops where it should, no drama, no extra cleanup. Less fuss with tools, less chance of scarring the wall forcing in shallow anchors, and fewer do-overs. It’s these imperfect moments—poor visibility, awkward spaces, and fatigue—where real stops or collars quietly pull their weight.

    Tool Setup: The Small Habit That Pays All Day

    Setup is seconds; mistakes burn hours. Set up with a depth collar—just a minute with a caliper or even a tape measure. Dial it in a few millimeters deeper than the anchor to clear dust. That’s all it takes. Set tight, that collar gives you repeatable, reliable hits, no matter how many anchors or how tired you get. The payoff isn’t theoretical: it’s bracket lines that stay level, fewer anchors that have to be hammered, and no more “almost” flush fastenings that catch a critical eye at the walkthrough.

    Stick with tape and, by hole number ten, accuracy fades. Each misstep demands a cleanup pause, sometimes fresh bits, sometimes redrilling. What felt streamlined at 9 am becomes a slow-motion loop of checking and fixing, slicing up both energy and jobsite morale. In the long run, control saves more than it costs.

    Background Habits for Depth Consistency

    • Set collars with actual measurements. Even a quick check with a caliper or tape beats a rough guess every time.
    • Drill a little deeper than anchor length (4-6 mm is usually safe). That extra depth catches stray dust and lets anchors truly sit flush.
    • Re-tighten collars every dozen holes. Hammer drills vibrate things loose—don’t assume nothing’s shifted.
    • Change out dull bits fast. Rounded tips throw off both speed and control, dragging your workflow to a crawl.

    The Win: Smoother Installs, Fewer “Do-Overs”

    The best installers aren’t just quick—they’re steady. Reliable depth means reliable anchoring, and it shows up in cleaner work and jobs that finish right the first time. You don’t have to chase perfection. Aim for habits that limit surprises: a simple collar, a minute’s setup, and fewer corrections down the line. Less wasted motion. Less backtracking. Less aggravation when conditions are rough and the work just won’t wait.

    Shop tools and accessories built for real job site reliability at Gumboll.

  • Choosing Between Backyard Storage Units and Wall Systems for Outdoor Clutter

    Outdoor storage doesn’t judge you on moving day—your real verdict comes weeks later, when the shed’s clean lines unravel into soccer balls wedged by the door, hoses creeping across every path, and tools claiming whatever edge you’ll tolerate after a long day. The showdown between a freestanding storage unit and a wall-mounted system isn’t really about aesthetics or capacity. It’s about whether your setup quietly clogs your routine—shuffling bins, nudging doors, retracing steps—or actually makes your yard less of an obstacle course after each storm, each Saturday, each ordinary weeknight. Good intentions meet mud, rush, and gravity. Setup choices make every difference—especially in corners where room disappears fast.

    Where Storage Becomes the Roadblock

    The first afternoon, your new storage looks tidy—a shed lining the fence, or a wall rail loaded just-so beside the garage. But normal use doesn’t wait. Each trip for the rake brushes against the packed lineup of patio chairs; bins you swore would stay sorted get stacked and re-stacked, blocking the walkway on every pass. In no time, movement gets pinched: sometimes a sideways slip, sometimes backing up and moving a wagon just to reach the pruners. Overflow stops being a surprise and becomes built-in friction.

    If you work with a side yard barely wide enough to wheel a mower, or a patio edge serving both storage and kids’ traffic, setup footprint matters more than shelf count. A floor unit filled once becomes dead weight. It’s supposed to solve chaos, but more often, it becomes the pivot point where everything bunches up: Park the scooter and now nobody’s getting to the rakes; want the gardening gloves, but you’re balancing bins just to pull the right door open.

    Wall-Mounted Systems vs. Standing Units: How Use Patterns Actually Shift

    Wall systems promise freedom underfoot and open lines of movement—until vertical clutter stacks up. Hooks go up neatly, items are easy to see. But in practice, “out of the way” means cramming old hoses above eye level, stashing out-of-season tools on the far ends, and letting this month’s gear pile right in front of last month’s. What started as a clean wall morphs into a shifting wall of stuff.

    It sneaks up: grabbing a shovel now requires shifting past coolers and moving the folding chairs—one hang-up triggers two more fixes, and suddenly you’re halfway to another weekend reset. Hooks meant to organize now collect overflow, blocking what you use most.

    Freestanding Units: Shelter That Can Box You In

    Freestanding and modular units offer the shelter your gear demands—but they claim their territory and don’t give it back. Dropped into a fence line or anchoring the patio’s end, their swing radius interrupts the routine: the shed door opens and now the footpath is gone, so tools dragged out for one job just get dumped outside for “later”—clutter in a new location.

    Soon, the inside becomes an “anything goes” zone for bulky, awkward gear—cushions, sports nets, bags of soil—often just piled to clear the patio, not truly put away. The evidence: every time you pencil in a “Saturday shed rescue,” frustrated by how quickly that reset is needed.

    The Return Problem: Can You Actually Put Things Back?

    The best outdoor storage proves itself on the return trip, not on day one. If putting a trowel away means working past children’s boots, buckets, and a half-lost hose, it’s easier to drop it “just for now”—a momentary decision that, repeated, piles up into chaos.

    Wall-mounted options work if returning gear is simple—grab, hang, step away. But few systems stay that simple under daily use. If the trimmer only fits behind a stack of bins, or a wall hook now supports three tangled extension cords, nobody’s putting things away the right way after a late-night chore.

    Big sheds repeat the cycle with bulk. You unload outdoor cushions after a cookout and leave them inside the threshold, telling yourself you’ll “fix it up properly next time.” That next time creeps further out, as each drop-off blocks the last one. The rhythm breaks down, and the storage eats its own path.

    Overflow Piles & Dead Corners: How Clutter Wins in the Edges

    Every system promises a place for everything—until overflow creates its own zone. Stray gear finds the same awkward corner by the gate, or a once-clear path shrinks as piles drift slowly outward. That wall grid that felt perfect after spring cleaning? By July, it’s a choke-point for everything too awkward to store somewhere else, and the overflow stays until the next full reset.

    Modular units don’t always flex. One cubby stays empty for months, the next is packed and spilling out. Meanwhile, rigid storage boxes can’t dodge wheelbarrows or redirect foot traffic. The result? You’re always working around storage when it should be working around you.

    The Real Measure: Does Your Setup Keep Up With Daily Life?

    The difference isn’t drawer count or shelf height. It’s whether your flow—grab, use, put back—survives a real week of change. Areas that do double-duty for play and projects have to adapt on the fly, not just look contained when nobody’s moving. Wall racks can flex for midsummer swaps or quick rearrangements. A mobile cart or bin might save the day when garden tasks explode or guests bring more gear. It’s the ability to tweak, not commit, that keeps things from bogging down.

    Beware any setup that traps your habits. A shed that severs play space is an obstacle, no matter how nice the doors swing. A wall system overloaded with sports gear and boots becomes a messy barricade by the end of a rainy week.

    Practical Tweaks That Cut Down Clutter Creep

    • Designate an overflow landing pad—and set it where clutter wants to gather, not where you wish it would. A crate near the wall racks can keep soccer balls and jump ropes from flooding walk space.
    • Rotate out dead corners by swapping seldom-used stuff for what needs to stay within reach. Don’t expect one layout to last a year—refresh with the seasons, or after a month of noticing what keeps getting blocked.
    • Prioritize the return trip. If any system demands reshuffling for the smallest item, it’s time for micro-changes—not just another “deep clean.” Small adjustments beat giant resets, every time.

    Why Real Fit Eats Features for Breakfast

    The right setup won’t win awards for looks but will quietly make your yard less irritating, reset after reset. Go for what matches your yard’s awkward paths and return habits, not what seems impressive by the numbers or the catalog photo.

    Wall systems keep floors in play—but rustle up chaos if overloaded. Storage units keep your gear dry, but can carve zones that block everything else. What feels “easy” on install day can quickly become the thing you avoid, if it’s not built for the reality of your space and your routine.

    When “organizing” becomes your new default activity, your storage is failing. Build for easy returns, fast tweaks, and the messes you know actually happen. That’s when outdoor storage genuinely helps, not hinders.

    For a full look at outdoor storage and real-world fit, shop TidyYard storage solutions.

  • Keep Pet Areas Tidy by Placing Cleaning Cloths Within Reach

    Simpler Daily Pet Cleanup Starts With Setup, Not More Effort

    Most daily pet mess isn’t dramatic. The real friction comes when you reach for a cloth after a water spill or a quick wipe-down post feeding—only to find the towel is across the room, blocked by recycling or missing entirely. Even the smallest missing detail—a cloth, a scoop, wipes left out of reach—can stall your whole cleanup, letting drips and crumbs collect until you’re stuck with a mess that’s harder to handle at the end of the day. What seems like an “organized-enough” setup in the morning can slowly drag your routine down by dinnertime, just because basic pet-care tools aren’t where they need to be, when you actually need them. This is where many setups quietly fail, even when everything looks tidy on the surface—revealing the everyday gap that CalmPetSupply routines are built to close.

    When a Care Area Looks Set But Still Slows You Down

    Start with a typical morning: bowls aligned, food and scoops stacked, wipes tucked somewhere “handy.” Once the day hits full speed, those details start breaking down. You reach to top off water and find toys and crumbs crowding the area, or discover the cleaning cloth is AWOL—lodged behind clutter or left in another room. The setup looks right, but the function’s never there in real time.

    You’re forced to leave drips and sticky bits “for later,” which means they solidify. When both cats and dogs share the same zones, that gap becomes an endless cycle: the dog bumps the bowl just as the cat swoops in for breakfast, messy pawprints multiply, and you skip the quickest cleanups because the tools require just one trip too many. Nothing is catastrophic, but your routine starts falling behind at every edge.

    Hidden Friction: When “Easy Enough” Isn’t Simple in Real Use

    Real-world friction doesn’t announce itself—it just accumulates. Maybe everything is technically tidy because you keep cleaning supplies tucked away, but even one extra drawer or sealed container is enough to justify letting a wet patch sit, telling yourself you’ll handle it later. Meanwhile, your pet’s paws track the mess into hallways, and the “easy enough” system proves slow when it matters.

    Every delay compounds. A once-quick swipe morphs into a baked-on patch by evening. A lint roller lives in the cabinet, but grabbing it means moving shoes or wrestling the door, so shedding sits longer and resets get skipped. Over the week, these small frictions repeat—until a simple cleaning habit feels like a chore that’s always waiting in the background.

    Real-World Scenes: Where Setup Makes or Breaks Your Flow

    Scene One: Hectic morning. You reach for a refill and step on a squeaky toy, which tips the water bowl over. The cloth you need slipped under stray mail, and instead of wiping up, you dodge the puddle—catching sticky pawprints later, after they’ve already spread.

    Scene Two: End of the day. Dried cat food hardens at the rim of the dish. The towel’s technically nearby, but grabbing it means dragging a cabinet door open behind a recycling bin. Rather than wrestling with the setup, you leave it—more gunk to scrub next time.

    Scene Three: Quick outdoor walk. The dog returns muddy. You know the brush helps, but it’s buried with leashes and harnesses. Pawprints trail into the room; cleanup gets postponed, and what could’ve been a one-minute reset becomes a late-night sweep.

    Why Setup Matters More Than a Prettier Space

    A clean look can mask repeated slowdowns. Whenever you have to shift food bags to grab wipes, detour for a towel, or dig behind toys for a cleaning cloth, the area “works” until it doesn’t—and those missed moments pile up. The best tool stashed just out of reach loses its purpose, turning what should be a one-step reset into extra work. Even the most streamlined setup can reveal cracks by week’s end, once daily pressure exposes whatever’s just far enough out of place.

    You notice the weak link most when routines overlap: the cat sneaks a second helping, the dog sloshes water across the mat, and you’re weaving around toys or bags—all while the cleaning wipe is missing in action. That’s when a setup’s convenience collapses, taking your sense of control with it.

    Practical Adjustments for Smoother Daily Flow

    The upgrade isn’t harder work—it’s in small, targeted tweaks that actually cut friction. Hanging an absorbent cloth on a nearby hook transforms delay into action: grab, wipe, hang back up—no more searching, no more excuses. Every cleanup resets before messes get a chance to harden or spread, tackling pet tracks and feeding spills with the least effort possible.

    Keeping a visible tote right next to your main care zone handles two jobs: key supplies are visible and at arm’s reach, and you spot instantly when something needs refreshing (like switching out a towel before it gets gross). This way, instant wipes after feeding and refilling become background routine—less mess, less stress, and no more dreaded “catch-up cleans” eating into your evening.

    Takeaway: Easy Access Wins Over Perfect Appearance

    Real pet care setups are measured by what you can reach, not by what you can hide. Keeping just the right tools within reach means you actually handle every small mess before it piles up. This approach shrinks routine interruptions, cuts out constant reshuffling, and lets feeding, cleanup, after-walk resets, and basic grooming all blend into the day—whether the schedule shifts or not. A neater look is only the side effect; the main advantage is less repeated cleanup strain, more reliability, and a setup that finally keeps pace with real daily needs.

    Find practical setups and everyday tools for real-life pet routines at CalmPetSupply.

  • Streamline Your Carry-On Setup for Faster Post-Arrival Movement

    Plenty of carry-ons look organized when you first pack them. But the real test hits after landing—when you’re moving fast, squeezed in the jet bridge, and every second matters. The zipped-layer order that seemed like an upgrade quickly morphs into fumbling and blocked reach the moment you need your passport or transit card on short notice. In those minutes between seat and city, structure overtakes style: the bag that looked efficient now shows its blind spots when you have to dig, pause, or grip three pouches just to produce an ID. If you travel more than occasionally, you know the discomfort—slowed lines, missed beats, and a setup that seemed “neat” but now holds you back. This is where most carry-ons reveal what really works—and what repeatedly fails.

    When Organized Isn’t Effortless: Where Carry-On Setups Fall Short

    Mesh dividers and sleek little pouches only go so far. While your bag might “present well” on the hotel bed or in the overhead, travel exposes any system that trades quick access for visual order. Land, walk, and try to grab just one thing—too often your passport is trapped under headphones you wore halfway, or your charger’s behind a snack pouch you never even needed. Every time you unzip an extra layer or reach through the wrong pocket, you’re not just losing seconds, you’re losing your place in the flow of arrivals. This kind of slowdown rarely happens once—it repeats itself, checkpoint after checkpoint.

    What really grates is how these small missteps multiply. Watch a business traveler forced to dump out overlapping pouches just to reach a laptop cable, or a family stuck shuffling bags while the crowd flows on. Your “order” never really moves with you—it waits for a flat surface, slows at every squeeze point, and demands a reset every few stops. The friction isn’t messiness; it’s the gap between design and actual use in motion.

    The Real Retrieval Test: Fast Access vs. Packed Neatness

    First reach after landing is where neat setups unravel. Airports amplify this. In Amsterdam or Chicago, you’ll see some travelers glide right through with a pass or card in hand. Others stall, stepping aside to fumble through inner pouches, double-unzipping, and blocking lines. The perfect roll of cables, or a nest of snacks in a side sleeve, all get in the way when your rhythm depends on quick, reliable grabs.

    • A passport slotted in a middle sleeve—just deep enough to miss your first reach.
    • Tech pouch buried behind toiletries, forcing an awkward juggle at the edge of a crowded corridor.
    • Loose SIM cards, receipts, or emergency cash wedged so tight with snacks or chargers you have to dump two pouches to get at anything small.

    Every extra motion—wrong zipper, dragged-out sleeve, repacking on foot—builds unnecessary tension. Miss it once and it’s a pain. Repeat it every trip and your “system” becomes the thing slowing you down, not supporting you.

    From Boarding to Baggage Claim: Where Flow Breaks Down

    Boarding and deplaning push neatness to its limits. While a perfectly packed bag inspires confidence, the real check comes in the aisle or at your seat. You’re in motion—people behind you, elbow room tight, and half your essentials still need to be re-sorted. Wrong pouch, misaligned Zip, or that single-compartment “solution” you once praised—each now slows your exit as you hunt for passes or repack headphones with one hand.

    Getting your carry-on down from overhead is just a small win. The problem sets in when, balancing bag and jacket, you only have a few moments to reach key documents or a transit card. Too many compartments or a single deep pouch means you’ll open the wrong section and scramble. Watch this pattern repeat trip after trip: that neat overhead-ready setup repeatedly trips you up at precisely the moments when pace matters most.

    The Arrival Reset: Repacking in Real Time

    Past customs, after the baggage carousel, or outside the terminal, most travelers wind up wedged somewhere, clumsily repacking or searching for a cable or card that’s nowhere near the outer layer. The clever “pouch within pouch” thinking that seemed so clean at home betrays you in the field. Reach in, tangle with small electronics or paperwork, and discover that to reset your setup requires opening half the bag—all while taxis line up and others shift past you.

    This isn’t just about time lost. Miss a document, drop a pass, or forget a charger after a reset, and suddenly “order” becomes a source of mistakes. What fixes one kind of mess introduces a new hassle under actual travel pressure. Real improvement is measured not by the fresh look of your bag each morning, but by fewer repacks, faster retrieval, and less standing still at critical handoff points.

    The Shift to Immediate-Access: Small Change, Big Relief

    Travel long enough and you stop tolerating these slowdowns. Essentials—passport, transit card, cable, keys—get a fixed spot, outboard and reachable with a single zip. No more nested sleeves or layered pouches for anything you’ll need more than once per arrival. That change alone, trimming one or two barriers to access, radically reduces the odds of getting blocked at the worst moment.

    • No more flipping through two inner bags just to show a pass.
    • No more unpacking half your main compartment just for a phone cable.
    • No more rushed stuffing, then reshuffling everything minutes later as you transit again.

    The win isn’t hypothetical: the setup works every time pressure rises. Open, grab, done. That’s real stress removed—no matter how rough the travel day, your system scales to the rush, not just to the tidy photo before leaving home.

    Routines that Survive the Travel Cycle

    Repeatable access is what holds up—trip after trip. Fixing your keys, ID cards, and key cables to a dedicated, never-moved pocket cuts out the shuffle. Constantly moving these essentials, or hiding them deep to “look neat,” only creates new search routines on every leg. Minimize shifting zones—what works on the kitchen counter gets torn apart the minute you’re moving with a crowd, forced to produce documents or cables quickly.

    Save dividers and pouches for items you truly only access once or twice: toiletries, backup batteries, extra snacks—fine for internal organization. But for any item showing up at multiple pressure points—documents, phones, or passes—outer, direct access wins every time. Small repeatable moves beat big organizational resets, easing not just comfort but overall command as airport pressure builds.

    Layered vs. Direct: The Practical Difference Across the Trip

    If your carry-on is easy to close but slow to reach into, it’s only half-useful. When retrieval means repacking everything else just to get a single item, all the aesthetic points vanish. Trip after trip, the most effective setups always feature:

    • One predictable grab for high-frequency essentials
    • Zero overlap—no hunting between three pockets for the same card
    • Pouches as separation, not as an obstacle course you run each time the rhythm shifts

    Neatness at packing is not the same as flow in transit. The difference shows immediately: does each movement—boarding, clearing security, exiting to curb—add friction or remove it? Setups that look sleek but require regular unpacking for basics become an anchor, not a tool, repeating the same minor failures every leg of the trip.

    Carry-On Structure that Moves with You

    Carry-ons get judged not when they’re fresh, but when used in real pressure loops: overhead to aisle, gate to curb, lounge to train. The carry-on that gives a direct, reliable reach for repeated-use items rarely lets you down even on the messiest trips. Minimizing the same handful of slowdowns—awkward pouch repack, blocked outer pocket, repeated digging—is what genuinely keeps the journey moving. The goal isn’t a bag with zero problems, but a structure that absorbs the annoyance for you, rather than handing it back every time speed matters.

    Find practical tools for better carry-on setups at CarryOnSupply.

  • Achieving Balanced Ceiling Lighting for Comfortable Everyday Spaces

    Your lighting setup looks finished—until your routine proves otherwise. Ceiling fixtures lined up, cords hidden, surfaces swept: it feels resolved for a day or two. But sit down at a shared desk or pace past the far edge, and the cracks appear fast—a shadow always hugging one seat, cables that start escaping their “tidy” routes, or a persistent dim zone where you actually work. These aren’t rare misses; they’re the points where “looking done” fails under daily use, forcing repeated, annoying adjustments.

    Where “Looking Done” Falls Short: The Hidden Gaps in Ceiling Lighting

    Symmetry from above doesn’t guarantee usable, shadow-free surfaces below. The reality: one seat stays in the dark regardless of where the fixtures land. The furthest spot on a dining table or worktop—prime territory for spreading out—remains weirdly underlit, while the rest falls into patches of uneven light. Even with careful downlight planning, the corners or edge-seats become the weak links, introducing friction every time you reach for papers or shift your chair.

    Most flaws stay masked during a quick tour, but the moment you use the space—leaning in to work, reading into the night—your attention snaps to these shadow traps. Cords meant to be hidden brush against shoes, mounting points that seemed subtle before now get snagged on a jacket or catch your eye every pass through the room. Visual “neatness” dissolves with every inconvenience.

    Micro-Adjustments: A Routine Interrupted

    That “resolved” look gets tested and undone with every routine. You’re always reaching—pulling a lamp closer so you can see, shifting your laptop to dodge the glare from a fixture placed just off-center. One cable detaches from its clips after a desk shuffle for a call; a discreet bracket turns into a knuckle-bumper or a visual sore point with every lap around the room. What started as a lean setup spirals into a series of micro-fixes—lamps repositioned, chairs inched away from bright spots, tabletop clutter by necessity instead of choice.

    Task Corners: Where Frustration Builds Fastest

    Desks and work surfaces—especially in multi-use rooms—reveal these design gaps right away. Take a compact office with a dual-purpose craft table: overheads flood the main section, but the perimeter—where most tasks creep—stays persistently dark. By evening, someone’s fetched a spare lamp, its wire looping unpredictably across busy paths, creating trip risks or crowded outlets. Each workaround stacks more stress, and reaching for a plug or shifting tools mid-task becomes part of the expected struggle.

    Every new device, rearrangement, or shift in the day’s use exposes fresh limits. The sense of a “clean plan” turns brittle—now it’s just a shell over constant patching and cord wrangling, with small physical irritations compounding into real drag on comfort and flow.

    Lighting the Edges: Subtle Fixes with Lasting Impact

    Flooding a room with more overhead light rarely solves these edge failures. The improvement comes from pushing light—not just out—but right to the places your routine breaks down. A slim LED bar along the desk edge flips the script: previously murky corners become plainly usable, with no more angling a lamp or blocking your own shadow. Instead of chasing visibility, the brightness lands where your hands, papers, or tools actually sit. You no longer need to reshuffle light sources after every meeting, craft session, or late-night read.

    Cable discipline shifts from “temporary tidy” to a quietly stable baseline: integrated routes and brackets mean wires retreat from your daily field of vision and physical path. No dangling reminders; no subtle daily re-cluttering. Tiny hardware choices here directly reduce distraction and pre-empt rework as the ways you use the room flex.

    Not Just Overhead: Bringing Light Down to Usable Level

    Most failed setups rely too heavily on centralized, ceiling-mounted lights. These setups produce a glare zone directly under each fixture and under-serve shelves, desk perimeters, or display edges. Move your laptop three inches, and you’re back in shadow. Place a notebook along the outer quarter of the table—a real-life behavior—and it falls into the half-lit gray. Even a well-placed fixture, if not paired with low-profile, targeted light (under-shelf strips, panel LEDs, plug-in runs), can leave users trading off between too-bright central spots and dim, frustrating gaps at the margins.

    It isn’t only about prettier light—it’s about breaking the rhythm of interruption: surprise glare when standing up, stumbling over a pop-up extension cord that wasn’t meant for daily visibility, or juggling too many support brackets just to keep things in reach but out of the way. Each missed cue is a minor drain on flow.

    Practical Setup Observations

    • Frequent Lamp Relocation: If a lamp gets pulled and pushed constantly, your ceiling coverage skips the zones you actually use—especially surface edges and work corners.
    • Cable Sightlines: When the first thing you notice is wire—not workspace—your support plan has failed quietness. Bracket and route decisions up front erase daily visual and physical obstacles.
    • Shadowed Corners: Rooms that seem evenly bright under direct daylight reveal surprise shadow pockets at night or under bad weather. Test each area against your real schedule, not a perfect daylight walkthrough.

    Reducing Routine Hassle: Small Adjustments, Big Difference

    Lighting setups that truly support daily life earn their keep with a handful of low-drama, high-payoff tweaks. A targeted under-cabinet LED eliminates the nightly search for a flashlight or stray desk lamp. Cables fixed along support lines—not swinging loose—mean less visual noise and fewer stumbles. A secondary plug-in light at the far edge of a surface lets you stop moving your chair just to get clear, shadow-free visibility. The fixes aren’t flashy; they’re friction-stoppers.

    The acid test: when lighting stops dominating your awareness, and your attention sticks to work, crafts, or conversation, you’ve landed closer to the right setup. It’s not about being impressed by your own lighting, but about using a space that just gets out of your way.

    What “Evenness” Really Delivers: Quiet Comfort Over Time

    Perfect grids on the ceiling mean little if your routine still catches on surprises. Lighting evenness isn’t symmetry—it’s whether every used surface matches your actual habits: clear, consistent, no rerouting, no visual static. The test comes weeks later: are the cables still discreet, are brackets only visible if you look for them, do shadows creep in when schedules or seasons change? The best setups quietly track what you do, adjusting once, then holding steady—so you spend zero time second-guessing the light or moving things out of the way.

    Tips to Keep Everyday Use Smooth

    • Supplement close to routine points. Mount a narrow LED along the edge you use most, not just around the room, for practical, lived-in coverage.
    • Choose bracket and cable solutions that reinforce your lines of movement. Route wires off worktop edges and out of footpaths; integrated support hardware is often quieter than decorative.
    • Audit for reality, not ideal images. Meet your space in the evening, test your real patterns, and watch for any surface that sends you hunting for more light or hiding from cables and glare.

    A room that stops forcing you to tweak, shuffle, or tolerate small annoyances is what holds up in real use. Setups that still demand intervention after move-in weren’t actually finished; setups that need nothing more than being used are the ones that last.

    Shop LightSupport for smarter indoor lighting and cable support solutions

  • Why Your Dog’s Favorite Blanket Corner Shapes Daily Rest Habits

    The weak spot appears right after every walk or meal: your dog heads straight for their usual blanket corner—only to stall if it’s folded, shifted, or tangled. A few seconds pass. Circling, nose-prodding, that expectant glance—they’re all signals you’ve seen before. It’s subtle at first, just a pause where quick settling should be automatic. But as you move the blanket for laundry, tuck it aside for vacuuming, or accidentally flip it the wrong way, those disruptions pile up. Suddenly, your daily routine is haunted by split-second delays: a leash draped over a half-folded blanket, a water bowl in the wrong position, a comfort item blocking your path as you hurry to reset the room. The day keeps moving, but with drag you can’t see until it’s built into habit. What looked like harmless comfort now becomes a repeated snag during transitions—the kind you only notice because you keep having to reach, straighten, or explain why your dog just won’t settle on cue. This is where DogPile’s world of repeated-use setup comes into focus: not with show-dog neatness, but with corners, access, and rhythms that actually fit real daily flow.

    Why Dogs Anchor to the Same Blanket Corner

    This isn’t just “my dog likes soft things.” Dogs build patterns around anchors—predictable, repeated, always-in-the-same-place comfort points. After walks or feeding, that blanket corner isn’t just fluff: it’s the permission slip for downtime. When that precise zone shifts—folded differently, moved to mop the floor, overlapped by a toy or crate—the effect is visible. Your dog’s routine trips, not because of the blanket’s softness, but because the anchor cue vanished. Suddenly you see the results: sniffs, circling, nudges, waiting. It’s a negotiation, not an automatic return to routine.

    The Overlooked Source of Routine Friction

    Most owners miss that the real trouble isn’t the blanket’s material or the size—it’s that physical anchor. Lose it by cleaning, tidying, or folding absentmindedly, and you create a tiny but persistent break in the post-walk handoff. Each time you move or rotate that favored spot, rest needs to be re-negotiated. Now, instead of a smooth transition, your dog hesitates, and you’re forced to untangle, adjust, or guide. These micro-stalls are easy to disregard—until you’ve lost five minutes finding every missing cue in a week of routines.

    How Small Disruptions Become Repeated Stalls

    It seems minor: a slightly misplaced blanket, a towel blocking the leash hook, a food bowl nudged out of line. But after each walk or meal, these small misalignments trigger a growing pattern. You’re juggling bags or groceries, maybe wiping paws, reaching for that one tool you always need—only to realize it’s behind a comfort item, folded with the wrong edge up, or simply missing from its default spot. Instead of a fast reset, you get a stop-start rhythm—one more loop around the room, one more dog circling longer than usual, one more pause layered onto an already busy window.

    It stacks up fast. The setup you thought was “organized” asks for constant small interventions: straightening, shifting, refolding, or even calling your dog back over because they refused the new placement. Your own movements slow down every time their anchor isn’t where expected. Functional order gets quietly undermined, not by chaos, but by details just off enough to break the flow.

    When Comfort Becomes a Setup Weak Point

    The visible comfort zone can hide invisible friction. A neat blanket might look organized, but if it means you’re always unboxing, smoothing, or adjusting to get your dog to settle, you’re paying for “tidy” with time. You’re not just resetting the fabric—you’re resetting your patience. That repeated pause, those expectant looks or sighs, serve as reminders that every convenience for the eye can turn into a setup weak point as soon as real-world repetition returns.

    The Cumulative Drag of Routine Pauses

    Tiny interruptions start to echo louder by week’s end. You notice this after dinner, after late-night walks, or any time a rushed transition drags. Patterns emerge:

    • Blanket in the laundry: Dog stands, stares at empty space, paces until you grab a stand-in. Now you’re hunting for a backup right when you’d rather move on.
    • Spot is there, but misfolded: Dog noses, circles, waits—refusing the offer until you get down to tweak the setup. Dinner waits too.
    • A visiting dog mixed the edges: Your own dog hesitates, checks ownership, then waits for you to intervene before settling. Another lost minute as you play referee.

    The routines “work”—but slow. The underlying drag isn’t chaos; it’s a tangle of small, recurring corrections that build up, especially during transitions you rely on to keep your day moving.

    Reset Friction—Seeing the Real Signs

    Most people only catch routine friction when it becomes impossible to ignore: the dog double-circles, sighs audibly, or pauses at rest as if something’s missing. Each little fix—unfolding the blanket just so, moving the toy out of the way, explaining to your dog (again) that the corner is coming back—turns routine management into a series of micro-explanations. It’s not stubbornness. It’s setup resistance: the difference between a functional cue and a daily stall.

    Background Stress from Repeated Tweaks

    Every time you stop to adjust the resting place, guide your dog, or free the bowl blocked by a loose comfort item, it costs attention you didn’t plan to spend. By the third or fourth reset, you’re not just fixing a blanket—you’re feeling the drag in your own routine. The real impact is cumulative: transitions meant to be smooth become peppered with minor but insistent interruptions, steadily eroding post-walk calm, post-feeding downtime, and sleep prep flow.

    Designing a Reliable Dog Rest Setup

    Swapping in a plusher blanket or a bigger bed isn’t enough if its anchor keeps shifting. What matters is choosing a rest spot that maintains its orientation, familiarity, and access through daily traffic. Keep the anchor consistent: same location, same direction, same way of unfolding. Resist the urge to “tidy” by shifting or folding something that’s already working. Make sure other essentials—leash, towel, wipes—aren’t hidden behind comfort items. Position food and water bowls within direct sightlines of the rest spot, so after every meal, your dog turns and lands, not searches and negotiates. At scale, one less circling moment equals one less strain on your own next step.

    Observing and Adjusting, Not Forcing

    When you’re sharing space—visiting dogs, moved chair, vacuuming marathon—don’t chase symmetry or tidiness for its own sake. Offer a second soft spot nearby and see which one earns true repeat loyalty. Space comfort corners farther apart if you notice dogs crowding or negotiating the same edge. Use the pattern of their choices as your guide: true consistency is measured by which setup they return to, week after week, without your prompting.

    The real goal isn’t picture-perfect order but a backdrop that disappears from your attention—because neither you nor your dog needs to “fix” it in the middle of a normal day.

    When Setup Looks Right but Still Fails Routine

    Plenty of setups read as organized—blanket folded cleanly, bowls lined up, toys in a corner. But if routines keep breaking down—circling instead of settling, repeated nudges for help, migration of items into the wrong space—that’s the true report card. The dog cares less about aesthetics and more about frictionless permission to rest. If every settle feels like a negotiation, your “neat” layout is still failing real-world rhythm. The right setup doesn’t demand reminders; it lets everyone move past it without extra work.

    Spotting Early Warnings—Routine Drag Signals

    The pattern is clear when you look for it. If every leash grab sends you rerouting around a bowl, if every walk-in finds a blanket blocking the doorway or bedding migrating into cleanup space, the cost is visible. These aren’t just stray items—they’re repeated setups that keep interrupting the next step, especially during ordinary, high-traffic moments. Pay attention after each routine transition: when your dog expects their anchor spot and hesitates if it’s not available, that’s your adjustment point. Don’t just tidy or rearrange: make the access, anchor, and pathway work repeatedly in your actual schedule.

    The Usability Difference—Not Just Cleaner, but Smoother

    The target isn’t a prettier room or a blanket that never moves. It’s less interruption, fewer silent negotiations, and quicker returns to baseline—so real routines can stay on track even after the third walk or a muddy afternoon. When setups serve their anchor purpose—visible, accessible, unfussy—both comfort and flow return. For setups, tools, and practical solutions that fit the real pressure points of daily dog life, visit DogPile’s

  • Hidden Desk Clutter That Slows Your Workflow and How to Fix It

    The trouble starts when your desk looks controlled, but your feet, knees, and chair never get a clear path. A surface wiped clean of pens and cables doesn’t mean your workflow is smooth. Under the desk, cable piles slow the chair, power bricks drift, and that storage bin you introduced for “order” quietly eats into legroom—until every entry to your workstation turns into a nudge or a workaround. You roll forward and scrape your shin against something you meant to contain clutter. By day’s end, you’ve paused three times to untangle a wheel, clear a path for your bag, or reach behind a drawer that’s never quite out of the way. The surface looks ready, but every transition is slower, and the routine stalls start collecting—unseen, but constant.

    The mistake is easy to make: under-desk headaches blend into the everyday shuffle until each session starts with minor course corrections. In most real-world setups—especially tight home offices—it’s the spaces below that test the logic of the layout. That zone is where the system either supports your natural movement, or it quietly fights you. Early signs barely register: a cord that snags a shoe, a knee nudged off-center, a bin that feels “temporary” but sticks around for months. After a week, friction shifts from barely-there to a foundation of your routine:

    • Chair wheels trapping themselves around stray power cables, breaking concentration mid-reach.
    • Knees squeezed by a misaligned storage unit, making every stretch or posture shift a negotiation.
    • Cable clusters that pass a visual scan but drag along every time you switch devices or shift a bag.
    • Bins ending desktop pile-up—only to swallow the walkway needed for an easy reset between tasks.

    The Illusion of Surface Clarity: What Hides Beneath a Tidy Desk?

    The common trap: polish the top of the desk, then offload everything else underneath, trusting that out of sight equals out of mind. It works for about a day. Cable trays deliver instant visual relief—until you try charging a second device or trade adapters and wind up wrestling cords through a cramped tangle. The neater it looks, the slower it responds to real-life adjustments.

    Rolling drawer units promise control, too. Everything gets a slot, but now the drawer box inches into your path. By mid-morning, you’re rolling your chair away to grab a notebook and the bin wedges your foot, or sticks out just enough to angle your whole position off-center. The organized desktop quietly builds new interruptions underneath: you exchange clutter above for hidden obstacles below, trading visible mess for compressed movement and slower transitions.

    Where Daily Friction Begins: The Moments That Break The Flow

    A workstation passes or fails not when you first sit down, but in the details of every return, stretch, or device switch. Most friction isn’t dramatic—it’s constant:

    • Your bag knocks a power brick from its spot, unplugging something essential mid-call.
    • Extending your leg bumps a bin that’s migrated into your main path for the fourth or fifth time.
    • Plugging in a headset means ducking under the desk, prying apart a cable cluster, and re-emerging with your focus dinged.

    These are not outlier moments. Add a monitor arm, introduce a tablet, or file desk supplies into a rolling cart, and each “solution” can shift friction from one place to another. Hiding gear below is efficient—until every added object becomes a new minor obstacle. Over a standard week, these detours slow resets, crowd movement, and quietly steal more time than any surface clutter ever did.

    Clearing a Path: Small Shifts That Made The Space Work (Not Just Look Tidy)

    Order below the desk rarely comes from adding another box or bin—it comes from removing the quiet friction points. When one rolling bin was pulled entirely, the result wasn’t just visible space: for the first time, chair movement from desk to wall happened in a single glide, not a sideways “s” around low obstacles. Adjustments got faster. The route to stand, switch notebooks, or come back during a break required almost no correction.

    Power cables used to snake along the floor, waiting to catch ankles or block chair wheels. By mounting a power strip to the back edge of the desk with a clamp, all cord slack left shoe and wheel space, instantly killing off cable drag and reducing daily resets. One clear 12-inch corridor—bare, straight to the wall—meant every return felt lighter and nothing needed to be pushed or rewound. Even under a heavy workweek, the setup re-centered in seconds, not minutes.

    Functional Tweaks You Actually Notice

    • Mount power strips off the ground: Secure them to the desk’s rear edge or into an elevated tray; outlets are accessible, and all the plugs stay outside the chair’s wheel-path.
    • Anchor cables above leg level: Use clips or a cable sleeve under the desk—cables stay parallel to the back, not trailing under knees or shoes.
    • Designate one-sided storage only: Anchor any under-desk unit fully to a lesser-used edge, keeping the main entry and leg zone unobstructed. Any storage you roll in and out is likely to end up in the way.
    • Edit, don’t accumulate: Each extra bin or cable box multiplies interference. The less you have to alter your line of movement, the more fluid every reset and shift becomes.

    Everyday Questions: Getting Under-Desk Setup Right

    Where should cables and power strips go to minimize under-desk friction?

    Clamp power strips to the back edge of the desk instead of letting them rest loose on the floor. Route all primary cables directly along the underside, behind and above where knees travel—leg and chair movement should never have to dodge stray wires. For frequent swaps, cable clips let you pull or add cords without dislodging the entire setup or reaching into a mess.

    Rolling drawers vs. fixed storage—what’s actually less disruptive?

    Rolling drawers rarely behave as intended in limited spaces—after a week, they end up floating into high-traffic zones, blocking the natural approach for legs and chair. Fixed storage, anchored far to one side (the non-dominant leg), always keeps the main movement lane free. For repeated resets, immobile storage is clearer, while anything rolling quickly becomes friction you have to manage.

    What’s the most common under-desk mistake that kills flow?

    The pattern is always overcrowding: too many things vying for the same inches of movement path or plug access. If cables or boxes are anywhere in the main chair glide or leg extension zone, every transition gets harder. If sitting down or shifting out feels like a tactical puzzle instead of a single move, the under-desk plan needs a reset.

    Predictable Pathways, Not Just Cleared Floors

    Workstations that actually perform—especially over high-repeat sessions—rely on predictability below the desk, not just looks above. The only success test is whether you can slide in, shift leg position, and get up for a break without noticing the storage or the cables at all—every single time. After a day of interrupted resets, or a week of nudging bins to reach the screen, the “neat” desk shows its gaps.

    Often, fewer under-desk features mean better daily function. Instead of more organizers, start subtracting or sharply limiting anything that overlaps main movement or power routes. When cable paths, plug points, and storage units are set and clear, the gain isn’t surface order, but the vanishing of small distractions: you stop thinking about barriers altogether.

    If every workday starts with minor corrections, try removing one storage piece, lifting the cable cluster, and carving out a single clear chair lane. Most setups feel instantly lighter, and that fast, brainless re-entry is the whole point of an effective under-desk design.

    Explore the full WorkBasic collection

  • Why Wall-Mounted Storage Outperforms Floor Units in Busy Workspaces

    The real mark of an organized garage or workshop isn’t how it looks after a deep clean—it’s whether you can move, grab, and reset gear easily, day after day. The frustration comes not from a pile of clutter, but from a setup that turns every reset into a minor obstacle course. For all the talk of order, a space that seems “organized” on Saturday morning can quietly unravel by Wednesday, especially when floor units trap movement and collect overflow. In contrast, wall-mounted storage supports your routines—keeping paths clear and resets near effortless, no matter how many projects run back-to-back.

    Beyond the First Clean-Up: Where Friction Actually Starts

    That first hour after a big reorganization—rows of floor bins lined up, racks standing tall—feels like a transformation. Tools are sorted, everything visible, the floor reclaimed. But the testing ground isn’t the “after” photo. It’s what happens when you’re coming in with muddy boots one day and switching out garden gear the next. Racks inch into walkways. Bins scoot closer to doorframes. Suddenly, the space that felt wide open becomes a series of small detours and awkward hesitations.

    By the second or third reset, the cracks really show. Shoes pause at the edge of a shelving unit that’s crept forward, or you hesitate before rolling a cart that’s blocking the main lane—again. Resets go from a sweep of the hand to a multi-step dance: move this, shift that, just to reclaim the movement you thought you’d built in.

    The Hidden Problem with Floor-Based Storage: Movement Interruptions

    Floor units organize your gear—but claim your space in the process. There’s an initial calm: modular bins, racks, and carts suggest flexibility. Then daily reality intrudes. You haul out a lawn mower, return with a half-used tool bag, or grab a cleaning bucket in a hurry. A bin doesn’t make it back perfectly flush. A cart is left halfway between bench and exit, subtly wedged where you need to walk.

    Soon, what once held overflow becomes a magnet for it. A shovel is nudged to the wrong side of a freestanding shelf and stays there all week. Gear piles up against the “front row.” High-use zones morph into clutter traps, while corners sit empty or awkwardly unused, since floor storage is hard to move once overflow collects.

    Real Example: When Floor Overflow Slows Everything

    Picture the typical weekend reset. Hoses dry out by the wall, boots come off in a hurry, an overstuffed bin lands where you normally turn the cart. By Wednesday, you need to slide that bin aside just to carry groceries through, then shove a project crate back in line. The five-minute tidy becomes a multi-step routine: move-bin, pick-up, restore-path, repeat. The result isn’t chaos, but a slowing drag—more shuffling, less progress, every single week.

    Wall-Mounted Rails: Preserving the Flow of a Working Space

    A simple rail along the studs, a tidy bank of wall hooks, or a mounted rack seems almost insignificant at setup. But the shift in daily use is profound. No more stepping around bins or finding the cart’s in your way again. The floor stays open, with clear lanes through every high-traffic area—even on the busiest days.

    Returning a broom or tote is a direct movement, not a puzzle. The “return path” never gets choked with overflow, because everything parks above ground zero. The result: access stays quick, resets shrink back to seconds, and the garage feels ready for actual work—not just for show.

    Resetting Doesn’t Have to Get Harder—If the Floor Isn’t in Play

    Take away just two freestanding bins and you feel it instantly: straight-line movement between entry and workbench, no more weave-and-dodge through awkward footprints. Overflow tucks onto the wall or hangs in dead vertical space that never got used before. Resetting stops being a chore because there’s nothing left to drag, stack, or shuffle first. The area simply works, over and over, without a hitch.

    The True Cost of “Making Room” Again and Again

    Any floor footprint—no matter how efficient on paper—becomes a bottleneck with regular use. Quiet Tuesday? No problem. Three weekends in? The rack near the workbench now demands a sidestep every time you cross the room. Routine movement slows to a shuffle. Tools get left out, not from laziness, but because the path back is cluttered.

    This slow build-up—the quiet reshuffling, the subtle blockades—creates a hidden tax on your time and willingness to put things back. Before you know it, tasks get put off, not because you don’t want to do them, but because you’ve learned to expect a micro-hassle just to find a clear route.

    Designing for Routine: Why Floor Space Matters Most

    Order should support movement—not interrupt it. The setups that actually last aren’t just about maximizing storage, but about minimizing interference with the everyday flow. Wall-mounted racks don’t fight with carts, tubs, or boots—they slip seamlessly into the backdrop. There’s rarely a need to “make room,” and resets keep their original speed even as the area gets busy.

    Practical Tip: Protect Your Return Path First

    When rethinking your space, don’t just count storage slots—walk the actual route from entry to bench to door. Any item that repeatedly needs shifting—a cart, a bin, that “temporary” rack—is a candidate for the wall or for removal. Sometimes eliminating a single floor piece opens up an entire workflow and stops overflow before it ever starts.

    How Wall vs. Floor Storage Really Performs

    Why do wall-mounted rails keep things simple? It’s all about keeping the reset direct: grab, use, return—in one motion, with nothing to step around. The floor stays clear for work, and overflow never gathers in the main lane, so daily order is easy to maintain.

    Where do floor systems fall short? Anything that sits where you walk will become a landing spot for stray gear, stray bags, and the unfinished business of daily projects. More steps, more shifting—and more frustration with every round of cleanup.

    What are the pitfalls of wall setups? Overcrowd a wall or misplace the hooks, and you end up with dead corners or a jumble of tools that don’t really see use. However, unlike floor clutter, these issues don’t block movement—they just waste potential, which is a much easier fix.

    Reset Routines That Make Sense After Real Use

    The best setups don’t just look good on reset day—they stay easy for months of actual, messy use. Wall-mounted storage keeps lanes open and routines intact, so you spend less time reshuffling and more time actually working. Clutter has nowhere to collect and it’s clear what belongs where—so there’s never a question of “where to put this” when you’re done.

    If you want storage that works with your movement, not against it, start with the return path and keep your floor as free as possible. See storage options built for real-world resets at StackNest.

  • How Vertical Storage Solutions Keep Utility Rooms Organized Under Pressure

    An entryway doesn’t fail because it looks messy—it fails the moment it can’t bounce back from your real, repeated comings and goings. You set up shelves, a bench, maybe a few baskets. At first, everything holds. By midweek, though, shoe rows sprawl past their bounds, bags edge toward the door, and the bench—meant for a quick sit—gets buried. What started as “just for now” becomes the default: gym bag on the bench edge, umbrella halfway off, out-of-season boots waiting for a spot but never quite making it back. The problem isn’t a lack of storage. It’s the way the system starts dragging—resetting takes too long, categories blur, and the pressure to maneuver through the threshold grows every day. The entry space you wanted to smooth your routines now slows every exit and return.

    Where Well-Intentioned Setups Break Down

    On paper, a couple of shoe shelves, a low bench, and a few baskets tick all the boxes. In actual use, their limits show up fast. Shoes stray and multiply, forming new lines along the tight walkway, forcing you to zigzag instead of stride. The bench? It hosts one bag, then two, then a scarf, then the mail—a seat turning into an obstacle course. Temporary piles go ignored, then harden into permanent clutter, as each rushed day lets the overflow stay put. Five days later, the “system” looks intact but works against you every time you need to move quickly or share the space.

    Blocked movement is the early warning sign. If grabbing a coat requires unstacking a pile or shifting three bags, your storage isn’t keeping up with your pace. Instead, it piles on friction—forcing micro-decisions and repeat work each time you step in or out.

    After the Initial Calm: Signs of Creep and Drift

    Organized storage holds just long enough to deceive you: it looks fine day one, even day two. But watch the space after back-to-back school runs or two wet days in a row:

    • Shoes overflow, forming a second, unofficial row at the entry to the hall.
    • Bags and spare gear huddle in corners, squeezing out space for daily grabs.
    • The “just for a minute” bench pile becomes a layer you have to move before sitting.
    • Mail, bottles, and odd objects wedge their way onto any flat edge, crowding out the gear that should be easiest to reach.

    Category drift takes over: Items blend zones, half-in, half-out. Suddenly, there are boots in the mail tray and keys tangled with hats. The more surfaces get used, the more you improvise—and the more time and energy every reset demands.

    Real Rush, Real Friction: Everyday Use Scenes

    The Drop and the Backslide

    Picture the morning rush: someone searching for shoes among the pile, backpack half-zipped on the edge of the bench, keys missing under yesterday’s scarf. Cubbies and bins exist, but full or wet hands make shortcuts tempting—so items settle on the closest open spot, even if it blocks the path. One stray bag turns three shoe spots into trip hazards. Instead of grab-and-go, you get bottlenecks, sidesteps, and forced apologies just crossing the threshold.

    The Spread of “Just for Now”

    Deep bins and big baskets hide the mess at first, but by Wednesday, you’re fishing for a glove under last week’s mail or shifting art projects to reach today’s essentials. Every temporary dropzone raises the barrier to a true reset. Give it a few days, and it’s no longer a quick pick-up—now it’s an hour-long dig, or nothing at all. By Thursday, the “cleanup” isn’t a routine, but a postponed project.

    Vertical Versus Horizontal: Why Shape Wins Under Pressure

    The orientation of your storage controls your entry flow. Wall-mounted racks and slim, segmented vertical units force each item type—shoes, bags, hats—into a visible, easy-access zone. There’s nowhere to let clutter hide. Vertical shapes preserve walkways, so overflow can’t sprawl across your only path out. Category boundaries stay obvious, making it clear what’s out of place and where the reset should happen.

    By contrast, benches and deep horizontal bins invite trouble. The broader the surface, the wider the slow spread: shoes crawl out, stray mail stacks up, and the “quick grab” zone clogs up by midweek. Heading out means shifting things just to make space—which quietly lengthens every re-entry and exit.

    Making Returns Effortless: What Actually Holds Up

    The best setups that last through real-life pressure all do the same things:

    • Shallow, divided landing spots: Each item group has a clear zone. Returning it is direct and visual. Deep bins disguise the mess but never make routines easier.
    • True open access: Shoes or bags drop back into place with one hand. No stacking or re-arranging to find a spot—meaning less excuse for “just for now” piles.
    • Pathways stay open: Walkways never narrow around collected gear, because vertical setups fence in drift. You pass through, not around, your storage.
    • No awkward steps: If the return takes too much effort—moving other items, opening lids—the routine breaks. Survival setups make returning a habit, not a task.

    The difference is measurable each time you reset: a clear, segmented structure shrinks “reset” from minutes to seconds. The urge to just drop things disappears when the return spot is unavoidable and easy. By the end of a wild week, a quick pass is all that’s needed—not a drain of your Sunday energy.

    Signs Your Setup Is Quietly Failing

    • Are you always shifting something just to reach the door?
    • Do shoes and bags disperse further by Friday than they began on Monday?
    • Does restoring order mean committing half an hour, not half a minute?
    • Are deep bins and closed cabinets used for offloading, not daily routines?

    If any sound familiar, your entryway isn’t disorganized—it’s working against you. It looks passable, but eats up extra effort with every threshold crossing. Until each category gets a fast, reliable home—visible, ready, easy—you’ll keep battling the same cycle: drift, delay, and rework.

    How Better Structure Cuts Down on Reset

    The only setups that survive repeated, real-world use are those that match the way you (and other people) move through the threshold—hurried, unplanned, loaded down. A segmented vertical rack, clearly split for shoes and bags, redirects every item back to its corner. Shoes don’t flare into walkways. Bags don’t seed new drop zones by the door. Everything returns with less effort, so the reset is a minute, not a mood.

    The gain isn’t in showroom looks or first-day perfection. It’s day-five function: smooth entries, clear paths, friction cut down to size. The entry zone won’t ever be spotless, but it won’t slow you down. In a space built for real-life churn, you notice: the biggest change is how little you have to think about it after the setup actually fits your routine.

    For practical storage setups that actually stand up to rushes, weather, and the routine drift of real life—not just the first day’s organization—visit Betweenry.