Category: Tools & Workshop

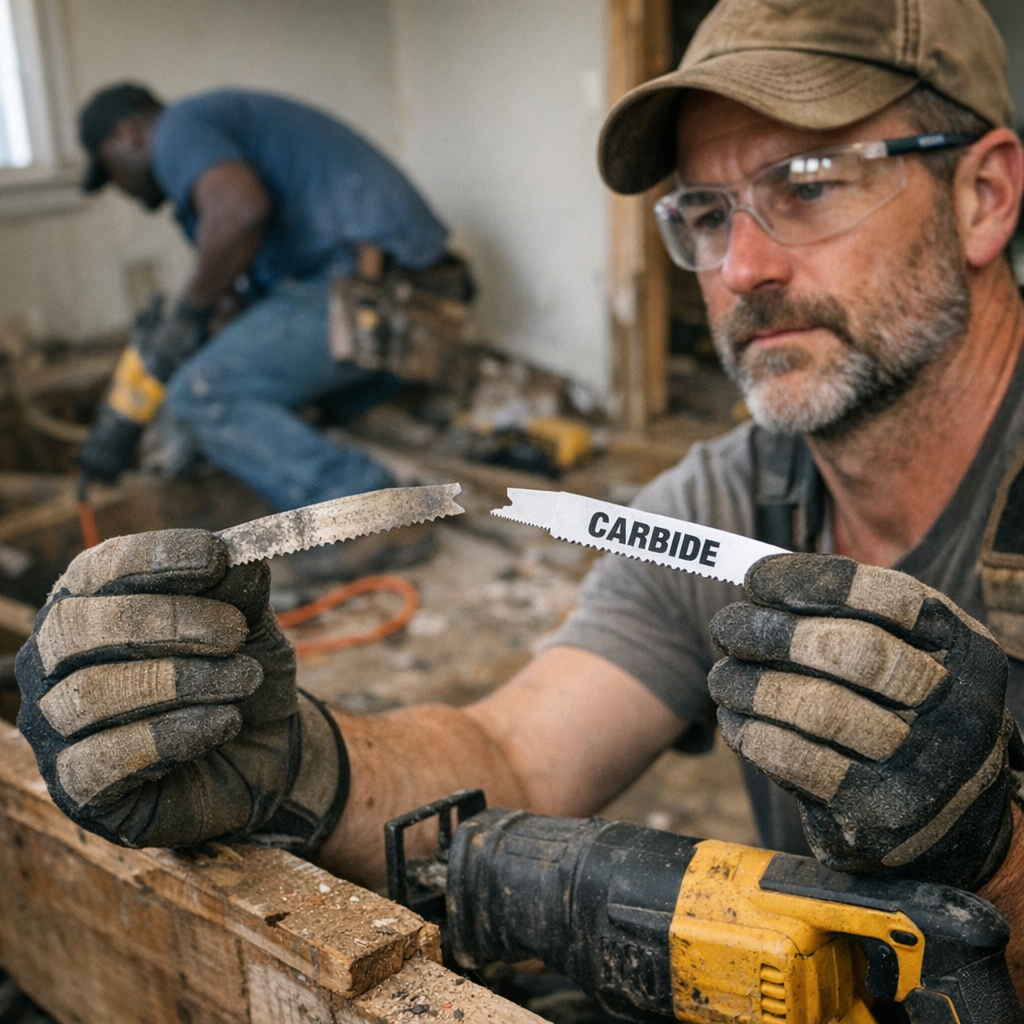
  • Choosing Between Bi-Metal and Carbide Blades for Tough Cutting Jobs

    The saw’s kicking. You’re halfway through a stack of nail-riddled studs—another gritty remodel, another mix of old wood and surprise fasteners. The first few cuts went smooth, but now each pass drags. Your blade flexes. Edges stray off course. Cut ends fray and splinter so badly you start dreading the cleanup. This is exactly when you stop caring about blade specs—and start caring about which blade keeps you working instead of fighting your gear.

    The Hidden Pain of “Good Enough” Blades

    When you’re ripping through clean, hardware-free lumber, nearly any new blade does the job. Bi-metal, carbide-tipped—they look the same out of the box, and both feel sharp on that first stud or two. That’s why the hardware aisle makes it seem like blade choice is an afterthought. But in the real world, jobs rarely stay textbook neat for long.

    Why Decent Suddenly Isn’t

    The real gap opens the moment a blade meets nails, screws, or composite—when you swap a trim-out for demo work, or hit a buried bracket nobody warned you about. Bi-metal teeth round off fast. Each push needs more muscle. The saw starts protesting, heat builds up, and every little shake in your arms gets amplified. By cut ten, you’re not slicing—you’re wrestling. By cut fifteen, you’re mentally tallying the extra sanding and recuts ahead.

    When the Material Fights Back

    Not every board wants to be cut. Fiber cement, bent-deck lumber with secret fasteners, old siding layered with staples—these materials grind down a blade quicker than you’d believe. With a bi-metal blade, two or three decently clean cuts often become an uphill slog of smoke, noise, and ugly kerfs. The saw vibrates, dust erupts, and soon, correcting a ragged finish takes longer than the cutting did.

    Carbide-tipped blades don’t just outlast—they outwork. Even on abrasive composites, or plowing through drywall with hidden conduit and nails, they keep their edge. Instead of burning through five blades, you’ll often finish the job with one, still sharp enough for a presentable cut. Every pass feels steadier: less wandering, less force, and less guesswork about where your cut is heading.

    Scene in Reality: Reno Wall, Hidden Headaches

    Picture a string of still-painted joists riddled with old finish nails. The job: cut out every last one, fast. Start with a bi-metal blade—first, clean, then every cut gets shakier. Your hands buzz, forearms tense, and the saw’s sound changes from a hum to a grind. Switch to carbide, and suddenly, the work is predictable again. Cuts run straight, the line doesn’t stutter, and tool vibration finally settles. Now it’s your work that sets the pace, not your blade’s mood swings.

    Dull Blades—The Real Cost You Pay

    We’ve all tried stretching a blade: flipping it after dulling one edge, clearing build-up, nursing it through “just one more” pass. Sometimes, that hack gets you through. Just as often, it leaves you with bad lines, extra sanding, and burns on both your cut and your patience. Tool fatigue sets in—the blade flexes, your saw jumps, and suddenly, you’re patching damage just to keep things presentable.

    The real cost isn’t the blade—it’s the compounding aggravation of unpredictable performance. Bi-metal blades, once dulled, start wandering, carving wider, less controllable paths that mean rework or filler. Even the most seasoned builder can’t sand away a bad cut made with tired steel teeth.

    Carbide-tipped blades aren’t a cure-all, but they take the edge off these headaches. On tough jobs—laminates, structural lumber riddled with hardware, or any mix of nails, screws, and stubborn glue—you get more cuts per blade, steadier hands, zero drama. That steadiness and control often mean less rework, less fatigue, and, in a tight deadline, the difference between finishing before dark and apologizing to a client for the dust and filler you left behind.

    The Subtle Impact of the Right Blade

    It’s not the badge—it’s the output at hour three that matters. The right blade keeps your workflow moving. Cutting more, stopping less. I’ve switched to a 6-inch carbide, 8 TPI, for demolition after losing whole afternoons nursing bi-metal blades. The difference: one blade lasted an entire teardown and cut the time I spent with a belt sander by a third. Not magic. Just sharper, and it stayed that way to the bitter end.

    When It’s Time to Go Carbide

    If you mostly handle single-pass trim work, or standard pine studs with the rare staple, bi-metal is fine—until the job isn’t. The grind starts when you’re stuck cutting reclaimed wood, demo-ing through layers of material, or facing run after run of abrasive composite. That’s when bi-metal chews through your patience and your budget.

    Carbide makes the grind routine, not a hassle. You notice it when the twentieth board cuts as cleanly as the first. When you’re not stopping to clear hot blades or breathing in clouds of dust from burned-out steel. In those repetitive, abrasive conditions, the return is less fatigue, fewer crooked lines, and a workflow you don’t have to keep interrupting for tool swaps or finish repairs.

    Pro Tip: Tag Your Blades, Control Your Downtime

    If you can’t predict what each job throws at you, stash both types. But when you hit the hard stuff—hidden fasteners, rough edges, weird laminates—send in carbide and keep it marked for demo. The difference isn’t just a longer-lasting blade, but fewer fixes at cleanup, and less time wondering which cut you’ll need to redo.

    The Takeaway: Field Reliability Over Factory Specs

    Blade labels tell you little. What matters is out there: repeated, messy, unpredictable cuts. Carbide delivers a steadier cut, a stabler saw, and a job that doesn’t get stopped cold by the wrong tool. For the work that pushes back—nails, mystery metal, multi-layer boards—the upgrade is visible, not theoretical.

    Forget the packaging. Next time the job kicks up more than chips and sawdust, you’ll know why your blade choice wasn’t just an afterthought—it was the difference between job done and job delayed.
    http://gumboll.myshopify.com

  • Choosing Between Pull-Out and Fixed Pantry Shelves for Better Storage

    The state of your pantry—orderly or chaotic—often comes down to a single, invisible factor: shelf style. If you’ve ever wedged a bag of groceries onto an already-crowded shelf, or found yourself restacking boxes just to reach one unlabeled can, you know the hidden negotiation behind every “organized” pantry. Pull-out or fixed—your choice doesn’t just shape how your shelves look. It quietly controls whether your pantry works with you, or against you, every time you open the door.

    Why Shelf Design Makes or Breaks Your Pantry Over Time

    Open a freshly organized pantry and both pull-out and fixed shelves give you that staged, picture-perfect moment: boxes in neat rows, everything upright, nothing lost. But real use doesn’t freeze in this snapshot. Kids grab snacks from the front, last week’s soup slides backward, a new haul of pasta finds the only open space—behind what’s already there.

    The real difference appears not on install day, but in the weeks that follow. Organization unravels by inches. Easy access—the promise of every storage system—gets chipped away by hidden layers, overstuffed bins, and the quiet creep of disorder across every shelf.

    Where Fixed Shelves Frustrate in Daily Kitchen Life

    Invisible Stock, Repeated Reach-Arounds

    With fixed shelves, the routine is familiar—and frustrating. You reach for oatmeal and remove an entire row of boxes just to see if it’s still hiding at the back. Deep shelves tempt you to stack and layer, but the price is always convenience: crushed snack bars, toppled jars, and long-expired cans gathering dust in the unseen rear. After a busy week, the front may still look organized, but the back is pure guesswork.

    Refilling after shopping rarely means just adding—more often it’s reshuffling, stacking, trying to find space without knocking over last week’s order. Small items vanish behind larger packages. That package of rice you bought “just in case” becomes a yearly discovery, not a current ingredient.

    Why Pull-Out Shelves Change the Game

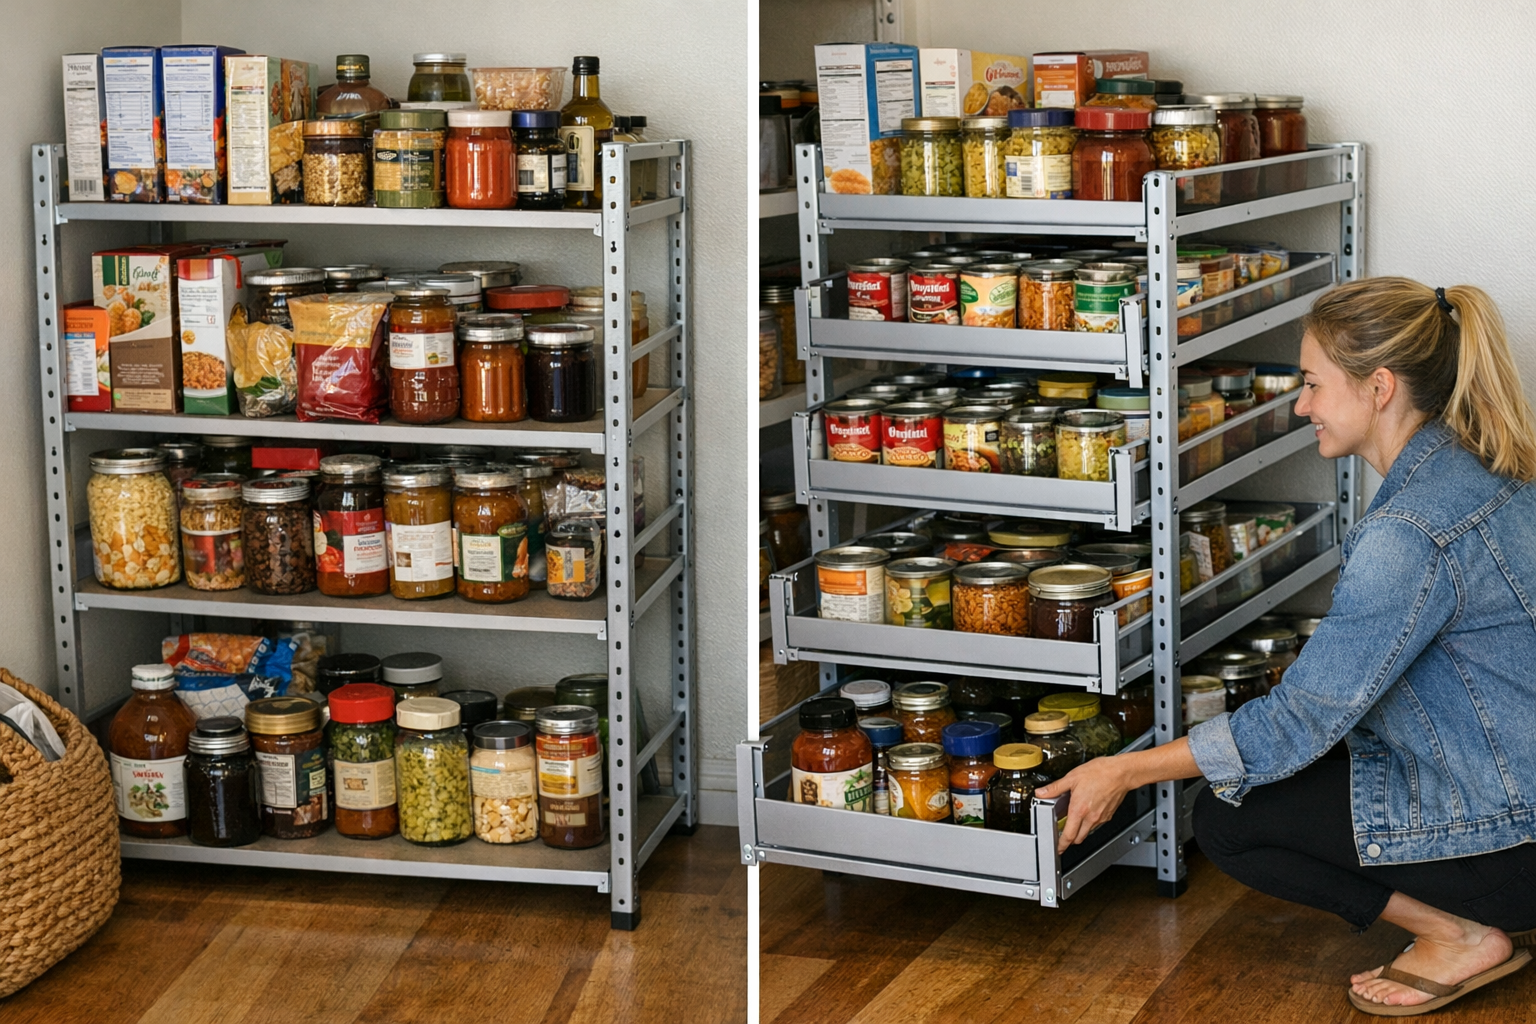
    Pull-out pantry shelves aren’t about adding space. They reveal what you already own—no digging, no shifting, no forgotten corners. Whether you’re prepping dinner or composing a lunchbox, a single pull instantly lines up every can and box. Pasta is visible. Soup isn’t hiding. The question “are we out?” turns into a quick glance, not a scavenger hunt.

    The day-to-day impact sneaks up: organizing no longer means emptying half the shelf. There’s less double-buying (“I didn’t know we already had two jars of salsa”) and fewer minor avalanches when you reach for something in the middle. And perhaps best of all, habitual clutter fails to take root because the shelf surface never disappears from view.

    The Hidden Downsides of “Tidy-Looking” Fixed Shelves

    Even the best-looking fixed shelf setup breaks down faster than you expect. As weeks go by, single categories blend, bins that made sense fill with mismatched items, and the back-half of the shelf becomes a no-man’s land for orphan snacks and backup supplies.

    These slow-burn problems linger: food waste from lost items, accidental duplicate purchases, and the slow loss of category clarity. Every “quick” tidy-up just delays the full-on reset that, inevitably, comes when you can’t find a core ingredient.

    Pull-out shelves act as a self-correcting system: everything’s visible, so you don’t end up building accidental stockpiles or discovering mystery cans months later. Adjusting, restocking, and spot-sorting all happen in the open—no need to excavate. Even after a heavy shop, realignments are fast and intuitive.

    When Deeper Shelves Aren’t the Solution

    It’s easy to think deeper shelves equal better storage: more depth, more supplies. But this logic breaks down in practice. Deep, fixed shelves turn into dark zones where forgotten items go to hibernate. Piling up fancier vertical stacks only accelerates disorder—unstable towers topple, bags in the back never see daylight, and the time required to reset climbs higher every week.

    Pull-out shelves unlock the entire depth without forcing you to stack, bend, or blindly reach. You access the back as simply as the front, and every inch is equally useful. Instead of shifting rows, you regain both visibility and speed—with no untidy collapse waiting by Friday evening.

    One Shelf, Noticeable Difference: Where the Shift Pays Off

    Sometimes you only need to swap one shelf to see the change. Convert the hardest-working zone—like your bottom pantry shelf—from fixed to pull-out, and the relief is immediate. Post-grocery restocks stop being a clumsy shuffle. Cereal stays lined up instead of buried. The back wall no longer grows forgotten towers. Forgotten spices and snack bars stop multiplying—because nothing is stuck out of sight.

    What used to take fifteen minutes—pulling, sorting, repacking—shrinks into a few simple motions. Even occasional batch resets feel lighter, because the shelf’s transparency stops buildup before it starts. If you’re short on time or patience, this one swap buys back both.

    Tip: Don’t Overcrowd Your Pull-Outs

    Pull-out shelves do the heavy lifting for you, but they have limits. Distribute weight evenly and avoid cramming the edges—overloading can strain the hardware and shorten lifespan. Treat them as practical helpers, not infinite storage, and they’ll save you daily aggravation for years.

    When Fixed Shelves Still Work—And Where They Don’t

    There are places where fixed shelving holds its own. Ultra-shallow shelves—where everything’s in one row—don’t develop the “hidden layer” problem. If you can always see every item in a single glance, fixed may be just right and mechanically simpler. Corner niches, tight utility closets, entryway cubbies: anywhere that makes layering impossible lets fixed shelving pull its weight without becoming a future headache.

    The Shelf Test: How Much Work Do You Do?

    The real assessment isn’t about what looks good. It’s about how often you’re forced to fix, search, or restart your order. If every restock feels like defusing a delicate tower, or if “resetting” means pulling half your inventory just to see what’s left, your shelves are working against you.

    Sometimes clarity is the best upgrade: a single shelf that removes the blind spots, a system that gives up hiding spots for lost ingredients, or a reset routine that finally fits the rush of weeknights. Whether it’s your pantry, crowded laundry wall, or the zone where household chaos gathers, the right shelf shifts your daily effort from “constant correction” to “occasional adjustment.” One sliding shelf often keeps the whole system intact, even when everything else feels one step behind.

    Explore practical storage solutions from ClosetWorks

  • Why Modular Storage Systems Need Space to Stay Functional Over Time

    The truth about “organized” spaces shows itself fast—usually the first time you try to get actual work done after installing a modular setup. Maybe you just hung a grid of wall panels, rolled in new bins, or filled up sleek shelving. For an afternoon, everything looks lined up and full of potential. But step into most workshops or garages a week later, and the honeymoon phase is over. Now you’re wheeling carts into tight corners, sidestepping an out-of-place bin, and reaching—again—for the same tool wedged awkwardly behind something else. The setup that seemed perfect on day one quietly reveals its limits as daily habits start to wear grooves right through the plan.

    The Mirage of Day-One Order

    Anyone can arrange bins in tidy rows and park carts flush up against each other to maximize open floor. When everything’s static, the layout holds. But routines pull the seams apart. The third day you roll your toolbox in, the cart snags because the “plenty of room” you measured is already down to an inch. The cabinet door only swings partway before bumping a shelf. A single corner becomes a go-to dumping spot because it’s the closest flat surface. Small misalignments feel minor—until they’ve turned every trip across the space into a contorted path between obstacles.

    It’s always something: a drawer that won’t close unless you shuffle what’s in front of it, a tool chest that creeps out of alignment every time you move it, or a rolling bin that’s technically mobile but has no easy way through the maze. Suddenly, what looked like maximum storage on install day becomes minimum maneuverability.

    When Every Inch Is Spoken For—But You Still Can’t Move

    The urge to fill every available space is powerful. A row of storage running from wall to door, bins pressed edge to edge, wall racks slotted into every stud—they all signal efficiency. But in use, those “gained” inches often cost you flexibility where it counts. A cart that fits only in one spot feels less like a solution and more like a barricade. If you have to juggle three things just to put one away, you’re not saving time—or your sanity.

    This problem isn’t just underfoot. On the walls, bins inch out of place with every grab, shelves flex under lopsided loads, and that one awkward tool winds up sandwiched at the wrong angle, hard to see and harder to retrieve. Wall space can be “used,” but if it’s not actually accessible, it becomes visual clutter—a background mural of things you keep meaning to reorganize. This kind of invisible drift is the enemy of easy returns and smooth routines.

    Overflow’s Favorite Hiding Places

    Most setups fail in the same quiet ways: a shelf end that turns into a magnet for misfit odds and ends, an underused tray that turns “temporary” into permanent, a mobile drawer that never quite returns to its slot and just keeps creeping out. The same corners collect wayward screws, forgotten gloves, and the things you “just set down for now.” Over time, these blind spots demand your attention but only reward you with the need for more reshuffling.

    Movement Obstructed—One Shuffle at a Time

    Start tracking how often you find yourself nudging, twisting, or sidestepping just to get where you’re going. Every time you have to slide a cart out of the way, reach awkwardly around a cabinet, or backtrack because a bin blocked a walkway, the setup is dictating your routine—not the other way around. These interruptions multiply: what starts as a minor delay becomes a constant slow-down, with frustration growing every time you ask yourself, “Didn’t I just fix this?”

    Micro-Shifts Add Up—And Reveal the Real Weakness

    No modular solution stays frozen as installed. Rails can loosen, bins drift from their spots, shelves sag, anchor brackets flex under real loads. The question isn’t if things will move—it’s whether your setup allows for it, or falls apart under the pressure. Sometimes the most productive gap is the one everyone else would tell you to close.

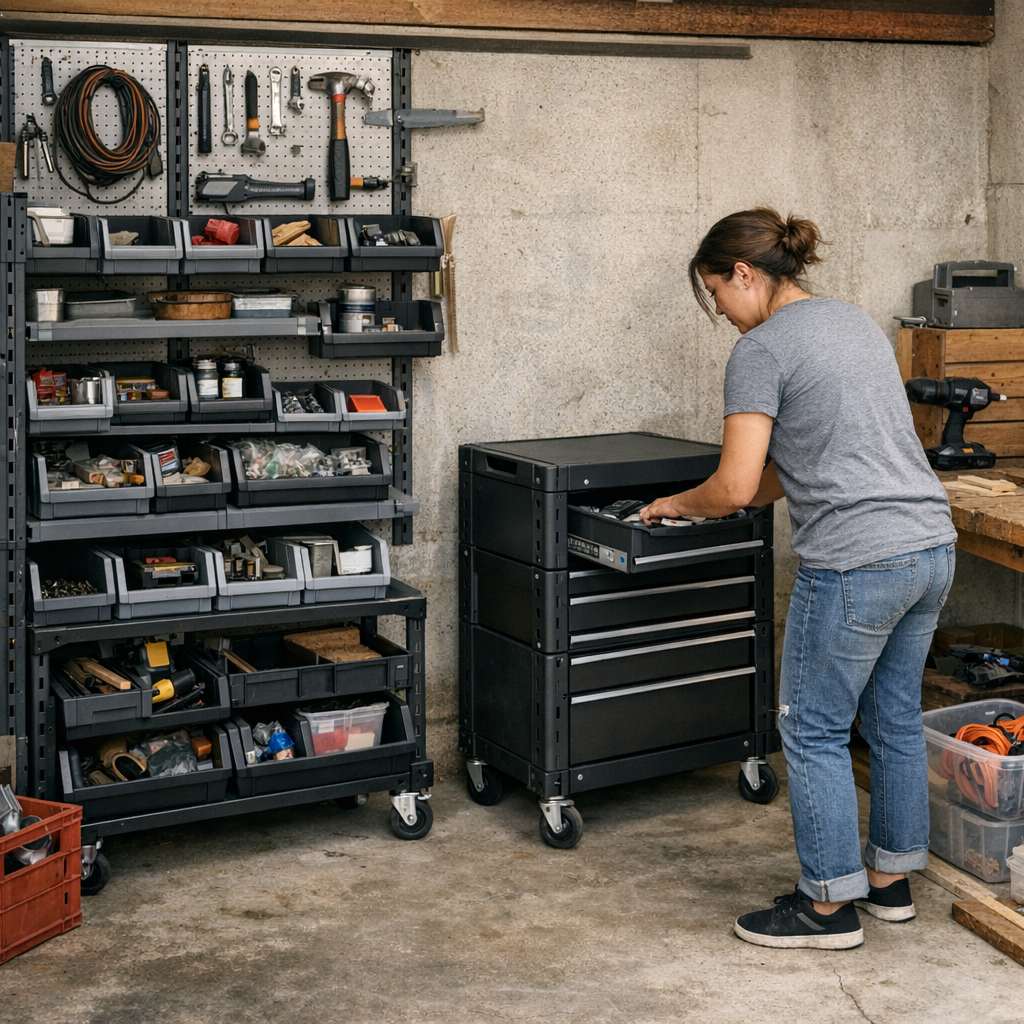
    One real-world proof: In a packed garage, leaving a six-inch space beside a main walkway looked inefficient—until the rolling cart zipped through cleanly every day, without scraping bins or catching wheels. The gain wasn’t storage; it was flow. There were fewer lost parts, fewer “just set this here for now” pileups, and less time spent yanking things back into place.

    If You’re Always Tinkering, It’s Not Working

    When you have to reset things after every project, or constantly scoot bins around just to move, the setup has failed the real test—not enough give for the way you actually use your space. Fixed units force consistency but can block new needs. Modular units promise flexibility, but if the pieces drift, tilt, or jam the minute you start moving, they become maintenance projects themselves.

    A shelf with no side support slowly skews. A rolling bin without real lanes gets wedged in wherever it fits. And an “overflow” zone that wasn’t given a real return function will keep overflowing—every week.

    Design for Routine, Not Just for Show

    The setups that last aren’t the ones with the most bins per square foot, but the ones with lanes left open for carts, real breathing room for quick returns, and landing zones for the things you’re always grabbing. Don’t trick yourself into cramming in “just one more” shelf or bin unless you’ve seen how the flow actually works.

    Pay attention to where clutter repeatedly accumulates. If one tray or corner always needs a reset, rework its purpose, not just the placement. Simulate a real workday: wheel out carts, recoil hoses, re-shelve tools at their actual pace. Fix anchors, brace shelves, and most importantly—leave functional gaps, even if they look like “empty” space.

    Small Tweaks, Outsized Results

    The relief often comes from fixing one snag: shifting a cart’s location so it never blocks a walkway; giving everyday tools their own return bin instead of squeezing them onto the nearest shelf; bracing a cabinet so the drawers always track straight. These behind-the-scenes adjustments carve out time and make routines less frantic, even if nobody else notices the difference.

    Bottom Line: Lasting Setups Make Room for Movement

    The best-organized spaces aren’t the ones that never look messy, but the ones that keep working when things are going full tilt—tools out, bins refilled, carts rolling, and new projects happening alongside old ones. If you’re constantly resetting, you’re just maintaining an image—not a routine. Build in lanes for return trips, anchor where drift keeps happening, and allow yourself some margin for mess in exchange for freedom to move.

    Leave space for your real habits, and your setup will earn its keep long after the “after” photo fades. Setup that tolerates real movement is the only kind worth building—and the only kind that actually lasts.

    http://stacknest.myshopify.com

  • Why Hard Cases Outperform Sleeves for Reciprocating Saw Blade Storage

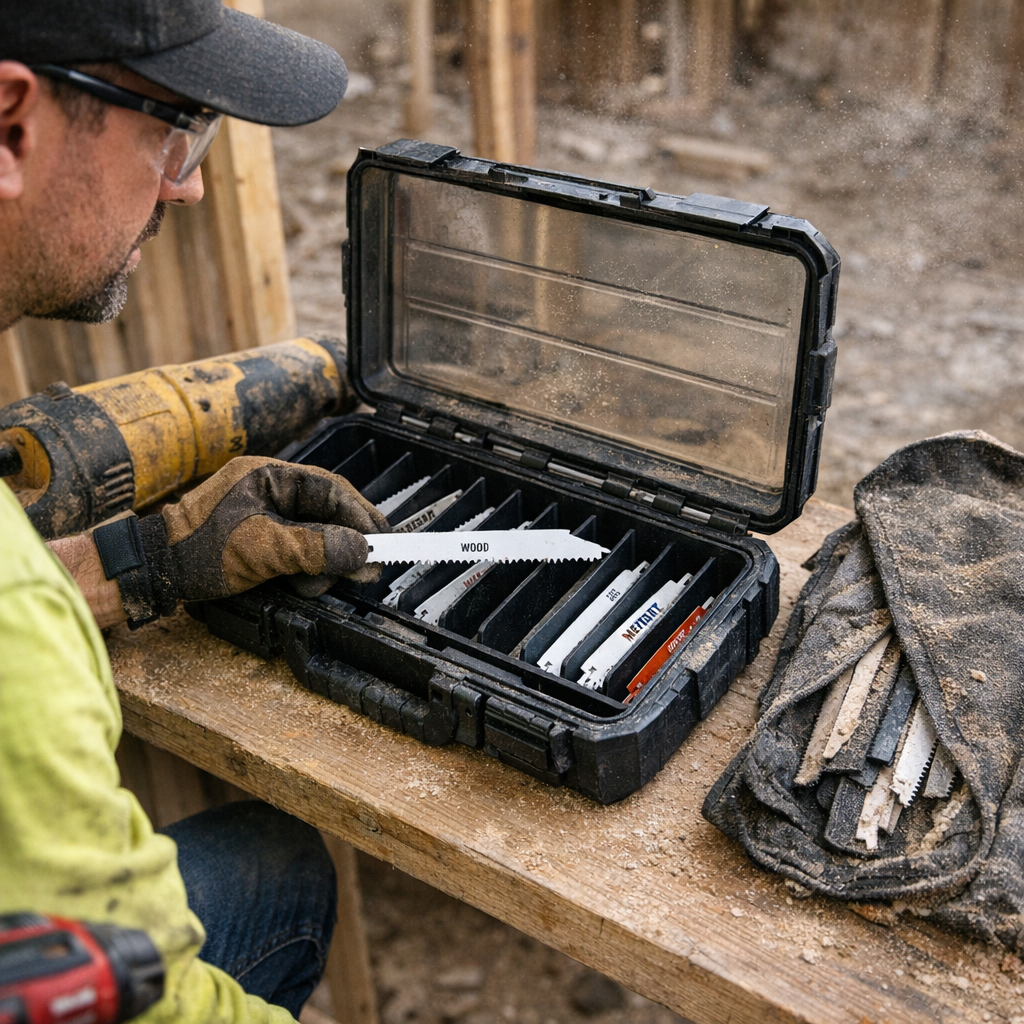
    The moment you realize your saw blade storage is holding you back isn’t usually dramatic—it’s subtle, and that makes it worse. The teeth bite slower. Cuts drag. Your gloves get sticky with dust and pitch you didn’t notice building up. What should be a five-minute cut turns into a ten-minute cleanup, all because you trusted a sleeve or pouch that quietly sanded the edge off your blades job after job. On a site where every wasted second piles up—whether you’re demoing a wall, slicing conduit, or rushing to make finish cuts—blade storage stops being trivial the first time a cut stutters or veers and you’re left wondering where your edge went.

    The Hidden Toll of Jobsite Storage

    If you spend any time in a real-world workshop or on a jobsite, you know dust settles everywhere—on everything. No matter if you’re drilling through studs or slotting plywood, airborne grit gets into your gear. Reciprocating saw blades are built for abuse, but fine scratches from dirt and constant contact can quietly dull even the toughest steel faster than you expect.

    When the pressure’s on, most tradespeople default to what’s fast and close: a flexible tool pouch or a cloth roll-up slung at the end of a saw bench. That “grab-and-go” mindset works well—right until you start noticing friction. Soft sleeves might seem nimble when you’re flying between demolition cuts, but every pull drags dust-laden fabric across the blade’s edge. Over a day, that fabric becomes a sandpaper trap, embedding grit on the toothline and prepping your next blade for a rougher ride.

    The Subtle Signs Your Blade Storage Is Failing

    It’s easy to miss how quickly tool performance shifts until you’re compensating for it. The blade struggles through a door jamb, or the saw starts to buck and whine midway through a flush cut. That vibration you feel in your wrist isn’t always the tool—it’s often a barely-there dullness, invisible until the finish splinters or the wood darkens where it should’ve been a clean slice.

    Try this for a week: bounce between dusty fabric sleeves and a hard, slotted case. Odds are, blades from the sleeve come out coated—sticky, gritty, and inconsistent. Glove after glove gets grimy. Cuts end rougher. Each small annoyance—the tightening jaw, the second pass over seams, the “why did this take so long?”—traces back to those silent abrasions in your pouch.

    Why Hard Cases Quietly Change the Game

    A rigid, compartmentalized hard case isn’t flashy, but the difference is immediate if you pay attention to your workflow. Slots keep blades apart: no tooth-on-tooth grinding, no dust caked into edges, no mystery dullness halfway through a job.

    Imagine the riot of a busy day—dust swirling, hands already tired, and deadlines closing in. Grab a blade from a fabric pouch and you’re often scraping off residue before you even line up the saw. That nagging burnt smell on the first stroke? The blade picked it up in your storage, not your cut. Seconds slip by as you wipe and fidget, the line wavers, and tool control just isn’t crisp. Now try pulling a blade from a hard case: it’s cleaner, edges bite instantly, and you’re pushing through with no stall or ragged pull. The job doesn’t just speed up—you end it with less rework, less frustration, and cuts that look intentional, not salvaged.

    Measured: What You Actually Gain With Better Storage

    If you stack up real numbers, the gap widens. Side-by-side on mixed material runs—studs, PVC, composite—blades from slotted cases kept their cut quality for twice as many swaps. After two dozen cuts, those blades still worked sharp, while sleeve-stored blades started dragging after barely half as many uses. That’s the difference between swapping out for a fresh blade every hour or risking rough seams and extra sanding by day’s end. The time saved isn’t just in the cutting—it’s the headache you skip from not having to fix and fuss every few boards.

    Daily Storage Friction: Where It Adds Up

    No jobsite operates in a vacuum. There’s always drywall in the air, a battery recharge to track, and someone else’s debris settling wherever you stow your gear. “Just toss it in” makes sense—until repeated effort creeps in. Each pause to wipe a blade, each time you lose your grip on a sticky handle, every offcut that veers—blade storage is right behind those moments.

    These aren’t one-offs—they’re the rhythm of the workday. Reach for a blade and get a face full of grime. Pull out what you think is a sharp edge and find yourself babysitting the saw, nudging it slowly rather than letting the tool do the work. Even a few lost seconds or a single crooked plunge eats away at your pace and your patience.

    Controlling Cut Quality Without Overcomplicating

    Sort Blades By Life—And See the Difference Instantly

    A slotted hard case doesn’t just keep things cleaner—it builds in a workflow advantage. Fresh blades go in one row, retired ones in another. One glance, and you know what you’re working with. No confusion, no unplanned “test cuts” to check for sharpness. It’s a system that eliminates guesswork, so you don’t have to relive the frustration of realizing too late that you swapped in a spent blade in the middle of a crucial cut.

    The Small Switch That Pays for Itself Fast

    If blade swaps are rare, the payoff might seem minor. But in the middle of stacked routines—three projects at once, tools getting handed off, debris clouding everything—a hard case is a shift that locks in more performance than almost any new accessory. Your blades last. Your lines stay straight. And you quit wasting time bringing subpar cuts up to standard by hand.

    Details That Compound—And Matter Most When Time Is Tight

    The deeper you get into hands-on work, the clearer it is: the smallest changes aren’t just “nice to have”—they’re often what keeps entire projects moving. Saw blade storage isn’t glamorous. But neither is having to resaw or re-sand everything after a marathon cut session. Every hour lost to dull edges or unpredictable tool behavior is time—and money—down the chute.

    Switching to a better storage system won’t show up in your highlight reel, but it’s one of those “invisible upgrades” you feel at the end of the day: less fatigue, sharper control, fewer surprises. Small discipline at the bench or truck means cleaner work, faster turnarounds, and less second-guessing when it counts.

    See practical blade storage and workshop solutions at Gumboll.

  • Why Visible Limits in Storage Prevent Hidden Clutter and Overflow

    Walk into a freshly organized closet and everything looks dialed: shelves in rows, socks paired and sorted, jackets hung just so. Give it seven days. After real life rolls through—quick mornings, muddy shoes, rushed laundry—what felt like lasting order starts quietly crumbling. Socks creep into the t-shirt zone. Scarves are swallowed by bins. The space is “organized,” but suddenly everyday access is slow, messy, and frustrating again. This is the real measuring stick for any storage setup: not how perfect it looks at the start, but how it survives daily pressure. Because real storage friction isn’t for show—it’s hunting for matching gloves in the dark, untangling gym shorts from a stack right before work, or hunting through the same bin again and again, each time finding less and less order left.

    The Relentless Slide: Why Surface Order Fades Fast

    It’s easy to think: add bins, use baskets, and clutter disappears. But most home storage fails in the details. Deep bins and open baskets swallow small items and let clutter multiply undetected. Reach for one shirt, two others slip; grab a hat, and half the pile shifts. Categories melt. That clear section for scarves now hides socks, sunglasses, receipts—a slow-motion disaster under a tidy surface.

    And when the system bogs down, so do your routines. Getting ready turns into an obstacle course. Instead of a ten-second grab, you spend a minute playing clothing Jenga. Quickly putting things away means tossing—not sorting—because the effort has outgrown the payoff.

    Hidden Breakdowns: When “Looks Organized” Stops Working

    The trouble usually isn’t obvious until you’re living in it. You glance at your closet, see neatly stacked shirts and labeled bins, and think it’s under control. Then you face reality:

    • Your most-used items slide behind stacks or vanish at the bottom of bins.
    • Piles on open shelves slump and sprawl after a single hurried morning.
    • Random extras—yesterday’s hat, today’s incoming mail—creep into any available space until sections blur together and roles are lost.

    Here’s what most systems miss: deep bins are an open invitation to the “toss and forget” habit. You never see the boundaries, and small category leaks are invisible until it’s a mess. Left unchecked, Monday’s tidy shoe bin quietly transforms into Friday’s collapsing pile.

    Why Visibility—and Containment—Change Everything

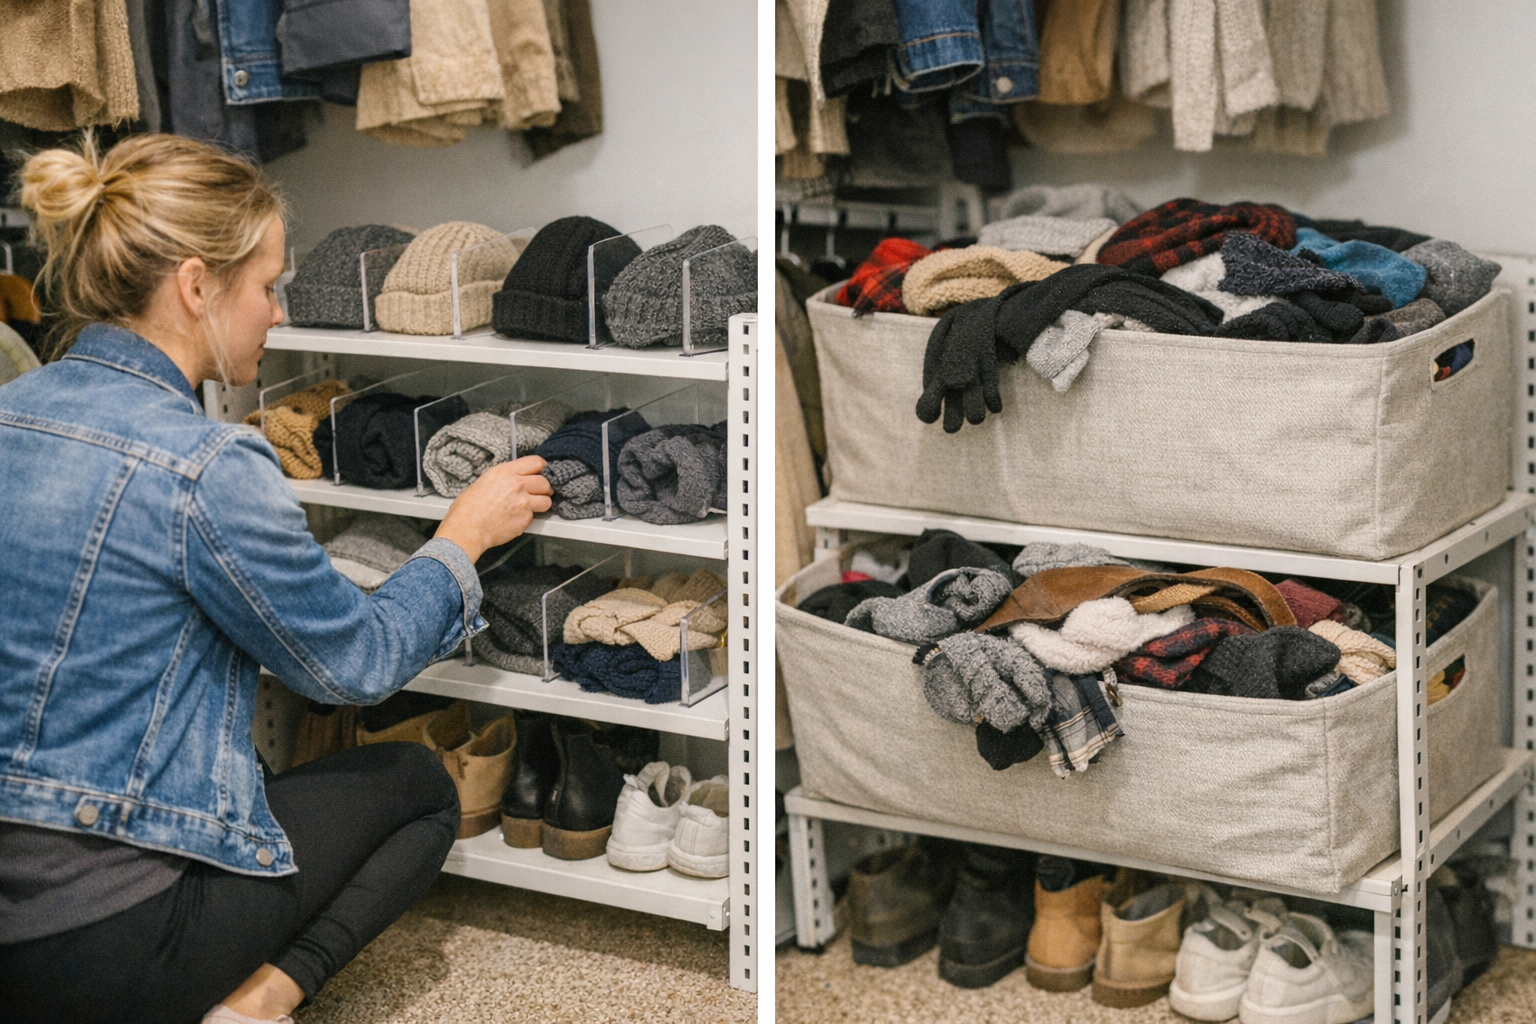
    The real shift? Shallow shelves and sturdy dividers create physical, visible boundaries for your stuff. Every scarf, t-shirt, or shoe has a home that can’t quietly overflow. You see when a category is maxed out. You feel when a section gets tight—well before it devolves into chaos. Instead of piles collapsing, you get crisp lines. Instead of mystery spaces, everything is in plain sight.

    This isn’t about getting every label perfect—it’s about making it impossible for piles to silently mushroom. Think about opening that hallway closet and seeing gloves upright in their own slotted space, not trapped under a random heap. When every division is visible, clutter doesn’t stand a chance to sneak up on you.

    Living With—And Without—Boundaries: Three Scenes

    Scene one: Hallway chaos remake. Two oversized bins for hats and scarves work for a week, then new stuff just piles on top. By Wednesday, you’re shivering in your coat, yanking out half the bin to get to winter gloves you know are in there—somewhere. Boundaries have vanished, and so has your patience.

    Scene two: Closet collapse in motion. Shirts were color stacked, but after late-night laundry, the lowest pile leans and sags. Accessories spill, socks wander into shirt territory, and grabbing one thing means disrupting everything else. Now “put away” just means “hide the mess and hope for the best.”

    Scene three: The entryway invasion. Shoes, mail, grocery bags—all competing for a few open cubes by the door. Lacking dividers, the pile quietly creeps outward. Midweek, tidy lines are gone; just finding one sneaker requires sifting, and the next reset is a full do-over.

    What Changes When You Get Sectioning and Depth Right

    Swap out those deep bins and sagging shelves for shallow, well-divided shelving and you’ll feel the difference in a day. In the hallway closet, each item stands visible and upright—nothing slipping down or getting lost. Everyday use no longer means undoing your whole system. The “grab and go” is finally just that.

    The practical move: Match shelf depth to what you actually store. Most accessible: shelves around 10 to 12 inches deep—enough for a single file of folded shirts, shoes, or gear. With fixed dividers, you keep each category tight and upright. No more disappearing gloves or T-shirts buried behind last week’s laundry.

    Spotting the Signs: Is Your Storage Failing in Practice?

    You don’t need an expert to tell you when a system’s failing—your routines will let you know. Watch for these tells:

    • Grabbing one item forces you to move, shift, or rebalance the rest.
    • Sections slowly morph: the mail shelf becomes a dumping ground for keys, chargers, and mystery objects.
    • Edge stacks slouch and never stay in line.
    • Each reset takes longer, and clutter always rebounds by midweek.

    These are daily reminders that visible limits and better design aren’t just extras—they’re necessary if you want storage that actually supports your routines.

    The Payoff: Smoother Days, Faster Resets, Fewer Storage Regrets

    Once you replace deep, shapeless containers with clear sections—just deep enough for daily essentials—everything changes. Most-used items stay findable. Categories don’t bleed. Resetting takes minutes, not afternoons. And you don’t have to “fix” things every night for the closet to work the next morning.

    It goes beyond surface-level tidy. Your storage actually fits into your day—so you spend less time digging, reshuffling, or resetting, and more living in a space that finally stays as usable as it looks.

    Shop ClosetWorks for practical storage that makes daily routines easier

  • How Clear Movement Zones Transform Your Wall Storage System Efficiency

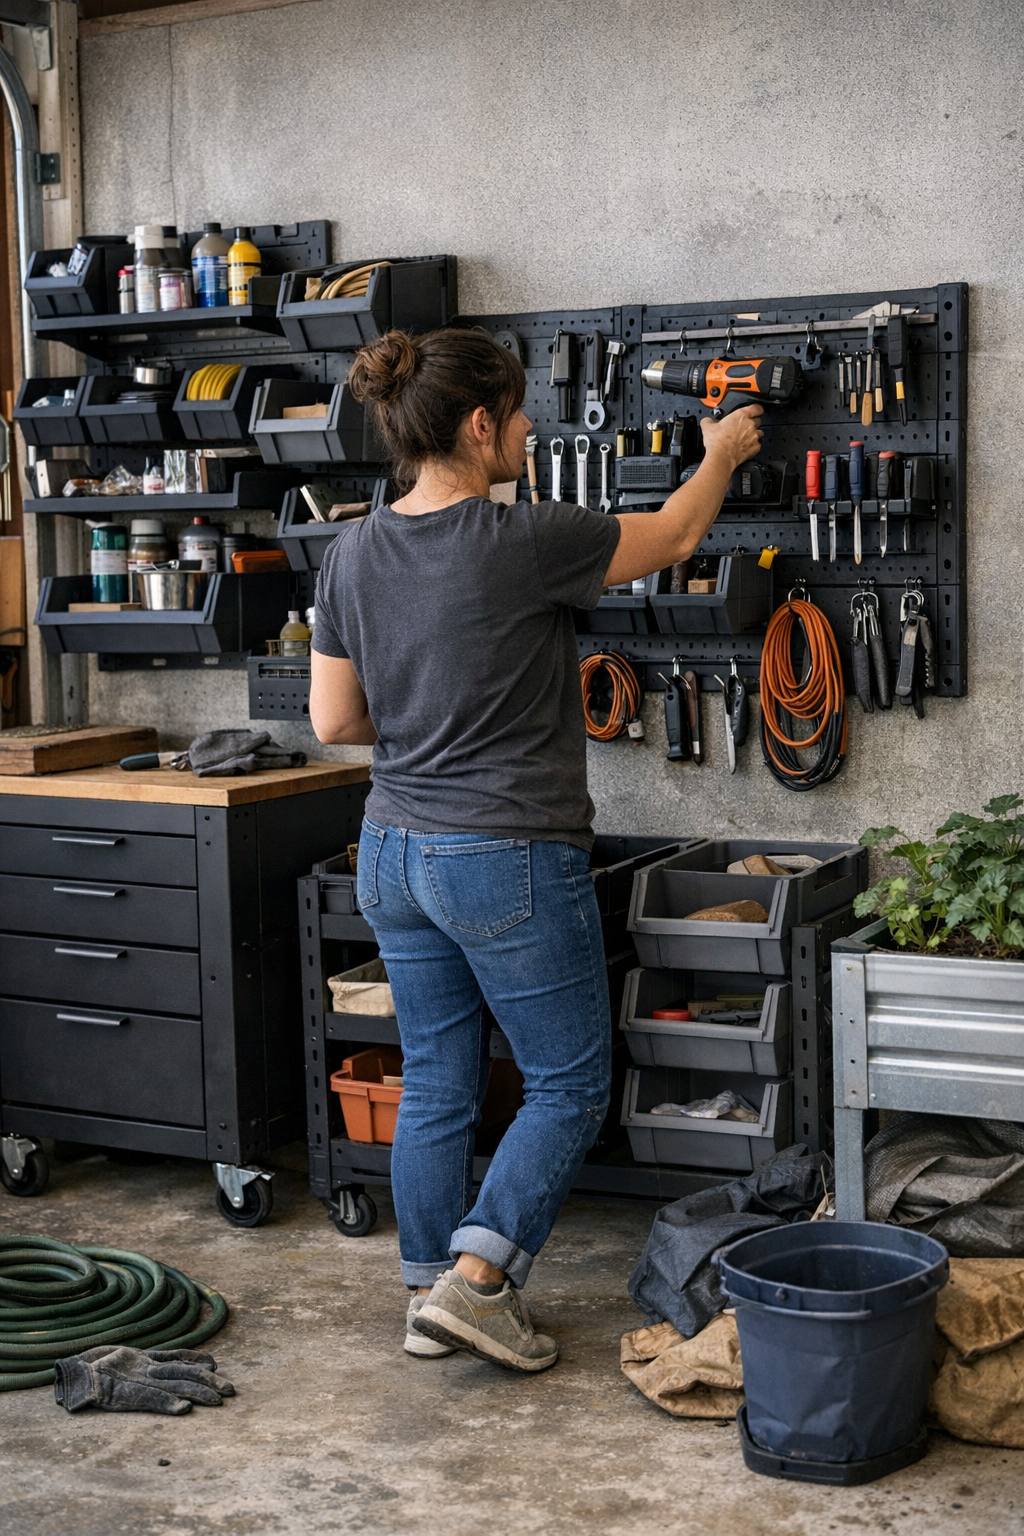
    The real test of any wall storage system isn’t how sharp it looks on install day. It’s what happens a month later—when the order promised by neatly lined panels, hooks, and bins collides with real, messy routines. In a garage, a corner workshop, even a crowded back room, you start with a blank slate: tools aligned, floor space visible, everything with a label or a rail. Then your habits take over. You’re rolling carts in and out, setting jobs down “just for a minute,” clawing past the edge of a cabinet you thought you’d finally placed out of the way. Suddenly, that well-ordered wall is just another background—yesterday’s gear pushed to the side, the prime strip near the bench jammed with overflow, and simple reset routines quietly dragging you down.

    Where Setup on Paper Slips in Daily Use

    Panels and rails rarely fail. But layouts often do—because they ignore the kinds of movement that actually happen. It’s not the hardware; it’s the habits and shortcuts that follow. Right after you hang the last hammer, everything fits. But fast-forward through a few projects and your resets get longer. The recurring friction piles up:

    • You edge a rolling cart, just to squeeze through—until every trip across the floor means bumping bins that stick out a few extra inches.
    • One patch of wall turns into the “catch-all”—the spot where nothing really belongs but everything lands after the rush of a job.
    • Putting things back isn’t automatic. It’s a jigsaw: if you hang up a wrench, two other tools are in the way—reshuffle, repeat.

    Two spaces with the same panels and the same instructions diverge fast. One, you move through cleanly. The other? You sidestep old projects, reach around the same awkward beam, and wonder why the path always manages to tighten up right when you need to move the most.

    Diagnosing Hidden Friction Before It Spreads

    Clutter rarely explodes overnight. It gathers in slow, subtle drifts—signals you notice only when routines stall:

    • A “clear” wall section never stays clear; something always migrates to that easy-to-reach spot, reappearing the next day no matter how many times you move it.
    • Your cart won’t settle where it used to—the path narrows, the angle’s wrong, that one bin keeps sticking out just enough to nick your hip.
    • The bin marked for ‘electrical’ ends up swallowing in-practice junk: pruners, work gloves, packs of screws temporarily abandoned for days.

    It’s tempting to blame too many tools, but the real problem is a setup that makes it too easy for categories to blur and blocks to build up. Labels only help when the flow of daily use agrees with them. Otherwise the overflow keeps creeping closer to the heart of your space.

    The Real World Isn’t a Showroom—Movement Beats Looks

    Wall systems win points in staged photos. But when you’re making repeated trips—hauling gear from the bench, parking a mower, zigzagging around drawers—the real question is simple: Are you moving through your space, or moving things out of the way? Each small interruption—a bin that’s inching into your path, a shelf that always needs another tweak, a dead corner swallowing “extra” gear—piles up.

    Take the classic problem: a rail below waist height near your bench. Seems ideal for those last-second grabs. In practice, it morphs into a drop point for whatever doesn’t belong anywhere else. Over days, that section clogs, blocks the cart’s spot, and forces you to adjust your route on autopilot. Leave it unsolved, and soon your “reset” is half an hour of sorting what should have never stacked up.

    Life in a Crowded Setup: A Day’s Evidence

    Picture the routine: the sun’s down, the garage door is half-up, and you’re racing to wrap up a bike repair before dinner. You reach for the essentials—but now a tangle of jumper cables and a borrowed drill crowd your most convenient bin. You try to step through the main aisle, but a floor jack wedges you against a shelf. To finish, you have to reshuffle lesser-used tools just to hang up the wrench. What should be a quick reset stretches—minutes lost fighting layout, not finishing the work.

    Overflow: The Silent Slowdown

    The offender isn’t always obvious—it’s the invisible “just for now” habit. Overflow builds up in the space that’s easiest to drop things: the busiest, most central strip of your storage wall. Bins and hooks get buried. The strongest hardware won’t save you if a key tool is always blocked, or if your favorite bin becomes a dumping ground. When main routes fill, every reset takes longer—and what started as a clutter fix now eats into your limited time and space.

    The Small Rules That Rescue Flow

    Making a setup work isn’t about adding more hooks—it’s about enforcing subtle boundaries:

    • Keep your main paths clear—no exceptions. The route from the bench to the door, or across your main zone, can’t shrink. If a bin overflows, move it now—not once you’re tripping on it every weekend.
    • Nip corner creep in the bud. Corners are magnets for clutter. Don’t let gear “rest there for a minute”—that moment becomes a month fast.
    • Honor your natural reach zone. Panels only help if your daily tools are where you grab them without a stretch. Put infrequent stuff high or low—keep core gear within waist to shoulder height.

    Real maintenance sometimes means sacrificing the illusion of maximum storage. For instance, committing to a clear 70cm slice of wall in your main walkway felt at first like a loss—until you noticed not having to fight for space on each pass-through. A clipped elbow isn’t just a bruise; it’s a warning your layout is crowding back in on you.

    Everyday Tweaks That Keep Systems Working

    Empty main zones on purpose. When you first see stray overflow in a walkway, move it before it sets in. Don’t settle for adapting to an annoying change—reverse it as soon as you catch it.

    Let reach guide your real estate. If a daily-use tool isn’t instantly at hand, don’t accept the inconvenience. Change the location or the panel height; you’ll notice the difference every session.

    Make overflow zones deliberate. Need a “parking lot” for project leftovers? That’s fine—just keep it out of your traffic lanes and clear it out often. If a hook or bin turns into a black hole, it’s time for a label or a hard reset, not a routine apology.

    Organization That Gets Out of the Way

    The most functional wall system fades into the background. It lets your projects set the pace—not the location of your screwdriver or the maze on your floor. The first hint of friction—the need to move things twice, the creeping block in the pathway—is your cue to intervene. Don’t wait until the system quietly becomes the obstacle it was supposed to solve.

    True storage control isn’t about a tidy surface for its own sake. It’s about having a space where movement stays fluid, resets stay short, and creativity isn’t choked by invisible slowdowns. That’s a setup that stays genuinely usable—session after session, not just for that first, “perfect” day.

    http://stacknest.myshopify.com

  • Choosing the Right Gloves to Prevent Bit Walking on Metal Surfaces

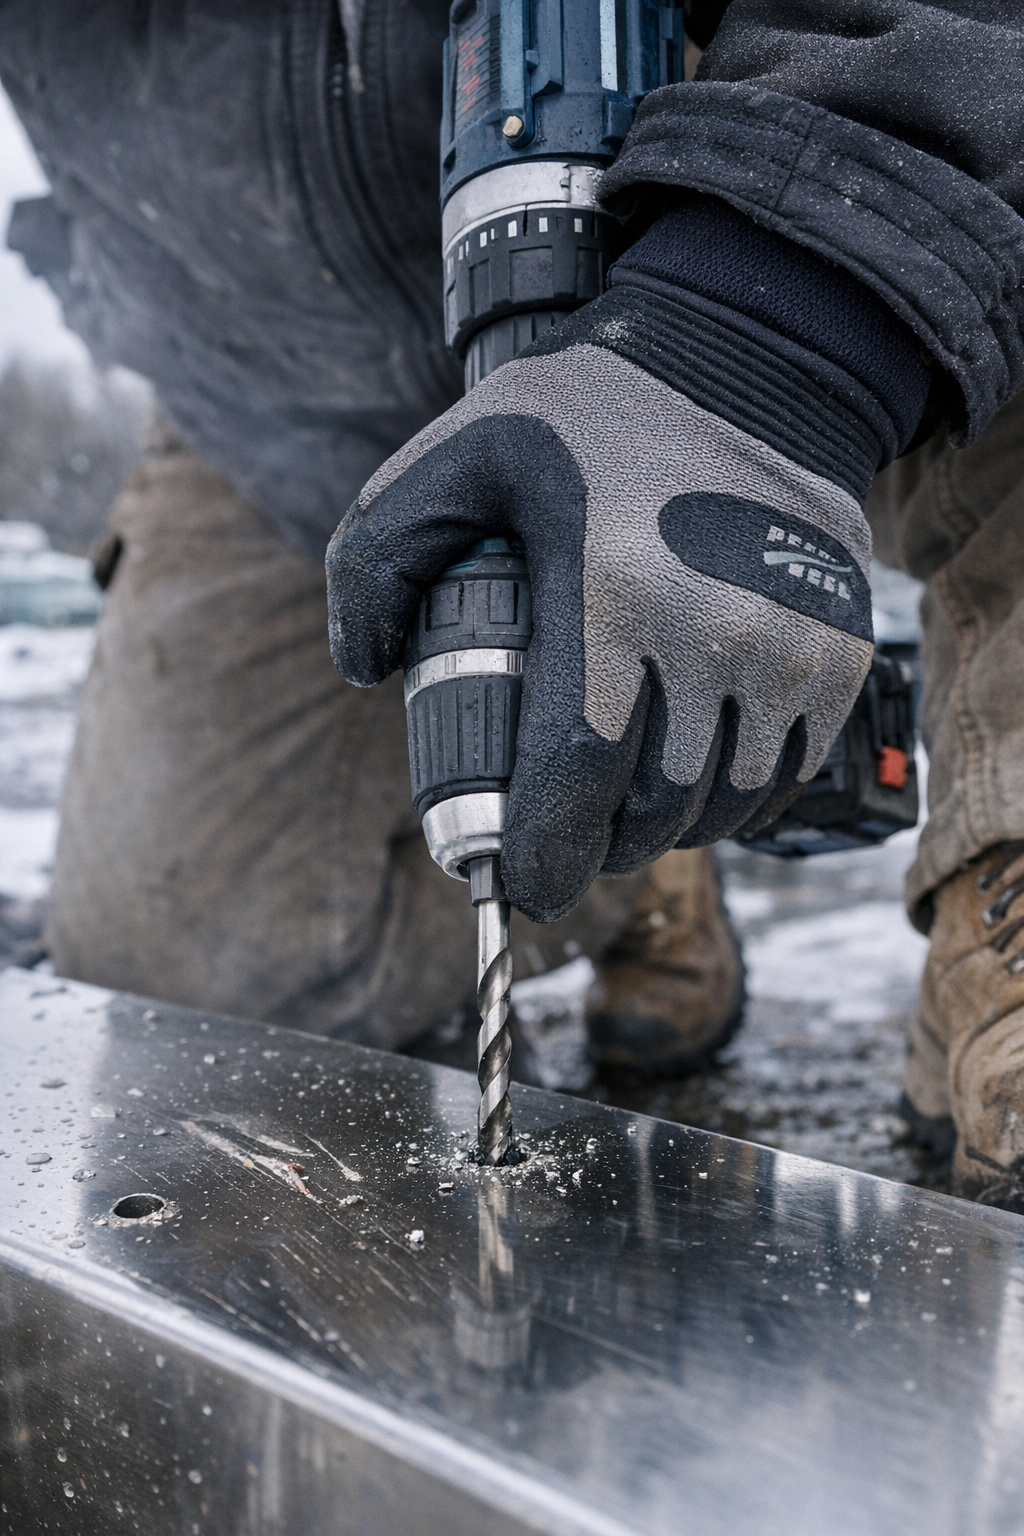
    You line up your bit, brace your shoulder, pull the trigger—and in an instant, it slides. Bit walk. The metal fights back, the drill rattles, and there’s your mark gone sideways: scuffed paint, a crooked gouge, the start of a long, frustrating repair job. If you work with portable drills on-site—punching through angle iron, strut, painted panels, or any spot where you only get one shot at a clean hole—this scene isn’t new. Bit walking can feel inevitable, especially mid-project, but what throws you off isn’t always cheap bits or rushed pilot marks. Sometimes, the real culprit is the gear that’s meant to help you—especially your gloves.

    The True Cost of Bit Walk: Fatigue and Frustration Add Up

    At first, you might get away with it. The first few holes punch clean. But by lunchtime—or on ladder work and over your head—the drill bit stops tracking straight. Each time the bit slips off mark, you wrestle it back, leaning harder, burning through energy and patience. This isn’t just about ugly holes. Sloppy edges and deflected bits lead to burrs, weak fastenings, even micro-cracks you won’t spot until weeks later. Worse, every correction costs time: you slow down, fight the tool, and finish sore, always filing or reaming the damage. All the while, you start to wonder: what keeps tripping you up?

    Not All Gloves Are Created Equal: Where Grip Fails the Test

    Gloves are supposed to protect, but some actively work against you. They promise dexterity by the box, but when drilling into cold steel—especially after sweat, dust, or a slick of oil from earlier—the differences show up fast. One pair locks in your palm, giving you confident pressure as the motor rattles. Another offers only a thin promise; the moment you apply force, the synthetic lining squawks and your knuckles strain as the bit skates off course.

    This isn’t the kind of thing you catch in the aisle at the hardware store. It shows itself three hours deep, surrounded by shavings, when you’re tired and the angle isn’t friendly. If you’ve ever drilled a pilot hole with wet gloves in a freezing subpanel, you’ve felt it: you squeeze for control, the bit wanders, and suddenly you’re compensating with muscle instead of grip. That’s not just inefficient—it’s how routine jobs slow to a crawl and injuries creep up unnoticed.

    The Nitrile-Dipped Difference: Subtle, But You’ll Feel It

    A glove upgrade rarely feels revolutionary during a test-fit. But swap in a nitrile-dipped palm—thin but tacky, with just enough flex—and suddenly, that tiny 0.2 mm layer changes everything under workplace vibration. The drill stays planted when you line up, whether the bracket is oily or bone-dry. After a full job day, the marks tell the story: the ragged 2 mm run-off edging becomes crisp, the fixes at the grinder disappear, and you notice your elbows aren’t screaming from bracing so hard.

    The shift is subtle but real. Your workflow becomes less about fighting the tool and more about getting actual work done—less fatigue, less wasted effort, more holes on target. And on longer installs or punch lists, that steadiness is the edge that keeps you running till the last screw gets set.

    Finding the Weak Link: Your Technique or Your Gear?

    Bit walking often gets pinned on dull tips, sloppy layout, or the wrong speed settings. But if you’ve retraced your steps—checked your marks, swapped bits, managed RPMs—and you’re still struggling to keep your line, start with your hands. Ask yourself:

    • Are your gloves letting your grip flex or slip under load?
    • Do they get slick when exposed to oil, metal filings, or even just sweat?
    • Is the surface glazing over after a few sessions, robbing you of purchase?
    • Are you constantly shifting how you hold the drill, chasing precision instead of relying on it?

    These are field cues, not just product specs. The right glove doesn’t just cushion; it holds sharp, dry, and tacky through mess and repetition. Upgrading might sound minor—but in a patch of thirty holes overhead or a batch of bracket mounts in an unheated warehouse, your hands notice fast if the PPE helps or hinders.

    Real Jobsite Scenarios: When Gear Makes or Breaks the Outcome

    The difference never appears in tidy spreadsheets. You see it in cramped corners, where the shop vac missed metal shavings and oil is floating on the surface. That third or fourth fastener—jagged, off-center—signals your glove’s lost its bite and your drill is wandering, even when your eyes and knees are locked in position. Instead of powering through, you tense up, the work slows, and the weight transfers to your wrist and shoulder. By the end of the shift, the accumulated strain is real—one more job that took longer than it should have, and didn’t look as clean as you’d hoped.

    Sometimes it’s the boots: swap a flexible sole for a stiffer one and realize your stance isn’t solid on a ladder or while pressing against awkward ducting. Small differences in gear ripple out over days and weeks, quietly stealing efficiency and increasing fatigue—nothing that jumps off a label, but everything that matters in practice.

    Keep Gear Honest: Clean, Replace, and Stay Sharp

    Even premium gloves wear out quickly in the dust and grime. If your palm looks shiny, feels slick, or flexes easier than it used to, don’t wait—swap them out. Wash off oil and filings between jobs to keep friction up and grip reliable, not just “adequate.” What seems like a small task can mean the difference between a smooth hour of drilling and a long, aggravating slog through fixes.

    The Real Fix: Habits Matter, But Gear Sets the Ceiling

    Technique is half the battle. Pilot marks, tool control, pressure—you refine those with practice. But your gear defines your ceiling. The right gloves mean the bit stays put, wrists last longer, and your work actually lines up the way you planned. When you don’t have to fight your own equipment, you move faster, make fewer errors, and end the day with something closer to satisfaction than exhaustion.

    Perfection’s a myth, but progress is real: less chasing run-out, less cleanup, more predictable results. In this world, what you wear on your hands matters more than brochures suggest—and the right upgrade means more jobs done right, the first time.

    Get the gear that actually stays put—see what works at Gumboll.

  • Why Honest Storage Solutions Transform Daily Organization Success

    Everyone recognizes the moment: after hours of sorting, your closet looks crisp and orderly—rows of matching bins, folded stacks, everything in its “place.” By midweek, reality intervenes. Categories bleed together. Shoes creep into scarf bins. Gloves hide beneath bags. What started as logical now demands extra time and double-handling just to keep pace with daily shifts. And if your closet only looks organized—without reflecting your real habits—the signs pile up fast: the lost glove, the slow hunt for keys, crowded stacks, and the steady creep of new clutter, even in a space you thought was finally under control.

    When Closet Systems Fall Apart—Midweek, Every Week

    The first few days after a reorg always feel like victory. Labels face forward, bins slide perfectly into cubbies, and there’s space—briefly—between each category. By Wednesday, stress leaks in. Folded shirts collapse as people rummage underneath. That bin for winter hats has swallowed everything from spare bags to rogue socks. Instead of quick access, you’re cautiously extracting items so nothing spills—undoing order with every rushed morning.

    Beneath the Surface: Hidden Friction of “Order”

    High-shelf bins and opaque baskets look efficient, but real life exposes the mismatch. Try snatching a scarf during the morning scramble: suddenly, you’re pulling down an entire bin, shifting half its tangled contents just to find the one thing you need. Each minor pause adds up—moving stacks that won’t stay up, searching behind baskets, rebalancing piles that keep slipping. By Friday, detritus spreads across the floor because the system’s logic can’t withstand real routines.

    Category Drift: When Lines Blur and Clutter Returns

    Most clutter sneaks back in quietly. One shelf meant for linen supplies ends up harboring stray shopping bags and forgotten socks. Entryway baskets absorb hats one day and dog leashes the next. The result? A single misplaced item snowballs into confusion: one deep bin holds five unrelated things, and getting to any of them means disturbing the stack. It’s not failure—it’s proof that the setup doesn’t fit the actual flow of your days.

    The Trap of Hidden Storage

    Deep bins and solid baskets promise a quick fix—stash everything out of sight. But the minute categories aren’t clearly divided, the system unravels. Busy mornings force you into rapid-fire searches: rummaging for keys, upending one container after another, resigning yourself to “junk bins.” The organization isn’t broken—just camouflaged until the next avalanche of clutter.

    Reality Check: Is Your Storage Helping or Hindering?

    Everyday friction reveals the real effectiveness of your storage. Think about your last week—have you:

    • Had to move two or three things just to grab something small in the back?
    • Watched a folded stack topple after plucking one shirt?
    • Fished through a chaotic basket near the door for keys or wool hats?
    • Watched one supposed “overflow” shelf quietly swallow items from other sections?
    • Spent time re-tidying because yesterday’s “system” broke down after a normal day’s use?

    If so, it’s a sign your storage is working against—rather than with—the true flow of your family or your routines. Outward order is only part of the story; reliable access and easy resets matter just as much.

    Storage That “Tells the Truth” About Your Household

    Effective organization isn’t measured by how your closet looks on day one, but by how quickly you can find what you need in the middle of a hectic Tuesday. Closets and shelves that surface every item, keep like with like, and clearly separate categories make resets faster and mornings less frantic. For example:

    When we swapped deep bins for open, divided trays, morning routines changed instantly. Instead of hunting through piles, every set of gloves and each hat was visible and easy to grab. No more upending stacks or creeping overflow. Instead of collapsing under the weight of hidden clutter, shelves kept their purpose: gloves in one divider, hats in another. It wasn’t extra space—it was smarter, more honest separation and visibility. Suddenly, a midweek reset took two minutes, not twenty.

    Small Adjustments, Real Results

    You don’t have to gut your storage to get clarity. Little shifts go a long way. Replace one deep hallway bin with a shallow, sectioned tray, and gloves stop knotting with scarves. Sub in clear bins, and even hurried hands can see what’s missing. Try an inexpensive drawer insert or divider—now socks stop wandering and categories stay distinct. Everyday friction fades: no more double-handling, no more mystery piles, less stalling out mid-tidy.

    Five Tweaks That Make Categories Stick

    • Break up the big bins: Insert smaller dividers for things that scatter—accessories, socks, kids’ mittens—so nothing drowns or merges.
    • Label with backup: Don’t just trust a tag—give sections physical dividers or trays, so the system holds up to real reach-ins.
    • Lift what you need: Reserve eye-level space for daily-grab items; keep lesser-used stuff below or above, where it disrupts less.
    • Show what you store: Opaque bins fuel out-of-sight, out-of-mind problems. Opt for clear, open, or mesh where practical.
    • Flatten the stacks: If piles topple, downsize—use shallow bins or single-depth shelves that force order and cut collapse.

    These aren’t massive investments—most are swaps or adds you can try today. The result: each category stays visible, separated, and ready to handle a real week’s wear and tear.

    More Storage Space Isn’t Always the Answer

    It’s easy to believe the problem is “not enough storage.” But anyone who’s tried adding just one more bin knows: more containers can mean more hiding spots—more mingling, more searching. What actually matters is whether your setup stands up to everyday mess, not just the afterglow of a Sunday sort. A closet that holds its shape through changing seasons, busy mornings, and everyday reshuffling doesn’t come from adding bins. It comes from systems that keep things sorted and visible—no matter how hectic the day gets. When storage tells the truth, even a small closet can feel easy to use. And clutter stops sneaking back in.

    See practical storage options at ClosetWorks.