Blog

  • Why Under-Cabinet Lighting Transforms Kitchen Detail Work Efficiency

    The difference between a kitchen that looks bright and one that actually works becomes obvious as soon as you reach for a knife at the counter. Overhead fixtures might flood the room with light, but the first time you try to slice vegetables after sunset, it’s clear: the countertop itself is still riddled with glare, uneven shadows, and dark corners where you actually need to see. Every meal prep becomes a pattern of leaning closer, shuffling cutting boards into the “least bad” patch of light, second-guessing ingredient colors, and wiping the same area twice because debris hides just out of view. For anyone relying on ceiling lights alone, this isn’t a rare annoyance. It’s a daily design problem that wastes time, strains your eyes, and makes ordinary tasks more awkward than they need to be. The right lighting setup isn’t a style choice—it’s a silent determiner of how smooth, safe, and stress-free your kitchen routine actually feels.

    When “Bright Enough” Isn’t: Shadow Problems in Everyday Kitchen Use

    A room can seem brightly lit until you actually put it to use at the counter. As soon as you step up to chop, measure, or scrub, overhead-only lighting exposes its weakest point: you’re always working in your own shadow. Cabinets overhang the workspace, your body interrupts the main beam, and even the most powerful flush-mount fixture leaves part of the counter dim. Before you notice it, you’re squinting at labels, dragging utensils to the front edge, or nudging a coffee maker toward any available light spill. This low-key struggle becomes routine, even if you’ve gotten used to the workarounds.

    The consequences add up: missed crumbs, knife slips, tomato seeds sticking to unseen patches, or a backsplash that’s never really clean because you just can’t see that last streak. Every subtle frustration stems from the same flaw—surface lighting that only looks good from a distance, but fails right where you need clarity most. The urge to “just get through” the task grows stronger with every evening meal, every hurried morning, every repeated workaround that interrupts real flow in the heart of the house.

    Why Shadows Keep Returning: The Limits of Overhead Fixtures

    Traditional ceiling fixtures are designed for general brightness—but they almost never solve counter-level visibility. Task surfaces are exactly where ceiling lights perform most poorly. Cabinets and arms cut off the beam, creating uneven patches. You turn on the switch, step forward, and instantly see the lit backsplash fade to gray under the wall cabinets. The edge of the counter vanishes. You find yourself creeping forward, stacking bowls in the only visible zone, or trying to twist a stronger bulb into the socket, only to have glare replace darkness and hotspots pop up beside new shadows.

    The scenario repeats every time: you prep dinner with the main light on, but ingredient details are still dull or hidden. Upgrade to a modern ceiling fixture, and the old imbalances still win. No matter how bright the room feels overall, the counter keeps you trapped in a loop of adapting or accepting half-seen tasks—always pushing for a spot where you can “just see enough.”

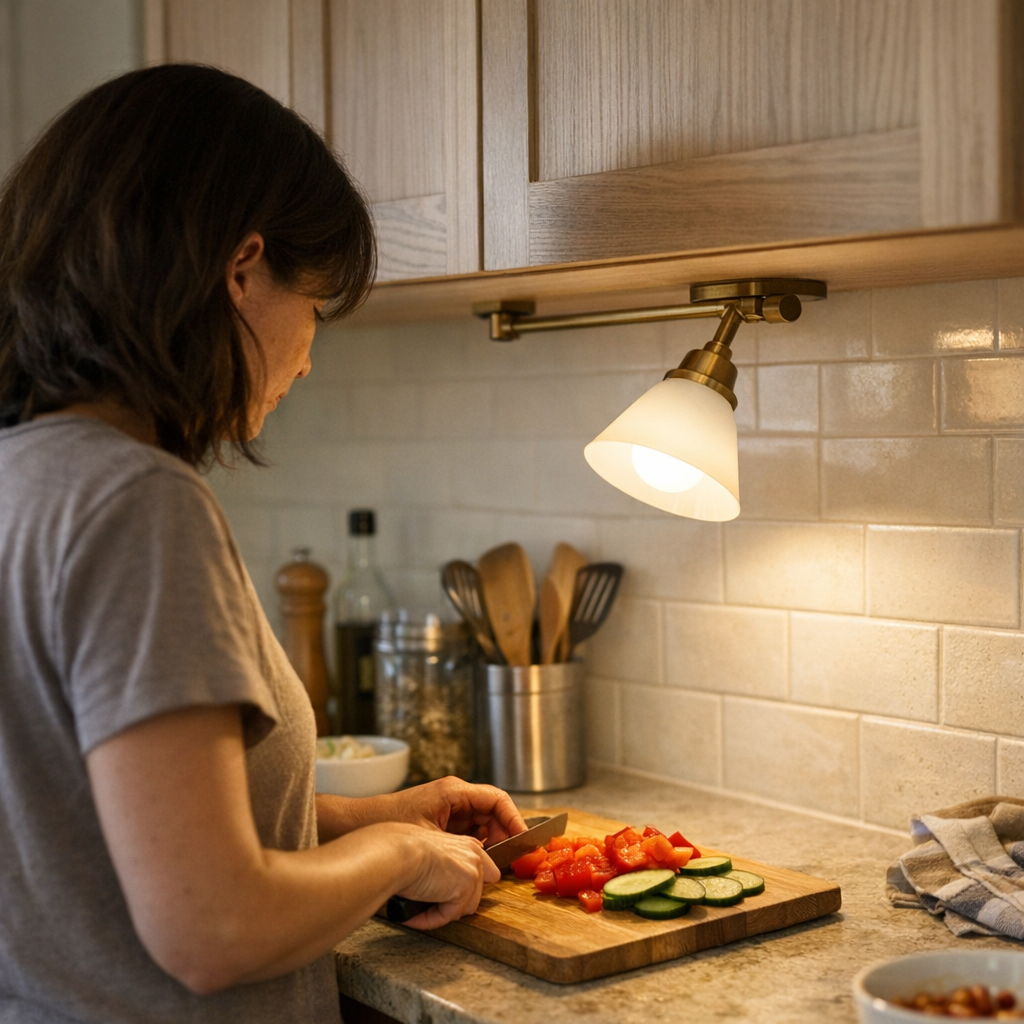
    Under-Cabinet Lighting: The Everyday Improvement That Sticks

    Lighting the work surface directly—close to where you actually cut, wash, or organize—breaks the cycle of dimness at the core of your kitchen routine. Under-cabinet lighting isn’t decorative. It’s a physical solution to the specific defects of ceiling-only setups. A well-placed linear strip along the inside cabinet front throws even, focused light across the entire counter. No more shifting side to side to dodge your own shadow. No more missing a rogue peel or oversalting dinner because of muddled contrasts.

    • Accurate ingredient colors, visible without adjustment—greens, meats, and spices all read true without guessing.
    • Clear work zones—crumbs, smudges, and edge drips stand out instead of fading into murk.
    • Consistent comfort—your arm, your knife, your mixing bowl all stay visible, all the way across, every evening.

    This isn’t just about convenience; it’s relief from daily micro-frustrations. Every prep or cleanup goes smoother. You don’t need to rearrange your stance or squint. Most importantly, the clarity isn’t just brighter—it’s repeatable, night after night, without effort or correction.

    Real Scene: The Shift from Shadow to Clarity

    You’re home after work with dinner still to cook. The kitchen looks fully lit, but the instant you stand at the counter, a blunt shadow from your own head and the cabinet lip cuts right across your cutting board. You push vegetables into the open, sigh, and only realize you missed a bit of peel an hour later. With a sharp line of under-cabinet LED—placed close to the cabinet’s front edge—every inch of surface pops into even brightness. Now you slice, sort, and wipe down with everything in plain, shadowless view. The silent drain of arm strain, eye fatigue, and repeated movement simply fades, meal by meal, as the routine finally stops fighting the lighting mistake built into so many kitchens.

    Common Missteps: Where Under-Cabinet Setups Go Wrong

    Installing under-cabinet lights isn’t a guaranteed fix unless you get their placement right. The most common error is setting fixtures too far back, leaving half your usable space still in shade. Push the light too close to the wall tile and you end up squinting at bounce glare—not the intended result. True usability comes when lights hug the inner cabinet front, flooding the counter (and only secondarily the backsplash) with even, wide coverage. If a shadow lingers, sometimes all it takes is nudging the strip an inch forward.

    Quick Tip: Look for Continuous, Even Output

    Puck lights or spaced mini-fixtures often cause a polka-dot pattern—bright-hot, then gap, then bright-hot. Continuous LED bars or strips create an uninterrupted band of light: every inch of counter usable, every task zone equally clear, no matter what time you’re working. Small detail, huge difference.

    Combining Overhead and Under-Cabinet Lighting: Practical Gains

    Ceiling and under-cabinet fixtures aren’t rivals—they’re partners, each fixing what the other leaves out. Overhead ambient light keeps you moving safely through the space, but only real surface-level light kills the fatigue of repeated guessing at details. With both, you move confidently from fridge to sink, prep without interruption, and finish cleaning without chasing invisible streaks. Forgotten messes and slowdowns shrink. You stop treating illumination as something to manage and finally let it serve the routine you wanted in the first place.

    Week after week, the small wins add up: less cleanup fatigue, more reliable prep, fewer “missed spots,” and kitchen work that stops feeling like a wrestling match with your own lighting.

    Why This Detail Matters—Even in “Well-Lit” Homes

    A room that seems bright at a glance can still trip you with surface-level struggle. Task lighting isn’t about visual style or a designer trend—it’s about bridging the gap between general glow and usable, actionable clarity. If you’re still sidestepping for a good view, missing wipedown streaks, or making do with whatever illumination happens to fall on your counter, you’re living with a built-in compromise. The principle is bigger than kitchens: laundry counters, workbenches, even a household command center all suffer from overhead-only washout. The right fixture, targeted to the actual work zone, fixes what vague “brightness” never will. It makes repeated use natural, without ongoing correction.

    The question behind every good setup: can you step up and see what you need, every single time, without adjusting or guessing?

    For more practical lighting options designed to solve real indoor visibility problems, visit LightHelper.

  • How Easy Return Flow Transforms Outdoor Storage and Reduces Clutter

    Why does backyard storage collapse so quickly, even when there’s space? The headache usually isn’t what the box or shed can hold. It’s the low-grade hassle of putting things back in a real outdoor zone—a side-yard you cross every morning, a cramped fence line where gear always seems scattered, a narrow backyard corner that starts tidy and ends up buried. The trouble builds slowly: clunky lids, awkward stacks, storage that needs two hands when you’re coming back with muddy gloves. One missed return becomes two, then four, and by midweek, the whole setup feels like a pile of catch-up tasks waiting for “some other time.” On the surface, nothing’s missing—but that invisible resistance turns setup “organization” into one more reset you’ll put off.

    Return Flow Drags, and Clutter Takes Over

    Imagine a side-yard storage area that looked fine when you set it up: shed against the fence, hooks for shovels, a bin for gloves. The first few days, sure, things end up where they’re supposed to. But midweek, you’re just trying to get inside before dark, so the hose ends up looped over the bin and the rake stays propped out to dry. That “organized” look falls apart not from design but from the fact that each step—unhook, unclasp, restack—feels like just enough work to skip. Return flow gums up, and little piles fill the edges. Suddenly, that clear Monday pathway is another zig-zag race through stuff you’re too tired to shuffle back.

    Why “Organized” Rarely Means “Usable” Outside

    Nobody’s storage stays show-ready past the first rain or the third hasty gardening session. On-paper capacity is meaningless if the system’s always a step slower than you are. Which tool leaves the setup most often? That’s the one that will break the routine first. Wall rails overflow, “temporarily” parked items fill a bin, and small gear—trowels, hand pruners—becomes nomadic. It doesn’t matter how many containers you own: if the return path is awkward, you’ll start bypassing the system, and the backlog starts. What looks organized today hides the slow breakdown that comes from return routines that never actually match how—under real weather, with real schedules—you use your space.

    Reset Tasks Accumulate Fast

    One pair of gloves left by the steps isn’t a crisis. But let a couple of returns slip, and soon the boundary of the shed is edged with earmarked piles—stuff “for later” that only gets re-shelved when you can’t stand it anymore. The effort to fully reset grows into a single big project you just keep postponing. That’s why people dread their own storage. Not because tools are homeless, but because putting them away is clumsy, cramped, or plain irritating.

    How Setup Friction Creeps In

    Walk through any lived-in outdoor zone and you’ll see the real issue isn’t lack of products—it’s the choke points: bins stacked so high you stop bothering with the bottom, overfilled wall railings that make every return a puzzle, narrow paths shrunk by a wheelbarrow left askew. Each tiny decision (“Do I open this lid with muddy hands or just drop the tool on top?”) piles up, eroding what started as a clear, easy routine.

    Typical return blockages:

    • Placing a trowel away means first moving a planter that’s in the way.
    • Bins with heavy or awkward lids get skipped, so gloves end up tossed wherever’s open.
    • Wall hooks jammed with odd-shaped gear push everything else further from reach, slowly exiling lesser-used tools behind the regulars.
    • Each new “temporary” pile tightens the walk-through, leaving less room—and less incentive—to actually put things back.

    The Gravity of Dead Corners and Overflow Patches

    Almost every setup has a spot that quietly turns into a landfill. An unused corner behind the shed, a fence patch where stray items accumulate, the shadowed ground nobody bothers with until you trip on a pile of spare pots. Those dead zones don’t get fixed by better labeling. They exist because putting things away there is never the fastest, easiest move in the moment—so overflow sticks and multiplies, cementing these spots as permanent “come back to later” zones that never actually get reset during regular use.

    Open Storage Changes the Real Routine

    What keeps order isn’t how sleek or compact the hardware looks on move-in day. It’s whether you can restore order without stopping to fuss, even after a rainstorm, even when you’re juggling muddy tools. Subbing out awkward bins for an open-front shelf or a rail at arm height, suddenly the most-used gear slides back in, single motion—no lids, no awkward stacking, no shuffling required. That’s the difference between a storage area that stays functional and one that’s always halfway to chaos.

    One-Move Returns Shorten the Reset

    After a weekend mowing rush, the trimmer lands on its shelf, not draped over a growing pile by the gate. Overflow bins don’t choke up because the reset path is so clear you actually use it—even if a stray tool lingers, the majority of returns stick, and the catch-up workload never balloons. When most gear finds its way home on the first try, the friction to “reset everything” shifts from overwhelming to background noise.

    Organization That Survives Real Use Patterns

    There’s no such thing as a flawless outdoor setup—power tools, weather, and shifting projects make sure of that. But a system that absorbs hasty returns—one that’s forgiving when the day gets away from you—is what separates clean, usable space from a zone that always looks halfway abandoned. Over time, these setups shrink the time you spend moving the same rake twice, restacking bins, or bracing for the big Sunday sweep. Instead of order that fades by midweek, you get regularly usable space, even if “perfection” never really happens.

    Quick Wins to Reduce Return Friction

    • Create a visible, open drop spot at utility entries for dirties and frequent-use gear. It intercepts overflow and keeps relentless backup from spreading into the main storage footprint.
    • If “scattered” items keep popping up in the same locations, rethink that dense row of bins or tight corner shelf—maybe those spots are fighting your real cleanup routine, not helping it.

    The line between a setup that actually works and one that always needs fixing is simple: if it’s easy to return gear—even with dirty hands, even in a rush—you keep up. If it’s a hassle, disorder creeps in and sticks. Frictionless storage isn’t magic, but over time, it turns resets from sprawling projects to an afterthought, and that’s the difference you feel week after week.

    Find practical outdoor storage setups at TidyYard.

  • Protect Your Home Exterior with Safe Pressure Washer Techniques

    The warning signs rarely announce themselves until it’s too late: a waver in the spray pattern, the sudden buzz of vibration in your hand, the pitch of water shifting as it hits paint instead of siding. One careless pass with a pressure washer can turn a satisfying cleanup day into a fresh problem—scratched finishes, sodden wood, and headaches that you won’t spot until the next job, or the next rainstorm.

    Pressure Washing: Where Routine Maintenance Goes Off the Rails

    Pulled from the corner of the shop, a pressure washer offers that elusive promise—make the battered work site look new, without hours of scrubbing. But beneath that raw speed is a choice: every squeeze of the trigger is a split-second decision about how much you’re risking the surfaces you meant to protect. The urge to move fast, to cut through that grime and dust, is real. So is the creeping regret when you realize a dirty deck has become a fuzzed-out patchwork, or trim is left with missing flecks of paint you swear were solid an hour ago.

    The fallout rarely appears as spray hits siding or rail. Instead, it sneaks up a day or week later—streaks across wood grain, warped boards, water ghosting underneath siding panels. There’s no dramatic blowout. There’s just that moment, standing with a sander or a caulk tube, wishing you’d run a different tip or eased off the trigger a few minutes sooner.

    Why Tool and Surface Mismatch Always Finds You

    Most pressure washers and their kits look near identical on the hardware aisle—plastic cases, curly hoses, nozzles impossible to keep sorted. That sameness hides crucial differences. Maybe you’re running a cleanup after a day of cutting new bench timbers, flying through dust and chips. The sprayer glides smooth across PVC or composite: quick, controlled, no resistance in the grip. But wheel around to a weathered back shed—the one with the paint already thinning from last winter—and suddenly that smoothness turns into a grating feedback through your wrist, spray marks blooming in the spots you can’t unsee.

    The minute you pair a wrong tip or push the PSI too high, you’re no longer cleaning—you’re creating your next repair list. Fine fibers lift off old planks, paint edges curl, and anywhere the spray lingers at the wrong angle, you’re one pass away from patches you’ll need to resand and coat. Most jobs don’t show the issue while you’re still working. The real cost lands later, in uneven textures, peeling surfaces, and wasted materials.

    On the Clock: A Scene from the Jobsite

    It’s the start of the season. Tools are scattered everywhere—plunge saws cooling off, a stack of drill batteries still charging, and you just wrapped up a run with the pressure washer on a grimy slab. It should be a quick reset: blast mildew off lower siding, touch up the window trim, sweep pollen off upper sills. But you don’t re-check the tip—still set up for concrete grit—and you go at soft paint and old wood at full tilt.

    The first loop feels efficient. The second? Paint flecks swirl in the runoff, the smooth grip buzzes oddly in your hand, and now you see you’ve overdone it. The real sting comes hours later, when dried streaks pop out or the surface fuzzes where you lingered too long. Now, instead of a finished job, you’re prepping boards for sanding and awkward touch-ups you didn’t budget for.

    Adapt or Repeat: Lessons in Tool Adjustment

    Too many callbacks and minor disasters—grain razed, smooth siding left pitted, edges of trim feathered out—finally pushed a change. I ditched the turbo nozzle and started every wood or painted job with a 40-degree tip and low pressure. The immediate effect? The sprayer ran smooth, no feedback jolting through the handle, and the water rolled off evenly instead of eating into the finish.

    There’s no wizardry here. When the job meant washing close to vents or gaps, I widened the spray and doubled my distance. It wasn’t just about surface protection—it also meant less debris flung in the shop, fewer mystery drips behind trim, and, crucially, no surprise moisture showing up under window casings later that week. Cleanup sped up. The cycle of resanding, painting, and fixing faded. Surfaces actually lasted, so I wasn’t running the sander or paint tray every season just to hide last year’s mistakes.

    Three Classic Pressure Washer Mistakes That Haunt Real Projects

    Trusting the Default Setup

    If you’re always using whatever tip or pressure setting the tool had last—especially in the scramble to knock out tasks—you’re asking for micro-damage. Even a half-step too much turns a maintenance wash into a subtle destroyer, roughening wood, piping water precisely where it shouldn’t go, and erasing finish in ways that don’t show up until you’re back on the ladder for repairs.

    Bigger Isn’t Better: Overpowering Sensitive Surfaces

    That urge to blitz through soft pine, trim, or painted wood with a tight jet? It feels effective until you catch yourself gently sanding out scars or hauling out tubs of filler for all the spots you “cleaned” a bit too hard. If you’re repainting after every wash, your setup is all wrong.

    Spraying Blind around Edges and Gaps

    Too much confidence near seams, vents, or window edges with the narrow spray? That’s an invitation for inside leaks, trapped grit, and late-season mold. Experience means noticing how water pools, how edges feel under spray, and stepping back—literally—when those clues add up.

    Quick Shifts That Pay Off Down the Line

    • Begin with the widest spray angle and only narrow if absolutely necessary. Wider coverage means less risk of instant damage.
    • Lower the PSI until surfaces show zero color shift, fiber rise, or roughness. If the spray “sounds” different on contact, you’re too aggressive.
    • Double your standoff distance near joints and openings. It’s a small slowdown for you, but caps off a parade of future repairs and pristine pawprints from debris that never gets a chance to scatter.

    The Feel and Feedback: Knowing When to Change Course

    Don’t just watch—listen and feel. If the grip vibrates oddly, if runoff leaves standing pools rather than sheets clean, or if the spray’s tone roughens mid-pass, those are all red lights. If you’re routinely sanding the same boards after each wash, that’s the tool talking back: you’re wasting time and creating work you don’t bill for.

    Skilled users don’t wait for disaster. Mid-job, they tweak the angle, switch the tip, step back. Those quick pivots aren’t interruptions—they’re basic shop sense, and they’re what make efficient work actually last.

    Keep the Cleanup off Your Punch List

    Pressure washing should end work, not create it. Use a 25- to 40-degree tip for wood and painted surfaces; reserve the pinpoint jets for the spots that truly demand it—bare concrete, brick, or caked-on trouble. If a section feels off, stop. Change the setup before fixing another mess.

    Every time you reach for the pressure washer, you’re deciding what gets cleaned—and what’s going back on the fix-it list. Make the right tweak, and the finish you want is the finish you get, not just until the next rain, but all season.

    http://gumboll.myshopify.com

  • Creating Space in Pet Care Areas to Simplify Daily Routines

    The real pressure points in daily pet care don’t show up as big messes—they slip in as interruptions during basic routines. You go to refill the water bowl and have to shift the food bin just to reach the sink. The brush meant for a quick pet touch-up is wedged behind wipes and a treat jar, adding two more steps every single time. These aren’t dramatic problems, but their effect adds up fast: every blocked reach, every extra shuffle, gradually turns an “organized” setup into a routine that drags. With the wrong layout, looking tidy masks the real friction. The CalmPetSupply world pays off not in how your space looks right after organizing, but in how little your everyday flow gets interrupted afterward.

    The Hidden Weight of Tightly Packed Pet Areas

    Efficiency disappears fast in a pet zone set up to be tight but not actually usable. The bin sits perfectly against the bowl—until you need both at once, and one scrapes the other every refill. That brush you grabbed easily last week now requires shifting a loose towel and restacking two backup bottles. Late-night you’re balancing the water dish, searching for a wipe, and cursing a storage container blocking your reach. At first, these tiny collisions don’t register; by midweek the hassle is hard to ignore. Repeating these fractured steps day after day is what wears down even the most streamlined setup.

    Real Home Scenes: Where The Routine Slows Down

    • Blocked Access: Evening feeding means digging under a treat jar for the scoop, or knocking the water bowl into a wedged bin before you can lift it free.
    • Missed Wipe-downs: Spills linger because the wipes are at the bottom of a stack. By the time you notice, the mess is set and takes triple the effort to clear.
    • Supplies Out of Reach: The grooming brush sits “close by” but always trapped under kibble bags and a backup blanket, turning a 10-second job into a two-minute hunt.
    • Shared Space Interruptions: Leashes, towels, and carriers drift or pile into walkways or shelves. Small detours and blocked grabs break up the routine and slow you down.
    • Repeating the Shuffle: After every meal or walk, you’re stuck moving multiple objects to return just one—clutter gone from sight, but not from your daily reset.

    Breathing Room Means More Than Looks

    A pet area that looks neat may still throw off your routine if items are packed too closely. The problem isn’t “clutter”—it’s the friction created by every lid, edge, and stack left with no margin. Refilling water, you nudge something else; wiping a counter, you have to move scattered gear for each pass. The friction isn’t a pile of mess—it’s a steady leak of time and patience.

    Practical setups make a noticeable difference when they allow a buffer—enough space to handle one thing without jostling another. Even a single inch of clearance around a bowl or container cuts down the bump-and-reset cycle. You lose a bit of compactness but gain a routine that works as intended: quick, one-step, and low-stress.

    One Change Can Unlock Flow

    The fastest upgrade is often just moving one low-importance item out of the “action zone.” Take the extra bottle you only use weekly and put it one shelf up—or stash backup towels out of arm’s way. Suddenly, refilling water or grabbing the brush doesn’t involve a balancing act or domino effect; each tool comes free in one smooth motion.

    The space won’t look dramatically different, but the process tells the real story. Regular jobs—lifting bowls, quick brushing, small wipe-downs—stop causing small delays. Wipes are ready at arm’s reach, not just “stored nearby.” After routine care, you’re done with one movement instead of resetting the same trouble spot again.

    When Looking Organized Isn’t Enough

    Tidy setups can hide daily annoyances: bins that always need shifting to scoop food, treat jars that save space but slow your reach, containers that line up but break the flow. The real friction isn’t space—it’s in the split-seconds you lose to repeated nudges, lifts, and workarounds.

    Even “perfectly organized” can feel exhausting in practice. If you delay a wipe-down, reach awkwardly for a tool, or find the reset dragging late at night, you’re seeing the gap between looking good and running smoothly. The tension stays under the surface until every repeat action reminds you of what’s not working.

    Simple Steps to Maintain a Smooth Routine

    Give every high-use pet care item about an inch of breathing room—space enough to pick it up or put it back without hitting, stacking, or nudging anything else. Ask: do spare bottles or towels need to live here, or can a less-used item go higher or further away? The right move isn’t more storage—it’s clearing the path for the basics you use multiple times each day.

    With each routine—feeding, grooming, fresh water, wiped counters—watch the reset: can you cleanly finish with a single motion? If not, spot the frequent blocker and move it once. This isn’t about tidying up for guests—it’s about reclaiming time and calm during real daily flow.

    Why Minor Adjustments Matter Over Time

    The heavier routines don’t start heavy—they accumulate friction from tiny, repeated detours. Hesitate, shuffle, or reach each round, and wasted motion grows invisible but real. The difference between “organized” and “truly easy” is as small as letting an inch of space stay open for what gets used the most. Don’t wait for mess to signal a problem. Watch where you move the same object twice or get slowed down after a walk, and protect that space as the start of an unbroken flow.

    For a pet-care area ready for the interruptions of real life, look for one small fix that will open up your most-used path. The daily ease you gain isn’t about appearance—but in how many chores quietly finish themselves. Find what works in practice—not just on paper—at CalmPetSupply.

  • How Small Changes in Living Room Setup Improve Your Dog’s Rest

    Most living rooms look calm after a quick tidy—but dog owners know appearances don’t last long. Downtime always hits the same invisible snag: just when you reach for a few quiet minutes, your dog is shifting, circling, or restlessly tracking every move. That’s not a coincidence, and it isn’t just boredom. It’s a setup problem that interrupts real rest and keeps everyone in a slow, silent loop of disruption: one seat away from comfort, one step short of easy flow. The right supplies may be spread out in plain sight, but the actual routine keeps stumbling.

    The Quiet Living Room That Isn’t Really Calm

    Take a common scene: late afternoon, the dishes are stacked and drying, and you finally sit down. Your dog settles nearby on their bed—except it only lasts five minutes. Door clicks, someone gets water, or a kitchen drawer rattles, and now your dog is alert, trailing you with their eyes or shuffling to a new spot. The room pretends at peace, but each “quiet” stretch gets clipped by small, repeated interruptions. Neither you nor your dog actually resets; you trade off between movement and restless watching, week after week.

    This tension barely registers if you glance at the tidy floor. But the dog hovers half-up, reading foot traffic and listening for every fridge door. Ordinary moments—reading, cleaning, meals—get eaten by the little frictions. A delivery at the door means the dog paces; finishing a phone call means you step around both pet and their toys on your way out. The routine never fully settles, and it adds up more than most notice.

    Surface Order Can Mask Daily Disruption

    Many living rooms look set: beds just beside the wall, bowls tucked under a bench, toys pushed to one side. But if your dog’s rest spot lands even slightly in a traffic lane—say, within one stride of the kitchen—every pass sparks new tension. One person grabs a bag, the dog springs up. Someone comes in after a walk—with a muddy leash—and the only open space is your dog’s side of the floor. Suddenly, the setup that “looks organized” turns into a relay of people and dog crowding each other, never relaxing for more than a minute.

    That so-called convenient bed placement is usually only “convenient” on paper. In real flow, any item even half-in the walkway throws the whole routine off: the bed slides, a water bowl gets jostled into arm’s reach, and both you and the dog start rerouting around each other. A neat surface only hides the repeated drag that fills an ordinary day.

    Spotting the Real Signs of Routine Friction

    Check the details. The dog who looks comfortable but never fully drops their head—eyes still tracking the door. The tail swaying the instant someone stands. A paw slides out over the bed’s edge as footsteps cross the room, or the dog’s ears twitch each time a drawer opens. The friction isn’t dramatic; it seeps in as a series of micro-adjustments. After days of this, downtime feels thinner because it’s chipped away by the same low-grade interference.

    Small Frictions That Build Over Time

    • The delayed dinner flow: You try to transition toward prep, but every unfamiliar sound from the kitchen has your dog on their feet, stretching the changeover long past the first cue.
    • Reading that unravels: Your book is open, but you lift your head every few minutes—your dog re-positions to track movement down the hall or toward the back door, never fully relaxing.
    • Routine clutter creep: Put away all the toys in the morning, yet by noon, a rope or ball sits right in the walking line; the bed has shifted into the path, and suddenly it’s a clumsy detour every time you move through.

    These are not just behavior quirks—they are a map of how layout quietly breaks the rhythm of every day, over and over.

    Why the “Right” Spot Can Still Undercut Real Rest

    Well-meant setups often miss the point. A bed that seems cozy near a sofa or a water bowl ready at the edge of the room is no good if normal routines force the dog back into the action. Bed too close to the kitchen? Now every sandwich or snack keeps your dog alert. Too near the main door? Muddy paws require scrambling for cleaner towels halfway across the room as your dog waits, dripping. That “perfect” arrangement quickly exposes its flaws the moment routines actually repeat.

    This is where real-life setups fail: The dog always lands in the “busy lane,” where rest is constantly chipped away by movements that looked harmless on a tidy day.

    What Routine Disruption Really Looks Like

    Zoom out across a week. Monday: the bed is flush against a wall but just inside the kitchen’s orbit. By breakfast, the dog rises at every pass. By midweek, you’re dodging dog and toys to avoid spilled water on the route to the fridge. Friday: prepping dinner means stopping five separate times—shooing your dog out of the way or nudging the bed aside so you can reach the pantry. The drag isn’t a one-off mess; it’s the grind of routines slowed and reset by a layout that keeps interfering at the same points, every single day.

    This isn’t messy chaos; it’s the persistent loss of flow. Instead of a space that smooths life, your living room acts like an obstacle course that both you and your dog adapt to—never getting ahead, never fully unwinding.

    Reset Friction: The Persistent Weak Point

    These little interruptions don’t just fade—they multiply:

    • Post-walk return: Dog comes in with muddy paws, but wipes or towels are still a reach away. By the time you find them, paw prints stretch onto the bed that now needs a full wash.
    • Bowl blockages: Food and water bowls are present, but the water always sits right where you walk first thing in the morning, making you shuffle them barefoot or spill on the carpet.
    • Bedtime resets: Chew toys are corralled to a basket nightly, but migrate back into the traffic flow by breakfast. Your “reset” means another round of picking up what routine keeps scattering back out.

    It’s not for lack of supplies. It’s the repeated effort—extra steps, shuffles, or labor after every normal use—that drag down both neatness and actual routine speed. The space looks fine until real dog-life puts it to the test hour after hour.

    Breaking the Cycle: Moving the Bed Just One Meter

    Sometimes one meter changes everything. Slide the bed farther from the kitchen’s “splash zone” and outside the path of daily foot traffic—not hidden, just outside the frequent crossing. Suddenly, the dog rises less, spends more time down, and waits out door swings or phone calls rather than trying to anticipate your next movement. The rest area stays cleaner; the toys creep less into the main walkway. There’s no need to pause the routine for micro-resets after every meal.

    This shift doesn’t make every distraction vanish, but it reduces almost-interruptions. The dog stays down while you grab a drink, instead of pacing with every sound. By the end of a week, you realize meal prep is less crowded, downtime is longer, and the after-walk cleanup is quicker. The improvement comes not from more products or stricter routines, but a layout that matches ordinary movement instead of blocking it.

    How Small Tweaks Shift the Entire Day

    No setup is perfect, but minor changes in placement—bed, bowls, toy basket, even towels—change the way routines feel much more than another layer of surface organization. The seemingly minor meter of distance quickly:

    • Reduces noise triggers: The dog learns to ignore distant kitchen sounds, since they’re not directly in the highway of traffic.
    • Makes transitions smoother: Walks, rest, and feeding slot into each other with fewer forced pauses and no need to dance around bowls or scattered toys.
    • Lowers reset drag: After a muddy walk or a play session, supplies are within practical reach—so resets turn from small projects into quick checks.

    What changed? Not just the look of the space, but how rarely daily routines now get interrupted by layout mistakes. This builds the strongest difference between a “tidy room” and a living room that finally stops fighting back.

    A Setup That Looks Calm—But Finally Feels Right

    You can buy more bins or baskets, arrange toys daily, or clean up after each meal, but most setups only disguise frictions long enough for the next awkward moment. The only real test is this: does your dog stop scanning the room, lying down entirely even when you move? Are toys and bowls positioned so you aren’t repeatedly stepping around them or resetting things after every walk or meal? If rest starts to come easily—not just for an hour, but across the entire routine—you’ve hit functional calm,

  • How Ending Playtime Gently Improves Indoor Cat Feeding Routines

    Tidying up after indoor cats isn’t a feel-good moment—it’s a treadmill of small resets that refuse to stay finished. The supposed “feeding zone” is where this cycle breaks down fast. Toys drift back to the bowl before you’ve put the scoop down. Half-chewed play things block the mat edge, stray kibble slides off mid-reach, and the “done” feeling after cleanup evaporates before you get to the next room. Even with a tidy surface, the work repeats: every meal means detangling toys from feeding gear, dodging blocks underfoot, or wiping down a space that never quite feels settled. The friction isn’t just mess—it’s the blur between play and feeding, and it’s exactly where a better StillWhisker setup starts to matter.

    The Overlap Trap: When Play and Feeding Blur Together

    If you’ve ever found a crinkle ball hiding behind the food bowl during an ordinary refill, you know the cycle: playtime turns into dinner without a reset, and the result is a feeding area that refuses to stay controlled. A wand toy is still within your cat’s strike zone as you pour kibble, and the “transition” is nothing but a quick handoff. This isn’t about having a hyper cat—routine itself sets the trap. Toys creep into feeding space, energy lingers high, and you end up managing the same spillover cleanup over and over.

    The real-life symptoms are hard to ignore:

    • Wand toys or balls pressed against the food mat before your cat even finishes eating—cue a hasty juggle just to pour fresh kibble.
    • Kibble kicked past the mat’s edge, turning cleanup into a two-room job when food tracks under furniture or into shared walkways.
    • An overall sense that the feeding corner is never truly “done”—the line between chores and clutter vanishes as toys keep sneaking back before the next meal even starts.

    How the Feeding Area Becomes a Hidden Repeater

    It doesn’t matter if your space is a studio, an open living room, or a crowded multi-cat apartment—when the reset between play and food is missing, mess skips back instantly. You may have a mat that looks organized at a glance, but after a few cycles, reality creeps in. Toys appear just outside the frame, food bits show up in neighboring zones, and that just-cleaned surface looks ambushed by clutter before the day’s over.

    Watch for these signals:

    • Your cat splitting attention between mid-meal bites and toys left in reach, dragging food and play objects back and forth.
    • Routine resets that slow you down: instead of a quick surface wipe, you’re rounding up toys and food bits in tandem, usually two steps too late for real containment.
    • Momentary order that lasts minutes, not hours—toy scatter and food drift cross over to water stations and shared human paths before you notice.

    This isn’t surface mess—it’s fatigue from always shuffling something away. The rescue supplies are present, but never where you need them when the scatter line moves.

    That Supposedly “Organized” Space? It’s Only Half the Battle

    You mop up, you return toys, you stack bowls. But when the cycle always resumes—play rolling into mealtime, toys returning to the mat—your efforts plateau. The tell: those “clean” resets feel shorter each time until you’re perpetually in mid-cleanup. On busy days or with multiple cats, the repeated work exposes where “order” isn’t enough if you don’t break the routine’s weakest link.

    Owners miss key differences:

    • Visual order doesn’t equal a true reset. Toys moving back mean your cleanup cycle is on repeat, not concluded.
    • Clean mats or bowls can disguise a maintenance loop—the scattered edge between feeding and play simply migrates to another corner or shows up again during the next reset.
    • Organized setups fail to deliver if the cat’s transitions are too abrupt—without a gap, mess repeats itself in the background, even if it’s not immediately visible.

    Real-World Moments: When Routines Don’t Quite Land

    Everyday friction is not dramatic, but it’s relentless. Filling the bowl means maneuvering around a feather stuck under the mat. Refilling water turns into skimming floating toy shreds and wiping puddles where toys, drool, and stray kibbles merge. Even with a toy basket close by, the missing pause means objects keep looping back before you can grab them. Recognizable moments pile up fast:

    • Reaching to refill the bowl and being blocked by scattered toys, forcing a last-second tidy-up while food spills wider.
    • Fishing a loud, half-buried toy out from under a feeding mat mid-meal as your cat bats both at once across the floor.
    • Water dishes cluttered with toy debris and puddles that spread as you step or wipe, meaning cleanup supplies are needed mid-routine, not after.
    • A toy basket that can’t outpace the cycle—the window to collect and reset always comes a moment too late.

    Week after week, this turns a minute-long cleanup into a drawn-out series of micro-interruptions, sliding into your own meal window or turning a “finished” space into a stopgap for the next spillover.

    A Small Reset with a Big Payoff: Containment Before Feeding

    The turning point isn’t extreme organizing—it’s one intentional closure before the cycle repeats. Pausing to collect all toys into a contained, reachable basket or soft bin, then waiting a moment before feeding, interrupts the auto-repeat. Instead of letting toys and bowls stay tangled, you add a clear edge between play and meal.

    With this single added step:

    • Toys are out of sight, so your cat’s energy begins to wind down, making last-minute chases or spills less likely when food is out.
    • The few seconds between play and feeding lowers meal-time scatter—cats shift from stimulation to eating mode, rather than bouncing between both and dragging objects across the mat.
    • Cleanup isn’t a frantic room-wide sweep: now, it’s a direct, predictable reset, not a constant hunt for outliers before every meal.

    The difference doesn’t feel perfect, but it’s practical. The “scatter boundary” stays put: toys don’t swarm the food zone, and feeding mess is easier to find—and fix—before it escapes to other living spaces.

    What Does This Look Like in a Shared Space?

    Shared kitchens, living corners, studio layouts—they all magnify the cycle if there’s no reset. A toy within a step of the bowl triggers the same chase, no matter how you arrange things. By putting every toy away—far enough to force a gap—you signal a functional line that holds through normal household movement. Even a small, soft basket puts just enough distance to keep the feeding area stable, no matter how compact the room or stacked the routine.

    Making the Reset Routine Stick (Without Turning the Room Into a Stage)

    You don’t need a showy ritual or a designer space. The fix is about easy, frictionless transitions: sweep up toys, drop them into an open bin away from the food station, and give it a short pause before setting down the meal. The ideal container is simple—soft-sided, not a distraction during feeding, placed for your quick access but not a magnet for a bored cat. This isn’t a 10-minute project. Even a 30- to 90-second gap resets the energy and keeps the boundary intact, whether you’re in a rush or have time for a slower wind-down.

    The difference in upkeep stacks over time. On hectic days, a rushed, minimal toy grab is still enough to blunt the mess. On slower evenings, a more deliberate collection and pause tighten the control. Either way, you spend less time tangled in the transition and more time staying ahead of repeated work—the whole point is to keep the cycle manageable, not magazine-worthy.

    Everyday Proof: What Actually Changes After Resetting the Routine

    Repeated use draws a line: after a few cycles, the contrast is visible.

    • Toys show up near the food or water less often. The “danger zone” around feeding stays cleared, even with multiple resets per day.
    • Kibble and crumbs mostly stay on the mat—no more tracking food into living room rugs, under appliances, or shared walkways with every rushed meal.
    • Cleanup shortens. Maybe not dramatically, but the time saved each day adds up, especially if feeding routines stack up across cats or meals.
    • Cats finish eating and are more likely to rest or groom instead of hauling a toy back for round two—or restarting the mess you just contained.

    The feeding-play cycle can’t be eliminated, but the pressure points become easier to handle—less reshuffling, fewer mid-meal obstacles, a predictable routine instead of a permanent scramble.

    See setup ideas for

  • How Pet Travel Bags Can Slow You Down at Every Crosswalk Pause

    The real blockages in pet travel aren’t dramatic—they’re the small jams and delays that pile up precisely when steady movement matters most. A pet bag that looks “ready” can still turn on you in the real world: you pack treats, wipes, the water bottle, the leash—all in their “place.” But by the third curb, that organization turns into a trap. You’re stopped at a crosswalk, leash taut, one hand steadying your dog. The other dives into a bag that resists: wipes buried behind a bottle, waste bags wedged awkwardly under a rarely-used blanket, compartments stacked so you have to reshuffle three things to reach the one you actually need. What ought to be a seamless motion becomes stop-and-go chaos—proof that real pet travel isn’t slowed by lack of gear, but by setups that turn quick access into their own obstacle course. This is the world PawGoTravel’s routines are built to recognize—and quietly correct.

    When “Looking Organized” Isn’t Enough

    There’s a quiet pitfall in pet-travel gear: a bag can look precise and composed but break down with every real-life pause. Structured pockets and crisp lines hold together until you’re perched seat-side, your dog tugging to get moving, and just grabbing a single snack demands unzipping, shifting, and half-emptying a pocket. Quick access becomes a shuffle. One zipper hides what another claims to hold. Overlapping pouches and blocked compartments mean a leash clip gets pressed inside, bowls wedge against snacks, and what once felt efficient becomes frustrating at the precise moment you need to move smoothly. If “organization” only works when everything is motionless, it’s not built for actual pet travel’s pulse and pause.

    Real-World Example: Curbs and Crosswalks

    Think of a typical stop at a crosswalk. Dog waiting, leash slightly tense, you try to grab a cleanup bag—only to discover it’s trapped behind a snack pouch last used at the previous stop. The bag looks organized, but nothing is at hand when it counts. What should be a one-handed grab becomes an awkward juggling act: pet in one hand, zipper in the other, balancing a treat pouch, hoping nothing spills, finally reaching the wipes that were supposed to be “right there.” One missed pocket becomes a delay. Multiply that by five or six stops, and you’re running out of patience in public, performing resets that pull your attention from the outing to your bag. These aren’t minor glitches—they’re the pain points that make even the best-packed pet routine start to unravel by midday.

    The Invisible Build-Up: How Friction Accumulates with Repeated Use

    Disorder rarely starts obvious. The longer your outing, the more every small interference weighs on the routine. The most common sign isn’t visible mess; it’s the cumulative drag of blocked access. Drying muddy paws? The water bottle’s in the way. Need a waste bag? The collapsible bowl blocks the way. Unclipping the leash? Now it’s tangled around a blanket edge intended for calm, but now it’s the latest stopgap. Each shuffle is quick—until halfway through the trip, when stopping means resetting the whole setup. Every restart is slower, each pause less seamless, and the bag’s structure turns into the friction you were trying to avoid in the first place.

    Comfort Versus Speed: When One Solution Creates Another Problem

    Add a comfort layer, favorite toy, or extra mat, and the setup feels cozy—until you need speed. That plush blanket meant for calm now shields the leash clip or buries the waste bags. “Comfort” items solve one problem and quietly create another. Over time, these tradeoffs stack: your pet rides calmer, but you’re distracted by reaching, searching, juggling. The hesitation slows both of you down. The bag stays neat to look at but grows clumsy in use—proving that good intentions in setup can get messy once the stop-and-go rhythm starts adding pressure.

    Access That Matches Movement: Where Dedicated Pockets Make the Day Easier

    Function wins when access points are truly direct—and not shared across items. Redesigning your setup even slightly—like assigning a side pocket strictly for wipes and bags, right next to the leash clip, leaving it clear—immediately shrinks routine friction. In action, this means at any curb, one hand always lands on exactly the right item while the other keeps your pet steady. No blocked zippers, no collision with bowls or blankets, no balancing act. The bag might look less symmetrical, but in repeated use, it feels designed for the pulse of restarts, not just the photo at home.

    What Actually Changes When You Rework One Weak Point

    The difference is instant and accumulates with each stop: clean, repeatable reach, no multi-stage item shuffling, and no pocket resets in public. Crosswalks become brief, not drawn-out. Cleanup moments are handled with one move. Focus comes back to the pet—not the bag. Instead of inventing tricks each time you pause, structure lets you flow through restarts without improvisation. Stability grows. That gain is almost invisible—until you realize you’re not fighting your own bag anymore. Only repeated movement shows how large the small improvements really are.

    Recognizing Signs Your Setup Needs a Change

    The simplest self-check: count the hands and moves it takes to get to one essential item at every stop. If you’re putting things down, shifting two or three pockets, or doubling back for cleanup tools, your setup is leaking time and calm. Drag by drag, the wrong layout costs you more than annoyance: tired hands, restless pet, and that creeping sense your gear is quietly working against you. Pet travel shouldn’t be a test of multi-task endurance.

    Telltale Moments of Friction

    • You reach for wipes or bags, but they’re nested behind other items, triggering fidgeting or straining from your pet.
    • The leash clips or gets snagged around a bowl or under a blanket, dragging out the restart while you backtrack for a missing clip.
    • Each pause leaves your bag’s inside more tangled, despite repeated straightening—evidence that “fixing” it isn’t solving the root problem.

    These are not dealbreakers, but they build up and undercut every walk that should feel smooth—especially on trips with stops and restarts.

    Easier Stops, Smoother Restarts: Why Setup Details Matter

    No setup makes friction vanish. A zipper will still catch, a treat will go missing. But what separates a “packed” bag from a practical one? Structure that supports you after repeated cycles, not just in the first calm ten minutes. Dedicated quick-access, zero-overlap for high-use items, a flow that lets each hand land where it needs—these shrink the exhaustion and awkwardness that builds with use. The point isn’t achieving perfection. It’s a layout that gets simpler as the outing continues, not harder.

    The difference is clear in movement: every stop, every crosswalk, each unplanned seat-edge pause, gets easier to manage, not heavier with baggage. The right pet-travel setup doesn’t just look sorted on your doorstep—it stays functional in motion, converting “wait, where is it?” into “ready, let’s go.”

    Discover practical pet-travel setups and essentials at PawGoTravel.

  • Optimizing Carry-On Organization for Seamless Travel Transitions

    A carry-on isn’t really tested until it’s in motion. The instant you step into the airport, every careful home packing decision gets stress-tested—first by a passport check, then an outlet search, then that first scramble as your boarding group is called. That sense of order you achieved at home starts breaking down the first time you need to grab a document or charger on the move. The problem rarely shows up on the bedroom floor; it hits when you find yourself fumbling with too many zippers, digging past tangled chargers or a wallet wedged deep in the wrong pocket, while the line inches forward and subtle frustration starts to build. This is the friction CarryOnSupply was built to diagnose: what slows you down in repeated use, even if your bag looks “organized.”

    When “Well-Packed” Fails Under Pressure

    The true weak point of most “organized” carry-ons appears the moment you need fast access in a real sequence: security, the boarding call, overhead bin juggling, dropping into your seat. It’s rarely what you packed—it’s how quickly you can actually get the one thing you need, exactly when you need it. You remember which pocket should have your passport, but when it’s your turn, it’s buried behind a cable, masked by a pouch, or stuck inside a section that now requires full unzipping. That outer order becomes a slow-motion breakdown: a double-zip hesitation, an awkward pause, a pileup forming behind you. Instead of clearing the checkpoint with one smooth zip, you’re working around invisible structural drag, and your “system” suddenly isn’t helping.

    The Overlap Problem: Where Organization Complicates Access

    Trying to combine too much into one control zone—passport pressed against charger, earbuds sharing space with tickets, phone layered with receipts—creates a new problem: every retrieval turns into a decision tree. In the logic of real travel, this overlap is where “neatness” backfires. Suddenly, a compact carry-on that looked streamlined hides access traps, especially under airport pressure. The classic mistake: front pouch loaded with all your essentials, so grabbing one thing starts a shuffle—holding up the line at security, digging around for an ID, extracting cables in front of a watching crowd. You’ve reduced visible mess but haven’t reduced the repeated, high-pressure interruptions that cost the most time and patience.

    Packing Choices That Backfire in the Terminal

    Nested organizers, micro-compartments, and zip pouches stacked in the main compartment seem efficient right up until you need something mid-journey. In practice, this “system” collapses into:

    • Peeling back several layers just to retrieve a boarding pass at the gate
    • Unzipping half the bag, obstructed by other travelers, to rescue a charger
    • Squeezing aside with your bag in a crowd because one needed item won’t surface easily

    Each of these friction points adds micro-delays that pile up: a journey built for movement becomes one of constant minor resets, especially when space and time are tight and every other traveler is also reaching for their essentials.

    Document Drama: The Airport Security Gauntlet

    Security trays reveal what neatness hides: the passport that slid under a pouch, a cable snagging on a charger sleeve, a document that now means partial bag unzipping in an overcrowded tray area. Suddenly, what worked “at rest” forces a full unpack in a two-foot gap between bins—with the impatient shuffle of a growing line behind you. These small breakdowns aren’t occasional; multiply them by every check, seat entry, carry-on repack, and gate transition, and structural weakness becomes the real trip cost.

    How a Dedicated Outer Pocket Changes the Trip Flow

    One well-placed pocket, sized for just your actual “in-transit” essentials, can flip your whole rhythm. Move the repeat-use items—passport, phone, boarding pass, earbuds—into a single, slim, exterior pocket that stays unblocked and upright. At security, it’s one zip: out and back, no bag drop. At boarding, no rummaging through nested organizers—just instant retrieval and return. In the jetway, your ID is under your thumb, not at the bottom of a compartment. Even reaching up to the overhead bin or squeezing into your seat, your next-needed object is where your hand expects it, not deep-buried or cross-layered under less urgent things.

    The difference comes after use: essentials settle back quickly, the routine resets itself, and you keep moving—no table, no reorganizing, no hunt for lost order. This isn’t about visible neatness; it’s about minimizing interruption and restoring real flow, every time you need to reach for something basic. The cleaner your access sequence, the less the system falls apart in repeated cycles.

    The Repacking Burden: Small Choices, Big Frustration

    Most travelers tolerate a carry-on that “looks right” but keeps costing time in every routine use. The moment you pull out a document and have to rebuild the pouch stack to keep things tidy, or when a charger extraction leads to a crumpled mass of cables and papers to rein in before walking on? That’s the real-world penalty for structure that only passes the bedroom trial. In crowded terminals or boarding queues, the price is bending awkwardly in a tight space or blocking the aisle as you unpack, hunt, and repack for the third time in an hour.

    The only test that matters: does your setup let you move faster (not just look neater) after multiple real-world resets? Every time you’re forced to step out of line, break your stride, or pause for another reach-inside search, the answer becomes clearer. The silent tax is in time and focus lost—rarely recovered by just “reorganizing” for looks.

    Small Improvements That Add Up Over a Trip

    Real carry-on performance isn’t about chasing perfect order—it’s about removing the biggest sources of repeated drag. These changes add up where it counts:

    • Keep only the most-used essentials in an exterior pocket you can reach fast, bag upright and in hand
    • Put chargers and power banks in a dedicated, separated sleeve—not sharing space with travel documents
    • Use internal organizers for secondary items only—anything you’ll grab once or not at all before arrival
    • Avoid the “everything in one tidy pouch” temptation; if you’re unpacking to access, the setup is already slowing you down

    This isn’t about more compartments. It’s about reducing steps—so airport flow, gate waits, and in-flight reach-ins all become one-motion easy, not multi-step hurdles.

    Packing for Movement—Not Just Appearance

    Nearly every traveler’s routine exposes the same flaw: a setup that can’t withstand two or three real cycles of use without starting to break down. What appears “in control” is often structurally weak; hand hesitations, cascading zippers, and uncertain pocket searches add up to repeated travel friction. What matters isn’t order in the static moment, but the speed and ease of use after the fifth repack, the fourth ID check, or the third overhead-bin grab in one day of travel. A genuinely reliable carry-on is built for these pressures—not just for the look of readiness, but for the flow that only holds up when order is quickly restored, again and again.

    Find carry-on gear built for repeated, real movement at CarryOnSupply.

  • Why Visible Storage Transforms Everyday Car Clutter Into Order

    A car interior that looks organized almost never stays that way under real, repeated use. Fast commutes, quick errands, and back-to-back stops expose design flaws instantly: chargers jam inside closed compartments, phones slip into unreachable gaps, and “tidy” storage turns into a scavenger hunt by the third or fourth drive. The line between an organized car and one that actually works for everyday routines isn’t just cosmetic—it’s measured in seconds wasted, items lost, and frustration that keeps returning.

    When Order Looks Right but Feels Wrong

    Factory layouts promise neatness with deep center consoles, sealed glove boxes, or slim door pockets. But the moment routines take over—fishing for gum at a stoplight, juggling keys and groceries, or charging on the go—these same compartments invite trouble. What’s out of sight doesn’t stay in mind: you reach for your cord and hit a tangle, sunglasses hide under street maps, and receipts crawl out from seat cracks with every turn.

    Returning to your car after a day out, the illusion drops: you’re forced to dig through the armrest for a charger you needed two minutes ago, or shove aside a pile of wrappers that seemed “handled” just one trip earlier. Small clutter lands right where you need fast access—seat edges, floor corners, cup holders—making a supposedly organized cabin feel clumsy whenever you’re in motion.

    The Repeated-Use Reality: Why Clutter Returns

    Prettiness fades when car traffic rises. Front-seat floors become the hold zone for bags or gym shoes, and quick handoffs override any hope of keeping smaller essentials neatly buried. Compartments with lids or zippers are rarely used once you’re actually pressed for time—so phones wind up on seats, snacks get jammed into visible ledges, and anything not instantly reachable just drifts out of order.

    Say you end a call as you pull in to park. If “putting your phone away” means popping a lid and cramming it into a shadowy bin, you’ll skip it half the time and let the phone ride shotgun until it eventually slides toward the door. Every ignored moment adds up—multiplied by rushed departures, changing passengers, and last-minute charging. Mess outpaces memory, and cleaning means chasing things that escaped the compartments entirely.

    Persistent Friction in Familiar Zones

    Clutter has its favorite landing zones: seat edges fill with receipts, center trays pile up with loose change and wipes, door pockets get stuffed when cup holders fail to fit another bottle. The source isn’t too many accessories—it’s the lack of visible, open storage in your high-use grab zones. And every extra second spent searching equals a little more friction injected into your routine.

    Hidden Storage: The Double-Edged Sword

    Packed bins and zippered organizers hide clutter—for about a day. Try retrieving a tangled charging cable while merging, or digging out wipes with one hand during school pickup, and the hidden solution feels like a trap. Convenience always beats aesthetics under real-world pressure: a neat surface with a jammed interior still leads to routine disruptions, lost time, and more “temporary” stashing that never gets reversed.

    Over a busy week, that deep compartment or covered tray quietly fills with “just for now” stash—random mail, snack packs, dead chargers—until cleanout day exposes the backlog. Visually clean doesn’t mean functionally better. Out-of-sight order breeds its own chaos, especially once the shuffling of daily use starts.

    How Visible Storage Changes the Routine

    Open organizers, center trays, and catch-alls in sight make the difference obvious. Instead of defaulting to any open ledge, your hands reflexively return the key, cable, or sunglasses to a seen, natural spot. No brainpower lost on digging or remembering. This small structural change—adding a slim tray or visible bin in the zone you most often reach—interrupts the cycle of drift and disappearance.

    This doesn’t demand overhauling your whole layout. Just a shallow, clearly-placed organizer lets your most-used items return instantly and stay put—removing both hidden mess and the slow drag of recurring searches. Extra, less-needed gear can live in the doors or trunk, while your in-and-out essentials stay always at hand, without friction or hunt time.

    Real Scenes: When Setup Makes the Difference

    • Returning to your car with groceries in hand, you drop keys and phone into a visible tray—no more half-blind pawing by the seatbelt or watching a phone flip out onto the floor.
    • On repeat school runs, snack wrappers and receipts land in an open trash bin—no more scraping under the seat two days later.
    • When switching drivers, nobody asks, “Where do I put my sunglasses?” They’re dropped in the same open pocket every time—accessible, obvious, and done.

    Each of these small shifts attacks specific pain points: cleaner re-entry, less missed gear, and faster transitions without the routine drag. The car adapts to your habits, not the other way around.

    Why Clutter Keeps Returning—Even in Neat Cars

    Organizing for looks isn’t enough. If your storage doesn’t match the daily motion—grabbing, dropping, swapping, and charging—mess always returns. A pristine console on Saturday is crammed with missed items by midweek, and anything not open or at hand is quickly forgotten. The high-traffic spots tell the real story: when “storage” means hidden, order falls behind nonstop access, and the neatest setup feels slower, not easier, after a few rounds.

    The right organizing setup isn’t about showroom minimalism. It’s about making the car adjust to the churn of actual use—meeting clutter at the source, not weeks later, and sparing you the repeated penalty of re-sorting every trip.

    Making Each Drive Smoother—Not Just Neater

    The payoff for real-world organization isn’t visual—it’s more fluid entry, quicker exits, and fewer moments spent swiping mess aside. Once the most-used items claim their visible zone, the time you’d spend cleaning out forgotten bins or chasing wayward cables almost disappears. The everyday cues—quicker handoffs, less gear lost, easier seat swaps, and less hesitation before starting the drive—all reveal the difference between a car that stays neat and one that actually runs smoother, week after week.

    Find real, repeated-use car storage solutions at DriveWellSupply.

  • Transform Your Workspace with an Under-Desk Cable Tray for Smooth Movement

    If you’ve kicked a charger, fished under your desk for a USB cable, or spent work time untangling adapters beneath your chair, you already know: desk-surface tidiness isn’t the same as actual usability. Cables taped to the leg, cord bundles behind the monitor, or a carefully coiled power strip may look neat, but under the surface, friction reappears fast. It drags against your feet, clutters your reset path, and turns “organized” back into awkward the moment you change your seat, grab a notebook, or switch devices. Workspace photos don’t show this—the daily payoff and daily cost only show up in use.

    When a “Tidy Desk” Isn’t Enough

    The real test isn’t how your desk looks at 9 a.m.—it’s what happens when you shift position after an hour. You reach beside the keyboard for a notepad, and your foot catches a cable loop that’s resurfaced behind your ankle. Swapping a laptop or plugging in new gear, you discover the bundle that held together for the photo doesn’t flex with you. Suddenly, cable drag and power-brick tug set boundaries for where your feet and chair can actually move. Every adaptation—pop up to adjust a monitor, scoot to the side after lunch—turns up new snags.

    With each attempt to reset, the organizing layer splits: a desk that looked ready for a “clean setup” snapshot eight hours earlier now has cords dangling, adapters drifting under your wheels, and a surface that resists clutter while the zone below your knees grows unpredictable. The problems aren’t dramatic but they add up—routine movements become little negotiations, posture suffers, and “ergonomic” arrangements need constant reacquainting to stay effective. What stays hidden out of sight is what quietly interrupts your day.

    Moving Cables Overhead: The Behavior Shift

    An under-desk cable tray isn’t about the photo—it’s about clearing your movement zone for actual work. Once cords, chargers, and adapters move overhead, the workstation stops fighting your legs and starts behaving like an environment tuned for repetitive, real-world use. The tray acts as an anchor, rounding up the slow cable drag that usually slips back into your path: no more nudging a rogue plug before you get up, pausing to rescue something stuck under the chair wheel, or tensing your ankle every time you scoot in or out.

    The improvement isn’t just at install—it accumulates with each routine. The phone charger that always slid off the desk disappears from your mental checklist. Instead of pausing to tiptoe through a reset, you settle in, adjust, stand up, and switch devices as your workday demands—less micro-fiddling, more forward motion. The tray keeps dozens of small interruptions from accumulating into a bigger, harder-to-diagnose problem.

    Placement Matters: Not Too Far, Not Too Close

    Installing a tray is one of the few times you dictate—and then feel—the cable pathways during real movement. Put the tray tight against the desk edge, and your knees hit it every time you sit down. Slide it too far back, and cables slip off, reappearing where your heels want to rest or swing. Over days of routine, the sweet spot—often about ten to twelve centimeters from the edge—feels right because it disappears under your natural range of motion, not because of a template. Tune it to your actual sessions: lean forward, scoot your chair, let your feet fall where they want to—if the tray interferes, move it. Specific fit beats generic symmetry every time.

    Where the Real Gain Appears: Day-to-Day Use

    The difference sharpens after several cycles, not on day one. Typing in the morning, sketching to the side in the afternoon—you notice nothing gets in the way as your body, not just your hands, shift work modes. A week later, you realize the daily questions—did I just unplug something with my foot? Why is my charger dragging?—fade from your mental overhead. Resetting the desk becomes automatic, not tedious, because stray cables don’t creep into the leg space where you actually reclaim focus between sessions.

    This isn’t just “ergonomics,” it’s about knocking out the disruption zone between organized and actually usable. When all your repeat-use charging (laptop, phone, monitor, light) stays corralled overhead, you stop tiptoeing and start working. Desk trays won’t make clutter vanish, but they will keep friction out of your essential movement area—the real bottleneck most fixes miss.

    Even Small Setups (and Small Changes) Count

    On compact desks, under-desk real estate is brutally limited. Built-in drawers, slide-out organizer units, or cramped file boxes are helpful until stray power cords wedge into the same path. A tray that actually matches your daily motion doesn’t just tidy—it keeps storage from swapping one frustration (piles everywhere) for another (trapped legs or snagged toes). Even a short or side-mounted tray can clear the main walkway. The payoff is visible: your storage units work, feet move cleanly, and you avoid the reset-rework spiral that wastes real minutes every week.

    Practical Checks Before—and After—You Install

    • Test your real movements—pretend you’re grabbing a notebook, stretching mid-session, plugging in, or sliding between keyboard and sketchpad. Where do your feet and knees naturally fall?
    • Do all cable routing while actually sitting, not from a standing view. If you only optimize what’s visible on the empty desk, friction returns the minute you start using it for real work.
    • Accessibility beats perfection: choose a tray that lets you swap out devices efficiently. Trying to “seal” the mess might solve visual clutter, but if every new adaptor needs a crouch-and-search, you’ve simply swapped one problem for another.

    The first week after install, you don’t just notice fewer tugs and less wrestling with your chair. The aftermath of a meeting, a reset between tasks, or midday energy drop doesn’t require a legroom overhaul. Most days, you won’t remember the tray—just that work flows with less debris, physical or mental, in the way.

    Quick FAQ

    How do I choose the right tray size?
    Pick a tray that supports all major device cables without intruding into your movement zone. For most setups, leaving around ten centimeters from desk edge to tray limits knee and foot interference. Always trace your actual cable runs and device chargers first, not just guesses from a product sheet.

    Will a tray make plugging or unplugging harder?
    Not if you leave room. Overfilling or fully enclosing trays can create new friction (or lost adapters) during cable swaps. Go for open access you can reach without a hunt—organization that trades away ease-of-use isn’t organization, just visual tidying.

    What if my desk has crossbars or limited mounting space?
    Even desks with undercarriage hurdles can use trays—just offset the install, use a shorter tray, or split cables into two paths. Partial cable management still solves most movement issues, as repeated workspace friction almost never comes from the entire undersurface at once.

    Order Underneath = Flow on Top

    Whether your setup juggles multiple devices, shares a compact surface, or rotates regularly between seated and standing work, surface-level sorting only gets you so far. The shift comes when cabling, power strips, and chargers move up above the leg zone—into trays tuned to your actual pattern of use. That’s when the “neat” desk starts behaving—reset after reset, session after session. You’ll see tidiness but feel the real win: freed-up routines, fewer interruptions, and a sense of space that persists through real work, not just when the desk is still and unused.

    Explore the full WorkBasic collection