Blog

  • Why Choosing the Right Impact Driver Bit Changes Everything

    When you reach for your impact driver to tackle a project—be it fixing a deck, tightening fence screws, or securing a detached bracket—you might glance over a box of assorted bits and wonder if it really matters which one you pick. At first glance, most bits look interchangeable, but choosing the wrong one can quickly lead to frustrating issues like stripped screw heads, slipping tips, and wasted effort. Understanding the common impact driver bit types can dramatically improve your efficiency and save you from expensive trips back to the hardware store.

    Why Selecting the Right Bit Matters

    Even if your impact driver cranks out serious torque, that power doesn’t mean much if the bit isn’t the right fit. The wrong bit can cause cam-outs—where the bit slips out of the screw head—leading to stripped screws, damaged materials, and sore hands. Time lost fixing these mistakes far outweighs the seconds saved by grabbing the wrong bit originally.

    Bit design and fit are just as important as the driver’s power. For example, a No. 2 Phillips bit looks similar to a No. 3 Phillips but using them interchangeably is a surefire way to wreck screw heads. Impact drivers deliver anywhere from 1,200 to 1,800 in-lbs of torque, and bits not rated for impact use often twist or break under that stress.

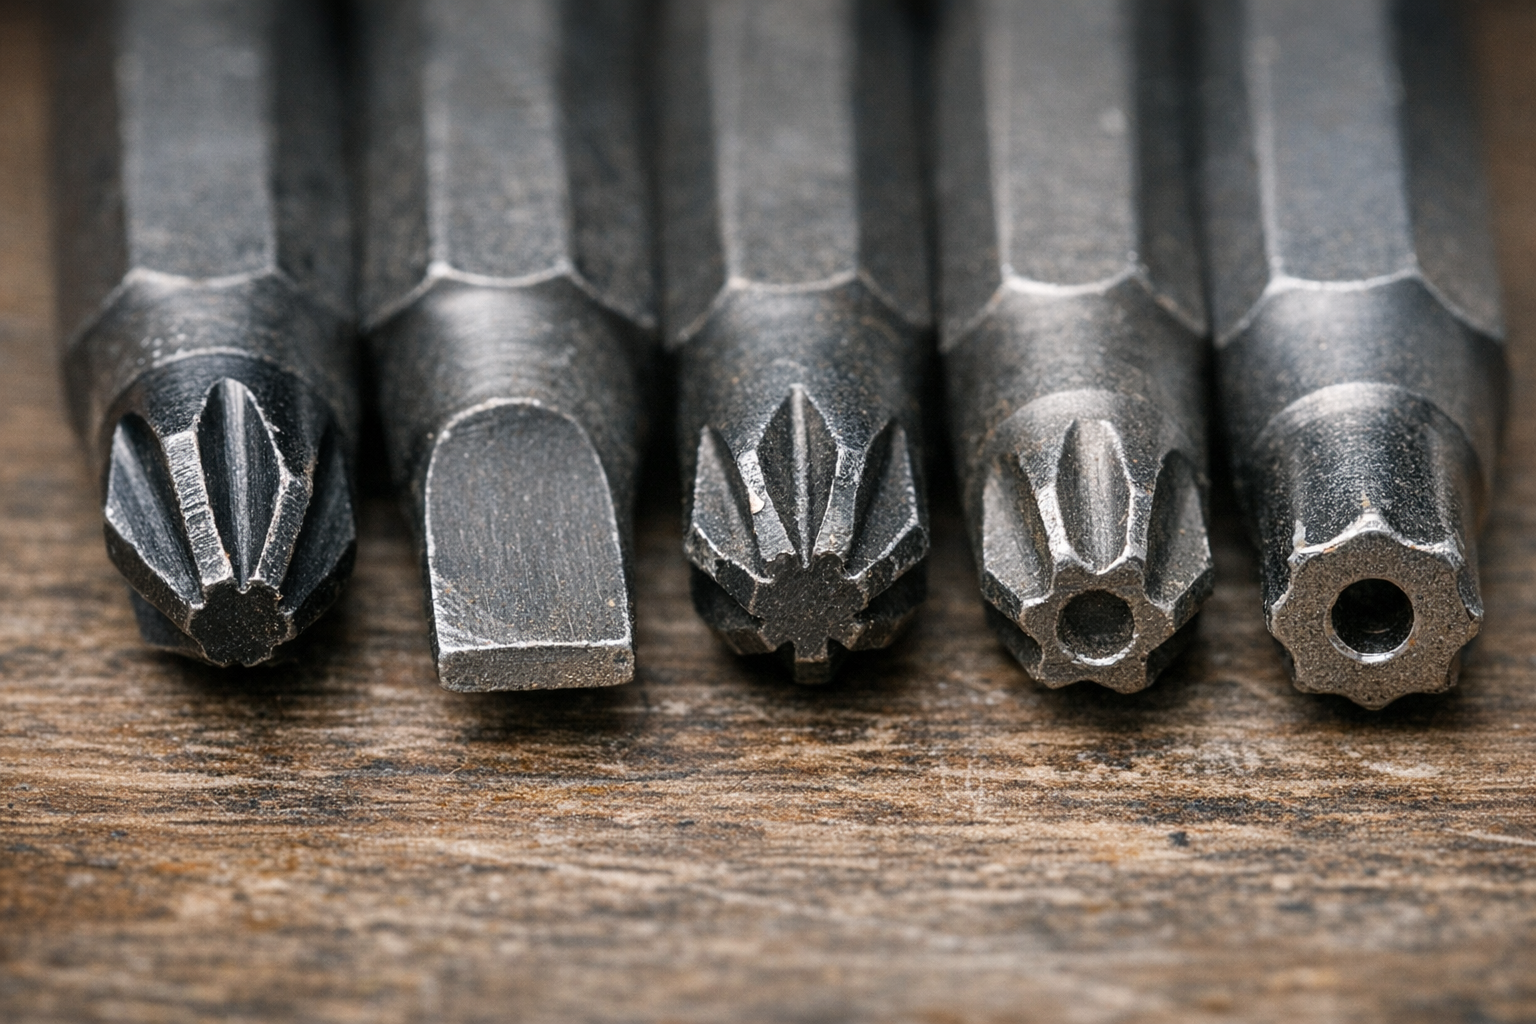
    The Classics: Phillips, Slotted, and Pozidriv Bits

    Phillips (PH)

    Phillips bits, with their iconic cross shape, are the go-to for many general-purpose screws. Their self-centering design works well for fast assembly, keeping things aligned as you drive. However, if you find yourself stripping Phillips screws frequently when using an impact driver, check if your bits are truly impact-rated.

    Typical Phillips bits are made from regular S2 steel, which can twist or wear out under repeated heavy impact. Impact-rated bits use special heat treatment and alloy blends to withstand the torque without snapping. For most household wood screws, a No. 2 Phillips impact bit, often coated with black oxide or featuring a torsion zone design, serves well.

    Flat / Slotted

    The flat blade is the simplest bit shape, fitting screws with a single straight slot. They aren’t ideal for impact drivers because they tend to slip out easily, especially under high torque. Use them carefully—stick to hand driving or a low torque setting (under 1,000 impacts per minute) to avoid damaging the screw slot or bit tip.

    Pozidriv (PZ)

    Similar in appearance to Phillips but with added ribs between the blades, Pozidriv bits offer superior grip and reduce cam-out. It’s crucial to match Pozidriv screws with Pozidriv bits, as using Phillips on Pozidriv screws will quickly chew away the ribs, ruining the fasteners in moments.

    Look closely at the screw head: extra small tick marks between the slots are a giveaway that it’s Pozidriv.

    Star Power: Torx and Security Bits

    Torx (T)

    The six-pointed star shape of Torx bits makes them favorites for heavy-duty applications like decking, automotive work, and structural fastening. Their design spreads torque evenly, letting you apply more force without slipping or damaging the screw head.

    Torx sizes are straightforward—T20, T25, T30, etc.—and it’s important to use an exact size match. For deck building, a T25 impact-rated bit about 2 inches long with a magnetic tip is an excellent choice. This setup reduces stripping, especially when driving long structural screws.

    If you encounter stuck or rusted screws, switching to a torx bit (always impact-rated) often reduces slips and gives better control, particularly in treated or outdoor wood.

    Security Bits

    Some Torx screws have a small hole in the center, indicating they require a tamper-resistant bit. While you won’t use these every day, having a security Torx bit can be a lifesaver when dealing with appliances, public fixtures, or specialized hardware.

    Square (Robertson), Hex, and Specialty Bit Types

    Square (Robertson)

    Robertson or square bits are very popular in Canadian construction and gaining ground in the U.S. Their square recess offers excellent grip and resists cam-out more than Phillips or slotted bits. Common field sizes include No. 1 (red), No. 2 (black), and No. 3 (green).

    These bits are great for repetitive tasks like subfloor installation or cabinetry because they reduce hand fatigue and bit wear. Key caution: never use a smaller square bit on a larger screw; this quickly rounds both and ruins the fasteners.

    Hex (Allen)

    Hex bits resemble tiny Allen wrenches and are essential for furniture assembly, set screws, and some door hardware. Sizes range across metric and SAE standards (4mm, 5mm, 6mm, etc.).

    A practical tip: magnetic impact bits—not just the bit itself, but with magnetic holders—help keep screws in place for overhead or awkward-angle tasks, making single-handed starts easier, especially on metal or sheetrock work.

    Jobsite Organization Tip

    Keeping your bits organized saves time and stress. Set aside a dedicated organizer with your most-used bits—like T25 Torx, No. 2 Phillips, and No. 2 Square—so they’re ready for common trades like rough carpentry or framing.

    Materials and Design: What Makes a Bit Impact-Rated?

    Impact-rated bits are engineered to absorb the repeated hammering action inside impact drivers. Made from hardened steel alloys like enhanced S2 steel and often featuring specialized coatings, they flex under torque instead of snapping. Along with toughness, some bits include torsion zones—twisted sections designed to absorb torque spikes and prolong bit life.

    Bit length matters too. Standard 2-inch bits are best for most framing or general work. Longer bits (3 or 6 inches) help reach tight or angled spots but can reduce control and increase bit wobble.

    Maintaining Your Bits for Longevity

    One overlooked productivity hack is replacing dull or rounded bits immediately. Even if a bit seems to work “well enough,” its worn edges will damage screws faster, making driving harder and risking tool damage. Create a “retired” box for worn bits to avoid accidental reuse.

    Regularly clean bits with a magnet or compressed air to remove metal shavings or debris—especially when working with treated or composite woods. This prevents premature wear on the bit tip and keeps your drives smooth.

    Refresh Tip: Matching Bits to Screws Saves Time and Reduces Frustration

    Before starting any project, spend a moment lining up the bits next to your screws. Confirm the fit visually and physically—an exact match may save you minutes or even an hour of frustration later. This small step is often skipped but pays dividends in keeping work flowing and stress low.

    A real-world example: During a subfloor installation, the crew had two types of screws mixed—Phillips and square. Poor organization led to frequent bit switching, delays, and, eventually, someone forcing the wrong bit on a square screw, stripping multiple heads. Arranging bits and screws side-by-side beforehand quickly restored order and kept everyone calmer.

    Practical Bit Sets for Common Projects

    • Home repairs: Phillips, slotted, and square bits cover the vast majority of tasks.
    • Decks and outdoor work: Include Torx bits, especially impact-rated T25s, plus security Torx for tamper-resistant fasteners.
    • Furniture assembly and fixtures: Hex bits handle these tasks well.

    When in doubt, don’t rush picking a bit. Taking a few extra seconds can prevent igniting a cascade of problems.

    Conclusion

    The choice of impact driver bit may seem minor but plays a major role in how smoothly every fastening task goes. Using bits that match screw types and sizes, that are impact-rated, and replacing them when worn, keeps your work efficient and reduces frustration. Instead of just grabbing the first bit you find, be deliberate. Your projects—and your hands—will thank you.

    If you want to explore a wide array of bits to suit different applications, consider looking through comprehensive collections designed to streamline your tool setup and keep you ready for any fastening challenge.

  • How One Simple Pause Prevents Stripped Screws Every Time

    Few experiences are as aggravating as when your impact driver suddenly lets go of a screw. That sinking feeling when your bit spins helplessly in a screw head, which has lost its grip, can halt your project and turn a simple task into a frustrating ordeal. If you’ve ever dealt with stripped screws, you understand how quickly momentum can grind to a halt. The good news? Most stripped screws don’t have to happen at all. By understanding why screws strip and adopting a few practical habits, you can prevent these setbacks and keep your work moving smoothly.

    Why Do Screws Strip?

    Stripping a screw typically results from a loss of proper engagement between the driver bit and the screw head. While degraded or poor-quality screws and bits do contribute, the overwhelming majority of stripped screws come down to technique and tool use.

    Here are the most common reasons screws get stripped:

    • Driving at an angle: If the driver bit is not aligned squarely with the screw, the torque transfers unevenly, causing the bit to slip.
    • Excessive speed or torque: Running the impact driver at its highest speed before full contact is made can cause the bit to cam out.
    • Incorrect bit size or type: Using a bit that’s too small or the wrong profile for a screw’s recess puts extra stress on the heads and bit edges.
    • Worn or low-quality bits: Bits with rounded or chipped edges fail to maintain grip and easily slip.
    • Skipping pilot holes in dense materials: Hard woods or composite substrates increase resistance, making driven screws prone to stripping if the path isn’t prepared.

    Additionally, under pressure to work fast or from lapses in attention, it’s easy for users to underestimate the importance of careful setup before each fastener. Impact drivers deliver high torque bursts, which amplify any misalignment or impatience.

    Pause, Align, Then Drive: A Simple Habit to Prevent Stripping

    In real-world scenarios, minor adjustments to how you approach each screw can make all the difference. A helpful technique I’ve relied on is to literally pause for a second before squeezing the trigger.

    What does this look like in practice?

    • Set the bit in the screw head carefully: Place the bit firmly inside and visually confirm it’s fully seated.
    • Check alignment: Ensure the driver shaft and your wrist are aligned at a 90-degree angle to the work surface.
    • Feel for engagement: The bit should “click” or settle squarely into the recess, signaling it’s properly seated.
    • Adjust as needed: If anything feels off, lift and reposition to avoid slipping.

    This deliberate one-second pause before each drive helps maintain control, reduces slip risk, and prevents screw head damage. While it may feel like a small thing, the impact on your build quality and frustration level is profound.

    Tip: Use the Correct Bit and Pilot Holes

    Choose bits that match the screw head perfectly—Phillips #2, Torx T20, or whatever fits your screw type. Impact-rated bits are worthwhile because they withstand the repeated torque shocks better, maintaining sharper edges longer.

    When working with wood, drilling a pilot hole appropriate for the screw size helps reduce driving resistance and splitting, especially in hardwoods. For softwoods, a 1/8″ pilot hole often suffices. Adjust your impact driver’s speed to a moderate setting (1000–1500 RPM) and start with a lower torque clutch setting, increasing only as necessary. This prevents overdriving and cam-out events.

    The Role of Speed and Torque Settings

    Driving screws too quickly increases the risk of stripping. Most impact drivers can exceed 2500 RPM in maximum speed, which is usually too fast if you haven’t confirmed proper bit-seat and alignment. Starting slow allows the screw head to engage fully before the tool ramps up torque.

    Using torque settings judiciously is just as important. Lower clutch settings provide controlled torque, preventing the driver from blasting the screw head once reach resistance limits. This is especially critical when installing flooring or hardwood decking fasteners, where precision matters.

    Tip: Use Both Hands on Long Screws

    When driving longer screws (2 inches or more), like deck or subfloor screws, hold the driver with both hands. This adds wrist stability and allows better control over alignment and pressure. Also, operate on a medium-to-high torque setting rather than drill mode to apply consistent force without risking excessive overdrive.

    Refreshing Your Approach: From Frustration to Flow

    If stripped screws have felt like an unavoidable hassle in the past, try this subtle mindset shift: see each fastener as its own mini project. This fresh perspective encourages you to slow down momentarily and give proper attention exactly when it counts.

    Instead of rushing to finish or assuming the driver will compensate for misalignment, remind yourself that a smooth, well-aligned start sets up the rest of the drive for success. This not only prevents damage but leads to cleaner, more satisfying results.

    By integrating this mental reset, you transform the task from a repetitive chore into a measured, quality-driven process. Over time, this builds confidence and reduces anxiety about stripped screws completely.

    Real-World Impact

    On a recent project assembling garage shelving with a friend, implementing the pause-and-align habit cut our stripped screws from multiple per hour down to zero. This was despite using the same screws and nearly new impact driver as before.

    The difference was clarity and control. My friend, who had always accepted stripped screws as an unavoidable nuisance, now credits this simple routine for saving time and headaches during follow-up deck installation. In fact, he completed hundreds of screws with no issues—a testament to how much technique matters over gear.

    Summary: The Small Shift That Saves Time

    Stripped screws are nearly always preventable. The key lies in adopting a few purposeful habits: pausing to check bit alignment, matching your bit size and type to your screws, drilling pilot holes when needed, and adjusting speed and torque settings appropriately.

    This approach requires no new tools, just a moment’s attention before each screw drive. By making this mental and physical habit second nature, you not only prevent stripped screws but improve the quality, feel, and pace of your projects.

    Next time you pick up your impact driver, take that brief moment before pressing the trigger. Set yourself up to succeed, and watch your projects flow uninterrupted.

  • How Simple Habits Quietly Boost Your Drill’s Battery Life

    Understanding Your Drill’s Battery Drain on Tough Jobs

    When working on demanding projects—whether drilling through reinforced concrete or assembling rugged wooden frameworks—the rapid drain of your drill battery is a familiar and frustrating reality. Heavy materials and high torque demand more current, often pushing batteries beyond their comfortable limits. For example, hammer drills operating on concrete can consume well over 10 amps continuously, which rapidly exhausts standard 2.0Ah or 4.0Ah batteries.

    Battery life isn’t just depleted by large workloads; inefficiencies like stalling, incorrect tool settings, or overusing hammer mode on softer materials can also accelerate power loss. Running drills at maximum RPMs without adjusting to the material’s demands leads to wasted battery juice and overheating.

    Practical Habit #1: Allow Batteries to Cool Down Before Charging or Reuse

    One surprisingly impactful habit is giving batteries time to rest between uses. After intense drilling, batteries heat up internally to temperatures that can exceed their optimal operating range (around 20–25°C or 68–77°F). Plugging a hot battery directly into the charger reduces the charge rate or triggers safety cutoffs, slowing the recharge process and accelerating battery degradation.

    Similarly, using a cold battery straight from a chilly toolbox or vehicle affects performance because cold cells deliver less power until warmed. By simply setting your batteries on a dry, shaded surface and letting them reach room temperature for 15–20 minutes before swapping them back into the drill or charger, you preserve battery health and improve runtime during your job.

    Tip:

    Carry a small towel or cloth to wipe off dust and sweat before swapping batteries. This helps keep contacts clean and supports efficient energy transfer.

    Optimizing Drill Use: Speed, Pressure, and Bit Maintenance

    Adjusting how you work with your drill can significantly extend battery life. Instead of blasting at maximum speed, lowering drill RPM to a controlled 500–800 (depending on the job) reduces current draw and heat buildup. Combine this with steady but firm pressure to maintain bit engagement without stalls or overdriving.

    Also, maintaining sharp, job-appropriate bits reduces friction and prevents unnecessary battery drain. A dull carbide bit, for example, can soak up energy while delivering poor progress, frustrating both you and your pack. Opt for SDS-plus bits for holes under 20 mm, and SDS-max bits for larger drilling, ensuring the bits are clean and in good condition.

    Pre-Drilling Strategy

    Before driving full force, mark your holes and begin with short, gentle trigger pulls to “start” the hole. This reduces drill walking and minimizes sudden current spikes, conserving battery power for when you need it most.

    Keep Tools Clean: A Simple Yet Often Overlooked Step

    Accumulated dust and debris inside your drill can hinder motor performance, forcing it to work harder and consume more power. Regularly clean around vents and battery contacts using compressed air or a dry brush. Dirty contacts cause voltage drops, leading to premature tool shutdown or misleading low-battery warnings.

    Furthermore, clearing cooling vents prevents overheating, which directly improves your drill’s operational efficiency and battery consumption. Taking a few minutes after each session to maintain your drill can translate into significant runtime improvements over weeks and months.

    Battery Rotation and Management

    If you have multiple battery packs, rotate their use instead of draining and charging a single one repeatedly. This balances wear across all packs, prolonging their overall lifespan and ensuring consistent performance throughout your project. Pro-grade batteries typically endure 500 to 1,000 full charge cycles before noticeable performance drops, so mindful rotation keeps you closer to these optimal numbers.

    Refresh Your Routine: The Power of Mindful Pausing

    In the hustle of construction or renovation, it’s tempting to swap batteries immediately and keep pushing. But pausing to let batteries “breathe” is a subtle, restorative habit that pays big dividends. This pause not only helps thermally stabilize the cell chemistry but mentally gives you a brief moment to review progress, plan your next moves, and adjust your technique if needed.

    When I started carrying a small towel and designated shady resting spots for batteries on hot summer projects, the change was tangible. Batteries stayed cooler, avoided thermal shutdowns, and maintained steadier output even during afternoon heat spikes. Integrating these pauses turned an exhausting day into more sustainable work sessions.

    Final Thoughts

    Extending your drill battery’s life on heavy jobs comes down to thoughtful adjustments: letting batteries cool, moderating drill speed and pressure, keeping gear clean, pre-drilling smartly, and rotating packs. Small behavioral changes compound, helping you avoid unexpected downtime and expensive battery replacements.

    Next time you head to the jobsite, consider whether your batteries have the rest they need between swaps. That few minutes’ pause can keep you drilling smarter, longer, and with less hassle.

    If you’re interested in exploring compatible tools and accessories, you can browse the full Gumboll collection.
  • When and Why to Switch Between Hammer and Drill Modes

    Some tools sit quietly in the back of your toolbox, waiting for the moment when you need reliable muscle to tackle tough materials. Hammer drills and their regular drill counterparts are perfect examples of versatile tools that require a bit of know-how to use effectively. If your drill offers a toggle between hammer and drill modes, understanding when and why to switch is essential—not just for getting the job done, but for working smarter and preserving your equipment.

    Understanding the Difference Between Drill and Hammer Modes

    At a glance, the distinction seems simple: drill mode rotates the bit, while hammer mode adds a percussive hammering action alongside the rotation. However, the implications of this difference extend far beyond a simple toggle.

    Drill Mode Explained

    Drill mode causes the bit to spin continuously without any forward impact. This mode works best on softer or more delicate materials, such as wood, plastics, thin metals, and when driving screws. The steady, controlled rotation helps create clean holes without unnecessary vibration or damage. For instance, using a sharp, purpose-made wood or metal drill bit at speeds around 800 to 1,200 SPM often yields excellent results.

    Hammer Mode in Action

    Hammer mode adds rapid, forceful blows along the axis of the drill bit, effectively hammering the material as it rotates. This action helps break up hard, brittle surfaces like masonry, brick, concrete, or natural stone. Because these materials resist pure rotational drilling, the impact bursts the surface, allowing quicker progress. In hammer mode, carbide-tipped masonry bits are essential. Hammer drills often operate at high impact rates—from about 4,000 up to 48,000 blows per minute—depending on the model.

    Identifying which mode to employ isn’t just about sparking drills or overheated bits; it’s about reading the material and adapting your approach for efficiency and tool longevity.

    Real-World Experience: The Impact of Using the Right Mode

    One memorable project involved hanging a heavy garage storage system on an uneven brick wall. Initially, I kept the drill in standard drill mode by habit. The bit overheated, drilling stalled repeatedly, and the brick resisted every inch. Switching to hammer mode changed everything—drilling became smoother, faster, and noticeably less strenuous. Holes were cleaner, the carbide bit stayed cooler, and the drill itself felt less taxed.

    This experience highlights how choosing the right setting can preserve both your drill bits and your physical energy. For example, drilling a 6mm hole into concrete in drill mode could take over a minute, risking damage to standard high-speed steel (HSS) bits, whereas hammer mode could accomplish the same hole in under 10 seconds.

    Choosing the Right Mode for Materials: A Practical Guide

    Material Use Drill Mode Use Hammer Mode
    Drywall
    Wood
    Plastic
    Thin metal
    Brick, block masonry
    Concrete
    Stone
    Tile ✓ (with caution)

    Important Considerations for Delicate Surfaces

    Never use hammer mode on delicate surfaces like drywall or ceramic tile unless you want to risk cracks or splits. For tiles, select a sharp spear-point bit and reduce the speed to maintain control and reduce heat buildup. Patience and precision trump brute force here.

    Developing Good Habits: Avoiding Common Mistakes

    Check Your Drill Mode Every Time

    A surprisingly common error—especially on busy worksites—is neglecting to verify the drill’s mode before starting. If you’re driving screws with the drill left in hammer mode, you risk damaging screw heads and the material, not to mention suddenly jerking yourself off balance. Conversely, attempting to drill masonry in drill mode can lead to blown bits and wasted time.

    Quick Preventative Tip: Before putting the bit to work, press the trigger lightly for a split second and listen. Hammer mode produces a distinct rattling or hammering sound. Verify the mode indicator visually to ensure you’ve got the right setting. This quick check prevents heat build-up, damaged bits, and ruined surfaces.

    Match Your Bits to the Mode

    Using a standard high-carbon steel (HCS) bit in hammer mode is a fast track to dulling or breaking bits. Always use carbide-tipped masonry bits for hammer mode, especially on brick and concrete. Similarly, for wood or metal, use appropriately shaped and sharpened bits designed for those materials.

    Key Indicators for Switching Modes

    Here are clear signs that will help you decide if you need to switch:

    • Switch to hammer mode when:
      • The drill bit stalls immediately against hard material.
      • You hear a high-pitched whine with minimal progress.
      • The bit heats up rapidly without effective drilling.
      • Fine dust escapes rather than larger chips.
    • Stick to drill mode when:
      • Working with fragile materials like drywall or tile.
      • When precise, clean holes are required.
      • Working on soft materials such as wood, plastic, or sheet metal.
      • Driving screws, where hammer action can cause cam-out.

    Refresh Your Perspective: Listening and Feeling Your Drill

    Beyond toggling switches and matching bits, developing an intuitive understanding of how your drill reacts can elevate your skills. Listen to the noise your drill makes—the smooth hum of drill mode versus the rhythmic pounding of hammer mode—and feel the vibration through the handle. Early recognition of these cues lets you adapt on the fly, avoiding damage and improving efficiency.

    Also, an often overlooked habit is periodically pausing during extensive drilling in masonry to let your bit cool. Run the drill briefly off the workpiece at low speed or simply rest for 30 seconds. This practice helps prevent overheating, preserves the carbide tip, and extends bit life.

    Final Thoughts: Making the Most of Your Hammer Drill

    The difference between hammer and drill modes is more than mechanical—it’s about how you respect the materials, your tools, and yourself. Armed with knowledge, a bit of practice, and attentiveness, you’ll find your hammer drill becomes less of a guessing game and more a natural extension of your hand. Remember to always:

    • Match the mode to your material and task.
    • Use the correct drill bits designed for the mode.
    • Check your drill’s mode setting every time before starting.
    • Pay attention to feedback: sounds, feel, dust, and progress.
    • Pause during long masonry tasks to cool your bits.

    By adopting these habits, every drilling job becomes smoother, safer, and more enjoyable.

  • Why Cutting Perfect Curves with a Jigsaw Feels Like Magic

    There’s something undeniably satisfying about guiding a jigsaw through wood, watching its blade effortlessly follow a curved line. However, anyone who’s tried cutting curves with this versatile tool knows it’s not always easy to achieve a clean, smooth edge. Beginners often end up with wobbly lines and rough edges that require extensive sanding to fix. The good news is that with the right approach—and a few practical adjustments—your curved cuts can become both precise and tidy, saving time and improving the final look of your projects.

    Understanding the Jigsaw’s Role Beyond Straight Cuts

    While jigsaws are often overlooked in favor of tools like circular saws or table saws, they actually excel at cutting curves, scrollwork, and intricate patterns. This is because a jigsaw’s blade moves up and down while allowing you to pivot the tool, tracing almost any shape you draw. You’ll find it invaluable for custom shelving, decorative pieces, or DIY signs that demand fluid curves.

    Still, to make the jigsaw work for you rather than against you, certain settings matter a great deal. For example, an orbital setting controls the forward and backward motion of the blade. Typically, a low-to-mid orbital setting (levels 1 or 2 on a scale of 3–4) is ideal for curves. This reduces aggressive forward blade movement, which can cause the blade to wander and tear especially on tight radii. Additionally, keeping the blade speed, measured in strokes per minute (SPM), moderate—around 800 to 1200 SPM for detailed work—helps maintain clean tracking without chipping the material.

    Choose the Right Blade: The Key to Clean Curves

    One of the biggest game-changers is selecting a blade designed specifically for curves. Typical blades made for straight cuts tend to be wider (more than 1/4 inch) with fewer teeth per inch (TPI), which limits their ability to turn sharply. Using these can leave your edges jagged and force you to push harder, increasing blade flex and imperfections.

    Instead, opt for narrower, fine-toothed blades with a width of 1/8 inch or less and at least 10–12 TPI. Blades labeled for “curves” or “scrollwork” feature these specifications. For softwoods and plywood, high carbon steel (HCS) blades are sufficient. For tougher materials such as laminates and hardwoods, bi-metal blades provide greater durability and maintain sharpness over time.

    A frequent mistake is using a generic blade for all cuts. This lack of precision causes unnecessary cleanup and uneven edges. Take a moment to select the blade that matches your project’s material and curve radius—it’s a simple swap that will drastically improve your results from the very first cut.

    The Importance of Proper Workpiece Securing

    Curving isn’t just about blade choice; it’s also about controlling the workpiece. Material movement during cutting can throw you off, so securing the piece firmly is critical.

    Clamps are your best friend here. Use at least two clamps positioned within 2–3 inches on either side of your cutting line, both before and after the area you plan to cut. This setup minimizes vibrations and prevents the wood or panel from pivoting unexpectedly, which is a common cause of uneven curves.

    Additionally, use your non-dominant hand as a guide—not for pushing or forcing—but gently resting on the material to stabilize it while keeping fingers clear of the blade path. For slick surfaces like melamine or prefinished panels, placing a small piece of anti-slip matting under the workpiece adds extra grip and prevents slipping.

    Master Your Pace: Slow and Steady Wins the Curve

    Patience is crucial when cutting curves. Forcing the jigsaw too quickly through tight turns often leads to blade deflection, rough edges, or even blade breakage. Maintaining a consistent, slower speed—usually between 800 and 1200 SPM—allows the blade to track the curve smoothly without overheating or chipping.

    When you approach a tight corner or complex bend, pause cutting briefly. Release the trigger and allow the blade to stop fully, then gently pivot the tool to align with the next segment of your curve before resuming. This simple pause prevents accidental notches or gouges at the start of turns and translates to cleaner edges.

    Remember to take short breaks every foot or so during long curved cuts, especially in dense or hardwood materials. This helps cool both the blade and motor, improving cut quality and tool longevity.

    Optimizing Sightlines and Work Positioning

    How you position yourself and your workpiece can greatly affect accuracy. Trying to cut while leaning awkwardly or with your cutting line obscured makes it difficult to follow the curve precisely.

    For better control, adjust your stance so your eyes look straight down the cut line rather than from above at an angle. Sometimes stepping to the side of your workbench or elevating your material slightly on a block enhances visibility. If your jigsaw has a dust blower, keep it running to maintain a clear cut line. For tools without built-in dust removal, a quick brush or puff midway through a cut keeps your line visible.

    A Subtle Perspective Shift: Take Micro-Breaks and Reset

    After guiding the jigsaw through several inches of a curve, pause for a moment—not just to rest your hands or cool the blade—but to consciously reset your focus. This brief mental break encourages you to reassess your hand positioning, ensure your workpiece is still secure, and clear away sawdust. Often, this subtle pause renews precision and steadiness, preventing cumulative small errors that can worsen over longer cuts.

    Learning to see cutting curves as a rhythmic process of cutting, pausing, pivoting, and adjusting transforms the experience from a rushed chore into an enjoyable craft.

    Accepting and Learning from Small Imperfections

    Even with the best technique, some tiny imperfections are natural, especially when you’re just starting out. Instead of letting these mistakes frustrate you, recognize them as part of developing your skill and touch. Over time, your hand-eye coordination improves, and smooth, confident curves will become second nature.

    Interestingly, occasional intentional rounding of sharp turns or subtle deviations can add character and individuality to handmade pieces, reminding viewers of the human touch behind the work.

    Conclusion: Let the Jigsaw Work With You

    Cutting clean curves with a jigsaw is less about brute force and more about technique, patience, and setup. From choosing the right blade to securing your material and managing your pace, small adjustments yield big improvements. Embrace pauses during curves, optimize your viewpoint, and treat the tool as a cooperative partner. These mindful changes turn challenging curved cuts into rewarding tasks.

    Remember, mastery comes with experience. Each project builds your intuition about the interplay between blade, material, and movement. After all, the smoothest curve is a product of both skill and a respectful partnership with your tools.

  • How Your Stance Quietly Shapes Perfect Jig Saw Cuts

    Understanding Blade Deflection in Thick Material Cuts

    Cutting thick hardwood or dense plywood with a jigsaw brings a unique kind of satisfaction. Tracing a bold line carefully marked earlier and watching the blade carve through the wood signals craftsmanship in motion. Yet, many users experience the frustration of blade deflection—where the blade wanders off course, curves, pins, or twists, leaving the cut edges rough, beveled, or simply inaccurate.

    Blade deflection isn’t a reflection of poor technique alone; it’s an inherent challenge tied to the nature of jigsaw blades and the materials we cut. Unlike other power tools with stiff, short blades, jigsaw blades are thin and long, which makes them prone to bending and twisting under the stresses of cutting thick stock.

    What Causes Blade Deflection?

    Several factors contribute to this all-too-common problem:

    • Blade Geometry: Jigsaw blades are narrower and longer than most saw blades, which makes them flexible under lateral pressure.
    • Material Density and Thickness: Thick hardwood creates more resistance and requires greater cutting force, which translates into more side pressure on the blade.
    • Friction and Heat: Cutting thick wood generates heat, which can soften the blade slightly and cause it to twist or wander.
    • Operator Movement: Leaning, pushing too hard, or steering aggressively can cause the blade to leave its intended line.

    For example, when pushing a blade through over 1-1/2 inches of oak, the pressure and leverage on the blade can easily cause it to flex sideways.

    Blade Width and Teeth Per Inch (TPI) Matter

    Blade width plays a critical role in preventing deflection. Blades narrower than 8mm tend to flex easily, even when labeled “heavy-duty.” For thicker stock, blades 10mm or wider with a kerf of at least 1.2mm provide better stability. Choosing a blade with an appropriate TPI also affects the cut: around 8 TPI works well for hardwood, balancing chip clearance and smoothness.

    Tips for Minimizing Blade Deflection

    Refine Your Stance and Body Position

    One of the most impactful adjustments you can make involves how you position yourself at the workbench. Standing with a wider stance and keeping your arms close to your body helps maintain control and balance. With elbows slightly bent and wrists aligned straight, you reduce unintended twisting forces on the saw.

    Try supporting the front shoe (the base of the saw) firmly on the material with your off-hand, and let your guiding hand focus on steady side-to-side control rather than pushing aggressively forward. Rather than wrestling the saw, aim to let its weight provide the forward force while your body movement keeps the blade on track.

    Adjust the Orbital Action Setting

    Many jigsaws feature adjustable orbital action, which influences how aggressively the blade moves in an elliptical path. For thick, dense material, using a low orbital setting (levels 1 or 2) helps by slicing more cleanly rather than aggressively chewing through the wood. High orbital action can cause the blade to pull along the grain, increasing the chance of wandering off the cut line.

    Select the Right Blade for the Job

    Blade choice can’t be an afterthought. For thick, dense materials:

    • Pick blades labeled as “extra thick” or designed for hardwood. Their greater width resists narrowing and twisting.
    • Choose blades with larger, fewer teeth to clear chips more efficiently and decrease kerf pinching.
    • Consider using bi-metal or carbide-tipped blades, which feature stiffer spines and increased durability, maintaining straighter cuts under side pressure.

    Control Your Cutting Speed and Pressure

    It’s tempting to crank up the speed, but in thick materials, slower cuts often result in cleaner lines. Run your jigsaw between 1200–1800 strokes per minute rather than pushing to the maximum speed. Allow the tool’s own weight to feed the blade gently through the wood rather than forcing it with your arms.

    When the saw starts vibrating excessively or bogging down, pause briefly to let the blade cool and clear chips. Periodically withdrawing the blade (every 6 to 10 inches cut) helps clear sawdust and maintain blade performance, doubling its service life and preserving your cut quality.

    A Practical Refresh Tip: Listen to Your Tool and Wood

    Sometimes the difference between a wandering blade and a clean cut is subtle but critical—how attuned you become to feedback during the cut. Pay attention to sounds like squeaking, changes in vibration, or dull “dragging” feelings. These clues tell you when the blade might be overheating or pinching, providing an opportunity to ease off or adjust your technique before deflection occurs.

    Taking a moment to reset your position, check the orbital setting, or even swap the blade when you catch these signs can be an effective mental reset that elevates your cutting precision overall.

    Avoiding Common Mistakes

    • Don’t Overreach: Standing too far from the cut line forces awkward arm positions, increasing side pressure on the blade.
    • Don’t Muscule the Saw: Applying excessive forward force leads to blade wandering. Trust the tool’s weight and let it work strategically.
    • Don’t Ignore Setup: Clamping your material securely at waist height reduces movement and improves control.

    Conclusion: Make Your Stance and Setup Your First Fix

    Blade deflection in thick materials isn’t just about blades or tools; more often, it’s about how you interact with your saw. Before blaming dull blades or inadequate equipment, check your stance, body alignment, and support. Set your material to a comfortable working height, plant your feet wide, and use your whole body to guide the saw steadily along the line.

    Match your blade type and jigsaw settings to the density and thickness of your material, control your speed, and take breaks to clear chips and cool the blade. Applying these combined strategies will lead to strikingly better cuts with fewer frustrating deflections.

  • Mastering Vibration Control in Tight Demolition Spaces with Reciprocating Saws

    In the world of demolition, efficiency and precision are everything—especially when working within tight, confined spaces where every movement counts. One of the most underestimated challenges is controlling the vibration generated by reciprocating saws, tools whose power and utility become liabilities if not handled with care. The difference between a clean, controlled cut and a frustrating, exhausting ordeal often boils down to how vibration is managed.

    Why Vibration Control Is Crucial in Confined Work Areas

    When demolition zones leave you cramped—think crawlspaces, utility closets, or areas wedged between structural elements—vibration doesn’t just affect the tool’s performance; it directly impacts your ability to work safely, accurately, and comfortably. Unlike open areas where you can adjust your stance, reposition the workpiece, or let the saw swing naturally, tight quarters limit your options. Vibrations transfer more abruptly through your body and onto surrounding structures, magnifying fatigue and increasing the risk of errors.

    Each pulse of vibration is felt as a jolt—a transfer of kinetic energy that quickly exhausts your hands, wrists, and arms. Over time, this fatigue reduces your steadiness, making precise cuts difficult to maintain and leading to rough edges or damage to adjacent materials that ideally should remain undisturbed. In addition, the unpredictable vibrations sometimes cause the saw blade to “skate” or deviate from the intended cut line, especially when awkward angles force compromised tool positioning.

    Choosing the Right Blade and Settings to Reduce Vibration

    Your blade selection and saw settings are the first line of defense against excessive vibration. For most confined demolition tasks involving multiple materials—such as wood framing, drywall, and metal pipes—a bi-metal blade with 10 to 14 teeth per inch (TPI) provides a balance of durability and control. This TPI range enables smoother cuts and reduces kickback by minimizing aggressive tooth engagement.

    Opting for a thinner kerf blade, usually around 0.9 to 1.1 millimeters, also helps significantly. A narrower kerf means less material is removed with each stroke, reducing resistance and therefore the magnitude of vibration transmitted back to your arms. This aspect is crucial when space restricts free movement and torque absorption.

    Beyond blade choice, consider tuning your reciprocating saw’s speed. Instead of running the tool at its top strokes per minute (SPM)—often upward of 3,000—dial it back to 1,800 to 2,200 SPM for delicate or plunge cuts near fragile surfaces. This slower pace lowers vibration amplitude and enhances control, allowing you to work steadily without sacrificing efficiency.

    The Physical Toll: Vibration’s Effect on Fatigue and Accuracy

    Vibration-induced fatigue manifests quickly, even in experienced operators. Tingling fingers, wrist stiffness, and shoulder soreness can appear after only a few minutes of sustained use under high-vibration conditions. The saw gradually “feels heavier” as your body struggles to compensate for the shaking.

    In this state, your ability to keep the blade on the cut line deteriorates. Increased movement leads to rough cuts, unnecessary material removal, and potential damage to adjacent surfaces or hidden utilities. Beyond immediate physical discomfort, excessive vibration raises the risk of accidents caused by tool kickback or loss of control.

    A common rookie mistake is to run the saw at full speed with aggressive orbital action in every situation, regardless of space constraints. This might speed some cuts but often accelerates fatigue and magnifies errors where precision is critical. In tight demolition spots, controlling tool speed and stroke action is essential to reducing these effects.

    Real-World Insight: Learning to Adapt

    Reflecting on early demolition experiences, many professionals recount moments when fatigue set in too soon, and cuts became sloppy—not due to lack of experience but from underestimating vibration’s impact. For example, working underneath a low stairwell with elbows pinned and shoulders pressed against framing made it impossible to adjust stance or leverage. At that point, it became clear that a change not only in posture but also in grip and saw handling was necessary to maintain effective work.

    The Loosened Grip Technique: A Practical Approach to Vibration Management

    Conventional wisdom often suggests gripping the tool as tightly as possible for control. However, in tight demolition settings, this can backfire by increasing the amount of vibration transferred into your hands and arms. Instead, adopting a deliberately relaxed but secure grip helps absorb and dissipate the saw’s natural movement more effectively.

    How to Implement the Loosened Grip Technique:

    1. Anchor the Front Boot Firmly: Position the tool’s front shoe or boot flush and firmly against the cut surface. This anchoring reduces tool jump and stabilizes the blade path, letting the saw absorb some of the vibration through the material.
    2. Relax Your Trigger Hand: Instead of choking the handle, grip it firmly but without excess tension. Your fingers should engage the trigger securely without causing your knuckles to whiten. It’s about controlling, not constraining, the saw.
    3. Let the Supporting Hand Absorb Movement: Place your other hand lightly on the barrel or body of the saw. It should stabilize the tool without clamping it rigidly. This way, minor ‘jitters’ caused by vibration are smoothed out rather than directly transferred to your muscles.

    This technique feels counterintuitive initially, especially if you’re used to holding tight to power tools. However, the reduction in shock felt throughout your arms is substantial—and muscle fatigue sets in much more slowly.

    A Subtle Mindset Shift for Sustained Energy

    As a fresh tip, consider viewing vibration not as an enemy to be fought but as a natural motion to flow with. Instead of channeling energy into resisting every tremor, take brief micro-breaks between cuts to shake out your hands and reset your grip. This conscious relaxation helps prevent cumulative tension, improves blood flow, and recalibrates your motor control over the saw. Over time, this mindset reduces overall mental and physical strain.

    Optimizing the Work Environment for Reduced Vibration

    Beyond personal technique and tool setup, subtle environmental adjustments can make a marked difference. If you can clear even a few extra inches of space around the work area, you’ll gain better angles and more comfortable access—translating into less forced body positioning and tool angling.

    Also, be vigilant about loose materials or elements near your cut line. Unfastened panels, rattling pipes, or debris can amplify vibration response or cause unpredictable tool behavior. Securing these before cutting can simplify control and minimize unnecessary feedback.

    Final Thoughts: No One-Size-Fits-All Solution, But Techniques Matter

    There’s no magic upgrade, blade, or attachment that renders reciprocating saws vibration-free, especially in cramped demolition jobs. Instead, mastery comes from understanding and adapting to your tools and environment—using the right blade and speed, employing a relaxed yet secure grip, and stabilizing the tool against the workpiece. These adjustments combine to reduce fatigue, improve accuracy, and help you push through tough demolition tasks more comfortably.

    Every job is a balancing act; some days the technique sings perfectly, while others remind you to pause and rethink. With practice and mindful handling, you can extend your endurance and maintain quality, even when wedged between walls, pipes, and joists.

    Further Resources

    If you’re interested in exploring compatible tools and accessories that complement this approach, check out the full Gumboll collection for a wide variety of reciprocating saw blades and accessories designed for various demolition challenges.

  • Mastering Air Pressure for Consistent Nail Depth in Your Woodworking Projects

    Introduction: The Subtle Art of Air Pressure Adjustment

    If you’ve ever stopped mid-project, frustrated by nail heads sticking out or sinking too deep, you’re tapping into a common challenge in compressed air nailing: dialing in the right air pressure. For woodworking enthusiasts and professionals alike, understanding how to adjust your compressor’s air pressure settings is fundamental to achieving a flawless finish. The pressure dial on your compressor isn’t just a casual setting—small tweaks can make a significant difference in nail depth and overall project quality.

    Let’s explore why air pressure is a critical, yet often overlooked, factor and how to develop practical habits that guarantee consistent nail penetration with brad nailers, finish nailers, and staplers.

    The Crucial Role of Air Pressure in Driving Nails

    Compressed air tools like nailers and staplers typically operate within a standard air pressure range—usually between 60 and 120 psi. But within this range, just a few pounds per square inch (psi) can dramatically affect how your nails or staples set. For example, an 18-gauge brad nailer often performs best between 70 and 90 psi, while larger framing nailers that drive 2″ to 3½” nails prefer pressures from 90 to 120 psi depending on the hardness and thickness of the wood.

    Getting this balance right is vital because:

    • Too low pressure: Nails won’t fully seat, leaving heads proud of the surface and necessitating time-consuming countersinking.
    • Too high pressure: Nails can sink too deeply, damage softer woods, split trim, or crush wood fibers, creating unsightly results that require patching or replacement.

    Think of air pressure not as a fixed number but as a live adjustment informed by material, fastener type, and tool feedback.

    Real-World Scenario: Saturday Trim Work Goes Sideways

    Imagine working on built-in shelving installation with a reliable brad nailer. Early on, you notice nails barely protruding across pine trim, then switching to plywood causes nails to bury almost out of sight. Initial assumptions might blame nails or wood quality, but very often, the culprit is the air pressure setting. Adjusting it by just a few psi can mean the difference between a clean finish and a patchy, slow job.

    Matching Air Pressure to Wood and Fastener Variations

    One key takeaway for any woodworker is there is rarely a universal optimal PSI setting. Take your pine trim and oak door casing — different densities and grain structures require varied driving force. Likewise, plywood and MDF respond differently, often absorbing nails differently due to their construction.

    Fastener specs also change the game. A jump from a 1¼” 18-gauge brad to a 2″ variant typically means increasing pressure by around 10 psi to ensure proper seating. With this in mind, here is a quick guideline to help:

    • Softwoods or shorter nails: Start on the lower end of your tool’s pressure range.
    • Hardwoods or longer fasteners: Increase pressure gradually, testing for flush results.

    A Simple Testing Habit to Save Time

    Before you commit to nailing a full run, develop the habit of performing what professionals sometimes call a “two-pair test.” This means firing two nails or staples into a scrap of the same material you intend to use, under your current PSI setting. Then examine the fastener depth:

    • If nail heads are too high, incrementally increase the pressure by 5 psi and retest.
    • If nails are driven too deep, reduce pressure by 2–5 psi and try again.

    This quick, no-fuss method prevents costly overcorrections that might otherwise damage your materials or slow the project.

    Beyond Air Pressure: Other Factors Impacting Nail Depth

    While PSI is the primary control, several additional variables can influence nail setting depth and quality.

    • Moisture Content of Wood: High moisture or softer woods allow nails to penetrate more deeply than expected. Pressure should be lowered slightly when working with damp or soft lumber.
    • Fastener Length and Gauge: Longer and thicker nails require more power. For instance, shifting from an 18-gauge 1¼” nail to a 16-gauge 2″ finish nail usually demands 5-10 psi higher pressure.
    • Tool Cleanliness and Maintenance: Debris, oil buildup, or sawdust inside the nailer’s firing mechanism diminish driving power, causing inconsistent depth even if the PSI is correct.
    • Consistent Compressor Output: Fluctuations in tank pressure or cycling frequency can cause uneven nail depth between shots. Ensuring the compressor’s recovery time and tank pressure align with your tool’s needs promotes steadier performance.

    Refresh Tip: Slow Down and Listen to Your Tool

    When work gets hectic, it’s easy to turn up the pressure aggressively to fix problems. But blasting nails in isn’t the solution—it often worsens the finish and stresses the materials. Instead, take a deliberate pause and “converse” with your tool: Listen carefully to the firing sound and observe nail seating closely. Small pressure tweaks and tool maintenance create a rhythm that ultimately improves speed and quality. This shift in mindset—from forcing the tool to fine-tuning it—changes the game on every project.

    Routine Maintenance: The Unsung Hero of Consistent Results

    Between jobs or material changes, make it a quick habit to do a fast tool check:

    • Disconnect the air hose, invert the nailer, and gently tap to clear debris around the firing pin and driver blade.
    • Wipe down the barrel areas to remove sticky residues like glue or oil buildup.
    • Verify that the strokes per minute (SPM) setting matches both your nailer’s specifications and the material you’re working on, avoiding misfires or shallow nails.

    These small maintenance steps ensure your pressure adjustments actually translate into reliable nail seating, rather than chasing mysterious depth inconsistencies.

    Potential Pitfalls if You Ignore Air Pressure Calibration

    Ignoring air pressure tuning can lead to a cascade of problems including:

    • Misaligned or uneven trim that requires sanding, patching, or replacement.
    • Split or crushed wood fibers that undermine structural integrity and aesthetics.
    • Time lost with manual nail sets or additional finish work.
    • Tool jams from staples set too deeply or uneven fasteners damaging mechanisms.
    • Increased frustration and lower overall job satisfaction.

    Professionals know the smoothness and cleanliness of a final project hinge on these fine details. It pays to invest moments in PSI adjustment rather than hours fixing avoidable mistakes.

    Step-by-Step: My Nail and Stapler PSI Adjustment Routine

    1. Start with the manufacturer’s recommended mid-range pressure (e.g., 80–90 psi for 18-gauge brads, 100–110 psi for 16-gauge finish nailers).
    2. Perform a two-pair test firing into material scrap.
    3. Inspect head flushness carefully and adjust in small increments (±5 psi).
    4. Perform quick cleaning if seating is inconsistent or tool feels sluggish.
    5. Confirm your compressor’s tank pressure and recovery time consistently supply enough air.
    6. Always retest after switching material or fastener size.
    7. Maintain proper strokes per minute (SPM) or tool cycling speed as per manufacturer guidance.

    This process isn’t glamorous but transforms your work from frustrating and patchy to smooth and professional. It also arms you with a reliable system easily repeatable project after project.

    Conclusion: Treat Air Pressure as a Dynamic Partner in Your Craft

    Consistently perfect nail depth isn’t about setting a number on a dial and walking away. Rather, it’s a dynamic interaction between your compressed air tool, fasteners, material properties, and most importantly, your attention and technique. Small, methodical adjustments paired with routine maintenance and test firings dramatically reduce finish work and re-dos.

    Develop a habit of listening, adjusting, and cleaning your tool regularly. When you treat air pressure as a nuanced factor instead of a fixed setting, your finished woodworking projects—be it trim, cabinetry, or delicate plywood—reflect a superior level of craftsmanship. The difference is subtle but undeniable, and those tiny decisions add up to consistently better results and more enjoyable builds.

    If you want to explore compatible air nailers, staplers, or accessories, consider browsing a curated collection to find tools suited for your needs.

  • Why Nails Bend in Hardwood Applications: Understanding and Preventing Bent Nails

    https://pub-f0c1ed68cd7e4457a421886d78faa209.r2.dev/openai/gumboll_stapler-nailer_20260219_142514.png

    Why Do Nails Bend When Working with Hardwood?

    If you’ve ever tried installing trim on oak or fastening maple flooring and found your nails suddenly curving sideways, you’re not alone. Bent nails are frustrating and waste valuable time and materials. While it’s little wonder that dense hardwood is unforgiving, the reasons why nails bend go beyond the wood’s toughness. Understanding the interaction between fasteners, tools, and technique is crucial to minimizing these annoying setbacks.

    Understanding Hardwood’s Tough Nature

    Hardwood species such as oak, maple, walnut, and hickory are named for their density and strength, often scoring between 1,000 to over 1,800 pounds-force (lbf) on the Janka hardness scale. This dense, tight-grained structure is excellent for durability but presents significant resistance when driving nails or brads.

    When a nail encounters the tightly bound fibers of hardwood, the wood resists splitting or parting. Instead of allowing the nail to go straight in, the fibers push back, and without sufficient force or the right fastener type, the nail often bends or curves as it seeks the path of least resistance.

    Common Scenarios Leading to Bent Nails

    • Thin Fasteners in Dense Grain: Using 18 or 23 gauge brads in hard maple frequently results in bending because the slender fasteners lack the stiffness to push through dense fibers.
    • Driving At Too Shallow an Angle: Nails hit the grain or deflect along the dense fiber lines when driven at less than 20 degrees off perpendicular, causing them to curve.
    • Inadequate Driving Force: Underpowered nail guns or staplers don’t deliver enough impact to overcome wood resistance, letting nails bend instead of seating cleanly.

    Why Your Nail Gun Isn’t to Blame Alone

    It’s tempting to blame your nailer for bent nails, but the issue usually lies with a combination of factors:

    1. Nail Selection Matters

    Fasteners intended for hardwood need the right gauge and shape. Lightweight brads designed for softwoods or delicate trim simply can’t push consistently through dense hardwood fibers. Switching to a 15 or 16 gauge nail with a chisel-shaped tip gives your fasteners added rigidity and sharpness to penetrate the wood cleanly.

    2. Nail Quality Counts

    Lower-quality or dull nails with burrs or microscopic bends increase the risk of blowouts, especially in dense species. Before loading your tool, inspect for visible bends or imperfections. Investing in higher-quality nails reduces frustration and the need to stop and clear jams.

    3. Air Pressure and Tool Settings

    Pneumatic nailers perform best within specific pressure ranges—typically 70 to 110 PSI. Running at lower pressures often results in insufficient force to seat nails properly. Test scraps to dial in your settings, aiming to drive nails smoothly with minimal recoil.

    4. Nail Angle—and Why 90 Degrees Isn’t Always Perfect

    Driving nails at exactly 90 degrees to the surface seems logical, but in hardwood, a slight variation to 10 to 20 degrees off perpendicular helps prevent nails from following dense grain lines that cause bending. This subtle angle directs the nail away from tight fibers and helps maintain a straighter nail path.

    5. Wood Moisture Variations

    Though less common, inconsistent moisture content within hardwood (with spots over 10% moisture) can cause fibers to temporarily swell or tighten, increasing resistance and forcing nails to bend. Particularly with freshly milled or poorly acclimatized wood, this factor can contribute to challenges.

    A Real-World Technique to Minimize Bent Nails: Let Your Workpiece Float

    Here’s a practical shop-floor adjustment that can dramatically reduce bent nails when driving into hardwood: support the workpiece so it isn’t rigidly backed by a solid surface.

    When trim or flooring is pressed firmly against a bench or clamp, the wood is essentially trapped with zero movement. The force of the nail impact reflects back into the nail and the wood fibers offer more resistance, making the nail more likely to bend.

    Instead, by letting the wood “float” slightly—supporting it gently in your hand about half an inch (10-12 mm) above the bench—you give the workpiece a tiny amount of movement. This small give allows impact forces to be absorbed and disperses resistance, letting the nail penetrate more cleanly and straight.

    In practical terms, instead of clamping or pressing the workpiece flat, just support it from underneath with your fingers and fire the nail. It’s a subtle change, but one that can cut bent nails by as much as 75%, based on real job experience with tough species like hickory and maple.

    Refresh Tip: Think of the Wood as a Partner, Not Just a Surface

    This small shift in perspective—from seeing hardwood as a rigid obstacle to working with its natural resilience—can help you rethink your fastening approach. Rather than forcing nails straight in with brute force, adjusting support and angle to accommodate the wood’s resistance flows better with the material, saving time and reducing waste.

    Other Practical Tips to Avoid Bent Nails in Hardwood

    • Upgrade the Gauge Slightly: Moving from 18 to 16 gauge can significantly reduce nail bending without making the fastener too bulky for trim work.
    • Pre-Drill Pilot Holes: For extremely dense and high Janka woods (above 1,800 lbf), drilling a 1/32″ pilot hole reduces resistance just enough to guide the nail straight.
    • Inspect Nails Before Use: Discard nails with visible warps, bends, or burrs to prevent jams and bent fasteners.
    • Fine-Tune Air Pressure: Test on scrap wood to find the ideal PSI—enough power to drive the nail fully without overdriving or rebounding.
    • Adjust Your Nailing Angle Slightly: Angling nails 10–20 degrees off perpendicular can prevent the nail from deflecting along wood grain or knots.

    Common Mistakes and How to Avoid Them

    Even experienced carpenters get frustrated when working with dense hardwoods. The patience required can feel exhausting, especially when bent nails accumulate early on a project. Remember, some amount of bending is almost inevitable when conditions vary—wood aging, grain irregularities, and moisture levels all affect results.

    Accepting that some trial and error will happen reduces stress and encourages you to focus on process improvements rather than blaming tools or materials. Keeping a few spare quality nails handy, taking breaks to readjust settings, and trying the “floating” support method change the game from chaotic fastener replacement to steady rhythm.

    Final Thoughts: Mastering Hardwood Fastening

    Preventing bent nails in hardwood applications boils down to careful selection of fastener type and gauge, fine-tuning your tool’s settings, adopting slight angle adjustments, and most importantly, supporting your workpiece in a way that lets it absorb impact forces naturally. Minor changes in your technique often have more impact than expensive tools or hardware upgrades.

    By understanding the unique challenge dense hardwood offers and adapting your approach, you’ll find fewer mangled nails, smoother installations, and better results that stand the test of time.

  • Choosing Grit Sequences for Smooth Furniture Finishing

    Introduction

    For anyone who loves woodworking, sanding is one of those indispensable skills that can elevate a project from good to truly standout. Whether you’re shaping raw poplar boards or smoothing a hardwood coffee table, the grit sequence you choose sets the foundation for your finish. Rushing through sanding with the wrong abrasives or skipping steps often results in visible swirl marks, uneven grain absorption, or a surface that feels rough to the touch. This article explores the essentials of selecting and following an effective grit progression to achieve flawless furniture finishes every time.

    Understanding Grit Numbers and Their Purpose

    Sandpaper grit numbers indicate the coarseness of abrasive grains on the paper. They range from very coarse (around 40 or 60 grit) used for rapid material removal, to extremely fine (400 to 600 grit or more) for polishing and smoothing delicate surfaces.

    Lower grits are excellent for preparing surfaces by removing saw marks, filling glue squeeze-out, or leveling rough joints. Higher grits refine the surface texture and prepare hardwoods for a finish that’s evenly absorbed.

    Why Not Skip Grits?

    A common mistake among DIY woodworkers is jumping too far ahead in grit numbers to save time. For example, moving directly from 80 grit to 220 is tempting, but not effective. Each grit removes the scratches left by the previous step — if you skip grits, deep scratches remain hidden and later appear as imperfections after finishing.

    Best Practice: Increase grit size by about 50% at most with every step. So, if you’re starting at 80 grit, the next step should be 120 grit (80 + 40), not 220 grit. This steady progression minimizes residual scratches and results in a consistently smooth surface.

    Recommended Grit Progression for Hardwood Furniture

    Here is a trusted grit sequence when working with hardwoods like oak, maple, or walnut on a typical furniture piece such as a coffee table:

    1. 80 grit: Use this first sanding stage to remove saw marks, flatten glue areas, and smooth joints. It’s aggressive, so take care not to round over edges or obliterate fine detail.
    2. 120 grit: This step removes the coarser marks made by 80 grit sandpaper and begins evening out the surface.
    3. 180 grit: At this stage, the surface texture begins to refine noticeably. It feels smoother under your hand, and stray scratches become less visible.
    4. 220 grit: For most finishing processes, 220 grit provides the ideal smoothness. Finishes adhere well without blotching, and the natural wood texture remains tactile. For ultra-smooth or high-gloss finishes, some woodworkers go up to 320 grit or higher, but this can reduce stain absorption.

    Additional Tips for Power Sanders

    If you are using a drum sander or random orbit sander, choose sandpaper with a stearate coating to reduce resin or dust build-up (loading) and heat generation during sanding. Keep grit jumps between 40 and 60 for the gentlest, most consistent results.

    Considerations When Staining Wood

    Many open-grain hardwoods (like oak) can appear blotchy if sanded with extremely fine grits beyond 220, because sealing pores too much reduces stain absorption. To achieve more uniform stain color, some woodworkers prefer stopping at 180 grit.

    This highlights the importance of matching grit progression to your specific finish goals. If a natural clear finish is the plan, going through finer grit steps is beneficial; if heavy staining is desired, stopping at a coarser grit may produce a richer look.

    Simple Method to Ensure Even Sanding: The Pencil Mark Test

    One low-tech yet highly effective trick is to draw light squiggly lines with a pencil across the wood surface after each sanding stage. Sand until you remove every mark. This practice confirms you haven’t left missed spots or uneven sanding patterns, which often go unnoticed until finish application.

    Even professionals use this method on-site to catch gaps early and avoid costly rework. Some also find this step mentally rewarding—it gives a clear milestone after each grit change.

    Common Pitfalls to Avoid

    • Excessive Sander Speed: Using a random orbit sander at speeds higher than 10,000 OPM with coarse grits can engrain deep scratches and rough spots, undoing progress.
    • Too Much Pressure: Pressing hard wears sandpaper prematurely and generates heat that can scorch or glaze the surface. Let the sander’s weight and motion do the work.
    • Skipping Grit Changes: Trying to rush by jumping grit levels often yields visible swirl marks after finishing.

    Refreshing Your Approach: The Power of Patience and Sequence

    Sanding is as much a mental exercise as it is physical. Consider the story of a woodworker named Keith, who persuaded a colleague to insert one intermediate sanding step—120 grit instead of jumping straight from 80 to 180 grit. The result was a finish that radiated warmth and smoothness, something that rushing couldn’t achieve.

    This anecdote is a gentle reminder that patience and intentional pace make all the difference. Recognize each grit step as a bridge to the final result, not an obstacle to bypass.

    Sanding Comfort and Efficiency Tips

    Long sanding sessions can tire your hands and arms quickly. To maintain both comfort and quality:

    • Use sanders at moderate speeds—typically 7,000 to 9,000 OPM for 120 to 180 grit is ideal for hardwoods.
    • Replace sandpaper frequently; worn discs clog and cut less effectively, making the job frustrating and less efficient.
    • Allow the sander’s own weight to guide pressure instead of forcing it down.
    • Work in manageable sections and take breaks to avoid fatigue.

    Actionable Habit: Crosshatch Marking After Each Grit

    Build the routine of marking light crosshatch lines with a pencil after completing each grit sanding pass. Sand until all marks vanish. This ensures complete coverage and surface uniformity, preventing frustrating finish flaws that typically appear during the first coat.

    This simple, cost-free method helps maintain focus and guarantees no areas get overlooked.

    Conclusion: A Thoughtful Sequence Leads to Professional Results

    Finishing wood furniture well doesn’t happen by chance—it requires deliberate attention to the sanding process. Selecting an appropriate grit sequence, avoiding large jumps, moderating pressure and speed, and employing visual progress checks transforms sanding from a chore into a skillful art. When you respect each step and take your time, your finished piece not only looks better but feels like a cohesive whole where your craftsmanship shines.

    Next time you pick up your sander, plan your grit progression and make the effort to follow it precisely. The difference in your furniture finish will be clear, both in appearance and in the pride you take in your work.