
Nothing kills a smooth drilling job like the wrong speed—because you rarely catch the mistake as it happens. The first few holes look fine. Then, quietly, the trouble builds: wood turns black at the edges, acrylic sags with milky scars, drill bits start spitting chips instead of clean ribbons. Suddenly, the project stops flowing, and you’re hunting for a file or a fresh bit, wondering how things went sideways. Out in the real workshop, a drill bit speed chart isn’t just a technical nicety—it’s the quickest path between clean results and a wasted afternoon fighting scorch marks, melted rims, and ragged repairs.
Why Skipping the Chart Slows You Down
No one has time to baby every setup. You drill cable holes in pine, shift right into acrylic sheeting, then aluminum angle—all in one afternoon. It’s easy to leave the drill on last job’s RPM, aiming to squeeze out a few more minutes. That shortcut rarely holds. Pine chews through fine, but try it on acrylic and you catch the smell first: faintly sweet, slightly burnt plastic. Instead of a hole, you end up with a mess around the edge—gooey, uneven, stuck to the bit. Suddenly it’s not about drilling anymore; you’re scraping, reaming, and cleaning when you could have moved on if only you’d dialed in the speed up front.
How the Wrong Speed Eats Away at Every Step
Misjudged speed is a silent problem—but the fallout is loud: overheated bits, rough plastic lips, ragged burrs on metal, edges stubborn enough to catch a sleeve or slice a finger. Over longer jobs, every mismatch multiplies: a row of holes that need reshaping, bits losing their bite, motors heating up as the drill strains. Shifting from one material to another without pausing for speed control is how workshops end up trading neat progress for a pile of “fix it later.”
The Chart in Action: Getting the Edge Right
Why not just trust your hands, your ears, your experience? Because consistency beats bravado. Getting the RPM right isn’t about textbook perfection—it’s about keeping the tool cool, the edge sharp, and keeping your workflow tight. When you take thirty seconds to check the chart, you cut down on overheated bits, fussy edges, and panels that leave you dreading repair. The benefit isn’t theory: it shows up when you’ve got a line of holes to match, when exit holes are visible, or when one bad edge can wreck the look of a finished bench.
What It Looks Like When You Miss—And When You Don’t
You’re framing out a workbench and need three different holes: oak for the uprights, acrylic for a wiring channel, aluminum for a support strap. Leave the setting at 1800 RPM and watch what happens: the oak’s fine, the acrylic gets a smeared, swirled rim, and the aluminum spits out burrs sharp enough to draw blood. Cue the file, the sanding block, maybe a replacement part. Drop the speed for the aluminum (950 RPM, per the chart), and the next hole slides through cool with an edge that’s ready for fast assembly—no need to grab safety gloves before the next step. That kind of improvement isn’t flashy, but it saves real time and spares your tools.
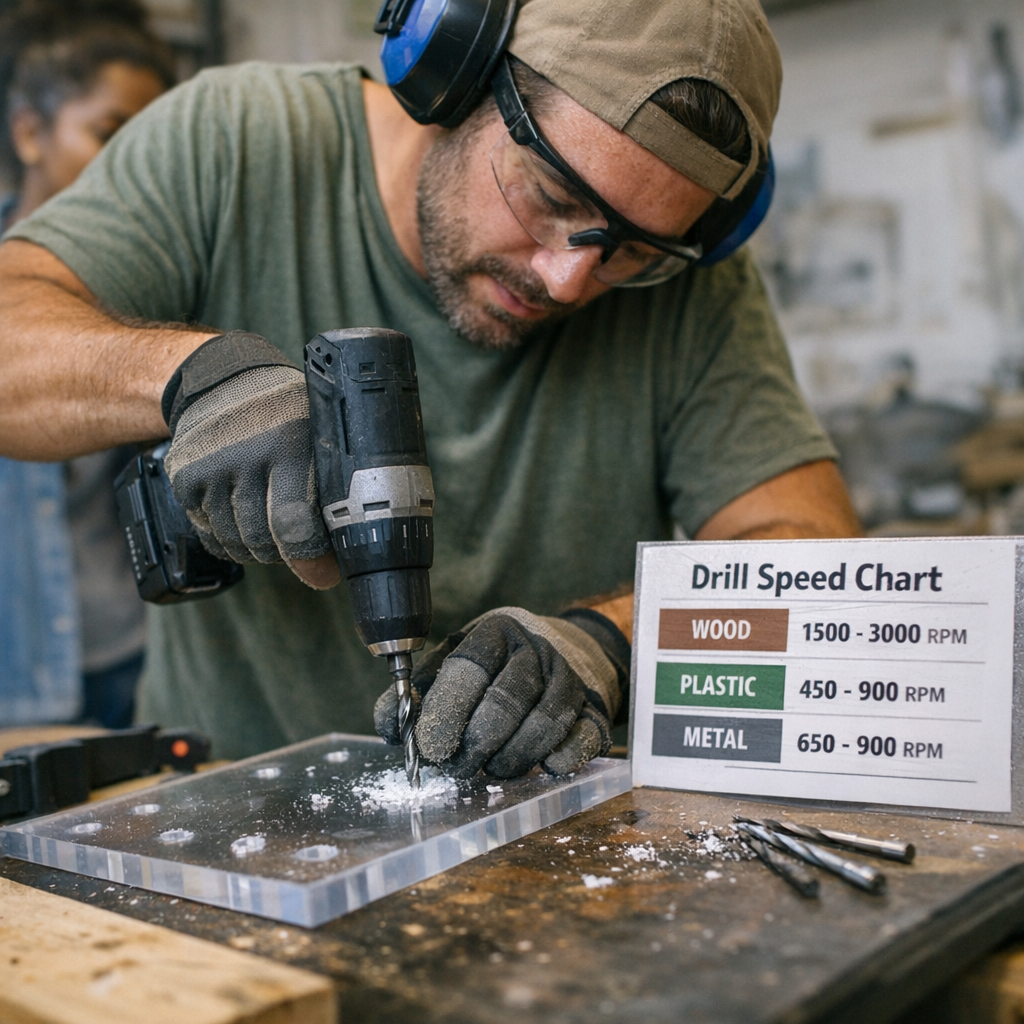
Benchmark Numbers Every Crew Knows
Here’s what drill speed references look like in practice:
- Wood: 1,500–3,000 RPM (good bit, steady clamp)
- Plastics: 450–900 RPM (don’t rush it, clear chips as you go)
- Aluminum and light metal: 650–900 RPM (slower as diameter increases, with a touch more lube on big jobs)
These aren’t hard rules—they’re friction-tested starting points. The rest is signs and sounds: in wood, hot smoke means you’re too fast. In plastic, a gummy white edge means dial back. In aluminum, any grabbed or jagged lip is your cue to slow down another notch. Every time you swap bit size or sheet thickness, a quick check on the chart is faster than fixing a bad hole after the fact.
The Drill Bit’s Report Card: Clean, Cloudy, or Chewed
Edge finish tells you nearly everything. Plastic should leave a clean, glassy edge—or you’re burning it. Good wood work curls out smooth shavings, not blackened splinters. Metal jobs done right leave a soft, manageable curl at the bottom—no wire tangles or feathered shards. If you’re forced to sand or trim hole after hole, odds are you missed on speed. Those little warning signs—slight burns, biting, whining—are easier to fix now than when you’ve got a project full of ugly slots.
Fixing the Melt: What a Slight Speed Change Does
No theory here—just experience. Running a dozen holes through acrylic at anything over 1,000 RPM? You’ll get blobby, frosted rims and a bit hot enough to stink up your shirt sleeve. Fighting it with a file only turns the problem cloudy. Switch down to 800–900 RPM, pause to clear chips every hole, and suddenly you’re getting sharp, clear exits. Not flashy, but if you’ve ever spent ten minutes scraping tacky plastic off a $20 drill bit, you know how much it’s worth. Each clean hole saves time—and your patience holds up, even near the end of a big run.
Big Bits, Low RPM: The Forgotten Rule
The bigger the bit, the slower you need to go. Seems obvious—until you’re mid-job and trying to power through with a 12mm tip at full tilt. Even in soft pine, a big bit at high RPM means smoking, snatching, and sometimes outright stalling the drill. Cut speed to match both the bit and material instead of muscling through, and you’ll keep both the bit’s edge and your drill’s motor out of trouble. Upfront, it’s a few seconds lost. In the aftermath, it’s hours saved on damage and cleanup.
Why These Details Decide Workflow, Not Just Finish
Right drill speed isn’t about putting on a clinic for bystanders—it’s about working like the job matters. Less time fixing mangled holes, fewer bit changes, and almost no tool fatigue from fighting overheating motors. You see the payoff after a full day: sharper results, bits that last the month, batteries holding out, and assembly steps that snap together the first time. Skill isn’t just measured by speed—it’s precision, finish, and how much work isn’t left over at the end of the shift.
Check the chart, read the edges, and don’t let familiar tools lull you into extra work. Good control and a little patience make all the difference between wrestling through every hole and letting your tools handle the load, one smooth cut at a time.