Category: Uncategorized

  • Maintaining Safety Gear Hygiene to Prevent Workday Slip-Ups and Errors

    If you’ve spent a day on the line—riveting, drilling, wrenching nonstop—you already know when safety gear crosses the line from “fine” to a liability. The shift is never dramatic; it creeps up just as you reach peak focus. Suddenly, gloves you trusted slip mid-pull, goggles streak over a critical guide mark, or your respirator draws breath like you’re sucking through felt. Efficiency stutters, rework piles up, and you feel every shortcut you took with gear cleaning catch up at the worst time.

    How Neglected Gear Derails the Work Rhythm

    Dust, sweat, and metal filings accumulate layer by layer, unnoticed through each repetitive task—drilling joists, sanding edges, affixing hundreds of fasteners. Dirty gear doesn’t waste time with warnings: slippery gloves turn precise work into muscle-wasting battles, smudged lenses throw off your last good attempt at a straight cut, and a clogged respirator throttles your concentration just when the dust cloud peaks.

    This isn’t theory. Missed grips mean a drill bit skips, seams go crooked, edges need recutting, and you end up burning through your best batteries or blades. The dirt that built up unseen costs you in missed marks and a fatigue curve that gets steeper by the hour. By cleanup, you’re left with a gear triage that steals time you needed for real resets.

    What Happens When Cleaning Slips Off the Checklist

    Every real workspace, from job sites to solo garages, moves fast on a good day—until you hit hour three and the little lapses start bruising your output. In high-repeat work like siding, metal framing, or scoring tile, grime quietly loads your gear with each motion. It’s rarely dramatic—until a glove twist ruins alignment or you start misjudging depths through a foggy face shield.

    The pinch comes in the mid-shift grind. That’s when gloves, already damp, glide where grit should bite. Goggles you wiped on your shirt now scatter task-light glare across cutting marks. You can blame tired hands, but most times it’s buildup, blurring the line between sharp work and slip-ups. Ignore it, and you’re not just fighting stubborn materials—you end up fighting your own tools.

    Glove Reality: No Cleaning, No Control

    Compare two pairs of gloves at shift’s end. At a glance, both pass—but wear them, grab a vibration-heavy drill, and the truth shows quick. The pair scrubbed down after each 90-minute block still grips hex and trigger. The quitters, slick from oil and invisible dust, slip just when you need clean control for straight holes or countersinks. That struggle adds up: more hand tension, shifting torque, and mistakes that eat chunks out of the next round’s progress.

    Goggles: One Smudge, One Missed Mark

    A faint haze on safety lenses isn’t just cosmetic. With the wrong angle on site lights or window glare, that old fingerprint turns alignment guesswork into a detour. Suddenly, it’s harder to judge saw blade paths, match measurement lines, or spot hairline splits before you commit a cut. Not planning for routine wipes puts every small cut or drilled pilot hole at risk.

    When Dirty Gear Dictates Unplanned Pauses

    Nothing derails workflow faster than unpredictable gear failures. In real fast-cycle tasks—setting hundred-plus siding pins, rapid drilling, or panel fastening—the exact second a glove slides or a lens clouds, you’re forced to stop, wipe down, and reset. Each time, you forfeit your momentum, and that quick fix robs minutes that add up by shift’s end. On jobs where battery swaps are already scheduled for efficiency, it’s your safety gear—not your drill—that starts calling timeout. And you pay for it: rushed corrections, sore hands, repeats you could have prevented with basic routine.

    Sneaking Cleanliness Into the Workday: The 90-Minute Rule

    Strict cleaning intervals—every 90 minutes, no exceptions—stack up as efficiency, not hygiene theater. Here’s the practical breakdown from actual sites:

    • Glove wipe-downs with isopropyl mean consistent grip—no second-guessing on high-torque gear
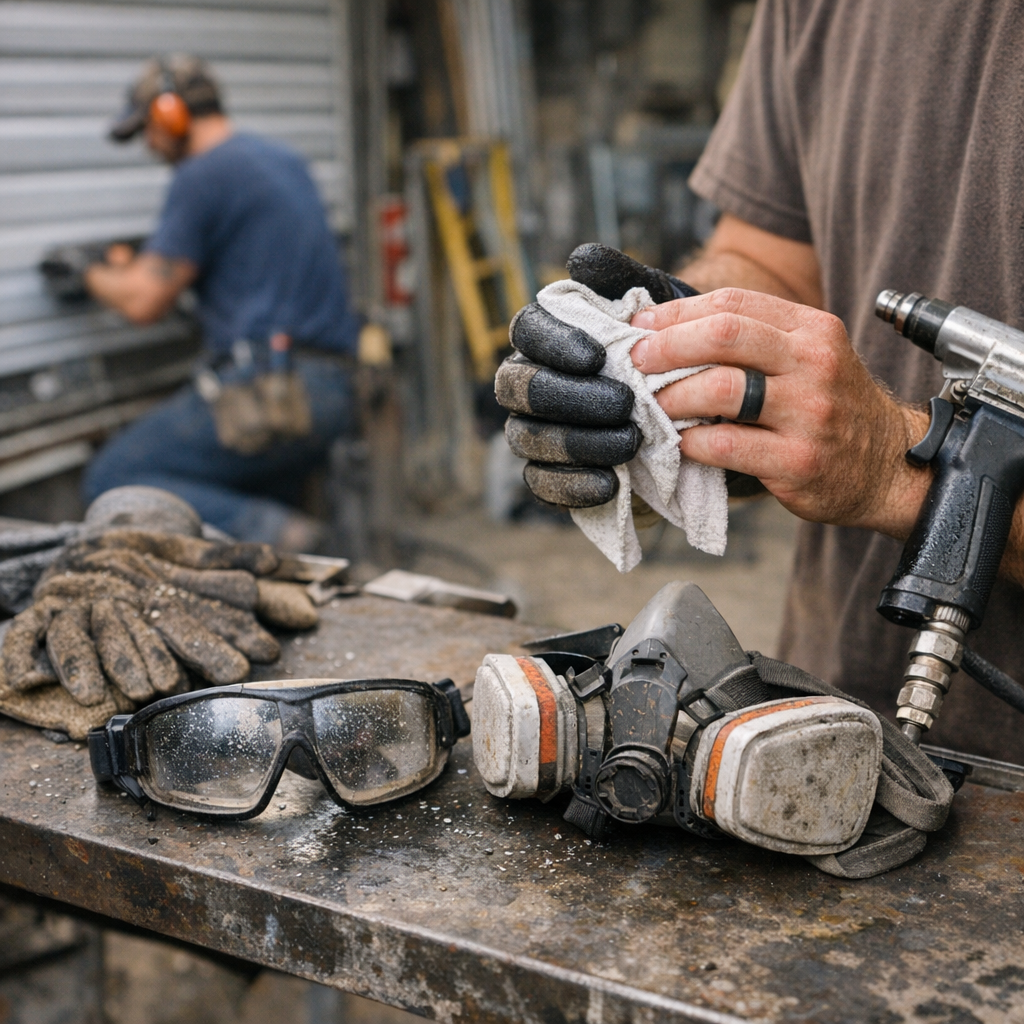
    • Task-light goggle checks expose smudges before you botch a final cut or mess up a finished surface
    • Respirators get opened, filters knocked out, and comfort checked so you’re not distracted when sanding or cutting kicks up dust clouds

    The results aren’t hypothetical. Glove performance stayed consistent, lines stayed crisp, and finish corrections dropped. Cleanup became a tight, predictable block—not a scramble. That’s the real difference: more energy and attention for linework, less wasted time on “how did I miss that?” moments.

    Quick Spot Checks and Gear Swaps: Small Wins, Big Impact

    Get in the habit: after every break, check your glasses in the light—if you see a faint mark or a spot in your sightline, clean it. For gloves, if the grip still feels off after a proper wipe and dry, don’t push your luck—swap them. Some residue, like fine oils or embedded composite dust, can’t be wiped out and just kills grip for the rest of the day.

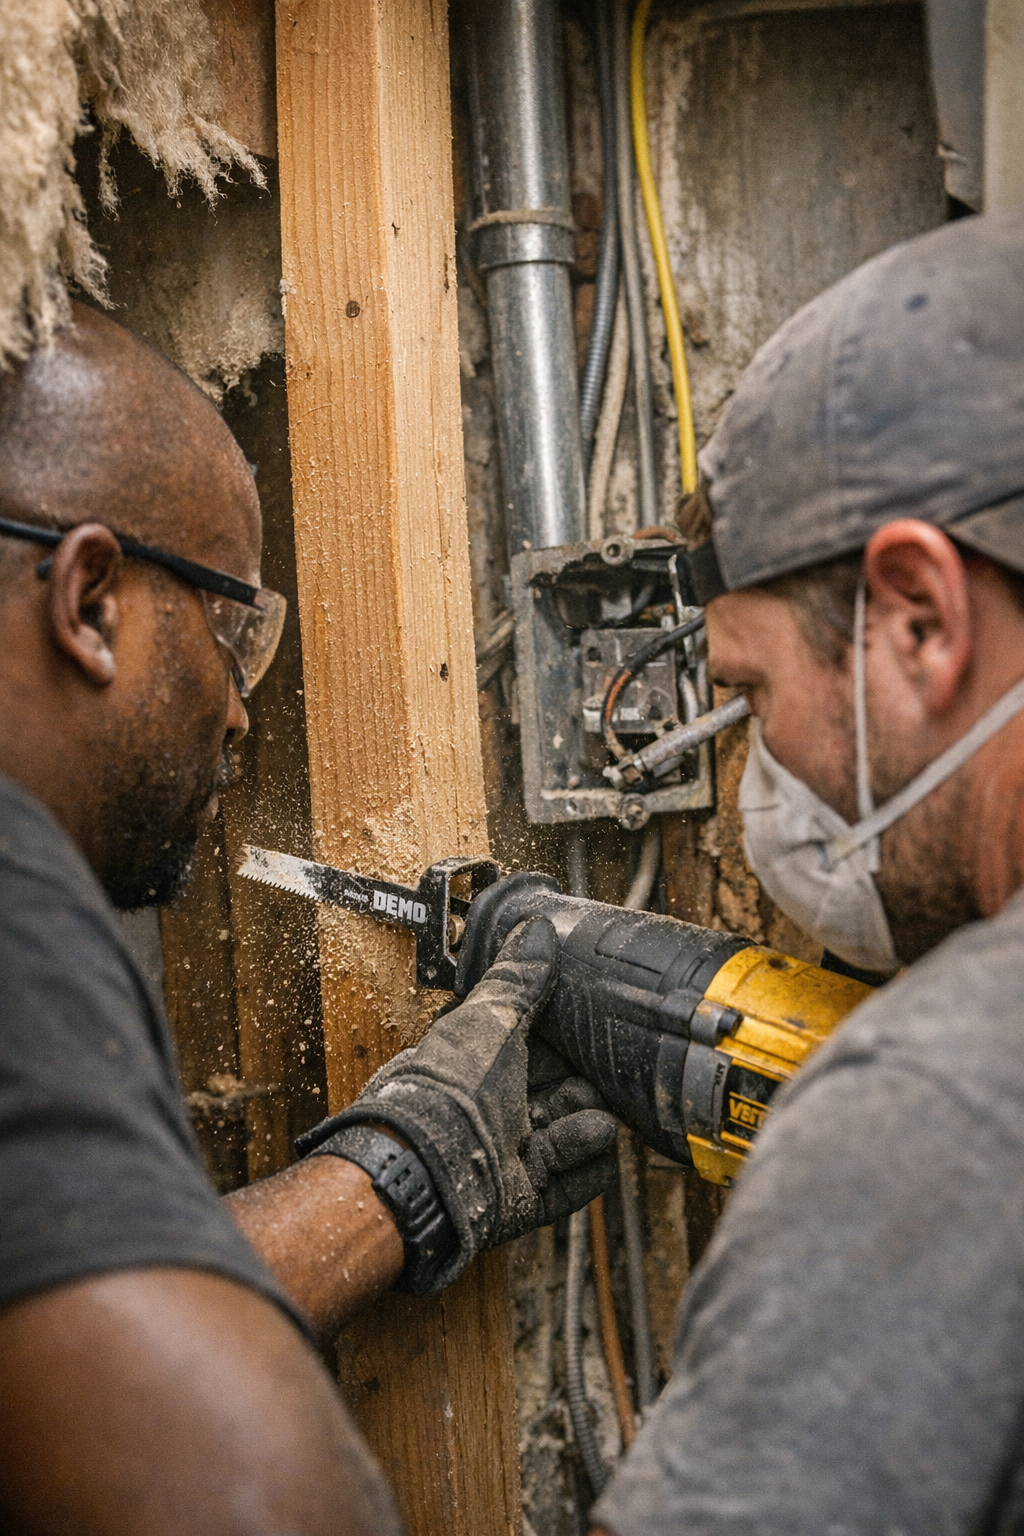
    Respirators are the same: if airflow suddenly feels rough, you catch odd odors, or a filter seems sluggish, don’t wait for a full stop. Swap the cartridge or clean immediately. Waiting until a complete clog means that fatigue and distraction have already sneaked in, especially when sanding, grinding, or using demolition tools in the dust cloud.

    “Good Enough” Always Costs More in the Long Run

    Slipping by with an end-of-day wipedown doesn’t cut it if you’re drilling, sanding, or fast-cutting all day long. The stacked-up friction, missed precision, and burnout are silent at first but become impossible to ignore shift over shift—straight cuts turn rough, pilot holes wander, and every battery change feels heavier than the last.

    Turn a few minutes of cleaning into your new quality control loop. Cleaner gear carries over to your next task, prolongs tool life, makes every cut truer, and ensures you’re working at max capacity—not fighting avoidable breakdowns just as focus matters most.

    Find more practical gear and get the right setup for real work routines at Gumboll.

  • Effective Compressor Shutdown Techniques to Prevent Repairs and Delays

    The real workday doesn’t start with your first tool in hand—it starts the night before, with the way you shut down the air compressor. That single routine, often skipped or half-done, is the difference between walking straight into a smooth morning and wrestling with jammed fittings while last night’s pressure hisses back at you. If you’ve ever stood over a workbench with a drill, ready to go, only to get slapped with a burst of trapped air or stuck couplers, you know exactly how these shortcuts turn into tomorrow’s slowdowns.

    Why Compressor Shutdown Isn’t Just Another Checklist Item

    Real shops and jobsites demand more than flipping a switch and calling it a day. Miss a proper shutdown and by morning, small oversights have turned into wasted time, dulled precision, and tool fatigue. Pressure left lurking in the system spits dampness into drills, gums up quick-connects, and means your first fastening job needs two hands and extra force—never a good sign when accuracy matters. Every repeated shortcut quietly eats away at both the lifespan and performance of your grinders, sanders, and everything that needs clean, dry air for sharp, controlled work.

    Anyone who has pried stuck connectors with frozen hands, or heard the groan of a sander running damp, knows: neglected shutdown is never just cosmetic. It’s lost control, slow cutting, and batteries draining faster as tools fight against air hiccups.

    The Three-Step Routine That Actually Pays Off

    One tight shutdown routine changes everything for tomorrow’s pace:

    1. Bleed Air Lines Down to Zero

    Forget simply silencing the machine. The only good reading is a rock-solid zero psi on the gauge, not just the absence of noise. Fully bleeding the lines means you don’t flinch swapping hoses. Your next project—lining up a cabinet hinge, snapping in a sanding bit, or zipping through pilot holes—starts steady, not with a wincing bang and double-checks on safety glasses.

    2. Turn Off the Power—Every Time

    Shut off power at the source, not just the unit. This blocks accidental starts after close, which matter if you’ve got the compressor right next to heavier cutting or grinding stations. The last thing you want is a compressor kicking in while swapping a saw blade or adjusting clamps mid-assembly—a sharp reminder that skipping power-off isn’t just annoying, it’s risky.

    3. Drain Tank Moisture (Not Just “Some”)

    Moisture is the slow killer, seeping through fittings or pooling unseen. If you ever scraped orange rust from a valve, you know the cycle: gunked threads, stubborn drains, and air that smells wrong when you fire up tools. Full drainage protects bit speed, painting smoothness, and keeps your equipment’s guts from becoming a corrosion project. Missing this leaves you fighting against your own setup, whether you’re sanding a fine edge or punching holes through steel.

    Design Traps: Where Compressors Trip You Up

    No two compressors shut down the same—or make it easy. You’ll find one with an awkward crusted valve that bites fingers, and another with a supposed auto-drain that quietly clogs up while you sleep. The practical result? What should be a two-minute shutdown sometimes turns into a late-night patch job, pliers in hand or knees on concrete, just to force out leftover water.

    • The portable unit that drains on cue… if you remember to pull the right lever
    • An older shop tank cursed with a rusty knob jammed behind a shelf, daring you to try
    • A tall vertical tank whose auto-drain is silent—but not always reliable, hiding its failures until you hear that unsettling slosh on Monday

    Don’t let design quirks excuse bad habits. Take two seconds to verify the gauge is truly at zero, and physically watch valves open and clear. Don’t settle for “probably”—make it definite every time.

    Everyday Annoyances: The Real Cost of Skipping Steps

    Ignore a good shutdown a few times and it doesn’t always explode in your face. Instead, you get the steady drag of problems:

    • Quick-connect couplers snapping loud enough to jolt you, just as you’re fine-tuning a drill angle or starting a delicate sanding pass
    • Leaky fittings that sap air flow, turning a pneumatic grinder into a sputtering, stop-start hassle mid-cut
    • Hardened dirt and sludge spat into tool attachments, so every changeover is a struggle and nothing fits cleanly
    • A musty smell from a sander, meaning the tank held onto moisture and your finish job will pay for it

    Let it slide long enough and the pain points scale up: tank gaskets start to fail, valves seize, and sometimes the tank itself cracks, shutting down work for real repairs that never feel “urgent” until the morning everything grinds to a halt.

    Small Upgrades and Habits That Save the Most Hassle

    Install a ball valve at the base of your tank—not as an upgrade, but as a sanity saver. It turns end-of-day draining from a knuckle-wrecking chore into a twenty-second breeze, especially if your setup is boxed in or low to the ground.

    Take the tiny extra step: wait for the needle to hit dead zero before cutting power. It’s not obsessive; it’s the difference between tomorrow’s quick, confident tool swap and a morning spent wrestling a stuck fitting because yesterday’s pressure still lingered where you couldn’t see it.

    If you rely on an auto-drain, trust but verify. Check it. Clean it. Never assume moisture didn’t find a way to stay. The two minutes it takes saves an afternoon cleaning out regulators or dealing with weakened tool power.

    If your drain valve fights you every time, switch to an easy-grip handle type or hit it with quality thread lubricant. Shift the friction from your wrist to the valve—maintenance shouldn’t be a fight.

    How Consistency Builds Better (Not Just Easier) Work

    No routine fixes everything; tanks age and work gets messy. But when shutdown becomes deliberate and consistent, you notice real benefits: tools that run at full speed from the first use, clean transitions between drill bits and sanding blocks, and less mid-task annoyance or tool wobble. Fewer battery changes, tighter control, less fatigue—just sharper, more precise work where you need it.

    Don’t chase perfection. Aim for steady, repeatable shutdown that respects your tools, your time, and everyone who needs to pick up where you left off.

    Visit Gumboll for real-world tools and jobsite equipment

  • Daily Air Compressor Inspection Prevents Costly Tool Failures and Downtime

    You’re pushing an oscillating saw through hardwood or guiding a sander across MDF, when suddenly—the tool sputters, blade slows, airflow drops. Momentum lost. That’s not just mid-job bad luck; it’s a direct hit from skipping your compressor’s daily check. For people who actually live in the shop, this isn’t a theoretical slip. It’s a real cost—blades dulling faster, arms working harder, the tempo of your workday thrown off by a single overlooked habit.

    Daybreak Decisions: Will Today Flow or Stall?

    The early quiet of a workshop carries a question: will you get smooth, uninterrupted tool performance, or spend the day chasing after small, preventable failures? The answer is set before cutting, drilling, or fastening even starts—right at the compressor. On the surface, tank capacity and horsepower sound like the end of the story. But in practice, they’re only as reliable as the morning’s inspection.

    Shortcuts Only Promise Friction—Not Speed

    Skipping the startup walk-through doesn’t gift you extra minutes. It compounds risk. A compressor might have shown perfect numbers yesterday, but thermal cycles, vibration from hammering, or shifts in humidity can loosen connections and knock valves out of calibration. A faint leak that’s just a whisper at idle can become a bottleneck after you snap in a drill and call for steady airflow. That’s when a five-minute shortcut at sunrise becomes thirty minutes wrestling with half-powered tools later.

    Hidden Friction: What You Don’t Fix Will Stall You

    The shop never lights up a warning sign when your compressor drifts out of spec. Instead, you pick up the clues where the work gets rough: the sander loses touch on an edge, the angle grinder bites unevenly, or your drill bogs halfway through a clean hole. If a pressure gauge sags even 5 PSI below the line, every motorized tool downstream will feel it. That’s when precision suffers—holes go off-mark, fasteners sink too shallow, and sanded surfaces turn streaky or uneven.

    It’s more than slowdowns. Each stall wears out bits, dulls blades, and pushes your wrist and shoulder muscles harder with every job. The cost isn’t just in consumables—it’s in re-dos, rough surfaces, and extra battery swaps as you press tools harder to make up for lagging airflow.

    What a Real Checkup Feels Like—Not Just a Checklist

    Daily inspection is about noticing real signs, not chasing perfection. Turn on the compressor and get close:

    • Hands: Glide your fingers over tanks and fittings as pressure rises. The short, cold puff of leaking air, or a spot of unexpected warmth—these are the first clues that something shifted overnight.
    • Ears: That clean hum interrupted by a faint whistle at a quick-connect or a tensioned “twang” from the belt isn’t background noise. These are advance warnings—an air escape, a fraying belt, or a valve seat starting to go.
    • Eyes: Watch your gauge. Filling to 125 PSI but sagging past 119 PSI before you hook up a tool isn’t minor; it’s a signal the system won’t keep up under load. That’s how poor cut quality and longer sanding times show up before the actual work even begins.

    You’re not looking for imaginary issues, just learning the rhythm. Your baseline. A compressor tells you when its tempo shifts—if you know where to feel and listen.

    No Check? Here’s Where Work Grinds Down

    Picture standing on a joist, reaching deep with an oscillating tool to free old adhesive. The job depends on an uninterrupted cut—quick, accurate, clean. But as you press, the blade drags, stalls, starts to overheat. The air flow is choppy. You compensate, press harder, and the tool strains. Maybe you switch to a sander or try a drill—doesn’t matter. Now every tool in the chain operates at a disadvantage. Bits dull early. Blades wander. Fasteners get chewed. In half an hour, you’ve burned through extras and still have uneven lines or rough finishes to show for it.

    This isn’t rare. Across a shift, wasted discs and dead batteries pile up. Fatigue sets in as you grip tools tighter or double your passes. The day gets longer—and not in the way you want.

    Catching Trouble Before It Grows: Tuning in to Subtle Shifts

    Problems don’t show up all at once. Today’s slightly different vibration or unusual pressure dip might sound minor, but they hint at tomorrow’s breakdown—a belt slowly loosening, or gasket starting to give way. Spotting these signals means handling fixes early—before the shop scrambles, before the backlog builds, and before anyone actually grabs the backup tools.

    Make the Routine Stick (Even on a Fresh Compressor)

    Brand new? Doesn’t matter. Fresh from the supplier, fittings settle, tanks cool unevenly, moisture shows up in odd places. Waiting even just a day to do your first real check can guarantee the first “run” of your tool set is interrupted by some annoying, totally preventable issue—like sticking valves or an early drip of condensation down the hose.

    The habit: every morning, hands, ears, and eyes run over the machine for a minute as it primes. It’s not busywork. It’s how you catch small leaks or sticky drains before they cost you fine control on a sander or a perfectly centered drill in the bracket you measured twice the evening before.

    The Payoff: Smooth Runs, Predictable Tools, and Less Fatigue

    Compressor specs mean little once the hose is coughing halfway into the day. That startup check isn’t an extra step—it’s your insurance against wasted blades and the lost rhythm that drives you to trade control for brute force. With steady pressure, your cuts stay clean, sanders keep their pace, drill bits don’t burn or drift. You work smoother, faster, with less strain, less battery swapping, and fewer frustrating returns to the start of a job.

    Start the day with a check. Set up steady airflow. The rest of your shift—whether you’re drilling, cutting, or sanding—stays yours to control.

    http://gumboll.myshopify.com

  • How Small Drill Adjustments Can Double Battery Life on Site

    You know the sound—a mid-shift groan as your drill bites into sunbaked studs, motor laboring, battery gauge already sagging. It’s the unwelcome soundtrack to late-day anchor runs and box-out work. Most crews blame old batteries, but the root problem hits closer to home: all those small, repeated choices in speed, clutch, and bit selection that gradually bleed your cordless power right when you need it most. Every detour to the charger feels longer, especially when your drill dies just short of the last fastener.

    Why Tough Jobs Expose the Real Battery Limits

    Forget what the box promises—runtime numbers rarely survive a jobsite’s relentless friction. Working through engineered beams, rim joists, or composite slab eats batteries alive. But specs aren’t the villain. The real drain comes from decisions on the fly—torque pegged too high, bits pushed past their prime, operators muscling through resistance instead of dialing for control.

    Once the drill is set to “all-in,” runtime shrinks fast. Clutch settings aren’t just for beginners. Cranking up max torque and speed unleashes full current draw, punishing the pack with every deep anchor. Subtle tweaks—dropping the clutch, slowing trigger pulls—protect both tool and battery, especially when the job gets stubborn like back-to-back holes through an LVL.

    Two Operators, Same Drill—Why Only One Makes It to the End

    Picture a real scenario: Two drills, both fresh 4.0 Ah packs, identical bits, and a run of slab anchors waiting. The first operator goes flat out—full torque, clutch at its highest, squeezing the trigger with urgency. The other dials back: moderate clutch, slightly reduced speed, lets the bit bite at its pace.

    The outcome? The careful user clears the line—anchors set, battery still green. The throttle-heavy approach fizzles halfway, pack overheating, motor hot to the touch. Settings alone explain why one drill carries the team to finish and the other limps out, even with identical gear. It’s proof: performance lives in the details, not just numbers on a spec sheet.

    Pacing Pays: Why Pushy Trigger Habits Backfire

    Fatigue tricks you into “working faster”—quick, pulsed pulls on the trigger, desperate to power through. But that rapid cycling heats up both battery and hand, leading to short runs and sudden stalls. On a rainy retrofit, drilling track with just one battery between us, I saw the difference: my partner pulsed every hole and burned out early, while I swapped to a sharper bit, eased the clutch, and let each bore clear. My battery outlasted the metal run—and with a cooler grip, I wrapped up fastening without a dead stall.

    It’s not just about saving a few holes. A lighter touch buys you more control, less fatigue, and a smoother finish. Less vibration and less heat translate to steadier hands, straighter holes, and a battery that makes it to cleanup instead of dying two screws short.

    Small Tweaks, Tangible Gains: Putting Numbers to Feel

    Last season on anchor duty, I dropped the clutch from 18 to 14, switched down a gear, and swapped a worn bit for new carbide. Instead of muscling through, I slowed my entry and let the cut progress. The result? No wrist shock and roughly 15% more runtime—enough to finish two more boards before swapping batteries. That extra stretch doesn’t come from fantasy—it’s visible in fewer pack swaps and a jobsite where tools don’t stall out before the crew does.

    Catch the Clues Before Runtime Collapses

    Your drill tells you everything. When it stutters, when the battery bars vanish after a couple of holes, when the case warms before lunch, that’s your warning: the clutch and bit are begging for adjustment. If you’re muscling harder and hearing that gritty, overloaded whine, back off and let the tool breathe. Letting the bit lead is the difference between a shift that finishes smooth and one spent running for the charger.

    Bit Matters: The Overlooked Link in the Chain

    A battered bit ruins everything, straining the drill, chewing up more power, and wearing you down. Dull or oversize bits bog the tool, slow your pace, and peel minutes off battery life—even a spare pack won’t fix a blunt tip. Every seasoned finisher knows: a clean, matched bit is worth more than an extra battery in the van. Change before burn-out, and suddenly your pack lasts long enough to finish before dark.

    Batteries Don’t Lose—Habits Do

    The most common runtime killer isn’t a dead cell—it’s auto-pilot habits. Flooring the trigger, ignoring bit condition, setting torque to “11,” never listening for the tool’s feedback—these are the gremlins that cut your drill’s life short. If your battery’s dying just as you’re packing up, ask whether your own routine is burning power faster than the spec sheet ever warned.

    Four Drilling Habits to Maximize Every Charge

    • Feel for heat, listen for strain: If your hand’s warming or the motor’s groaning, ease up or adjust.
    • Retire tired bits early: Don’t wait until a bit is smoking before you swap—it’s costing you battery from the first dull turn.
    • Let the clutch do its job: Higher isn’t always better; dial for the job, not just for speed.
    • Read the drill’s voice: The pitch shifts before a stall. When you hear it, slow down and let the tool work.

    Runtime Isn’t Theory—It’s What Happens Under Your Hands

    In the end, those printed amp-hours only predict so much. Runtime unfolds in real time—bit after bit, board after board—shaped by the settings you choose and the habits you run. Every day on the job is a test, and control wins out: the operators who listen, tweak, and swap smart see fewer mid-shift stalls and more uninterrupted progress. Next time your battery dies before you’re ready, ask where the power really went. Then adjust—and see how much further the same tool can carry you.

    Visit Gumboll for tool solutions that work where you do.

  • Knowing When to Switch: Hammer Mode or Drill Mode for Every Surface

    The first time hammer mode rattles your wrist, you learn fast how badly drill settings matter. It hits in small moments: frigid fingers clamped to cold steel, collar filling with red brick dust, the bit refusing to bite as the wall thuds back against your effort. This isn’t just about power or specs. It’s about the daily tug—how grip, machine, and material all fight you or fall in line, depending on that tiny switch.

    The Real Distinction: Why ‘Drill Mode’ vs ‘Hammer Mode’ Gets Messy

    On paper, it’s clean: drill mode for wood, metal, and soft materials; hammer mode for masonry and concrete. But real projects don’t follow rules. The choked air of a renovation, rough-cut lumber stacked on stone, patches where old mortar meets new block—these are the places settings blur. You only notice the difference once your bit goes from a clean, steady spin to bucking in your hand, or an anchor hole mushrooms wider and looser than you wanted.

    I’ve watched drywallers blaze through “just another wall” only to hit cement board and shatter its edge, undoing half an hour of careful work. Or worse, someone treats plaster like plywood, and ends up patching ragged craters. Your drill talks to you through vibration and resistance—if you’re not listening, the mistake is instant, but the fix drags on.

    On the Job: When a Missed Mode Turns Simple Into Ugly

    Real slips happen in the rush. I once bored a series of holes through 2x4s, forgetting hammer mode was still engaged from the last bit of foundation work. The vibration numbed my hand, splinters exploded from the exit, and the holes were chewed rather than drilled—nothing you’d show on a finished job. A quick switch back to drill mode and suddenly the bit sliced clean, shavings curling out, the tool steady and responsive, the kind of cut that lines up for a perfect fasten.

    When you’re toggling between wood plates stacked over brick, or saddling metal studs to block walls, the rhythm demands you pause, check your mode, then check again. The trade isn’t just in speed—it’s in walking less distance for patch and repair after, protecting your bits from dulling and your own arms from hours of extra tool fight.

    The Pitfalls That Slow You Down and Ruin Work

    Forgetting to Switch: It Always Costs

    Blown-out holes, spent anchors, or the sudden crunch of wood fiber cracking—that’s what comes from moving too fast, skipping the mode flip. I’ve seen it on every job: skilled hands drilling smooth through pine, then stalling when the bit bites block, pouring sweat and battery life into nothing. The real fix is never rushing the switch—even if it means losing a few seconds per transition.

    Ignoring the Tool’s Warnings

    Hammer mode’s jackhammer rhythm isn’t subtle: it chatters, it jumps, and if you keep pushing into the wrong medium, you’ll feel resistance spike. Drill mode, forced through stone, just smokes the bit and saps the battery. Most “mystery damage” is just a warning ignored—a pilot hole that turns loose, a wood panel that suddenly splits because you were grinding when you meant to slice.

    Better Results: Adjusting for What’s in Front of You

    These days, I check clutch settings with intent: between 8-12 keeps wood fibers from burning out or tearing; crank up to max for stone, letting the hammer take over, always starting with a sharp 6mm masonry bit and easing in. But real control isn’t in the settings—it’s in that split-second recognition of how the drill “talks.” If the tone shifts, or the resistance spikes, I don’t force it—I stop, back out, and switch modes. Even something as small as bracing squarely and slowing the speed can mean a hole that fits tight and straight instead of ragged and oversized.

    All the product brochures in the world can’t show you that half-beat of feedback, the hum that turns to a staccato smack, the perfect moment to pause and adapt. But those choices mean bits last longer, wrists ache less, batteries hang on for two dozen more holes, and the patchwork at cleanup time all but disappears.

    Everyone Makes Tool Mistakes—Here’s What You Learn

    No one gets it right every time. There’s always that moment: you withdraw a bit to see chipped teeth, or the anchor spins dry in the wall, or a bracket sags because one hole was overdrilled and now the fastener won’t bite. Whether you’re replacing an outlet or hanging barn doors, those “should have switched first” moments become the stories you share—and the reason you double-check settings next time. The cost is always the same: time lost, tools dulled, work that needs redoing.

    Quick, Grounded Tips to Avoid Costly Misses

    • Only switch modes with the drill at a dead stop. Pause after each hole, back the bit out to clear dust, and prevent selector damage or jams.
    • Trust the feedback, not the label. The drill’s sound, resistance, and vibration tell you more than any icon under your thumb. Adapt and switch the moment material feels “off.”
    • Make surface changes your pause point. When moving from stud to concrete, wood to tile, or even a denser knot in lumber, take the three seconds. It saves a lot more than bits and batteries.

    Final Take: Good Outcomes Aren’t an Accident

    Choosing between drill and hammer mode isn’t just a feature, it’s a habit—one that saves time, money, and frustration. The best results don’t come just from tools or settings, but from noticing the moment your drill speaks up. The wall tells you what it needs, every time you touch trigger to surface. Get it right, and the job moves cleaner, with less fatigue and a finish you won’t have to hide. Get it wrong, and you’ll feel it—twice, when it’s time to fix the damage.

    http://gumboll.myshopify.com

  • Why Slowing Down Your Jigsaw Creates Perfect Curves Every Time

    If you’ve ever stood over a piece of ply, tracing a line for a jigsaw cut, you know the stakes. Ten seconds, a dull blade, or a missed setting—and the difference isn’t subtle. One wrong move will turn that clean curve into a patch job: roaring saw, hands tense, more dust than progress. On-site or back at the bench, there’s a familiar pressure—do you trust your setup or brace for another hour lost to sanding and filling? These aren’t small mistakes. They’re the things that slow an install, eat into your patience, and turn a straightforward job into a fight with your tools.

    The Curve Isn’t Forgiving: Where Accuracy Beats Rushing

    The reality: workshop control quickly fades on a real jobsite. The plywood isn’t always flat, the lighting’s bad, and there’s sweat running down behind your earmuffs. Early on, I convinced myself that any sharp blade and a steady hand were enough—until a hurried cut on birch ply snapped the line, splintered the edge, and stuck me at the sander longer than the saw. Small moments—tiny hesitations, blade flex, pressure just a touch too eager—decide everything. Every cut is a risk, every shortcut a gamble you’ll pay for twice.

    Ease into a curve too fast, and the blade bends without warning. Suddenly, the kerf drifts, chatter rattles up the handle, and your perfect line becomes a wandering mess. Muscle through and you might finish, but you’ll be repairing what you should have avoided.

    Setup Habits That Actually Save You Time

    The speed of the job doesn’t erase the value of a slow, deliberate setup. When I’ve forced myself to recheck orbital settings or swap in a new blade—even when the clock says not to—I finish faster overall. On tight jobs—arched window seats, infill around old radiators—three setup habits have saved hours, not minutes:

    Use a Blade Built for Curves—Not for Speed

    Forget “universal” blades. Fit a narrow, fine-tooth blade (10–12 TPI) meant for curves, especially in ply or MDF. Stock blades or anything for fast, straight cuts will slam through but leave the bottom edge in tatters. That means endless sanding and, on scribed panels, ugly gaps that show up at the final fit. Blades meant for curves track the line, leaving edges ready for finish—no finessing required.

    Keep Orbital to Zero: Speed Isn’t Always Your Friend

    Most people buy jigsaws for their orbital action—great for ripping long straight lines, but a trap on tight arcs. Dial the orbital to zero for inside curves (especially <50mm radius), and suddenly, the blade tracks steady, refusing to kick out into the waste. Miss this step, and the machine will outrun your line—forcing repair after repair. It’s a habit that shaves off more hours than any extra amperage or battery swap ever will.

    Let the Saw Set the Rhythm

    The control isn’t in your wrists—it’s in resisting the urge to rush. Keeping the stroke around 1200–1400 SPM lets the blade clear dust, bite deeper, and avoid burning. Let the jigsaw chew methodically, even if it “feels” slow. When you push ahead, it’s obvious where the blade bites off course or the baseplate catches. It’s always faster to cut clean the first time than patch what you rushed.

    Pressure Points: Real-World Friction You Can’t Ignore

    Workshop results rarely translate to a jobsite without friction. Cutting custom bench tops against a crumbling brick wall, there’s no margin for bad cuts. The fit will show any blunder. Dust buries the line, awkward handholds shake your grip, and interruptions come standard. Right there, your setup habits are your last defense. I’ve watched enough crews burn through panels or fudge gaps that need filler. Skipping a checklist—good blade, zero orbital, a steady baseplate—makes for wasted mornings. But the guy who pauses, resets, and trusts the process will shape a curve that lands flush on the first dry fit. That’s not theory; it’s the difference between confidence and rework.

    What Consistent Setup Wins You

    No two jobs feel the same: grain behavior changes, sheet thickness varies, vibration creeps in. Some days, a 30-degree arc feels like wrestling with scrap. Yet the best edge over fatigue and mistakes isn’t a “better” tool, but a setup routine that never relaxes. Over eight, ten, or twenty panels, those seconds spent dialing in save aching wrists and pitted edges. Fatigue shifts from sanding and repair to smooth progress—making the work feel manageable, not endless.

    Three Setup Checks That Earn Their Keep

    • Pause before a tight spot. Watch the blade, feel for flex. If it’s pushing back, slow down—don’t force it.
    • Keep the shoe flat—always. Even a barely-noticeable tilt can throw off the arc and leave you smoothing ridges for the rest of the afternoon.
    • Double-check settings each time. Yesterday’s dial-in often isn’t right today. Quick reset beats a ruined panel and a cloud of sander dust.

    Blade Wander, Hand Fatigue, and the Cost of Skipping Steps

    The ugly cut isn’t just an eyesore—it costs you time, energy, and even control over your tools. When a blade starts to wander from bad setup, you tighten your grip, absorb more vibration, and end up fighting the machine instead of working with it. That’s when fatigue creeps in. By sticking to sharp blades and lower orbital settings, you can let the tool do its job without feeling spent before lunch. The hours saved aren’t flashy; they’re just real—and noticed at the end of a long day, when your hands still feel steady.

    Why You Stick With a Setup Routine—or Pay for Not

    Every job is a test: will you skip the checklist, or do it right because last time paid off? It’s rarely about one cut. After a week, you notice less sanding, panels that fit, hands that grip looser. That’s where the new habit sticks—because it makes the work smoother, faster, and a little less punishing. The jigsaw isn’t magic. But its results are a direct line to the ten seconds—and the setup choices—you gave it right before every curve.

    Gumboll: Practical tools and jobsite gear for real work

  • Why Matching Saw Blades to Metal or Wood Truly Matters

    You know it the instant your saw starts fighting you—the job just got longer and rougher, and it’s not your hands or the tool that slipped. It’s the blade. One buzz too many through a corroded pipe, one shudder as teeth catch the wrong grain, and suddenly you’re stuck finessing every inch. Whether you’re breaking down a stack of pressure-treated studs in a muggy crawlspace or making a desperate, awkward cut through steel conduit by flashlight, the wrong blade turns a quick job into a slow grind—sometimes literally.

    That Moment You Realize the Blade Isn’t Right

    It’s never when you first pull the trigger—you always feel it a few seconds late. There’s a subtle drag, maybe less sawdust spraying, or you hear the saw bog down halfway through the cut. Sometimes it’s the smell—acrid, metallic, maybe a hint of burned wood or steel. Doesn’t matter if you’re sweating through demo by noon or swapping blades out of frustration at midnight; once you’re mid-cut, the blade you picked makes or breaks your momentum. And usually, when you realize you’ve picked wrong, it’s already cost you time and rhythm you won’t get back.

    The Difference You Can Feel (and Sometimes Regret)

    Metal and wood reciprocating saw blades don’t just look a little different—they work in completely different moods. Wood blades: Large, hooked teeth (6–10 TPI) blast through framing like there’s a deadline, huge chips flying. Metal blades: Finer, tightly packed teeth (14–24+ TPI), built to grind steadily through conduit or rebar, not splinters. The distinction isn’t just in TPI and steel grade—you can feel it with a finger: one set of teeth spikes, the other almost sandpaper-smooth.

    Get it wrong and you pay for it. Run a wood blade over pipe and you’ll stall, overheat, maybe even warp the blade in a few inches. Try pulling a metal blade through treated 2×4 and it smokes and squeals, burning both your patience and the wood itself. The telltale pile of chips versus fine metallic dust, a blue tint creeping toward the teeth after metal work, is all evidence of a blade that’s outmatched by the job—or a job outlasting your tools.

    What Really Happens on Real Jobsites

    Shop lights are rare. You’re cutting between joists overhead, or bracing yourself on muddy plywood to finish a cut in the rain before dark. Too often, you grab whatever blade’s already loaded, hoping for good enough—until you hit a hidden nail with a wood blade and turn sharp teeth to useless nubs in three seconds. Or force a slow-cutting steel blade through old pine, where it bind and scorches a ragged track instead of slicing clean.

    The cost is rarely just a ruined blade—it’s the lost flow, the extra grip strength needed when the saw kicks, and the fatigue as each mistake slows you down. When it happens, the whole pace of the job shifts. You start looking for spares, arguing with coworkers over the last decent blade, or end up carving lopsided edges just to get through and move on. No schedule or battery lasts through a fight with the wrong blade.

    Learning Blade Selection the Hard Way

    It took too many stalls, burnt blades, and aching wrists before I started matching blade and job with more discipline. A few habits that finally stuck:

    • When ripping out framing or demoing lumber: Reach for a 6–8 TPI wood blade. It pulls itself straight through beams and wall studs without bogging down, keeping you in control, especially on awkward overhead cuts.
    • For conduit, light steel, or EMT: Go with a bi-metal blade, 14–18 TPI. The finer teeth cut cleanly, with less edge flaring and fewer sparks, instead of chewing the metal apart and burning out after a few holes.

    One lesson I learned the expensive way: Never start a tricky cut with the saw at full speed, especially in metal. Squeeze the trigger slow and let the teeth grab before ramping up. It feels slower, but saves blades—and your grip—from sudden stalling and violent rebounds. Rushing at top speed (2200–3000 strokes per minute) just cooks the blade in seconds. That’s not a theory—I’ve trashed brand new blades in a single cut, all because impatience got the better of me.

    “Universal” Blades Always Underperform When It Counts

    No one wants to haul two dozen blades across a jobsite. Universal blades sound great—one version for wood and metal—but in real work, they’re always the compromise. You get splintered, slow cuts in wood and dull, dragging performance in steel. You end up tired and frustrated and the blades don’t last half as long. There’s no shortcut: the right blade for each task is worth the switch—even if you end up juggling blades with gloved hands in the dark.

    Blade Wear: Catch It Before It Trashes the Work

    Sometimes a bend or missing tooth is obvious. More often, it’s a creeping increase in vibration or the saw grabbing at the start of every stroke. A blade that heats fast or takes on a bluish tint after steel work is warning you the edge is mostly gone. Ignore those hints, and you’ll waste more time straightening out crooked, scorched cuts than you did saving money on blades. Swapping a blade early beats fighting a tool that’s working against you for the rest of the day.

    Fast Blade Picks for the Most Common Cuts

    • Steel or conduit up to 1/4″: A 14–18 TPI metal blade cuts with control and endurance. Ideal for EMT and thicker pipes where you need smooth progression, not stalling or sparking halfway through.
    • Thin-gauge metals: If there’s any chatter, a 24 TPI or finer blade will glide instead of bind, making sheet metal less of a headache.
    • Lumber, fast demo, or decking: A 6–10 TPI wood blade keeps the tool moving fast and straight, so you end up with clean cuts and less wear on your arms.

    Small Habit, Big Difference

    Too many people treat blade choice as an afterthought, something you sort out when things start going wrong. But every pro knows: choose right, and you get smoother cuts, less stalling, and fewer battery swaps, especially late in the day when everyone’s tired. Five minutes spent checking blades and matching TPI, a quick touch to test those teeth, and you’re less likely to fight through another afternoon of avoidable rework.

    It won’t make you invincible, but it does keep the work moving—and that always matters more than theory or specs. If you’re counting on your saw for rough cuts and clean results, the right blade is what makes the difference between going home with energy… or frustration.

    Find blades made for your kind of work—and gear built to keep up—at Gumboll.

  • How Adjusting Saw Speed Quietly Transformed My Demo Work

    Demolition in cramped quarters is a test of both nerve and muscle. One minute you’re wedged inside a closet, drywall dust settling in your hair, arm jammed against a stud, saw thrumming so close to your chest you can feel each vibration through your ribs. In tight, awkward spots, the saw’s shudder isn’t just uncomfortable—it’s the difference between making a clean cut or ending up with burning forearms, bent blades, and extra repair work before you can even think about moving on.

    Why Saw Vibration Stops Work When You Least Expect It

    If you’ve ever tried to maneuver a reciprocating saw while half-crawled behind a water heater, you know the stakes: high vibration strips away precision and energy, second by second. The whole tool can rattle loose in your hand just when you need a controlled finish. Bracing for the next lurch as the blade binds or skitters, you’re not just fighting the material—you’re fighting the tool itself. There’s never enough elbow room. Pipes wait to get nicked, wires hang in the way, and all you feel is pressure to get out before anyone notices the delay.

    Vibration fades into the background on wide-open demo jobs. In the crawlspaces and closets, it’s the silent enemy that drains speed and control.

    The Fix Starts at the Trigger: Speed, Blade Choice, and Setup in Tight Spots

    Cranking up saw speed is the rookie mistake. Under pressure, the typical reflex is to max out strokes per minute. In reality, that’s a recipe for the saw to buck and chatter—burning out your grip and mangling the cut line. Dialing down to around 1,800 SPM, with orbital mode off or at its lowest, reduces the shockwaves and lets the blade eat steadily into the work.

    I used to rush, thinking speed was progress. But slowing things down let the blade seat into the cut—less bouncing, less wild arm fatigue. The less you chase the tool, the less likely you are to slip and need extra patching later.

    The 6 TPI Demolition Blade: Underrated for Keeping Cuts Clean (and Less Painful)

    Packages promise every blade is “demo-ready,” but that promise dissolves when you’re working overhead or saw-twisting through doubled-up studs. Higher TPI blades (the ones that buzz and scream) just skated over wood, especially with hidden nails. I switched to a 6 TPI demolition blade—chunkier teeth, thicker body. Combine that with a slower SPM, and the difference stood out fast. The blade chomped through framing without wandering, and the tool’s feedback evened out—less unpredictability, fewer missed cuts.

    On older hardwood, the cut tracked straight and finished fast. Softer sheet goods or underlayment still threw curveballs, sometimes bogging or shaking more than expected. Even with the right blade and speed, you end up reading each new material—there’s no one-setting-fits-all. Some pieces demand patience or a mid-job blade swap.

    Jobsite Reality: Vibration Surprises, Missed Cuts, and the Small Fixes That Help

    You don’t always get to practice changes in a calm moment—it’s when insulation’s falling in your face, or you’re jostling for space with another tradesperson who just started up the shop vac. Cut too quickly, and the saw shimmies off its line; squeeze the trigger too hard, and the blade jumps, slapping your wrist. Instinct wants to clamp down harder, but that just pumps the shakes deeper into your arm and forces you to waste time chasing accuracy.

    It’s not just about comfort—it’s about doing clean work, the first time. Forced corrections blow clouds of dust into your cut. Rough edges slow the project because you have to patch, sand, or explain to the next crew why the hole is too wide. Extra fatigue creeps in the longer you fight the tool, and the crew can read the struggle before you even look up.

    When “Slower” Actually Means Smoother, Faster, and Less Fatigue

    It took enough beat-up fingertips and stuttered cuts to learn: in cramped demolition, patience is the shortcut. Back off to 1,800 SPM, run a demo-grade blade, and you’ll get more control, less numbness, and almost no tangled-up mistakes. It’s not glamorous—cuts take a few seconds longer. But fewer jagged gouges and less do-over work add up. Sawing slower lets the teeth bite, the blade stops skating, and you end up with holes placed exactly where you want them, not where vibration pushes them.

    No setup’s perfect. Some awkward plates or old caked-on nails still bounce the tool, no matter how much you adjust. But the combination of right speed, sturdy blade, and a relaxed grip consistently trims back soreness and post-job fix-it lists.

    Hand Pressure: The Trick to Making the Saw Work, Not Fight

    I lost count of how often I tried to muscle my way past vibration—wrists locked, knuckles white, hands gassed after a few cuts. The real breakthrough came from a steady, neutral grip—just enough to guide, never to strangle. When you let the tool ride, keep the shoe firm against the surface, and avoid gripping like you’re wringing out a rag, the wobbles fade. That stable shoe contact matters more than squeezing harder. Over-gripping just makes you lose finesse, and it amplifies every jump.

    Adapting in Real Time: Materials Change, Techniques Adjust

    Vibration control isn’t some fixed checklist you check off with every project. Sometimes, you hit a run of joists that cut smoothly—until you find a patch of layered plywood that bounces every tooth. That’s when you adjust without thinking: lighten up, change angle, clear out packed sawdust, or pause to swap a dull blade. The best routines aren’t fancy: quick brushes to keep the shoe clean, checking tightness before tough cuts, and swapping in a sharper blade a little sooner than your old habits suggest.

    These small habits save your hands—and your workflow. Less downtime, more accuracy, and a lot less of that feeling where every bone in your hand aches by lunch.

    Lessons That Stick: How Smart Adjustments Keep Tools Working with You

    There’s no secret setting that erases all vibration or makes tight demolition effortless. But tuning your speed, swapping the blade for the job, and paying attention to how the tool “feels” are real advantages—especially when inches matter.

    If you feel the saw drifting, or the vibration ramps up, that’s your signal to adjust—don’t just power through it. Most improvement happens by reading your own fatigue, re-gripping, slowing down, or pausing to check a blade. You finish smarter, not more tired, and the jobsite sees less wasted motion and cleaner results.

    On your next tight patch or awkward demo, try this: start slow, set up with the right blade, and let the tool’s feedback guide you. You’ll feel the difference—in your arms, and in the finished cut.

    http://gumboll.myshopify.com

  • Why Resetting Your Nailer’s Air Pressure Changes Everything

    The sharp kick of a compressor firing up isn’t just background noise—it’s a signal that the real work is about to start. Whether you’re gunning baseboards in a tight hallway or piecing together crown molding at the top of a shaky ladder, every trade person knows: your setup is the difference between a day that flows and a day you spend fighting your own tools.

    When Nailer Depth Throws You Off

    The routine starts smooth—a fresh box of nails, regulator needle steady at 100 PSI. Then you sink the first finish nail and—of course—the head stands proud, snagging your fingertip as you sweep the board. Next shot buries itself deep, a crescent divot in the trim you’ll be patching later. That’s the reality: even after years with the same trim nailer, depth inconsistencies pop up and break your workflow.

    The manuals say, “Keep pressure between 70–120 PSI.” But jobs aren’t static. You switch from MDF to maple, swap out 1 1/4” nails for 2-inchers, or walk your compressor into a colder room—what held steady an hour ago is suddenly unpredictable. The regulator doesn’t warn you about a swollen hose or a bit of grit in the nose, and it definitely won’t fix a nailer that’s due for a cleaning.

    When the Regulator Lies and the Work Shows It

    Maybe you’ve done the side-by-side test: two nailers, both at 100 PSI, on the same chunk of trim. One drives flush, the other leaves the head exposed. A hidden air leak? Gummy piston return? Sometimes it’s as simple as a sticky trigger or old oil thickening in cold air. The result doesn’t show up on the dial—it shows up in your finish work, every time you have to stop and patch a mistake.

    It’s mechanical small talk. Worn seals, aging springs, compressor thumps echoing on cold mornings—you’re always chasing some variable. Even with all the dials in the “green zone,” you get streaks of nails needing a re-do. It’s the jobsite reality: there’s no set-and-forget, not if you care about finish quality and keeping your pace steady.

    Switching Materials: The Job Changes Under Your Hands

    If you’ve ever watched a nailer skate flawlessly into pine, only to split the fibers on poplar or sink invisibly into MDF, you’ll know: the board itself rewrites the rules. Nail heads start riding high, marring visible seams, or dive too deep and threaten the joint’s hold. And it’s not just woods—angled cuts, overhead shots, or switching from 18-gauge to 16-gauge fasteners all add friction.

    This is the point where confidence tilts toward caution. No experienced crew just trusts yesterday’s setup. Adjustments become ritual: slight tweaks to pressure, swapping out punchy batteries, testing bits or blades after a few runs—each variable gets its moment in the spotlight. The faster you can pivot, check, and re-tune, the less you end up chasing lost time or ugly surprises.

    Forget Memory—Build a Reset Habit

    It’s easy to go by feel, glancing at the regulator and trusting your rhythm—but that’s where most trip-ups happen. Maybe you’re moving fast on a high bid and decide not to bleed air when something feels off, promising yourself you’ll “deal with it after this run.” That shortcut almost always costs you more: the nailhead that won’t sink, or worse, a board ruined by a blow-through.

    Start at 90 PSI for most finish work in pine or basic MDF—yes. But as soon as you change materials, switch up fastener size, or relocate gear, you need to reset. Grab scrap, pop a few test nails, actually check the result. On dense hardwoods or thicker boards, count on needing extra tweaks mid-batch. These aren’t wasted seconds—they’re how experienced crews make up the difference between constant fixes and clean, continuous progress.

    Tip: New Batch, Fresh Setup

    Whenever something changes—the wood type, the weather, the tool—take a brief pause. Shoot test nails into off-cuts. Feel for that perfect head: sitting just under the surface, no filler needed. Those five seconds head-off much bigger problems: split trim, ugly shiners, endless sanding later.

    Beyond PSI: The Ghosts in the System

    Pressure alone can’t explain every problem. A dry driver blade, uneven lube on slides, or debris jamming the magazine can play havoc, sometimes more than a pressure dip. Swapping out blades, topping off oil, or actually cleaning a gunked-up mechanism does more for precision than ratcheting up PSI ever will.

    And don’t forget the jobsite itself. Morning humidity, extension cords dragging power down, hoses snaking across rubble—all introduce variables that undermine the most careful prep. Light at a bad angle hides proud nail heads until too late. Always test in the actual light where you’ll be working. Trust your eyes and hands, not just numbers on a gauge.

    Habits That Kill Surprises (and Saves Your Day)

    After a while, muscle memory alone won’t cover you—the pros separate themselves by having tight, repeatable routines. Checking pressure every batch. Test-driving a fresh battery or new bit before an important cut. Running sandpaper over a blade to clear pitch before starting a run. It’s a string of small checks—less glamorous than speed but far more likely to keep your work trouble-free.

    Every workday has its curveballs: hoses that snag on debris, fasteners that seem just a hair different from last week’s, boards that don’t cooperate. Learning to expect those quirks and pause for an extra check is what keeps your jobsites humming. These aren’t time drains—they’re the habits that separate “good enough” from sharp, clean results you can walk away from proud.

    In the end, the gauge is only advice. Every nailer acts a little different, every batch of trim comes with its own attitude. Trust what you see, what you feel in each strike—reset, recheck, and let your rhythm be shaped by the small deliberate habits that actually keep things moving.

    Find practical, work-ready tools and accessories at Gumboll.

  • Why Do Nails Bend When Working with Hardwood? Insights Revealed

    The clang of a nail skipping off stubborn hickory lingers long after the shop goes quiet. That sharp ring marks the line between a routine install and a job that suddenly demands more sweat, more patience, and more skill. You’re halfway through a stringer or casing, sunlight glinting off nail heads—some set perfect, others cockeyed, standing proud. With pine or fir, the work moves smooth: the tool hums, fasteners sink with a satisfying tap, and you barely think about the next step. But the minute you’re handed maple, oak, or hickory, the tempo changes. Nails bend, the drive grows tense, and you’re reminded—one slip in hardwood and the board calls the shots.

    Hardwood Hits Back—And Never Softly

    Every hardwood board carries its own resistance. That prized density—the reason a maple tread holds up for years—is the same quality that forces your fasteners to fight for every millimeter. Drive a nail or brad and you can feel the grain pushing back: knots redirect your aim, fibers refuse to part, and that finish nail you sent flying into pine now shudders and twists instead.

    Skip the pilot hole to save a minute, and hardwood will punish the shortcut. Even an air nailer at full tilt can’t always muscle past the microscopic barricades. Whether you’re swinging a hammer or squeezing a trigger, you learn quick—hurrying the setup in hardwood just invites headaches and scavenger hunts for pliers to yank out bent shanks.

    Pine Feels Like Cheating—Maple Demands Respect

    Pine trim spoils you. It takes nails with an easy generosity, swallowing shanks with barely a hiccup. Maple or hickory, though, let you know with each drive where you slipped. The feedback comes fast: your wrist absorbs the resistance, the nail may decide to wander, and sometimes the board shrugs everything off—except the twisted evidence left behind.

    The trouble isn’t your grip, your aim, or the brand of tool. It’s the material putting up a fight, mid-board, that turns any shortcut into extra work. Each mistake, from a split to a proud nail head, is a lesson issued by grain that you don’t see until the job slows—or breaks altogether.

    Every Snap or Bend Tells You: Speed Isn’t Always Your Friend

    Picture the push to finish oak treads before a lunch deadline. The compressor kicks in, fresh nails snap into the magazine, and the first runs look golden. Then—thunk—the tool jumps, the next nail drives sideways, and your pace drops as you fuss with prying out the mess. The board takes another scar, and the punchlist just got longer.

    This is the job site tension: shave steps and you spend them again fixing bent fasteners, sanded splinters, or ragged holes. The margin for error is razor-thin. Real productivity isn’t speed, it’s a rhythm built from respect for stubborn wood. If you gamble on “just one more drive without a pilot,” you’re often trading minutes saved for the next hour lost.

    Pilot Holes: A Five-Second Fix for a Forty-Minute Headache

    After you’ve burned time on bent screws or half-set nails, you start reaching for the drill. With anything harder than pine, pre-drilling is just cost of entry—especially on longer nails or finish pieces that need to look right the first time. Most find the sweet spot with a 1/16” bit—small enough to leave grip, big enough to guide the shank.

    The payoff? Less splintering on delicate trim, fewer nails ruined and wasted, and arms that aren’t throbbing from counteracting that constant jolt. Armor-plated grain is less likely to twist your work. The workflow slows just a hair, but now you’re working, not wrestling. Higher PSI settings or fancier nailers might sell confidence, but nothing replaces clearing the way before you start driving hard into dense wood.

    Why Force Fails—And What Finishing Pros Actually Do

    Maxing out tool pressure can fool you into believing it will bulldoze through hardwood. But if the fastener isn’t up to the job, all the power does is turn a straight drive into a torqued nightmare—or worse, it splits the board you just spent all morning cutting. More speed gives you a faster mistake.

    The real solution is knowing when to back off and adjust. Match each technique to what’s under your hands: a lighter squeeze at the tool, a bit of angle to follow the fiber, a moment to make sure the grain won’t catch you out. It’s patience and precision—instead of trying to overpower something that outlasts every shortcut.

    Reluctant Boards Make Reliable Carpenters

    Work with enough hardwood and you develop a bag of anti-bend rituals. Every finish nailer or pack of brads still asks for the same basics: pilot holes drilled, grain checked, and corners respected. The temptation to skip “just this once” is strong—but stubborn maple or heavy oak never lets you forget a misstep. Each finished job free of mangled shanks becomes proof that slowing down, just a little, pays off in the end.

    The real difference shows up at clean-up: less rework, fewer coins spent on replacement trim, and the steady confidence—board after board—that you can rely on your results, not luck.

    Bench Tips That Actually Save a Job

    It’s no accident seasoned crews keep a fresh 1/16” bit close at hand. Nobody glamorizes pilot holes at the pub, but they’re what separate a day of cursing from a day that ends with a flush-set final board. If the hardwood starts heating up your bit faster than pine ever does, swap it out—dull bits invite burn, smoke, and split ends just as much as brute force does.

    When fastening at the edge or near end grain, tilt that nail so it rides a little more parallel to the fibers. Even tiny shifts in angle can keep a split from running or a head from popping. These aren’t hacks—they’re just the practical choices borne of too many emergencies with pry bars and patch filler.

    Hardwood Remembers Every Shortcut You Take

    Finishing work in hardwood is a test of discipline, not just your tool budget. Every skipped pilot hole, every impatient drive, every angle overlooked—hard maple or solid oak keeps score in splinters, splits, and that unmistakable, metallic ring of a nail gone wrong. Over time, you develop a routine with built-in respect for the material: slower, steadier, but cleaner and with far fewer fixes once you’re done.

    Browse job-ready tools and fastening gear at Gumboll