Category: Uncategorized

  • Why Anchoring Lighting Fixtures to Studs Ensures Long-Lasting Stability

    The right-looking ceiling light can become the wrong light as soon as daily life starts pushing back. You screw a flush mount into drywall, check the symmetry, and call the job done. But after a week of closing doors, steamy showers, or even carrying laundry past, the fixture begins to loosen or drift off-center. Suddenly, that “finished” lighting throws uneven shadows, casts glare at the mirror’s edge, and leaves parts of a room feeling half-lit. The disappointment isn’t dramatic—just the slow build of crooked lines, creeping glare, and the sense that bad lighting is quietly reshaping how you move or see, especially where visibility matters.

    When a Lighting Shortcut Starts to Show

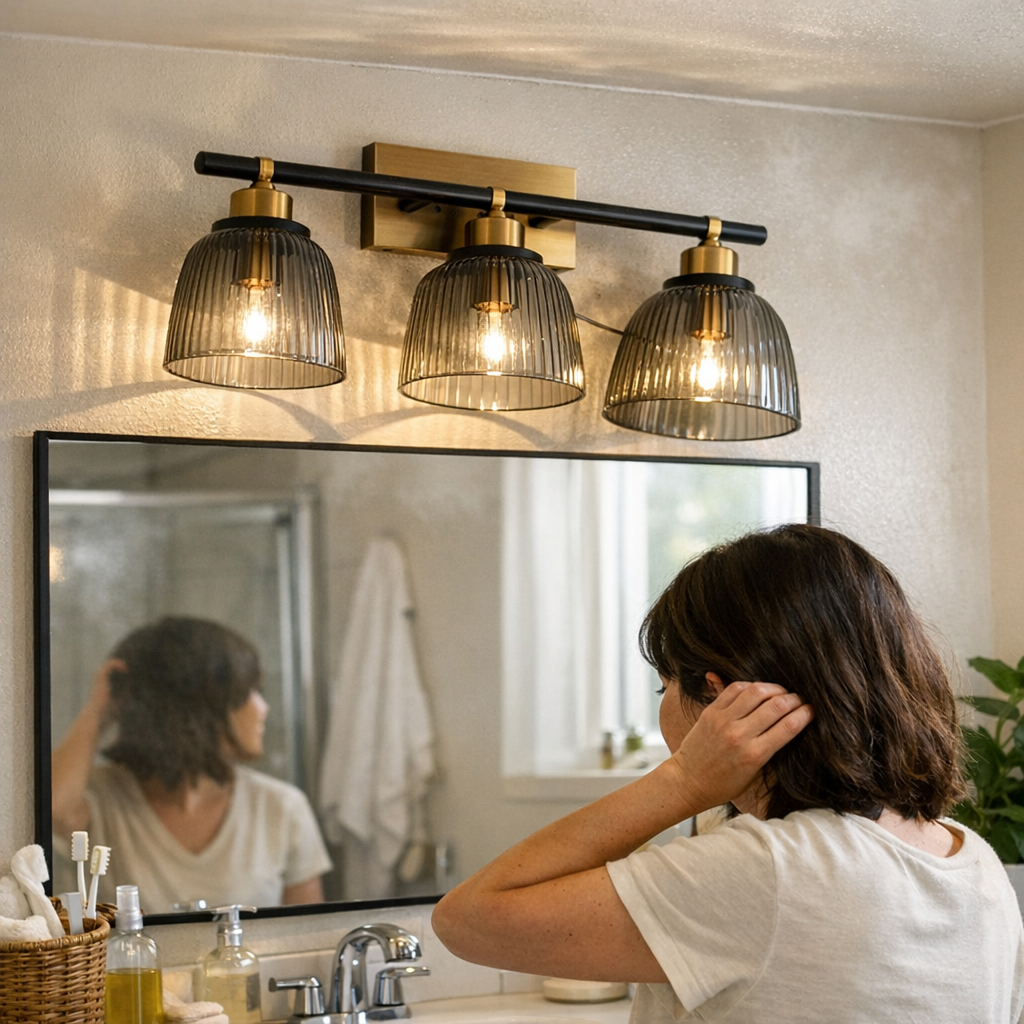
    Problems announce themselves quietly: a hallway ceiling light rocks as you pass, or the brightest bulb in a vanity sconce edges away from your face, lighting the towel rack instead. You recognize it during routines: squinting at the bathroom mirror, nudging a fixture every time it slips, twisting at the kitchen counter to keep clear of a shadow that didn’t exist when the light was first installed.

    Living with lighting exposes every shortcut. Hanging straight on drywall, a fixture stays put for a few days but rarely longer—especially in places with steam, cleaning, or moving air. In bathrooms, one shower and the screws start dropping grip. In hallways, vibration from door after door, even normal foot traffic, quietly nudges mounts loose. What you first notice as a small lean quickly becomes a daily nudge and then a routine annoyance, changing how you use the room without ever making a noise.

    Room Brightness Isn’t Enough: The Trouble with Drywall Mounting

    It’s easy to mistake a freshly installed light for a well-chosen one—the room looks bright and the symmetry is satisfying on day one. But the gap between “looks finished” and “works every day” widens every time the room actually gets used. When a fixture is attached only to drywall, gravity and activity win: the fixture bends, pivots, or sags, even a few degrees, just enough to change where shadows gather or how glare bites in.

    Daily proof comes from movement, steam, and time. Steam works behind a barely anchored bathroom sconce, and before long, one side sinks lower, kicking out uneven shadows. In narrow corridors, a semi-flush wobbles with foot traffic, until the spread of light slips off center and a dull side appears along the wall. Even swapping a bulb puts extra strain on loose anchors, leaving a fixture permanently tilted or off-aim.

    Stand at the mirror first thing in the morning: if the fixture isn’t solidly into a stud, light might shift just enough to throw your reflection off-balance or leave one side in gloom. Over time, you stop trusting the light and start working around it—leaning outside the glare, raising your chin, squinting sideways, and forgetting what “good lighting” should feel like.

    Everyday Lighting Friction: How the Small Shifts Add Up

    Every flush mount ceiling light installed on plain drywall becomes a suspect for small, cumulative trouble. Several hand washes or a slam of the door and the base inches sideways, pouring shadows under the mirror or casting a jagged line over the sink. A hallway fixture drifts, and you find one stair noticeably darker or a landing uncomfortably lopsided.

    The irritation is physical and daily. Walk the dimmer edge of a corridor and unconsciously hug the lit side. Catch your silhouette fractured against the bathroom wall, shifting for a better angle. Grip a mirror sconce not for support, but just to keep it straight—and realize how routine maintenance, like changing a bulb, feels like a risk to its alignment. These are not rare failures, but steady reminders that the shortcut is winning.

    The worst part isn’t even the flaw itself, but the repeat fix: tilting a fixture back, tightening the screws every month, or hoping one more drywall anchor will last. Every adjustment is a minute lost—and a compromise on the actual purpose of lighting: clarity, ease, and safety in your own space.

    The Quiet Power of the Stud Finder

    Stud marking isn’t overkill; it’s the difference between persistent frustration and invisible reliability. The real improvement often comes not from a new light, but from using a stud finder first. Tapping into a real wood backing—with a bathroom sconce, flush mount ceiling light, or linear wall unit—means the fixture doesn’t care about steamy air, shuddering doors, or aggressive cleaning. Even if it lands an inch off the wall center, the tradeoff is years of ignored maintenance and a room that works as intended each time you turn on the switch.

    If you’ve ever pressed your head closer for better vanity lighting, dodged a bright spot in a hallway, or steadied a loose sconce, you already know: anchoring to real structure makes the light vanish as a source of trouble. Suddenly, you stop noticing your fixture and just see, move, clean, and work—without the small, steady interruptions of light shifting, shadow creeping, or the constant fear of something coming loose.

    Where to Prioritize Structural Anchoring

    Not every fixture demands a stud, but certain spaces absolutely do. Focus stud anchoring on:

    • Bathrooms and utility areas: High moisture plus frequent contact creates constant stress on lighting mounts. Ceiling and wall lights here need the reinforcement.
    • Hallways and stairs: Repeated foot traffic, doors, and even the tremor of a carried load mean any fixture should stay level—never wobbling as movement flows past or up a landing.
    • Mirror and vanity zones: Light shape and stability matter every day; a loose sconce or mis-aimed panel defeats the point of clarity.
    • Work surfaces and under-cabinet runs: Task lights that shift or tilt bleed shadows onto what should be the brightest, most usable spot in the room.

    Lightweight wall fixtures or decorative sconces that never get touched may live with drywall anchors. But high-moisture, high-movement, or high-precision zones will keep exposing drywall shortcuts. Stud-mounting fixes the root—not just the wobble.

    One Fix Changes Everyday Use

    Lighting fixed to real structure disappears from your mental to-do list. The results aren’t flashy—just everyday clarity. Corridor lights stay put, even with a rush of footsteps. Bathroom vanities keep your face lit evenly, day in, day out, with no new shadows crawling over the sink edge. Over weeks and months, you stop noticing your fixtures entirely—right until you cross into a room with the old shortcut and the same old frustrations return.

    When lights are anchored past the drywall, visibility stays even, glare doesn’t sneak in, and routine cleaning no longer threatens to tilt your setup out of alignment. Your home becomes easier to move through, with every task completed without interruption from wandering shadows or loose fixtures.

    Find practical indoor lighting, built for repeated routines and real fixes, at LightHelper.

  • Wall-Mounted Rails Transform Narrow Hallways by Clearing Floor Space

    Every narrow hallway runs on a timer: by Friday, the path that felt wide and managed on Monday has shrunk to a squeezed, obstacle course. Shoes multiply, bags drift off course, and that “place for everything” dissolves into basket bulge, sneaker spillover, and jackets slouched where no one planned. The routine shifts from simply moving through the door to dodging clutter, negotiating corners, and bracing for one more drop in the wrong spot. What starts as order—bench, baskets, shoe rack—turns into a routine bottleneck, slowing everyone just when things need to move fast. This is the entryway problem that doesn’t fade with better intentions: it repeats every week, unless the way you structure the space actually changes the flow.

    The Problem with Floor-Based Storage in Real Use

    Floor storage feels like a fix: line up a bench, tuck in shoe racks, and stack baskets along the wall, and day one looks controlled. But repeated use breaks that surface order. Each day brings another bag that’s not aligned, another pair of shoes wedged at an angle for convenience—soon the “clear line” becomes a diagonal of tripping hazards. By midweek, passing through means sidestepping not just stuff but frustration. Design doesn’t matter if what’s tidy in theory becomes a reset chore every evening.

    When “Just for Now” Blocks the Door

    Picture this: someone drops a backpack just off its label—the “I’ll move it later” moment. It sits. Next day, a new drop lands alongside. Shoes that started paired migrate and spread; a single bag triggers two more. The walking lane that once seemed solid gradually closes in, each pass more awkward. This is the real cost: small deviations turn a functional entry into a pressure zone where every shortcut becomes the new rule.

    Benches and Bins—Overflow in Disguise

    Entryway benches promise order—sit here, stash there, store out of sight. But during real-life rush, the bench edge becomes the drop spot for whatever doesn’t fit: lunch boxes by evening, hats, then mail, then stray crucial items. Bins and baskets edge outward as more is squeezed in, making it harder to keep anything truly contained. What looked like storage ends up as overflow staging, pulling your routine off balance and swallowing the hallway’s walking edge.

    Wall-Mounted Rails: Moving Storage Up, Clearing the Floor

    Wall rails change the logic of the entryway by lifting the clutter off the walking path. Hooks, ledges, and rails move daily storage vertical, immediately restoring floor space. What used to be a tangle at your feet becomes a visible order line: the lowest third of your hall or entry stays clear, so speed and movement come back to the zone that’s supposed to help you get out the door.

    How Rails Police the Drop Zone

    The effect becomes obvious after a single week. Every item above the “rail line”—coats, backpacks, bags—must claim its hook. Shoes move from scattered rows to one managed ledge or mat, so any overflow signals a problem instantly. The split is uncompromising: if something is on the floor, it’s out of place—no slow build-up, no mystery pileups. What can’t be hung reveals itself, making clean-up obvious and new clutter harder to ignore.

    The Real Test: Use Patterns That Stick (or Slip)

    But rails only succeed if habits cooperate. If you overload hooks or let overflow slide onto the floor, you’re back at square one: vertical storage doesn’t block “just drop it” impulses if there’s nowhere left to hang. The right match—a rail system sized for the zone and daily load—makes routines stick. When it works, the space feels balanced: people move through without bumping shoes aside or restaging baskets, and quick tidy-ups are enough to keep resets below ‘project’ level.

    Everyday Scenes—Setup Influences Movement

    On a hectic weekday morning: three people reach for what they need, every second matters, and the old bench-and-bin setup triggers a traffic jam—bags on the floor, shoes blocking the door, that backpack in the center just as someone steps through. With rails, bags hang in the clear, above foot level; shoes stay corralled to their zone instead of trailing everywhere. Those saved moments of not dodging piles or stepping on laces don’t stand out at first, but week after week, the entry feels less stressful, less like a recurring reset challenge.

    Small Resets That Don’t Spiral

    Adding a wall rail and a slim shoe ledge changed everything. Instead of reorganizing toppled baskets or shoving shoe piles back every night, the “reset” shrunk to a few seconds: line up shoes, check all bags on hooks, move anything left behind. Because the shoe ledge limits what fits, the overflow isn’t invisible—it forces a decision, or the extra pair goes elsewhere. These boundaries make the zone hold its shape longer, so even on high-traffic weeks, the hallway doesn’t default to chaos.

    Where Rails Hit Their Limits

    Still, no system is magic. Rails that are hung too high for kids or too cramped near corners push clutter right back to the ground. If the only storage is above natural reach or adds steps (like unlocking cabinets every time), users adapt by taking the fastest route—dumping gear on the floor where it instantly restarts the cycle. Layout mistakes get exposed fast because in transition spaces, what isn’t easy gets ignored.

    Optimal Height and Flow: Entryways Are Not One-Size

    The right height is non-negotiable. For adults, shoulder-level rails (typically 140–160 cm) balance reach with storage height—keeping coats and daily bags up, but always at hand. Adding a lower rail gives kids their own reach zone, removing “I can’t reach” as an excuse for floor drops. The threshold path is now mapped out for all users, reducing pileup by design rather than routine reminders.

    Pair that with a narrow, honest-capacity ledge: if only three pairs of shoes fit, the edge is enforced. Instead of pretending the area can handle overflow, the setup draws a hard line—extra goes elsewhere, or the overflow signals immediately. This is how small entryways defend against sprawl that starts quietly and becomes chronic by Friday.

    What Actually Changes: Movement, Reset, and Clutter Drift

    The goal isn’t a catalog-perfect foyer—it’s an entry that absorbs real traffic without falling apart by Tuesday. Floor setups always break down as habits pile up; wall rails and shoe ledges keep the route open, the drops visible, and the clean-up tenable. The payoff is less friction: you move through without pausing to triage baskets or carve a path past the shoes—a reset feels baked into the flow, not like one more neglected to-do.

    Stress-Test Your Setup: Imagine Next Friday

    Before calling a drop zone “fixed,” picture the space a week after real use: shoes kept to the ledge, or oozing into the walking strip? Bags clipped safely on hooks, or slumping back into the corner for someone to trip on? The right entryway setup doesn’t just tidy up once—it resists the daily drift and still works when no one’s paying extra attention.

    http://www.betweenry.myshopify.com

  • Why Shallow Pantry Shelves Improve Daily Kitchen Efficiency and Reduce Waste

    Open most pantries and the problem shows itself right away: a front row of picked-over boxes, a rear line-up of cans fading from memory, and that persistent stretch—reaching past what’s in the way, digging for what you thought was right there. Each mealtime run turns into a shuffle of shifting stacks, blocked labels, and small spills on the edge. If you’ve ever wondered why an organized pantry still never stays that way, the issue isn’t always space—often, it’s the shape and depth of what you’re working with, and how quickly hidden storage becomes broken storage in daily life.

    When “Maximizing Space” Backfires in Real Life

    Piling items in deep rows looks organized on day one, but real use exposes its cost. Deep stacking creates a wall: cereal boxes pack in front of canned goods, snack bags layer behind rice, and what’s tucked furthest back might as well be gone. Every attempt to grab a can or check inventory means sliding, rearranging, or unloading half a shelf. Over time, this isn’t minor—foundation categories blur, expired food gathers unnoticed, and the sense of control vanishes a little more every week the cycle repeats.

    The core friction: deep stacking trades initial order for constant work. Every pull shifts something else out of place, and “making room” once leads to overflowing rows that only get less functional. Even the most careful restocker faces growing delays and micro-chaos in the process: the more you try to fit, the more often you’re forced to reset.

    Inside the Cycle: What Deep Stacking Feels Like in Routine Use

    Routine exposes the cracks fast. On a busy morning, searching for oatmeal becomes a two-handed task—one to hold back slumping cans, the other navigating a blockade of packaging. Labels get blocked, items tip, and the “just put it back where you got it” rule collapses as everyone returns things wherever there’s space. The front layer drains, the back collects dust, and the shelf edge becomes a drop zone for anything that won’t fit the old system. Each retrieval means at least two moves. Each return, a new layer of disorder.

    By Friday, a supposedly orderly shelf has orphaned snacks marooned behind dinner supplies, boxes wedged in unreachable corners, and crumbs from opened bags leaking through gaps. What started as a simple storage fix has become mess you have to dig out from every Sunday—a full reset that would have been avoidable if the shelf had actually matched the way you use the space.

    Living With Overflow: Where Deep Stacking Sneaks In

    Overflow rarely announces itself. A shelf that looked “maximized” slowly collects backup items: a jar slipped behind pasta, new cereal stashed behind the snacks, an extra sauce container wedged out of view. Different hands put things wherever they find space, mixing up categories—spices edge into snack territory, pantry backups swim into daily-use lanes. The line between routine essentials and “backup stock” fades away—and once return flow weakens, clear zones disappear.

    What Changes With Shallow, Single-Depth Storage?

    Shifting to shallower, single-depth storage flips the script. Every item is now visible—nothing buried, no second-guessing what’s left. Instead of digging past three layers, you see it all at a glance and return everything to its rightful spot without contorting the lineup. Horizontal dividers or clear bins enforce order: categories don’t spill together, and backup stock lives in its own utility zone, not wedged behind daily essentials. After regular use, all it takes to reset is a quick realignment—no emptying the entire shelf just to rescue lost items.

    The payoff is constant, not just in looks but in how the system stands up to pressure: out-of-place items get caught right away, not weeks later. Restocks are intentional, not desperate. And instead of hiding overflow behind visible order, you channel extra inventory to a clear, secondary shelf rather than sacrificing retrieval speed or mixing up routines on the main shelf.

    More Than Pantries: Deep Stacking’s Trap in Other Zones

    Layered stacking isn’t just a pantry problem. Under the sink, in bathroom cabinets, linen closets, or bedroom drawers, the pattern repeats. The stuff you use every day blocks easier access: toothpaste tubes stuck behind surplus, bins buried behind bins, shoes double-parked in a floor rack where only the front pair ever rotates. Fast returns vanish, slow resets become standard, and every openable space gathers clutter along the walls and back corners. A layout that looks sorted on install doesn’t stand up when used in real cycles.

    Recognizing the Slow Friction of Everyday Access

    The daily grind of clumsy retrievals and awkward returns quietly erodes any sense of system. Need socks from a closet bin? You might have to pull it out, tip it, sometimes re-sort what tumbles loose. One pot means moving three. “Quick access” fades into hesitation—with every extra step, the invisibility of “stored” items turns into wasted time and mental energy. The test isn’t whether the space looked good after setup—it’s whether the place actually helps you keep up, week after week, without a constant parade of resets.

    Tips That Actually Help: Small Shifts, Real Difference

    Small, specific changes deliver surprisingly persistent order. A single-depth shelf for daily-use, a clear bin for fast sorting, a backup spot for overflow—these details mean every item is one move away, not a puzzle of sliding and restacking. Always keep the main shelf for weekly-cycle items; shift surplus to a dedicated overflow zone, whether it’s a higher shelf, a utility module, or a hidden base cabinet. Place labels forward and ask: can this be reached without displacing something else? That single filter signals whether your setup is serving you, or tripping you up.

    The Real Payoff: Shelves That Help, Not Hinder

    Real storage works quietly in the background, not by looking perfect for a photo, but by letting you move through routines without being slowed down. Single-depth shelves and clear containment may give up a few inches of raw volume, but return far more in visibility, speed, and less friction at every touchpoint. The reward: fewer missing items, stronger category boundaries, and a living space where returning something to its place takes seconds, not a pile-on or reset marathon.

    When storage setups trip up your daily flow—whether in pantries, closets, bathrooms, or anywhere items collect in layers—that’s the real signal to rethink not just how much space you have, but how you’re able to use it, every time you open a door or drawer.

    Find practical storage solutions at Gridry

  • How Smart Walkway Design Transforms Small Yard Storage Efficiency

    In a small yard, outdoor storage doesn’t just sit there—it quietly claims your route, squeezes your steps, and sets the rules for how you move. The “organizer” you picked for looks or capacity soon starts to redirect bikes, force sideways shuffles, and interrupt your flow in subtle ways. Real friction in tight outdoor spaces isn’t about how much stuff you can fit, but about how the setup actually collides with daily routine—when weather, chores, and family life keep cycling through.

    How Storage Layout Shapes Every Step

    Start with a side yard. It looks fine: bins lined against the fence, hooks spaced for each tool, nothing visibly crowded. But give it a week of use. A storage box nudges out just enough to knock your shin. Someone hangs the rake so it sticks into the walkway—“just for now.” By Thursday, your simple pass-through feels like navigating a slowly tightening maze.

    The path shrinks without warning. Every time you grab a shovel or return a ball, you compensate—sidestepping that barely-there corner, pivoting extra to miss a bin lid, brushing sleeves on hooks meant for “convenience.” The space that looked organized Monday now drags on your patience by Friday. One lunch hour you’re wedging a garden cart through a spot that “should have fit,” realizing the layout only works when no one actually uses it.

    The Compound Effect of Imperfect Layouts

    Small yards punish loose planning fast. What starts as a tidy arrangement—deck bins hugging the fence, wall racks eating up air—quickly reveals its blind spots:

    • Bins without a hard edge creep, sometimes quarter-inch by quarter-inch, until you’re rerouting your walk.
    • Wall hooks designed for “maximum storage” become sleeve-catchers and hose tanglers the second routines heat up.
    • Deck boxes morph from seasonal neat-fix to daily drop zones. Last Tuesday’s “just for now” compost pail is now blocking your morning bike exit.

    Every inch gained is also an inch at risk. Small shifts—barely noticed during setup—amplify under real use. After a kids’ play session, bins overflow into foot traffic. Add weather, and now boots are drying where you used to walk. Suddenly, combining three purposes—tools, toys, sports gear—means you’re untangling a knot instead of moving on autopilot. The stress isn’t theoretical: it hits on real days, when someone’s late and the storage is in the way, not smoothening the rush.

    Real Scenes: When Layout Meets Lived Routine

    Returning One Thing—Blocking the Next

    You finish chores, dump muddy boots in the storage box by the gate. By the third rainy morning, they spill out past the edge, forcing you to angle around just to bring in groceries. What was organized yesterday is now a toe-stubber. Bikes and chairs layer on, and suddenly one quick drop-off causes a cascade—you move one thing just to put away another. Routine resets become sprawling, tedious instead of quick.

    The Sneaky Drift on the Fence Line

    Hooks along the fence look sharp after a thorough reset—tools spaced, everything flush. By the week’s end, pruning shears have slid over, a rake now pokes out several inches beyond its lane. It’s not more stuff, just Stretched spacing. Over time, you catch your sleeve or shorts on that “efficient” rack, irritation growing with every pass. The real loss isn’t capacity but a once-clear edge that now takes part of your route.

    Overflow and the Disappearing Pathway

    When a side yard doubles as tool storage, bike garage, and kid gear central, predictable routes dissolve fast. Bikes lean wherever the last person managed to squeeze them. Bags and boots sprawl outside bins. Suddenly, there’s only one awkward way through—or none at all on busy afternoons. The usual quick fixes just redistribute the overflow: you move the barrow to access the shovel, now the sports rack is blocked, and each “reset” looks more like shuffling deck chairs than restoring order. The space fights your routine instead of flowing with it.

    Why Small Yards Need Path-First Planning

    This isn’t about “perfect” storage. It’s about not having to solve a puzzle every single reset. The friction spikes not only when things get messy, but when:

    • Zones overlap—“bike space” covertly eats into where you need to walk, or tools encroach on gear storage.
    • Your return route forces you to shuffle, sidestep, or double-back, breaking any sense of rhythm.
    • What passes for “organization” after setup can’t withstand three real-life uses before paths get blocked.

    One game-changer: Declare hard visual boundaries—no-go lines for anything not in use. Use tape, a paver, a different color—anything to make it obvious when stuff is seeping where it shouldn’t. The simple act of enforcement makes daily resets almost thoughtless, pushing back against the slow crawl of “just for now” clutter before it turns into daily friction.

    Choosing Wall, Floor, or Both? Make Every Inch Earn Its Place

    Wall racks rescue square footage—right up until they stick out into the path or pull double-duty beyond their actual reach. Hooks for little-used tools work fine press-fit against the fence, but bulky items or frequently grabbed gear should never interrupt a walking line. Floor storage looks right in the empty yard but can’t spill past its footprint. Most small zones work best with a mix:

    • Reserve wall racks for slim, seldom-used items, mounted so snag risk stays zero.
    • Keep ground units only at high-use entry points or zones of constant exchange. If bins creep outward, reset—don’t just ignore.
    • Every couple of weeks, scan for slow drift or choke points. If you’re still detouring, your system isn’t working—tune the boundaries, not just the bins.

    These setups are never finished. Modular systems help only if the boundaries are maintained and floor space is more protected than filled. The magic isn’t in more storage—it comes from arranging what you need so nothing blocks the paths real people actually use, day after stubborn, weather-beaten day.

    Protect the Last 24 Inches—Or Lose the Yard

    If there’s a single after-the-fact test for small setups, it’s this: Can two people (plus a bike or wheelbarrow) move through cleanly with 24–30 inches of clear path? Give up that margin and the rest doesn’t matter; you’ll be resetting, shifting, and muttering at every turn. Let the walkway narrow “just a bit” and before long, even a perfectly modular system can’t save you from blocked movement and endless reset cycles. That last strip of pathway is your setup’s make-or-break edge—it decides whether the space actually works or just looks organized on a quiet day.

    More Workable, Not More Full: The Real Yard Metric

    Packing storage into a corner means little if each drop-off or pickup slows you down or forces you to resettle bins and hooks. The winning setups make themselves invisible during normal use—enough room to pass, nothing to step around, no recurring clutter. Every item returned should feel frictionless, not another reset-in-waiting. For small yards especially, “fitted” isn’t the finish line; “usable without thinking” is the gold standard. That’s when outdoor storage stops fighting your habits and quietly, finally, serves them.

    For more practical outdoor storage ideas and modular systems that fit real-world setups, visit TidyYard.

  • Why Clear Bin Placement Makes or Breaks Your Storage System

    Clear bins promise instant order—a shelf with easy visibility, every sweater and tool in its place. In reality? The illusion cracks fast. One week in, lids are askew, socks spill onto the shelf, and daily items wind up perched on top of containers, not inside them. The supposed shortcut to a smoother routine ends up slowing you down: each grab for a belt or battery means awkward bending, shifting, and re-stacking. Suddenly, the bins feel less like help and more like friction—just more steps between you and what you need.

    When Clear Turns Complicated: Where Bin Placement Fails

    The selling point of clear bins is obvious: spot what’s inside, skip the rummage, keep chaos contained. But for most closets and utility shelves, the issue isn’t the bin—it’s the way we wedge bins into our routines. What looks sorted after an afternoon of organizing rarely survives a week of fast mornings and distracted evenings.

    Think about grabbing socks before work. If that bin lives on the top shelf, stacked behind winter gloves, you’re forced into a daily dance: reach, drag a bin forward, lift a lid, catch a stray scarf—and mutter as another folded pile slumps sideways. The system asks too much. Those extra steps become the start of clutter: after the third morning you leave socks draped over the bin or dropped on an open surface “just for now.”

    Everyday Clues Your System Isn’t Working

    The warning signs arrive quickly. Bin edges sprout hangers and half-folded shirts. Chargers and keys pile up beside the containers you supposedly sorted them into. Entry tables that once looked minimal now collect mail, masks, and buttons, because reaching the “correct” bin takes too many moves. It’s not laziness—it’s a setup designed for the rare deep clean, not the daily grab-and-go.

    The Morning Stress Test

    Run through your own morning. You slide open the closet, aiming for a T-shirt, but the “daily” bin is half-buried. You hesitate, shuffle containers, maybe knock over a stack, and the rest accidentally lands on the floor. Or that laundry shelf: detergent ends up on top of bins marked for out-of-season hats just to save time. Quickly, order leaks—items migrate outside their bins, old piles mingle with new, shelf edges start to blur. That feeling of ‘almost organized’ is a sign the system isn’t matching your pace of use.

    Visible Is Not the Same as Reachable

    A bin that shows you its contents doesn’t guarantee effortless access. Set bins two deep or layer them in towers, and you’ve hardwired extra work into your routine. What should be a fast grab—a facecloth before a shower, a pair of gloves on a cold morning—becomes a shuffle: move a bin, pop a lid, then restore the stack, hoping the next person does the same. It’s all friction, disguised as transparency.

    Stacked bins are the true hidden culprit. They block your quickest moves. Any system that turns a two-second reach into a mini balancing act is destined for breakdown. Before long, “quick” retrieval means bypassing the bins entirely and letting clutter live in the open again.

    How “Organized” Storage Quietly Unravels

    • You stop using bins that require two hands, extra shifting, or bending.
    • Seasonal or backup items end up occupying the most convenient shelves, while daily basics drift to awkward corners.
    • Piles build on entry benches, closet floors, or counters—because putting things back is more work than getting them out in the first place.

    What you wanted was an effortless reset. What you get? More clutter migration—just neater, for a while.

    The Usual Trouble Zones: Not Just the Closet

    Bedroom closets aren’t the only casualties. Laundry rooms bog down when detergent or dryer sheets live under a heap of old linens. Entryways gather an explosion of hats and shoes when storage bins need to be shifted or re-labeled just to park a backpack. In bathrooms, the promise of a “clear, stackable system” fizzles every time dry towels get dumped onto the stacks instead of in them. Even organized garages lose the plot as bins of rarely-used holiday gear barricade tools you need every week.

    Rethink the Map: Store by Routine, Not Just by Label

    The real fix? Give priority placement to what you actually use daily. That bin for socks, daily skincare, or batteries? Move it to arm height or the front row—one motion, no stacking required. Push seasonal or rarely-used bins up high, down low, or all the way to the back, out of the traffic zone. The fewer the steps between you and what you need, the more the system holds up against real life.

    One Adjustment, Tangible Payoff

    You’ll notice the difference right away. Suddenly, things get put back where they belong because it’s just as easy as grabbing them out. The piles shrink. The reset time—those little clean-ups between commitments—drops way down. Instead of crumbling under daily use, your shelves start feeling steadier, cleaner, and more predictable.

    Pro tip: For shared spaces, label bins with both the contents and a quick-use tag—“Daily,” “Weekly,” “Seasonal.” It takes seconds, but quietly cues everyone in the house to return bins to their rightful place and to keep most-used bins front and center.

    Track the Sticking Points

    The longest-lasting systems aren’t the ones that look perfect after an hour of sorting—they’re designed around the real patterns you repeat, under real family (or roommate) pressure. After a week, scan your shelves. Where do you hesitate or skip a step? Which bins become satellite piles instead of staying in play? Those friction points are the ones crying out for a placement rethink.

    The best storage setups don’t demand constant willpower. They remove obstacles so it’s easier to keep order, even on autopilot.

    Less Rearranging, More Breathing Room

    Clear bins can work—if they actually serve the flow of your daily life. A shift of six inches, moving a frequently-grabbed bin to the edge, or outlawing any stacking in your “rush hour” zones can make all the difference. Instead of chasing a fantasy of picture-perfect shelves, anchor your system in how your routines really play out. When bins fit your true habits, you spend less time shuffling and more time moving through your space—without the undercurrent of “I’ll fix it later.”

    Shop practical storage solutions designed for real daily routines at ClosetWorks.

  • Choosing Ventilation Fans That Truly Handle Dust in Workspaces

    The real verdict on a workshop ventilation fan doesn’t arrive in the first quiet minutes—it hits once the saws, sanders, and drills have been running nonstop and you’re elbow-deep in dust, watching your cleanup window evaporate. Whether you’re running a router down edge profiles, grinding screw heads flush, or putting in hours cutting trim, you learn fast: not every fan with a promising spec sheet can keep up with actual shop conditions. That seemingly harmless cloud of airborne dust is not a minor detail—it’s the deciding factor for finish quality, tool performance, and, day after day, how much energy you have left when the job is finally done.

    When Dust Won’t Settle: The Trap of “Good Enough” Fans

    Imagine a real shop afternoon: you’ve just spent two hours smoothing MDF, the floor’s a web of sawdust under your miter saw, and tool trays start to look matte instead of clean. You vacuum. You wipe. You hit the fan. But a thin film keeps reappearing across your panel edges and even your drill case—settling onto surfaces you were sure you’d cleared moments before. If your fan can’t keep pace with the constant output, those fine particles just keep circling back.

    The trouble goes beyond appearances. Slipshod airflow or cheap filters let dust tuck into clamp threads, land in open glue-ups, even drift into drill chucks—turning simple sanding into a cycle of repeat wiping and reworking. Cutting corners here means more than a few flecks on the floor: it means extra battery swaps as tools overheat, faster blade dulling from embedded grit, and finishing delays as you chase sneaky dust into every seam. In a team shop or on a tight delivery, these delays don’t just irritate—they multiply.

    Spec Sheets Lie: Fan Numbers vs. Real Work

    Anyone can get seduced by CFM ratings and shiny housings, but dust management rarely goes as planned. In practice, a fan that’s “enough” in the packaging copy might fail completely once the drum sander and orbital both spin up. The best fans maintain visible air movement, even after hours in the zone: you’ll notice bench tops feel crisp, layout lines remain visible, and the next tool doesn’t emerge coated in unseen grit. The weaker fan—same size, same price—struggles as filters clog, letting dust accumulate along the bases of your table saw or drill press right when precision is at a premium.

    The difference is sharpest during changing tasks. Drill pilot holes, then jump to sanding edges: the air can turn stale shockingly fast. Gloves gum up, saw handles feel sticky, and bit changes become fumbly as dust coats everything, barely visible. Over time, these tiny, cumulative losses—blurred pencil marks, clogged bits, gritty battery contacts—slow down your workflow, inviting errors and fatigue. Instead of flowing from step to step, you fall into a frustrating rhythm of cleaning, checking, and doubling back.

    On the Floor: Where Real Fans Prove Themselves (or Don’t)

    Grinding, Sanding, and Constant Cleanup Fatigue

    Set up: two similar fans on opposite ends of the space, one shop full of noise and airborne debris. You run the tablesaw on hardwood, then move to hours of non-stop sanding. The result? One fan keeps air and surfaces under control—every clamp and blade holder just needs a quick brush-off. The other? Tool trays get that greasy, sticky layer; clamps need full wipe-downs between each use. Suddenly, every shift between cutting and fastening becomes a slow-motion slog. The right ventilation cuts this cycle short, letting you switch tasks without the drag of constant re-cleaning.

    Finishing Touches: Dust That Can Undo Hours

    It’s almost criminal to watch a freshly painted shelf go gritty as soon as the air stagnates. Shared workspaces and batch jobs only make this problem worse—a “clean” zone turns hazy in minutes. The difference becomes undeniable in direct light: a web of fine debris appearing just as a topcoat is tacky. Choose wrong, and you’re hunting down dust rings in hardware recesses or resticking painters’ tape. Mistakes here mean lost time: you resand, recoat, and retouch, derailing your finish schedule.

    What Actually Changed the Game—A Real-World Upgrade

    After enough reruns of resanding and filter-caked tools, making the leap to a variable-speed 650 CFM fan with real HEPA filtration changes the rhythm of the shop. Instead of random pulses of “almost clean” air, you get steady extraction where it matters. A test showed particle counts in high-traffic zones dropped by a third. The trick wasn’t brute force—it was matching airflow to real output, dialing it up when planing half a dozen boards, backing off during fine detail or glue-ups. Suddenly you catch yourself using fewer rags, reaching for the dust mask less, and changing blades or bits not because of hidden grit but according to schedule. Cleanup becomes routine, not a marathon.

    Don’t Let CFM Alone Guide You—Match Performance to Workflow

    Cranking a fan to max isn’t always the answer. Full blast can lift settled dust, blowing it across fresh finish or into open electronics and battery packs. Run it too low, and those dead zones—around your drill press base, behind the chop saw—become a permanent frustration. Choosing right means understanding your routine: do you drill a dozen pocket holes between every cut, or do marathon sanding sessions? For nimble benches, a mid-output fan that travels with you does the trick. For stationary, tool-packed corners, dedicated high-volume units pay for themselves in tool lifespan and reduced redo work.

    Filter Discipline: Don’t Sabotage Your Own Results

    Replace filters as soon as you see dust buildup on the intake—don’t wait for airflow to lag. Some shops need this every three weeks; others, after each heavy run of softwood or MDF. If filament brushes and painted edges aren’t coming clean, or you’re blowing dust off screws before driving them home, it’s time for a swap. Delaying just resets the cleaning grind and eats into results on your next task.

    Know the Signs: Early Warnings That Your System’s Slipping

    Subtle clues crop up before things get out of hand: a dry tickle in your throat late in the day, a finishing pass that feels snaggy despite careful prep, or blades that seem dull after fewer cuts. If you’re reaching for extra sandpaper, noticing static latches or gummy fastener holes, or cleaning becomes an all-day affair, your ventilation isn’t keeping up. Ignoring these adds up to more downtime, blunted performance, and eventually, fatigue that follows you home.

    The Real Payoff: Consistency, Comfort, and Fewer Redos

    Shop progress isn’t about chasing the biggest badge or trendiest air mover—it’s about finding the fan that stands up to actual workflow, not just label promises. Proper extraction chops down time wasted, lets you work with focus, and means your results rely more on your skill and less on how much dust you missed last round. Set your ventilation to match your shop reality and you’ll notice it in finish quality, tool control, and in that rare feeling: a cleaned-up day that ends before the light’s gone outside.

    http://gumboll.myshopify.com

  • Optimizing Drill Bit Speeds for Cleaner Holes Across Materials

    Nothing kills a smooth drilling job like the wrong speed—because you rarely catch the mistake as it happens. The first few holes look fine. Then, quietly, the trouble builds: wood turns black at the edges, acrylic sags with milky scars, drill bits start spitting chips instead of clean ribbons. Suddenly, the project stops flowing, and you’re hunting for a file or a fresh bit, wondering how things went sideways. Out in the real workshop, a drill bit speed chart isn’t just a technical nicety—it’s the quickest path between clean results and a wasted afternoon fighting scorch marks, melted rims, and ragged repairs.

    Why Skipping the Chart Slows You Down

    No one has time to baby every setup. You drill cable holes in pine, shift right into acrylic sheeting, then aluminum angle—all in one afternoon. It’s easy to leave the drill on last job’s RPM, aiming to squeeze out a few more minutes. That shortcut rarely holds. Pine chews through fine, but try it on acrylic and you catch the smell first: faintly sweet, slightly burnt plastic. Instead of a hole, you end up with a mess around the edge—gooey, uneven, stuck to the bit. Suddenly it’s not about drilling anymore; you’re scraping, reaming, and cleaning when you could have moved on if only you’d dialed in the speed up front.

    How the Wrong Speed Eats Away at Every Step

    Misjudged speed is a silent problem—but the fallout is loud: overheated bits, rough plastic lips, ragged burrs on metal, edges stubborn enough to catch a sleeve or slice a finger. Over longer jobs, every mismatch multiplies: a row of holes that need reshaping, bits losing their bite, motors heating up as the drill strains. Shifting from one material to another without pausing for speed control is how workshops end up trading neat progress for a pile of “fix it later.”

    The Chart in Action: Getting the Edge Right

    Why not just trust your hands, your ears, your experience? Because consistency beats bravado. Getting the RPM right isn’t about textbook perfection—it’s about keeping the tool cool, the edge sharp, and keeping your workflow tight. When you take thirty seconds to check the chart, you cut down on overheated bits, fussy edges, and panels that leave you dreading repair. The benefit isn’t theory: it shows up when you’ve got a line of holes to match, when exit holes are visible, or when one bad edge can wreck the look of a finished bench.

    What It Looks Like When You Miss—And When You Don’t

    You’re framing out a workbench and need three different holes: oak for the uprights, acrylic for a wiring channel, aluminum for a support strap. Leave the setting at 1800 RPM and watch what happens: the oak’s fine, the acrylic gets a smeared, swirled rim, and the aluminum spits out burrs sharp enough to draw blood. Cue the file, the sanding block, maybe a replacement part. Drop the speed for the aluminum (950 RPM, per the chart), and the next hole slides through cool with an edge that’s ready for fast assembly—no need to grab safety gloves before the next step. That kind of improvement isn’t flashy, but it saves real time and spares your tools.

    Benchmark Numbers Every Crew Knows

    Here’s what drill speed references look like in practice:

    • Wood: 1,500–3,000 RPM (good bit, steady clamp)
    • Plastics: 450–900 RPM (don’t rush it, clear chips as you go)
    • Aluminum and light metal: 650–900 RPM (slower as diameter increases, with a touch more lube on big jobs)

    These aren’t hard rules—they’re friction-tested starting points. The rest is signs and sounds: in wood, hot smoke means you’re too fast. In plastic, a gummy white edge means dial back. In aluminum, any grabbed or jagged lip is your cue to slow down another notch. Every time you swap bit size or sheet thickness, a quick check on the chart is faster than fixing a bad hole after the fact.

    The Drill Bit’s Report Card: Clean, Cloudy, or Chewed

    Edge finish tells you nearly everything. Plastic should leave a clean, glassy edge—or you’re burning it. Good wood work curls out smooth shavings, not blackened splinters. Metal jobs done right leave a soft, manageable curl at the bottom—no wire tangles or feathered shards. If you’re forced to sand or trim hole after hole, odds are you missed on speed. Those little warning signs—slight burns, biting, whining—are easier to fix now than when you’ve got a project full of ugly slots.

    Fixing the Melt: What a Slight Speed Change Does

    No theory here—just experience. Running a dozen holes through acrylic at anything over 1,000 RPM? You’ll get blobby, frosted rims and a bit hot enough to stink up your shirt sleeve. Fighting it with a file only turns the problem cloudy. Switch down to 800–900 RPM, pause to clear chips every hole, and suddenly you’re getting sharp, clear exits. Not flashy, but if you’ve ever spent ten minutes scraping tacky plastic off a $20 drill bit, you know how much it’s worth. Each clean hole saves time—and your patience holds up, even near the end of a big run.

    Big Bits, Low RPM: The Forgotten Rule

    The bigger the bit, the slower you need to go. Seems obvious—until you’re mid-job and trying to power through with a 12mm tip at full tilt. Even in soft pine, a big bit at high RPM means smoking, snatching, and sometimes outright stalling the drill. Cut speed to match both the bit and material instead of muscling through, and you’ll keep both the bit’s edge and your drill’s motor out of trouble. Upfront, it’s a few seconds lost. In the aftermath, it’s hours saved on damage and cleanup.

    Why These Details Decide Workflow, Not Just Finish

    Right drill speed isn’t about putting on a clinic for bystanders—it’s about working like the job matters. Less time fixing mangled holes, fewer bit changes, and almost no tool fatigue from fighting overheating motors. You see the payoff after a full day: sharper results, bits that last the month, batteries holding out, and assembly steps that snap together the first time. Skill isn’t just measured by speed—it’s precision, finish, and how much work isn’t left over at the end of the shift.

    Check the chart, read the edges, and don’t let familiar tools lull you into extra work. Good control and a little patience make all the difference between wrestling through every hole and letting your tools handle the load, one smooth cut at a time.

    http://gumboll.myshopify.com

  • When to Replace Your Air Compressor Lens for Consistent Finish Quality

    Momentum dies fast when your tools start slipping out of spec and you barely notice—until the work starts turning on you. You know the moment: a drill bit suddenly dragging through what should be easy pine, a jigsaw blade leaving chatter where you expect clean cuts, or a spray lens that seems “okay” but quietly turns crisp coverage into hours of nitpicking fixes. In the shop, it’s often not catastrophic failure that costs you, but the slow drift—where finishing work becomes a guessing game and efficiency bleeds out one pass at a time.

    The Hidden Cost of Pushing a Worn Lens Too Far

    Unlike a snapped blade or a seized drill, a spray lens doesn’t always shout when it’s done. Air pressure sounds normal. The pattern holds together—at first. But with each new panel, you notice more wobble than control. Seams start to blur, and edges lose their bite. Suddenly you’re chasing streaks that weren’t there yesterday, reaching for sandpaper more, and wiping overspray you never used to see. The sessions drag, and “routine” touch-ups feel more like trying to save a job gone sideways.

    Fatigue Sets In—For You and the Rig

    Spray five panels back-to-back and problems show by panel three. Now you’re gripping harder, compensating for a pattern that doesn’t land where you aim. What started as a crisp session turns into a grind: focus drifts, touch-ups pile up, your gloves end the day filthier—and cleanup stretches into overtime. Equipment that should sync with your pace starts to slow you down, demanding double the effort for half the outcome.

    The Real Tells: Early Warnings You Can’t Ignore

    • Trigger drag that creeps up after a few passes—the spray rig just doesn’t reset like it used to
    • Accumulating fine dust or film at the lens edges, even when your setup stays otherwise spotless
    • Spray lines that soften or scatter—where before the edges were razor-sharp and defined
    • Double-coating, or patching bare spots you’d clear in a single pass on a fresh lens
    • More work sanding seams, more second-guessing edges after the fact

    Each moment adds up—lost precision, wasted time, mounting frustration. The jobsite grind changes: now it’s about chasing flaws, not hitting targets. If you’ve ever spent a morning re-masking corners because drift made a mess, you know exactly how fast a “minor” wear issue snowballs.

    Where the Real Cost Shows Up

    An accessory left well past its best isn’t just more cleanup—it chips away at every step. Re-doing touch-ups. Re-masking and taping corners you’d nailed before. Even the best hand loses out when the tool can’t keep pace. Show up to install and find you have to sand back two panels? That’s not just a bad finish, it’s lost hours you won’t reclaim. Whether it’s a dull bit sticking mid-drive or a blade wobbling at full charge, letting things ride costs you both control and confidence.

    Unlocking Smoother Routines with Proactive Swaps

    Start swapping your lens by schedule—say, every 30 working hours—and the entire rhythm of the day changes. One Gumboll user found that following a strict swap interval took seam deviations from over 2mm down to less than 0.5mm. Suddenly, every pass feels predictable. Patching drops off. Surface quality from first to last spray stops fading. At the end of a shift, you’re not dreading the cleanup—just wrapping up.

    Reclaim Control and Cut the Guesswork

    A set replacement schedule puts you back in the driver’s seat. You stop wondering if the next panel will throw you off. No more banking on “good enough” and hoping touch-ups keep pace. When every pass counts—especially on tight installs or finish work that can’t hide mistakes—this kind of control means you walk away knowing the job will stick, not just survive.

    Practical Tips—Because Nobody Likes Mid-Job Surprises

    • Don’t wait for a total failure. Fading precision, soft spray lines, or that telltale drag mid-pass are red flags—swap early and stay out of patch-up limbo.
    • If you’re working with abrasive or high-grit material, shorten your swap intervals—the wear shows faster and no touch can fake a fresh lens.
    • Keep a spare lens at hand. When failure hits halfway through a project, nothing is worse than scrambling for a replacement while the clock keeps ticking.
    • Sync lens changes with routine checks—filters, hoses, seals—so your whole kit stays tuned and surprises stay rare.

    One proven trick: Write the replacement hour or date right on your lens container with a bold, visible marker. No guesswork, no asking what the last guy did—just straight information that travels with the tool, especially if rigs rotate through multiple hands in a week.

    Stay Ahead—Don’t Let Wear Run Your Workflow

    Waiting for visible failure is a losing gamble: the real cost is what slips away before you even spot what’s wrong. Each late swap bleeds minutes, piles up repair lists, and drags out every job. Spot the creeping symptoms—trigger resistance, scattered lines, edge residue. Make the change before it’s urgent. That’s how you keep your finish sharp, your cleanup routine, and your jobs moving forward instead of circling back.

    Find reliable air compressors, jobsite-ready lenses, and work-driven accessories for real shop routines at Gumboll.

  • Protect Safety Glasses from Scratches with Proper Storage Solutions

    Scratches on your safety glasses don’t send a warning. Most days, you only realize what’s happening when the view gets hazy—right in the middle of a job that actually matters. It’s easy to shrug off those first faint marks as workshop grit, but by the time you’re threading a saw blade through finish work or lining up a pilot hole, you can’t wipe your way back to clarity. What started as simple storage—pouch, tray, edge of the bench—slowly turns into another layer of friction in your day: missed details, more squinting, a job that’s literally harder to see through.

    It’s the Dust You Never Notice That Wears You Down

    No two shops are the same, but every active bench has airborne crud floating around—whether it’s plywood fines from the miter saw or metal shavings kicked up by an angle grinder. Work means movement: drilling a run of holes, swapping bits, shooting compressed air across the vise. Each task adds to the dust in the air and—without noticing—onto the surfaces you trust. Set safety glasses on an open rack near a drill press, and it takes just a few cycles of air hose and tool change before new grit lands right where your eyes go next. By day’s end, that layer is ground in with every quick thumb-wipe.

    Open storage works for a while because it’s fast. Glasses off for the close-in work with the router, back on for the sander, off again for a battery swap—seconds lost or gained. But the cost builds slowly, embedded in each micro-scratch and every time you grab the lenses without thinking where they sat last shift. After a week of work, that convenient tray starts clouding every line you’re trying to follow.

    Why Exposed Storage Means Gradual Lens Ruin

    Picture the real rhythm of the job: clamp, cut, brush debris, reach for glasses, repeat. A tray by the miter or a bin on the side of the bench feels like the obvious drop zone. But check the lenses after a few rounds—faint haze and scattered scratches show up long before the first big gouge. These don’t come from one careless moment; they creep in with every fine particle settling while you work, every casual toss back onto a dusty surface, every quick, gritty swipe to “clean” a lens mid-shift.

    Wherever there’s traffic—crowded bench, power tools cycling, sawdust riding thermal currents—open storage is a silent liability. The glasses catch it all: sander dust in the afternoon, oily residue from a fastener change, even the blowback from a quick air nozzle blast. The more you task-hop, the faster the damage compounds, until you’re fighting to see center measurements or ghosting out score lines you could once follow without hesitation.

    The Actual Difference: Closed, Lined Storage in Practice

    The solution doesn’t need to be complicated—a hard case with a soft lining, stashed outside the main impact zone. What changes in real use? For starters, the case blocks that endless drift of fines and keeps the surface of your lens free from the fallout of every sander pass or exhaust blast. Mid-project, you knock out a dozen drive holes or clamp up for assembly. Glasses go off for intricate cuts, but if they wait in a closed case—rather than an open tray—they stay cleaner, with fewer interruptions to wipe or clear your view. Over the course of a build, the difference is less frustration, more accuracy where it actually counts, and one less excuse to reach for a replacement pair when you’d rather be finishing up your last battery pack of the day.

    Work-Tested: One Case Versus the Open Rack

    Try this over any real season. Place a set of glasses in a lined hard case a few feet upwind from grinder dust; keep a backup in the catch-all tray next to the drive station. Run through your regular pace—forty, fifty job cycles, switching from blade to bit, in and out of the compressor’s shadow. After two months, the cased pair shows just a few isolated scuff marks, mostly from hurried handling. The open-tray pair, though? It’s dulled all over, with scratches that glare out under shop lights, nagging you every time you need detail or contrast for a tight cut.

    The Build-Up of Small Frustrations

    Ignore the problem, and it finds you at the worst time. Trying to scribe a clean edge, crosscut a line, or check bit depth with foggy, dulled glasses is a direct hit to both accuracy and patience. The temptation is to blame the lens, but really it’s the daily shortcut—dumping glasses anywhere close, trusting last week’s pouch to still be clean—that adds up. The time spent re-cleaning, swapping pairs, or fighting through a blurred field of view is tool fatigue in disguise. It chips at job speed, confidence, and even safety, especially when each pause knocks you off your rhythm during a tricky assembly or deadline push.

    Even the best polycarbonate lenses wear down if left exposed. The more you tool-hop, the faster the cycle—scratched lens, more cleaning, more replacement. The fix is neither expensive nor slow: use a soft-lined, rigid case and keep it clear of dust paths from saws and compressors. Over a full job cycle, the improvement is obvious in the time you save and the clarity you don’t have to fight for.

    Habits That Protect Your Field of View

    Buying a lined case is step one. But it’s where—and how—you use it that matters. Keep the case away from air hoses, exhaust, and sanding stations. Shake out the lining now and then, especially after a chaotic day. Build the reflex: glasses go into the case before you grab a rag, not after dust has had a chance to settle. These are ten-second changes that, repeated through daily cycles of cutting, battery swapping, and cleanup, keep your best view intact longer than you’d expect.

    For anyone moving from miter saws to drill drivers in a single shift, or racking up dozens of tool changes before lunch, these routines pay back quickly. They don’t add friction—they smooth it out, reducing stop-start time and extending the life of every safety lens you depend on.

    See Sharper, Work Smoother—Small Adjustments, Noticeable Difference

    Serious scratches are a slow build: dozens of jobs, each one grinding in a little more clarity loss. But paying attention to how—and where—you store your glasses is an easy win when cumulative fatiguing problems are what you’re actually fighting. Whether you’re marking out sheet goods, running through cut lists, or prepping jigs for another pass on the router, the right storage choice isn’t about babying your tools—it’s about keeping them working at peak, so you can, too.

    No fancy system required. Just a reliable lined case, used reflexively, is the difference between squinting through another shift or staying sharp for the work that pays. The clarity is in the habit—and the results turn up in every straight cut, every fine-line layout, day after day.

    Find work-tested safety storage and more at Gumboll.

  • Why Sealed Goggles Outperform Safety Glasses for Grinding Tasks

    The grind doesn’t pause for comfort—not when the sparks are flying, dust is everywhere, and your eyes sting before lunch. In the thick of a shop or garage, whether you’re running a cutoff wheel, sanding down weld spatter, or drilling out a broken bolt, eye protection becomes the only thing between you and a hard stop. Every routine task—chasing weld lines on a frame, carving away stubborn rust, swapping a fresh blade into the grinder—becomes a pressure test for your safety gear. If your protection fails, you feel it long before you finish the job.

    When Safety Glasses Get Outworked

    Most glasses and goggles look solid at first—clean, impact-rated, and unassuming while you knock off the first round of slag. But by the third battery swap or the fourth sanding pass, trouble sneaks in. Grinding dust creeps through vent holes, fog streaks the lens after an hour in humid air, and suddenly wiping your glasses every ten minutes is baked into your routine. Try drilling overhead or cutting at an awkward angle, and you’ll notice how fast debris finds the path of least resistance.

    This friction snowballs quick. As vision blurs and sting sets in, every stop-and-wipe slows the pace. You miss details—a wandering drill bit, a crooked cut, a spatter rougher than it looks. Halfway through the shift, your eyes are burning, the lens is scratched, and fine work feels like guesswork. The discomfort doesn’t just hurt—it steals your accuracy and rhythm one gritty blink at a time.

    Open Frames, Open Invitations for Dust

    The truth: most “shop-ready” glasses aren’t built for a full day’s worth of sparks, fines, and flying grit. Catalog photos miss the reality—workbenches stacked with tools, air pulsing with metal and sawdust, ventilation thick with past jobs. Minutes after starting, side gaps on open glasses let in swirling debris. Try cutting fasteners near a wall or grinding overhead, and fine particulate drifts in with the air. Every cramped fix or awkward cut turns eyewear gaps into a direct line for trouble.

    Once the first grain gets past, it’s a slippery slope—constant blinking, stops for relief, a quick dash to the sink. Over one morning, the rhythm is gone. You’re trading focus for eye drops, and tough angles only make problems worse. You feel the toll well before the job’s done.

    Side-by-Side: Standard Glasses vs. Sealed Goggles

    The difference cuts in when the work stacks up. Put in hours prepping welds, or run a grinder until arms buzz, and you’ve run both: open glasses leave you in a fog of lens wipes and cleanup breaks. Switch to sealed goggles—especially with a foam gasket and a solid anti-fog coating—and the cycle breaks. No more surprise grit in the eye or washed-out sight lines. Suddenly, finishing a tricky edge or lining up bolts is less about fighting debris and more about finishing the task clean.

    Why Anti-Fog Actually Matters

    Anyone pushed through a muggy shop knows: fog is more than hype. Whether it’s the heat from cutting through channel iron or just thick summer air, cheap coatings fog fast, forcing you to peel off protection or risk working blind. Real anti-fog lenses, paired with a full gasket, can cut downtime from every half-hour to a rare midday break for a quick swipe. That’s the shift: not magic, but steady, clear vision that lets you grind, cut, and drill without planned interruptions.

    And no, sealed goggles don’t have to suffocate. Take two minutes to tweak the strap—not too tight, just enough to close the gaps. Suddenly, it’s not a fight for comfort. Your eyes stay fresher over a four-hour weld prep, not because you’re lucky, but because grit and sweat never got in. Those rare cleanings? Now they’re preventative, not desperate firefights.

    Confined Corners and Bad Airflow Make It Worse

    Shops aren’t airy studios. Cram behind the chop saw, fix something under a workbench, or angle in close to fasten a bracket and the air thickens. Extraction fans can’t hit every corner, and suspended fines hang in the stillness. In these dead spots, even brand-new glasses can’t cope—grit settles, gaskets gap, irritation builds. Red eyes become routine, and what seemed like overkill in the catalog becomes minimum spec by the end of a long week in cramped quarters.

    Spot the Warning Signs

    If you’re counting cleaning breaks, blinking out grit, or getting the familiar burn by mid-shift, your eyewear is tapped out. Tradespeople recognize it immediately: detail work gets sloppier, time adds up lost to cleaning, and you’re rushing when focus should be sharpest. Waiting until problems stack up just means longer cleanup, wasted consumables, and sometimes even redoing rushed work—the hidden cost of inadequate eye protection.

    Real Payoff: Consistency and Confidence on the Job

    The proof shows in real projects. On a multi-day fabrication job, one switch to high-seal, anti-fog goggles meant no more lost minutes to cleaning or chasing debris. The crew rolled through weld setup and abrasive passes without breaking stride. Eyes were less raw, details sharper, battery swaps faster. The final cleanup? Focused on dusting the bench, not nursing an avoidable eye strain. That’s not a miracle—it’s what happens when the gear finally matches the mess of real shop life.

    Pro Tip: Fit Matters More Than Spec Sheets

    Don’t overtighten. Foam-seal goggles only need to be snug—enough to close the gap, not enough to dig in. Adjust, look for daylight leaking around the edge, and back off at the first sign of pressure. Tuck a microfiber near the tool station for quick maintenance, and get in the habit of checking the seal whenever you shift hats, masks, or headbands. Little rituals add up to steady all-day comfort and grind sessions without distractions.

    The Bottom Line for Working Shops

    Tool upgrades aren’t about the spec sheet—they’re about surviving the longest days without letting old frustrations creep back in. The right eye protection in messy, demanding shop conditions isn’t an extravagance; it’s the safeguard that keeps your work sharp, your routine smooth, and your eyes ready for one more round of sparks and sawdust. The gain isn’t superhuman speed—it’s stubborn consistency and clarity that’s hard to notice until you lose it.

    Seeing dust sneaking in, frequent lens wipes, or the first red-tinged warning signals? That’s your cue. Sealed, anti-fog goggles aren’t overkill—they’re what lets you work the shop instead of fighting through it, every pass, every long day.

    See practical tool and safety upgrades at Gumboll