Category: Uncategorized

  • Why Your Nailer Jams When It Matters Most—and How to Fix It

    Understanding Why Nailers Jam at Crucial Moments

    If you’ve spent enough time wielding a nailer, you know the frustration when it suddenly clunks, stutters, or jams—especially when the pressure is on and you’re racing against a deadline. Whether you’re installing baseboards for a client’s house or fitting crown molding in your own living room, the unexpected halt in workflow can drive your stress levels sky-high.

    Typically, the culprit isn’t the nailer by itself. More often, the problem starts from small missteps we make during use or maintenance. Under pressure, tiny errors can quickly snowball, causing the tool to stumble just when you need it most. This article breaks down the main reasons nailers jam and offers practical advice to keep your projects running smoothly.

    Common Causes of Nailer Jams

    Contrary to popular belief, nailer jams aren’t random; they usually have identifiable and fixable causes. Recognizing these can protect you from downtime and frustration.

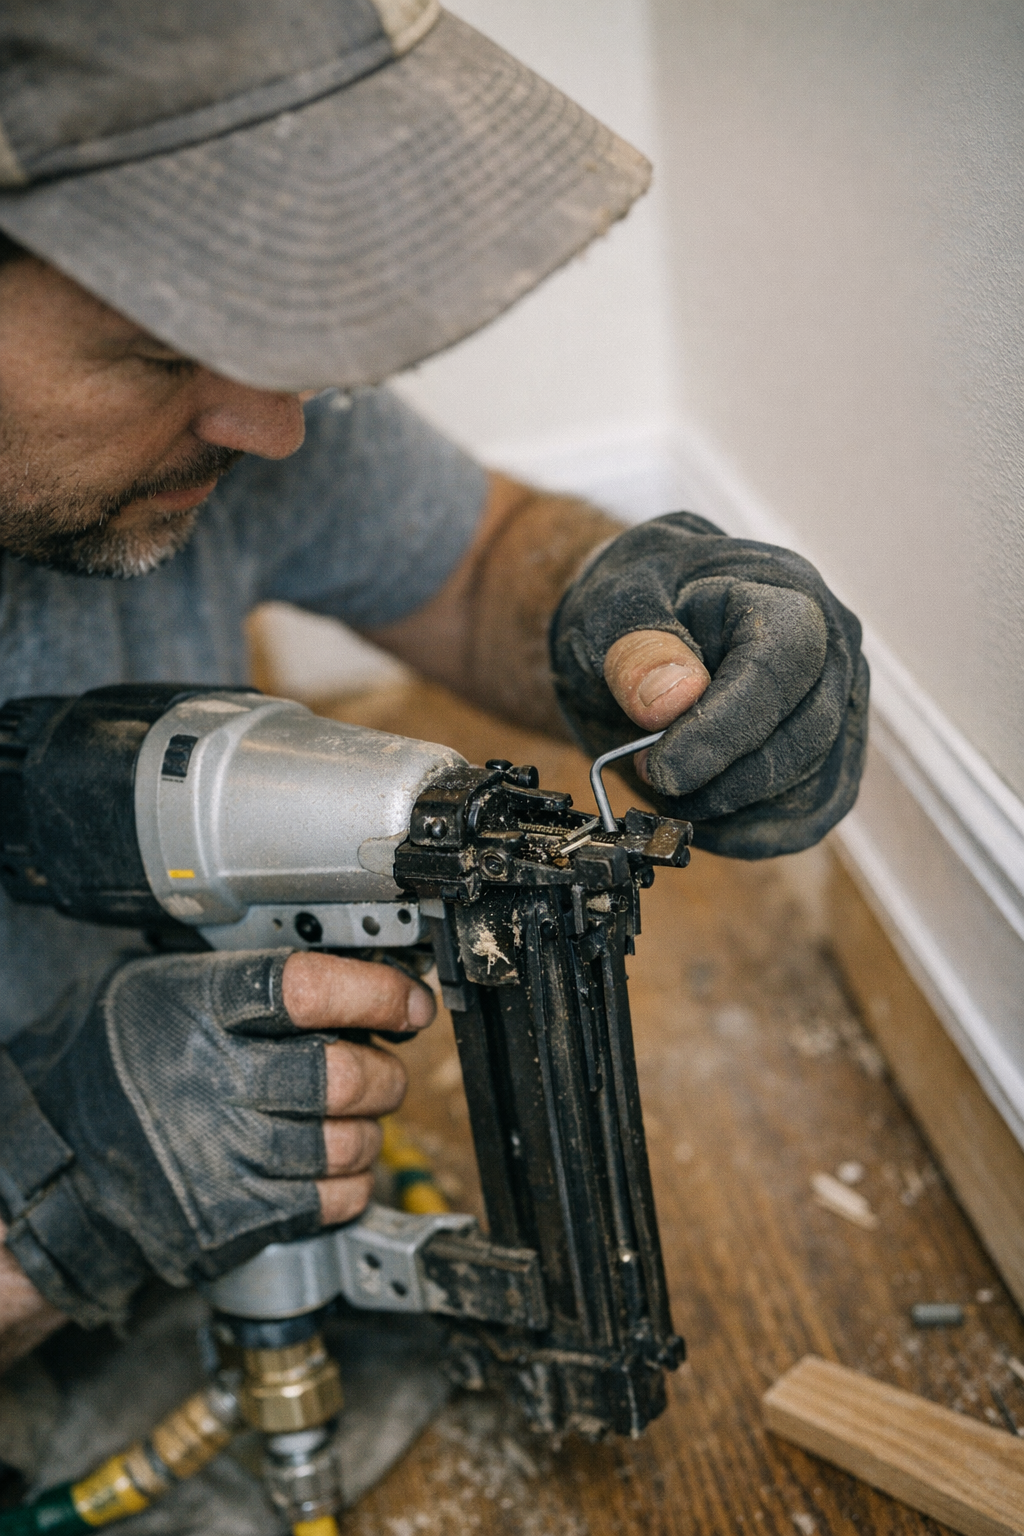
    1. Using Incorrect Nails or Staples

    Manufacturers design nailers to accept specific fastener types, gauges, and lengths. For example, finish nailers typically accommodate 16- to 18-gauge brads ranging from 5/8″ to 2″. Using anything outside of this specification—even just a slight gauge mismatch—can cause the nails to feed improperly and jam inside the magazine.

    When the fastener strip isn’t an exact fit, the nails may cock sideways, or get stuck at feed points designed for different dimensions. This is especially common when mixing leftover nails from previous jobs or borrowing staples from a different tool.

    2. Improper Loading and Alignment

    Loading the nails quickly without ensuring perfect alignment often leads to feed issues. Even a tiny misplacement can create enough resistance for the tool to jam. For example, an 18-gauge brad nailer’s feed channel is often as narrow as 1.2mm. If a nail strip is pushed just 1mm too far forward or not seated flush against the guide, the feeding mechanism can stall.

    Developing the habit of pausing briefly during reloads to nudge the nails back gently into place can prevent many jams. It’s a simple habit but saves you from tearing down your tool on the fly.

    3. Dirty or Poorly Lubricated Magazine

    Dirt, dust, sawdust, or old lubricant buildup can gum up the magazine and preventing smooth feeding. Regularly cleaning the inside of the nosepiece and magazine channel, and applying manufacturer-recommended lubrications, keeps your nailer running like clockwork.

    4. Overfiring or Firing Too Quickly

    Trying to work faster than your nailer’s cycling capability often backfires. Most consumer-grade nailers are rated around 2–4 cycles per second. Exceeding that by triggering shots in rapid succession can cause double fires, overheating, or sticking nails.

    Heat causes expansion of the metal components inside the nosepiece, increasing friction and binding the nail strip. Particularly for coil nailers, which fire dozens of nails in quick bursts, proper pacing is critical to avoid jams.

    5. Incorrect Air Pressure or Battery Charge

    Pneumatic nailers require correct air pressure to drive nails fully and reset the driver mechanism. Running at pressures too low means the punch mechanism can stall halfway, causing jams. Conversely, operating at pressures above the manufacturer’s recommended range stresses internal components and encourages misfires.

    Always check your compressor settings or battery levels before starting the job to ensure your nailer performs optimally.

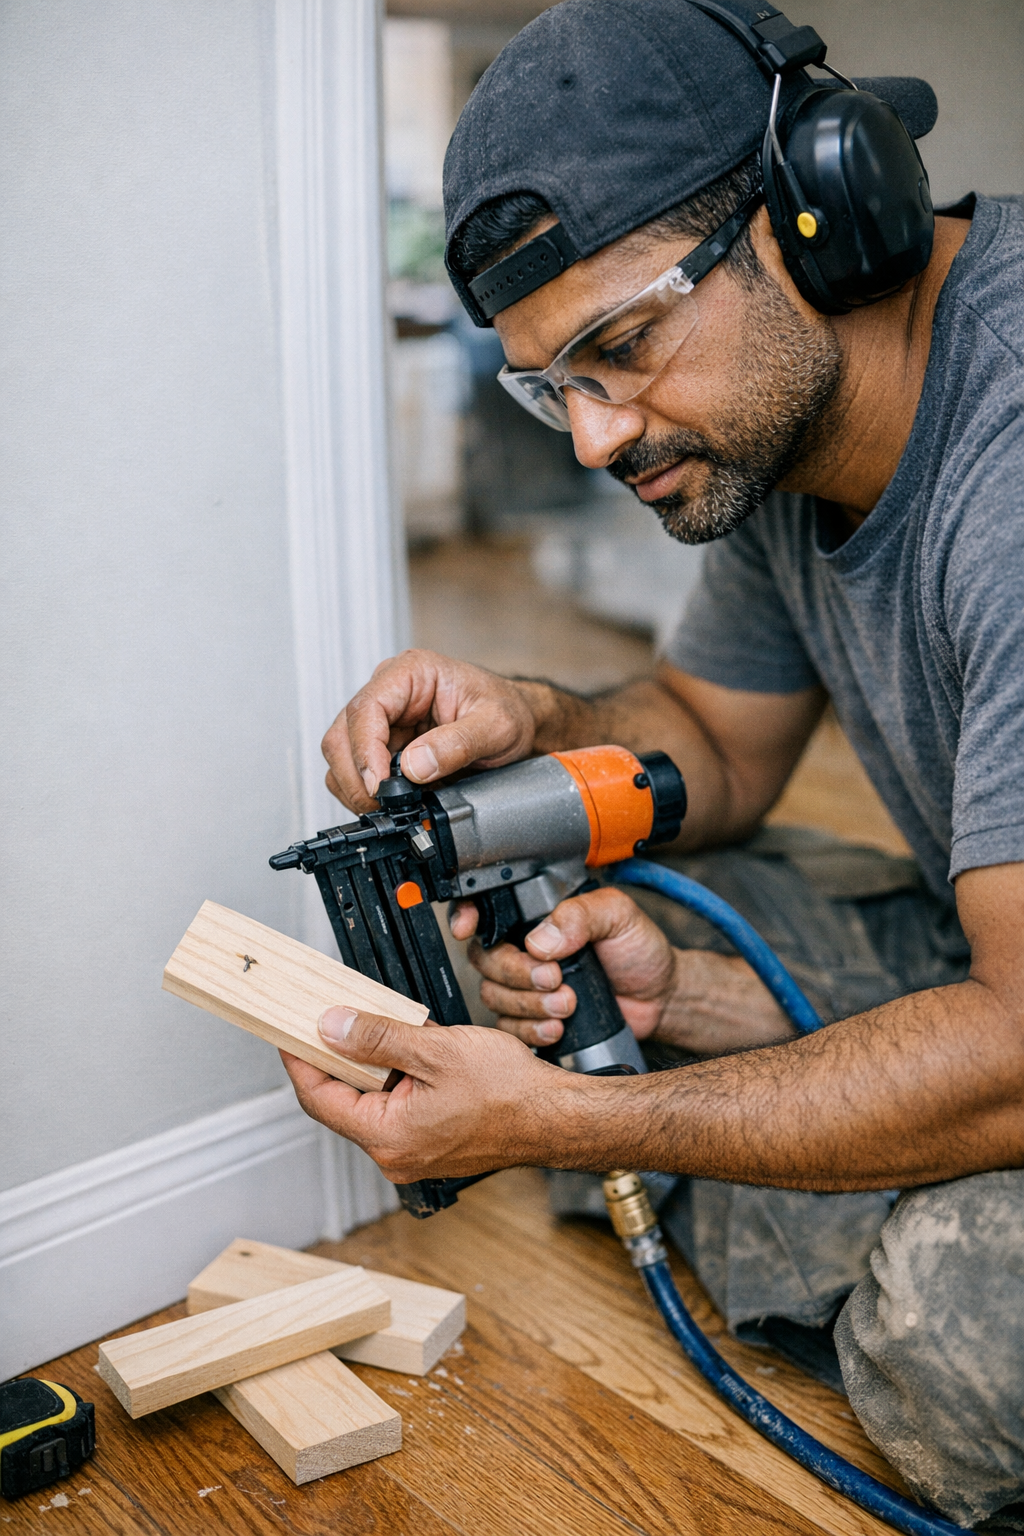
    Real-World Experience: How a Simple Habit Change Made a Big Difference

    During a hectic home renovation, my finish nailer repeatedly jammed during a trim job. After a few frustrated disassemblies, I realized my mistake: I was loading fasteners too quickly and letting them settle ever-so-slightly forward, misaligning the strip.

    A small change—just pausing to gently tap the nail strip back so it was fully seated in the guide channel—transformed the experience. This two-second habit prevented misfeeds almost entirely, saving me from stressful downtime and preserving the project’s schedule.

    This taught me a valuable lesson: deliberate, mindful tool handling can prevent many headaches, especially when the clock is ticking.

    Maintenance Tips to Avoid Repeated Jamming

    Regular Cleaning and Inspection

    Cleaning your nailer at the end of each day, especially after messy jobs, helps maintain smooth function. Remove dust and debris with compressed air or a soft brush, and check for signs of burrs or damage on the driver blade.

    Check the Driver Blade

    A bent or nicked driver blade repeatedly causes jams and misfires. If you notice inconsistent driving or frequent jams, inspect the blade and replace it if necessary.

    Use the Correct Lubrication

    Applying a few drops of pneumatic tool oil (for air tools) to the moving parts keeps the tool cycling smoothly. Avoid over-lubricating, which can attract dust.

    Refresh Tip: Slow Down to Speed Up

    When you’re stressed and trying to rush, your body tends to get tense, and your actions become jerky or hasty. Taking a moment to breathe and approach your nailer reload or firing rhythm deliberately can dramatically reduce errors and jams.

    This subtle mental reset encourages better hand-eye coordination and precision, translating into fewer mishaps. Remember, consistently fast isn’t same as smoothly fast—patience in action ultimately leads to higher productivity.

    Summing Up: Keep Your Project Moving When It Counts

    Nailer jams are not inevitable or mysterious. More often than not, they’re a sign of fasteners mismatched for your tool, slight misalignments during loading, improper air pressure, or firing speed that’s too aggressive. Addressing these details with deliberate care can prevent jams from derailing your momentum.

    Adopt small but effective habits—like gentle fastener seating and paced firing—to keep your tool in tune. Maintain your equipment responsibly, and watch how much smoother your workdays become even under the tightest deadlines.

  • How One Simple Depth Adjustment Saves Your Trim from Splitting

    Understanding the Common Problem: Why Does Trim Split?

    One of the most frustrating moments for any woodworker or DIY enthusiast is when perfectly cut trim suddenly splits as you nail it into place. You’ve carefully measured, cut, and aligned that piece of trim, only to hear a sharp crack as the wood gives way. The result is an unsightly split that compromises the finish and wastes materials.

    Many attribute this problem to “bad wood” or simply “bad luck,” but the truth is more technical: the settings on your finish nailer or stapler often play a pivotal role in whether or not your trim splits. The force and depth at which a fastener is driven deeply affects how the wood responds—especially on delicate edges or harder boards.

    Why Depth Setting Matters in Finish Nailing

    Every finish nailer or stapler, regardless of brand or price point, has a mechanism to adjust the depth of the fastener. This can be a dial, a switch, or sometimes an adjustment requiring tools like a screwdriver. This setting controls how far the nail or staple is driven below the surface of the wood.

    Proper depth adjustment is critical because driving a fastener too deep can create a wedge effect, pushing the wood fibers apart and causing splits. On the other hand, if the nail or staple is set too shallow, it will stand proud above the surface, which interferes with finishing work and creates a rough appearance.

    Recommended Settings and Basic Guidelines

    • Use nails that are typically between 1¼” to 2″ in length for most trim work.
    • Adjust the nailer so fasteners sit flush or just slightly (up to 0.5 millimeters) below the surface.
    • If your tool offers variable strokes per minute (SPM), use a moderate speed—roughly 50–80 SPM—to reduce impact force and minimize splitting.

    How to Avoid Split Trim in Practice

    A common novice mistake is to leave the nailer at factory default settings or run it at maximum power to ensure nails are fully driven. However, wood, especially softwoods like pine or pre-primed MDF, reacts differently depending on grain direction and moisture content.

    Shallow nail placement near edges greatly increases the risk of splitting. For narrow trim pieces less than 2″ wide, aim at least ¼” in from the edge. For hardwoods or tougher species, pre-drilling pilot holes with a small bit (1/16″) helps prevent splitting altogether.

    Testing Your Settings Before Installing Trim

    One of the simplest yet most effective ways to avoid splitting is to spend a few minutes testing your nailer on a piece of scrap trim before starting your installation:

    1. Take an off-cut from the batch of trim you’re about to install.
    2. Set your nailer or stapler to the lowest depth setting.
    3. Fire a nail or staple into the scrap, then inspect closely for any cracking or splitting.
    4. If the fastener head isn’t sufficiently countersunk, increase the depth slightly and repeat.
    5. If you notice any cracks, dial the setting back to the previous safe point.

    This simple test ensures you’re not working blind, and the cost is negligible compared to replacing split boards.

    Acclimate Your Wood and Control Environmental Variables

    Wood’s response to nailing isn’t static—it varies with moisture content and temperature. Trim that’s stored in a cold garage and then brought into a warm room can behave differently. The colder, slightly damp wood is more prone to splitting because it is less flexible.

    A practical approach is to let your wood acclimate indoors for at least a day before installation. Combined with proper tool depth settings, this acclimatization drastically reduces the risk of splitting. Adjusting the air pressure on pneumatic nailers to around 70 PSI and setting the drive depth mid-range can also help during these transitions.

    A Refresh Tip: Slow Down and Reassess Your Work Flow

    When you get into the rhythm of installing trim, it’s tempting to set the nailer once and rely on “muscle memory” or previous jobs. However, each new house, batch of wood, or season change demands fresh settings. A subtle but powerful habit is to reset your depth adjustment regularly—even multiple times per job if needed.

    Pausing briefly to retest on scrap slows the pace but enhances quality and reduces frustration. It shifts your workflow from reactive repair toward proactive prevention, saving time and material on the downside.

    The Benefits of Getting Depth Settings Right

    When your fastener depth is dialed-in correctly, you’ll notice immediate improvements: trim boards hug the wall smoothly without cracks or gouges, fasteners sink neatly ready for filling, and your caulking and paint jobs look seamless. Overdriven nails or staples create unnecessary sanding and patching, while shallow ones might catch or cause paint failure.

    Beyond aesthetics, consistently proper depth settings reduce callbacks and rework, improving job satisfaction and professional pride. That snug, silent fit of trim is a small but fulfilling “win” every woodworking professional enjoys.

    Final Thoughts: Make Depth Testing a Ritual

    There is no once-and-for-all depth setting that works on every project. Wood species, grain, humidity, temperature, and even paint or primer coats can all shift how your fastener should be set.

    Your best defense is a simple routine: take the off-cut from your current batch, test fastener depth before starting, and adjust as needed. Make this an ingrained habit whenever you switch trims, work environments, or tools.

    That small investment in setup time ensures your trim work is clean, your materials intact, and your finishing process smooth. Split trim boards become the exception instead of the rule—and that makes every job easier and more professional.

  • “Master Calm Travel: Pack Smart, Start Every Trip Peacefully”

    There’s a quiet that seems to settle in the apartment the night before a trip. The city is softer as the daylight fades, and my suitcase sits open beside the bed—my dependable, hard-sided carry-on, covered in a few familiar scuffs and stickers. Sometimes I put on a playlist, or just leave the window cracked for the evening breeze, but lately, the thing that makes travel days easiest is just taking the packing slow. No rush—just a calm start to the adventure.

    This wasn’t always the case. My old routine was a last-minute scramble: clothes in heaps, tangled chargers, always glancing at the clock or scrolling through a to-do list. The next morning, I’d shoot out of bed, heart racing, half-certain I’d left behind something important—passport, phone charger, any sense of calm. In the past year or so, I’ve gotten into the habit of setting everything out the night before, checking and rechecking until it feels right. It’s a basic ritual now: jeans smoothed out instead of bunched up, snacks in the side pocket, favorite sweater folded for easy reach on the plane. There’s some comfort in knowing the carry-on I picked up here—http://carrysupply.myshopify.com—always has just the right pockets when I need them.

    By dawn, everything’s set. The carry-on feels familiar in my hand. Heading out to the ride-share, weaving through early traffic to LaGuardia, the morning feels less stressful without last-minute worries. Even airport security seems less daunting, and while some travelers rush by with arms full of shoes, jackets, and electronics, I’m not so frazzled. Everything I need is packed and ready.

    There’s something nice about airports in the morning, too—a sense of fresh starts everywhere. With my bag just the right size, I’m not waiting at the check-in counter or the carousel. Instead, I can grab a decent coffee and watch as sunlight creeps through the airport windows. Traveling light isn’t just practical; it actually lets me notice small, good moments—a dad tying his kid’s shoes, a gate agent sharing a smile.

    Airports have a way of putting everyone on edge, but having only a carry-on and a clear plan makes a difference. This time, my flight’s headed to Seattle. Once we’re airborne, my carry-on fits beneath the seat, and I settle in with my book. Somewhere over the Midwest, looking out at snowy patches and tiny towns far below, I catch those small in-between moments you rarely notice in the rush.

    Landing always feels quick—suddenly the shuttle doors open and the outside world is waiting. Seattle’s morning mist sticks to the windows, and the air feels cold but welcoming. As others crowd around the baggage carousel, looking for their bags, I just walk on with my carry-on. The smooth morning back home makes arriving here easier too.

    In the hotel, I leave my bag beside the desk. I didn’t realize how much difference it makes to start a trip calmly—how that feeling stays with you through airports and unfamiliar streets. Packing in an unhurried way, with a bit of intention, makes the rest of the day quieter too. Wandering along Elliot Bay, grabbing coffee or visiting a gallery, my steps just feel lighter.

    One morning heading toward Pike Place Market, I found the pair of gloves I’d stuffed deep into a side pocket—just in case. It’s kind of satisfying to find something small and useful you packed without thinking.

    After days of meandering through Seattle—checking out coffee spots, tide pools, library corners—I’m ready for the trip home. The peaceful start I gave myself seems to carry through, making the return trip softer, even if there’s a twinge of wishing I’d stayed longer. Unpacking is quieter too, like a gentle landing.

    Looking back, it always comes down to the basics: packing with a bit of patience, taking the time to set the tone. And if you’re wondering, the bag with pockets deep enough for gloves and a zipped compartment for snacks is the one I found here: http://carrysupply.myshopify.com.

    There may not be one perfect way to travel, but for me, it all starts with a calm beginning and a bag that keeps up. The next trip will have its own early morning, its own new city—and probably, my old carry-on rolling along beside me.

  • “Mastering Travel Rituals: Packing Comfort in Every Carry-On Journey”

    It always begins in that quiet stretch between a closed suitcase and the first chime of the alarm. There’s a certain comfort in the calm before heading out. I always end up pacing around my apartment, just sure of a few things: coffee brewing for when I wake up, a stack of travel documents in a worn envelope, and my reliable carry-on waiting by the door.

    Over time, anticipation has replaced the old nerves about leaving home. It wasn’t anything fancy—just figuring out what feels right for me. I throw in the sneakers I know I’ll actually wear, pack the book I might not finish, water my neighbor’s fern. These little routines feel like a quiet ritual. I almost expect to forget something—maybe a charger or that one scarf—but I’ve found that leaving a few loose ends isn’t the end of the world.

    Getting to the airport puts me in a kind of in-between space. The city outside the taxi window looks familiar, but I already feel a step away from it all. Somewhere between clicking my seatbelt and tossing my carry-on into the backseat, my mind jumps ahead to where I’m going. At the airport, I blend in with the early crowds, watching all the suitcases roll by. I like seeing what people grab onto when they’re between places—the calm travelers moving at their own pace, the bag lifted in one go at security, that quick pat of the pocket for a passport.

    Standing in those long lines, the weight of my carry-on is always reassuring. It stays steady while everything else gets shuffled at boarding gates and during the inevitable gate changes. Airports have taught me patience. Delays happen; sometimes there’s nothing you can do except wait and pass a small look of commiseration with someone across the lounge. I’ve even ended up sleeping in a terminal overnight—jacket for a pillow, curled up next to my bag. Oddly enough, it was fine. I didn’t feel alone.

    There’s something about early morning flights. Outside is still dark, everything feels possible. Once on board, as the runway lights slip by, I usually close my eyes for a second. It’s as if each mile up in the air loosens worries a little. The gentle pressure of my bag under the seat helps keep me settled. Sometimes, with hours to kill, I’ll flip open a notebook and just jot down whatever comes to mind. There’s space for it up there somehow.

    Jet lag is a strange companion but arriving somewhere new always brings a shot of energy. Shuffling through customs, clutching the handle of my bag, I notice new scents—coffee, cars, maybe a bit of rain. The wheels on tile remind me of every city I’ve landed in before. Even if I forget something, I’m glad I took those extra minutes at home, double-checking for aspirin, an old city map, or a crumpled snack at the bottom of my bag.

    For me, it’s the simple rituals that make leaving easier—a bit of mental checklisting, unplugging things at home, texting my sister my ETA. One summer in Italy, I met someone who always packed blank postcards for new friends. I liked that idea. Now I sometimes slip an empty envelope next to my clothes, just in case.

    Coming home, I notice how my packing shifts. I wedge souvenirs and mementos into spaces I didn’t know I had. Departures and arrivals blend together after a while, but the small routines—organizing what I bring, double-checking before I leave—tie every trip to the next. It’s never been about getting it perfect, just about finding those little comforts.

    Maybe that’s what I like most about frequent travel, knowing home is always at the start and end. And my carry-on just keeps coming along, no matter how many journeys it takes.

  • Why Following Grit Steps Transforms Your Woodworking Finish

    Understanding Why Grit Order Matters in Wood Sanding

    If you’ve ever admired a flawlessly smooth tabletop at a craft fair or in a professional woodshop, you’ve likely wondered what process created such a perfect finish. The secret often lies not just in the sandpaper grit itself, but in the order the grits are used. Proper sequencing prevents the dreaded swirl marks that can ruin an otherwise pristine surface.

    Swirl marks typically show up as circular scratches under finishes, betraying rushed or improperly sequenced sanding. They’re especially common when you skip grits or jump from very coarse to very fine without intermediate steps. Avoiding them means respecting the progression of grit sizes, allowing each step to effectively remove scratches left by the previous grit.

    Why Skipping Grits Causes Swirl Marks

    The main culprit behind swirl marks is skipping grit sizes during sanding. When moving from a coarse grit to a fine grit too quickly, the fine sandpaper can’t effectively remove deep scratches created by the coarse sandpaper. Instead of eliminating those scratches, you’re just polishing them, and under wood finishes, these still show up as unsightly patterns.

    For example, jumping directly from 80 grit to 220 grit is a common mistake. The fine 220 grit sanding disc will glide over the deep grooves left by 80 grit, leaving them visible even after finishing coatings are applied. This problem is particularly pronounced in hardwoods like maple or cherry, where deep scratches easily telegraph through the finish.

    Recommended Grit Progression for a Swirl-Free Finish

    Professional woodworkers swear by a gradual grit sequence that moves up one step at a time:

    • Start with 80 grit for rough shaping or flattening surfaces.
    • Progress to 120 grit to smooth and begin refining.
    • Move to 180 grit for further smoothing.
    • Finish with 220 grit for an ultra-smooth surface ready for finishing.

    This steady progression ensures that each sanding step removes the scratches left by the previous grit completely, resulting in a perfectly smooth surface with no visible swirl patterns.

    Choosing the Right Tools and Settings Matters

    Equally important as grit sequence is choosing the appropriate sanding tools and settings. Random orbital sanders are preferred for their ability to reduce visible swirl marks compared to traditional rotary sanders or hand sanding.

    Operating your random orbital sander at a moderate speed—typically between 10,000 and 12,000 orbits per minute (OPM)—with a 5-inch or 6-inch pad helps prevent overheating and swirl patterns. Overly fast speeds can burn the wood or create deeper scratch patterns.

    Additionally, using sanding discs with an “open coat” design helps reduce dust loading by providing more space between abrasive particles. This keeps the abrasive active longer and prevents clogging, which can cause uneven sanding.

    Pro Tip: Keep Your Discs Organized

    A simple yet effective workshop habit is to write the grit number on the Velcro side of your sanding discs. This prevents confusion mid-project and eliminates mistakes like skipping a grit or accidentally jumping ahead.

    Dust Management and Technique: Essential for a Clean Finish

    Beyond grit order and machine settings, dust management dramatically impacts your sanding results. Fine dust particles left on the surface between grits can cause new scratches or imperfections.

    Always vacuum or wipe down the surface thoroughly between sanding steps. Using a tack cloth or low-lint microfiber cloth helps remove any remaining dust. Some woodworkers attach a shop vacuum to their sander’s dust port (typically 1.25 inches in diameter) to reduce airborne dust and keep the work surface cleaner.

    Also, maintain steady pressure—too heavy-handed sanding can cut unevenly and leave marks that require more work to remove. Let the sander’s motion do the work. Overlap each sanding pass by about a third to ensure even coverage without patchy spots.

    Refresh Tip: Slow Down and Embrace the Process

    Often, the biggest enemy of a flawless finish is rushing. It’s tempting to leap to the finest grit to speed things up or skip vacuuming to save a minute. However, every shortcut risks creating swirl marks that show up after finishing, forcing costly fixes.

    Try this small mindset shift: treat sanding as a meditative, stepwise ritual. Spend focused time on each grit progression, check your discs, tidy up the dust, and move deliberately. This attentiveness transforms sanding from tedious labor into craftsmanship and ensures you can take pride in the finish.

    Case Studies: Lessons From the Workshop

    On an oak shelving project, skipping the intermediate grits turned what should have been a shining finish into a surface riddled with fine swirl patterns. When finished with oil, those imperfections became impossible to hide. The fix involved re-sanding step-by-step through all grits and thorough dust cleaning, doubling work time.

    Conversely, projects where I adhered to 80, 120, 180, and 220 grit progression finished with buttery smoothness every time. The surface was so refined that even bare wood felt like glass to the touch, and finishes applied flawlessly without magnifying imperfections.

    Summary: The Simple Sequence for Swirl-Free Sanding

    1. Choose a random orbital sander with appropriate speed settings (10,000–12,000 OPM).
    2. Use sanding discs starting at a coarse grit like 80.
    3. Progress sequentially—never skip grits.
    4. Use an open coat abrasive pattern for better dust management.
    5. Keep dust under control by vacuuming or using tack cloths between steps.
    6. Maintain slow, even pressure and overlapping passes.
    7. Label sanding discs clearly to avoid stepping out of sequence.

    Following this disciplined approach will dramatically reduce swirl marks and produce wood surfaces ready for flawless finishing layers. It takes patience and attention, but the rewards are tangible in every perfectly smooth project.

    Remember: sanding isn’t just a chore—it’s an essential stage of craftsmanship. Getting grit order right transforms the final look and feel, making your work stand out for its quality and polish.

  • When and Why to Recalibrate Your Laser Level Mid-Project

    Understanding Laser Level Drift and Why It Matters

    Working with a laser level introduces a unique rhythm to any construction or remodeling project. There’s something satisfying about watching the laser beam sweep over drywall, concrete, or tiles, providing you with straight, reliable lines. But beneath that confidence lies an important question: how much can you trust your laser level throughout the duration of your project? Is it accurate from start to finish, or does its precision deteriorate over time and use?

    This question becomes a real concern when you notice things aren’t lining up the way they should—like the last row of tiles ending up out of level or shelves that don’t look quite right. The difference between a flawless finish and a frustrating correction often comes down to knowing when to pause and recalibrate your laser level.

    Why Calibration Can Drift During a Project

    Even the best laser levels can experience calibration drift. The reasons vary and usually involve small, often unnoticed factors. For example:

    • Bumps and impacts: A subtle knock to the tripod or laser, even one you barely feel, can affect its internal alignment.
    • Environmental factors: Shifts in temperature or humidity can cause the internal components to expand or contract slightly, affecting accuracy.
    • Time and vibration: After hours of work, vibrations from other tools or movement might cause minor misalignments.
    • Relocation: Moving the laser to a different spot or repositioning its mount can create slight changes that add up.

    Because job sites are dynamic environments, these small shifts can add up and go unnoticed until they affect your work.

    Key Moments to Recalibrate Your Laser Level

    Laser levels don’t come with warning lights or alarms to tell you when calibration drifts. Instead, it’s up to you to recognize when a recalibration check is necessary. Here are the essential moments to stop and verify accuracy:

    • After relocating your setup: Every time you move your laser level—even just a few feet—you should confirm it’s still projecting a true line.
    • Following any accidental bumps or drops: If someone nudges your tripod or you drop something nearby, pause to check. Even minor impacts can cause enough misalignment to affect precision.
    • When environmental conditions change: If the temperature shifts significantly during the day, especially going from cool mornings to hot afternoons, verify your laser’s readings.
    • On long, multi-phase projects: For jobs spanning several hours or multiple rooms where the laser is moved repeatedly, build recalibration checks into your workflow.
    • Whenever you suspect something is off: Trust your instincts. If a projected line looks wrong or measurements aren’t adding up, don’t hesitate to double-check.

    Developing a Routine for Mid-Project Laser Checks

    In my own work, I’ve learned that being proactive with calibration pays dividends. Instead of waiting for mistakes to show up—like a crooked door frame or uneven cabinetry—I now stop at regular intervals to perform quick accuracy checks. This approach can save you hours of rework down the road.

    A simple technique I rely on is establishing two fixed reference points on surfaces known to be level or plumb, such as a foundation floor or a previously finished wall. Here’s how it works:

    1. Measure the distance from the laser line to your reference point at one end.
    2. Measure the same at the other end.
    3. If both measurements match within your tolerances, continue working confidently.
    4. If not, recalibrate your laser before proceeding.

    This quick “two-point reference” check usually takes less than 30 seconds but gives you reliable, real-world validation of your laser’s accuracy before committing to any new cuts or installations.

    How to Perform a Basic 180-Degree Calibration Check

    Most laser levels come with an easy method to check whether your tool is still calibrated:

    1. Place the laser level on a perfectly flat, stable surface or mount it securely on the tripod.
    2. Project the laser line onto a distant wall or surface at least 5 meters (around 16 feet) away and mark the line.
    3. Rotate the laser 180 degrees, aiming it back toward the same spot.
    4. Compare the original line and the rotated line to see if they overlap precisely.

    If the lines do not match, your laser level’s internal components may have drifted. Depending on your tool’s design, you might need to readjust the level, run an auto-calibration function, or send it in for professional servicing.

    A Refresher Tip: Shift Your Perspective to Prevent Fatigue Errors

    Working extended hours with precision tools can lead to subtle errors caused by fatigue and tunnel vision. To counteract this, take short breaks every couple of hours to reset your focus.

    During these breaks, step back from the immediate task and review the project from a higher-level viewpoint. Sometimes a quick walk around the space or a fresh set of eyes—perhaps from a colleague—can help identify calibration and layout issues you might have missed.

    This mental refresh complements your technical checks and ensures your attention to detail remains sharp as your project advances.

    Why Trusting Your Measurements Means Checking Regularly

    Ultimately, trusting a laser level requires active participation throughout your project. It’s tempting to assume your tool remains precise once set, but routine verification is the best way to avoid costly mistakes.

    Quick calibration checks are especially vital on detail-oriented tasks like tile installation, cabinetry, or trim work, where even minor misalignments are obvious and difficult to fix later.

    Establishing this habit transforms your workflow—it becomes about preventing issues before they arise, not just reacting to problems. This approach protects your craftsmanship and helps maintain a professional standard that clients and colleagues will appreciate.

    In Conclusion

    Laser levels are powerful, reliable tools—but they aren’t infallible. Environmental factors, impacts, and the natural progression of a workday all can nudge accuracy off course. To ensure your measurements remain true, develop a workflow that includes periodic recalibration: after moving your tool, when conditions change, after bumps, and whenever doubt creeps in.

    Simple techniques like the two-point reference measurement or the 180-degree rotation check offer practical, fast ways to confirm your laser’s accuracy without disrupting your flow. Remember, the best time to recalibrate your laser is before errors appear, not after.

    Next time you set up your laser level for a new phase, pause for a quick check—it’s an investment that saves time, preserves your project’s integrity, and upholds the quality you expect from your work.

  • Travel Light: Small Bag, Big Trip, Effortless Adventures Await You

    There’s a certain quiet before a trip when everything gets laid out on the bed and it’s time to decide what stays and what goes. Which sweater actually makes sense? Which book won’t just take up space? Packing for a flight always brings a bit of gentle indecision—what you plan to take and what you really need rarely line up.

    This time, I paused at my carry-on, resting a hand on its familiar shape. It’s been everywhere with me—flights, trains, backseat rides. But next to it was something new: a slim, simple day bag I’d picked up on a whim, designed to tuck inside my carry-on and barely take up any room. I used to wonder why people cared so much about bags, but now, in the early 4 a.m. calm, I had to admit swapping my bigger purse for this smaller one suddenly made a lot of sense. If you ever want to browse for a low-key upgrade, by the way, Carry Supply has a few worth checking out.

    Airport mornings have their own routines—shoes off, laptop out, trying to decide if that half-used lotion is small enough. I used to be one of those travelers juggling a heavy tote and a carry-on, constantly digging for my passport or untangling chargers that always ended up in the way. It always felt more stressful than it needed to.

    But this time felt different. The new small bag held just what I actually needed: passport, headphones, paper ticket folded up. At security, instead of my usual awkward shuffling, I set my carry-on and the slim bag on the belt and realized I wasn’t in a rush for once. No frantic digging, nothing misplaced. Even the guard smiled at how smoothly it went and waved me through. For the first time, I felt like one of those people in travel ads—relaxed, already ready for the trip.

    At the gate with plenty of time to spare, I sipped a warm coffee and watched people going by, happy to have my book within easy reach in the new bag. It’s funny how small changes in what you bring can make the biggest difference. Somewhere between checking in and grabbing my window seat, I realized I didn’t miss my old overstuffed tote at all. Traveling lighter just made everything easier. The usual airport tension dropped away, replaced by a quiet sense that I’d finally figured out a way to make things smoother.

    On the plane, the view outside faded into clouds. My new bag tucked easily under the seat, leaving room for my feet—a nice little win. My seatmate struggled to cram her oversized bag under her seat, and I caught her eye with a quick smile. It does take a few clumsy trips before you figure out what works for you.

    After landing, weaving through arrivals, it hit me how easy it was to swing my bag over my shoulder and keep moving. One hand was free for my carry-on, which I quickly appreciated as I watched others balancing awkward totes and packs. Sometimes it takes changing just one thing to make all of travel feel less complicated.

    Outside, in the bustle of the city, I reached into my bag for my hotel card and phone—right where I put them. A good travel companion isn’t always a person; sometimes it’s just a bag that works. What started as a spur-of-the-moment purchase ended up being the handiest part of this trip. I even caught my shuttle without feeling rushed.

    Little discoveries like this stick with you just as much as any landmark or meal. Those first quiet moments at the gate or an easy walk through security, hands free, end up becoming some of the brightest parts of the journey.

    The days passed with new streets, quiet parks, and night city lights. As always, I settled into the rhythm of a new place, my old carry-on and my new small bag close by, holding just what mattered. By the end of the trip, I noticed I was packing lighter, both in bags and in mindset. The usual annoyances—security lines, waiting at the gate—just faded into the background.

    Back home, unpacking, I looked at the bag on my kitchen stool and thought about how the simplest changes last the longest. Coffee at the airport, finding what I needed right away, walking through arrivals without feeling bogged down—they all made a difference. Sometimes it takes a while to leave behind what you don’t really need.

    If you’re curious, the place where I found mine is here: Carry Supply. For now, traveling feels a bit easier—like next time, I’ll already be looking forward to finding something good waiting by the door.

  • “Master the Art of Effortless Travel: Pack Smart, Travel Light”

    Every time I’m zipping up my suitcase the night before a flight, the weight feels totally manageable—sometimes even light. I’ll put the carry-on on the bed, sit on it just to coax the zipper shut, feeling slightly victorious as it finally closes. Maybe it’s the warm light in my bedroom or the city sounds outside that make it all feel okay. I like to think I’ve got packing down: smart, simple, always just the essentials. Still, there’s that small, familiar worry that tomorrow, it might somehow feel heavier.

    Morning comes and the air feels a bit thicker. I check things one last time—a sweater over my shoes, headphones wedged beside a paperback, a tiny pouch tucked in the corner. The bag waits by the door, canvas stretched tight. Carrying it down the stairs, my heart does that usual travel-day thing—part excitement, part nerves, even after plenty of trips.

    At the airport, my carry-on somehow seems twice as heavy the minute I lift it from the car. Maybe it’s the early hour or just the rush of moving between home and the busy terminal. As I join the flow of travelers, airport sounds blend together—shuffled steps, quiet voices, rolling bags. I notice people clutching their own luggage, each face showing a trace of that pre-flight energy. For some reason, the straps always feel like they’re digging in a bit more than they did at home.

    Waiting in line, I glance at the line of carry-ons—some with old stickers, others looking new. Mine sits by my ankle and I find myself rethinking what I packed. Laptop, book, snacks, a charger, that dependable sweater for the cold plane. Airports are great for second-guessing. Do I really need that paperback? Did I overpack by one pair of jeans? I start to realize it’s less about the items themselves, and more about how they connect me to home and help the next place feel a little more familiar.

    It’s around this point—usually when I’m paused near the gate or people-watching in the waiting area—that I’ll start idly scrolling sites like http://carrysupply.myshopify.com, daydreaming about better ways to pack or lighter bags for next time.

    Security brings a little relief. Carry-ons get lifted onto the belt, everyone quietly hoping their things make it through without a hitch. A few feet later, I gather my stuff and repack with the muscle memory of someone who’s done this a lot. There’s comfort in the routine, even if my arms are a bit tired. Maybe the heaviness is more about the moment—how close departure is—than the bag itself.

    At my gate, coffee balanced on my knee, I swipe through old photos, passing the time. Boarding starts and the usual dance begins—bags overhead, small apologies in the aisle. My carry-on fits with a soft thud, and having it stashed above feels strangely reassuring. It’s always a grounding moment when I grab it again on arrival—the first real step into somewhere new.

    Above the clouds, things go quiet. I tuck in with a scarf and watch people nap or flip through magazines, feet propped on their own carry-ons. It hits me mid-flight that packing is really just a series of hopeful guesses. We do our best, but the real weight at the airport isn’t what’s inside the bag. It’s in the leaving, and in all the small hopes tucked away for the trip ahead.

    Once I land and head into the fresh air, my carry-on rolling behind me, things feel lighter. There’s a shift stepping through a new doorway, sunlight at a different angle. The grip on my bag loosens and any heaviness eases with each step forward. Unpacking in a hotel room always reveals what was useful and what just took up space—the sweater that got worn, the book that maybe didn’t. Still, even when I could have packed less, I feel glad I packed the way I did.

    Days go by in a blur of new sights and sounds. I drop my bag by the corner and pretty much forget about it until it’s time to move again. Sometimes, looking out a window and watching the world go by, I realize the only thing heavier than the bag is that moment before heading home. Going back always feels like a bigger deal—like the bag somehow absorbed a bit of each day: crumpled receipts, half-finished books, maybe a small trinket tucked in with my socks.

    Heading home, the airport routine repeats itself. There’s a different kind of weight to leaving a place behind, and everyone in line seems a bit quieter, bags repacked a little tighter than before. As I roll mine to the gate, I wonder if anyone else notices how their bags seem a bit heavier on the way back.

    At home, unpacking feels oddly satisfying. I look at the scuffs, the stretched seams, and I remember which train or flight each one came from. It’s nice to think about how travel leaves little marks on both the bag and on me. The carry-on isn’t just for my stuff; it holds all the changes each trip brings.

    In the end, it’s just a bag. But somehow it’s not. For all the times it feels too heavy, or the handles ache, it’s still how I’d rather travel. And every so often, as I’m browsing http://carrysupply.myshopify.com, I catch myself smiling—already planning the next time I’ll be rolling that bag out the door.

  • Travel Light, Feel Free: Mastering Carry-On Comfort Everywhere

    There’s a certain quiet that settles over the early hours before a long flight. The world feels paused—caught between home and whatever comes next. This morning has that mood: soft blue outside, distant traffic, my alarm doing its job. My carry-on waits by the door, zipped and upright, a small comfort in its readiness. I glance at it and feel a nudge of reassurance. It’s packed just right: not too much, not too little.

    The airport always has its own pace, no matter where you are. I move through it, still carrying a bit of my apartment’s hush. The routine feels oddly peaceful—passport checks, shoes off, the slow shuffle through lines. My carry-on glides along quietly, grounding me as everything else shifts. Nearby, someone’s on the phone fretting about gate numbers. A kid tries to slip away from their mom’s grip. Lattes hiss behind the kiosks. We’re all part of the same scene, just waiting on what’s next.

    It’s a strange kind of quiet that sits between what you have to do and what you’re hoping for. For these few hours, life narrows down to moving and waiting. I send a quick goodbye text, get a “good luck” ping back. That little message and the feel of my bag’s stitching bring home a bit closer. After security, I pause by the windows and watch planes heading down the runway. There’s something steady about those big machines—like being reminded that soon, I’ll be somewhere new.

    I have this habit of browsing at http://carrysupply.myshopify.com when I think about travel gear that makes things easier.

    Boarding always seems organized at first, then a bit restless. I find my seat and get my carry-on overhead—still a relief every time it fits up there. Hours in the air blend together, sliding past as we cross the map. I’m glued to the window, watching the wing, feeling a mix of being separate but also part of it all. The routine of flying is almost soothing. Mostly, there’s nothing to do but settle in, watch clouds drift by, save your spot on the digital flight map, and listen to the sounds around you.

    Out over the Atlantic, I notice I don’t track time on planes by clocks. It’s the small habits—the way I curl up, nudge my bag closer, click open the latches for headphones or that half-melted chocolate in the side pocket. Flight attendants pass quietly, checking in. Gradually, it gets easier to let go for a while. Up here, it’s just me, my thoughts, and the steady hum.

    As we start to descend, the sun is coming up somewhere behind us. People sit up, the quiet is filled with the click of seat belts and bags unzipping. I reach up for my bag—a familiar touch after so many miles. Stepping into arrivals, I squint through jet lag and neon. Home feels a little farther back in my mind. At baggage claim, I slip past the carousel, relieved to just keep moving with only what I brought.

    There’s something nice about the small, steady things—my bag rolling easily, pockets still in order. Maybe that’s why I keep figuring out how to travel with just a carry-on. Over time, it’s become my traveling ritual. It’s not just about packing light—it’s about that sense of being a bit freer on the move.

    If you’re the sort who likes order in these details, who feels reassured by a good bag, you end up spotting your kind in an airport. Sometimes, I notice someone with luggage that’s clearly been places. Catching their eye, I usually just share a quick smile. Some things don’t need words.

    There’s always a moment after landing when tiredness mixes with anticipation. The city waits outside, but I pause, hand on my bag, just taking it in. For now, home is right here with what I’ve carried in. I step out—new city smells, engines fading, and the old routine already feeling distant.

    Toward the end of the trip, that familiar hush seems to return. There’s a rhythm to it: leaving, arriving, the small comforts you bring along. Packing before heading home, my bag right beside me under another airport’s sun or rain, I still catch myself half-planning, half-daydreaming about the next time. Sometimes I find myself back at http://carrysupply.myshopify.com, just to see what might make the next journey smoother.

    And so the quiet returns. The trip winds down, but the calm sticks around a bit longer. The world stretches out, and somewhere between here and home, the journey just keeps going.

    http://carrysupply.myshopify.com

  • The One Setup Habit That Guarantees Perfectly Straight Installations

    Why Crooked Installations Happen More Often Than You Think

    We’ve all experienced the sinking feeling that comes after hanging shelves or pictures only to see that something isn’t quite right. Even slight misalignments can spoil the look of an otherwise well-organized space. Home improvement projects relying on precision can easily go awry if the foundation of that precision—the setup itself—is overlooked.

    Using a laser level is a common way to keep things straight and in perfect alignment. However, owning one doesn’t guarantee flawless results. Many DIYers and even professionals assume that simply turning on a laser level will deliver perfect lines. In reality, a vital yet often neglected step determines whether your installations are perfectly straight or subtly skewed.

    Start With a Stable, Truly Level Base for Your Laser Level

    Before you switch on your laser level, pause and consider the surface where the tool will rest. Whether you set your laser on a tripod, a table, or directly on the floor, the flatness and stability of that base are critical.

    Imagine setting a laser level on an uneven or slightly tilted surface. The laser projects what it thinks is a level line, but if the tool is not truly horizontal, the resulting guideline is actually off-angle—sometimes imperceptibly at first but enough to cause noticeable issues over longer distances.

    Take it from the experience of many installers: setting the laser on a worn dip in the floor or an uneven table causes a cascade of error. For instance, when cabinets are installed using a laser line that’s just a fraction off level, it leads to doors that don’t close properly or shelves that skew perceptibly.

    Why Tripod Height and Placement Matter

    Tripods or stands that support the laser level should be positioned to reflect the intended height of your installation line, ideally within about ±10 millimeters. Setting a laser too low or too high can exaggerate minor unevenness in the supporting surface, amplifying errors over the installation distance.

    Moreover, the tripod should be sturdy and rated for the laser level’s weight to prevent subtle movements or tilting as you work. Tripods or stools with adjustable feet and built-in bubble vials offer fine control to achieve a solid, level base.

    How to Check That Your Laser Level’s Foundation Is Perfectly Flat

    Here’s a quick, no-fuss method for ensuring your laser level sits flat and stable. Place a standard bubble (spirit) level on the spot or surface where you plan to put the laser. If the bubble isn’t centered, adjust the base by moving the tripod legs, placing shims or folded paper under one leg, or picking a different spot until the surface is perfectly level.

    After settling on the spot, do a simple hand test by pressing down gently near the laser’s base to check for any wobble or give that might cause shift during your work session. Stability at this stage is a huge factor in your installation’s accuracy and durability.

    Measuring Long Runs and Avoiding Compounding Errors

    Errors scale over distance. A tiny 2mm tilt at the base can translate to a 5mm or greater misalignment over just a 3-meter run. On projects involving shelves, cabinetry, tile, or molding, this difference becomes glaring and costly to fix.

    For longer projects, like running tile rows or paneling over 6 feet, confirm your mounting spot is level to within 1mm per meter using a good quality 600mm spirit level if possible. Recheck the laser’s baseline periodically during installation to avoid gradual drift caused by bumped tripods or foot traffic.

    Where to Position Your Laser Level in the Room for Optimal Accuracy

    Jumping straight into placing your laser wherever there’s free space often leads to distorted lines or missed reference points. Instead, position the laser directly across from your principal installation wall or along a line between known fixed points, such as corners or door frames.

    This strategic positioning allows you to envision the entire work zone clearly and ensures the laser line reaches every critical point without distortion or blind spots.

    Smart Tips for Working With Long Distances

    • Use the laser’s micro-adjustment features, if equipped, to fine-tune the line once set.
    • Ensure both endpoints of your run fall within the laser’s effective range (some indoor lasers work best within 10-20 meters).
    • Mark the tripod footprint on the floor temporarily with painter’s tape, so if it’s accidentally bumped, you’ll immediately notice the shift.

    Refreshing Your Setup Approach for Better Results

    If you’ve been rushing your setup or skipping checks, try this mindset shift: treat the laser level’s base as the “foundation” of your project, much like the bedrock for a building. Dedicate an extra five minutes to leveling and stabilizing that base at the start. This small investment saves hours (and frustration) down the line.

    Consider routine “laser check-ins” during the project—every time you take a break, get a delivery, or change tools—return to verify the laser hasn’t shifted. Professionals swear by this habit as it catches problems early and preserves quality throughout the job.

    Common Mistakes and How to Avoid Them

    Besides neglecting the base surface, people often don’t:

    • Check that tripods bear the laser level’s weight without flexing.
    • Use bubble levels on both the laser housing and surface beneath it to cross-verify levelness.
    • Position the laser line relative to fixed, room-reference points rather than approximate locations.
    • Mark tripod feet locations, so accidental movements are easy to spot.
    • Periodically verify that the laser hasn’t drifted.

    Addressing these basics can transform average outcomes into consistently straight, professional-looking installations.

    Conclusion: The Foundation Before the Beam

    The key to flawless, crooked-free installations isn’t just in owning a fancy laser level—it’s in the often-overlooked setup step of leveling and stabilizing the tool’s foundation. Taking the time to confirm your laser level sits on a truly flat, steady surface, at the right height, and positioned smartly in the room pays off tremendously.

    Checking for uneven flooring, engaging the right tripod, and re-verifying throughout the project ensures that the laser’s beam guides you accurately from start to finish. This attention to detail may seem small, but it’s the difference between professional-quality craftsmanship and frustrating, uneven results.

    Next time you prepare for a project, pause at the setup stage to check your laser’s resting surface. Your carefully aligned shelves, tiles, and finishes won’t just look better—they’ll reflect a craftsman’s care and command.