Author: jaesoon_admin

  • How to Know When Your Reciprocating Saw Blade Needs Replacing

    Understanding the Importance of Saw Blade Maintenance

    Your reciprocating saw blade may seem like a simple component—just a thin strip of metal fastened to your tool. However, it plays a pivotal role in every cut you make. Using a dull or damaged blade doesn’t just hurt the quality of your work; it can stall your progress, overwork your tool’s motor, and even create safety hazards.

    Experienced professionals and dedicated hobbyists alike know that recognizing when to replace a blade is essential for maintaining productive, safe, and efficient cutting. Let’s dive into the telltale signs your blade needs replacing, why ignoring these will cost you more in the long run, and how proactively swapping blades leads to better results.

    Key Signs It’s Time to Replace Your Reciprocating Saw Blade

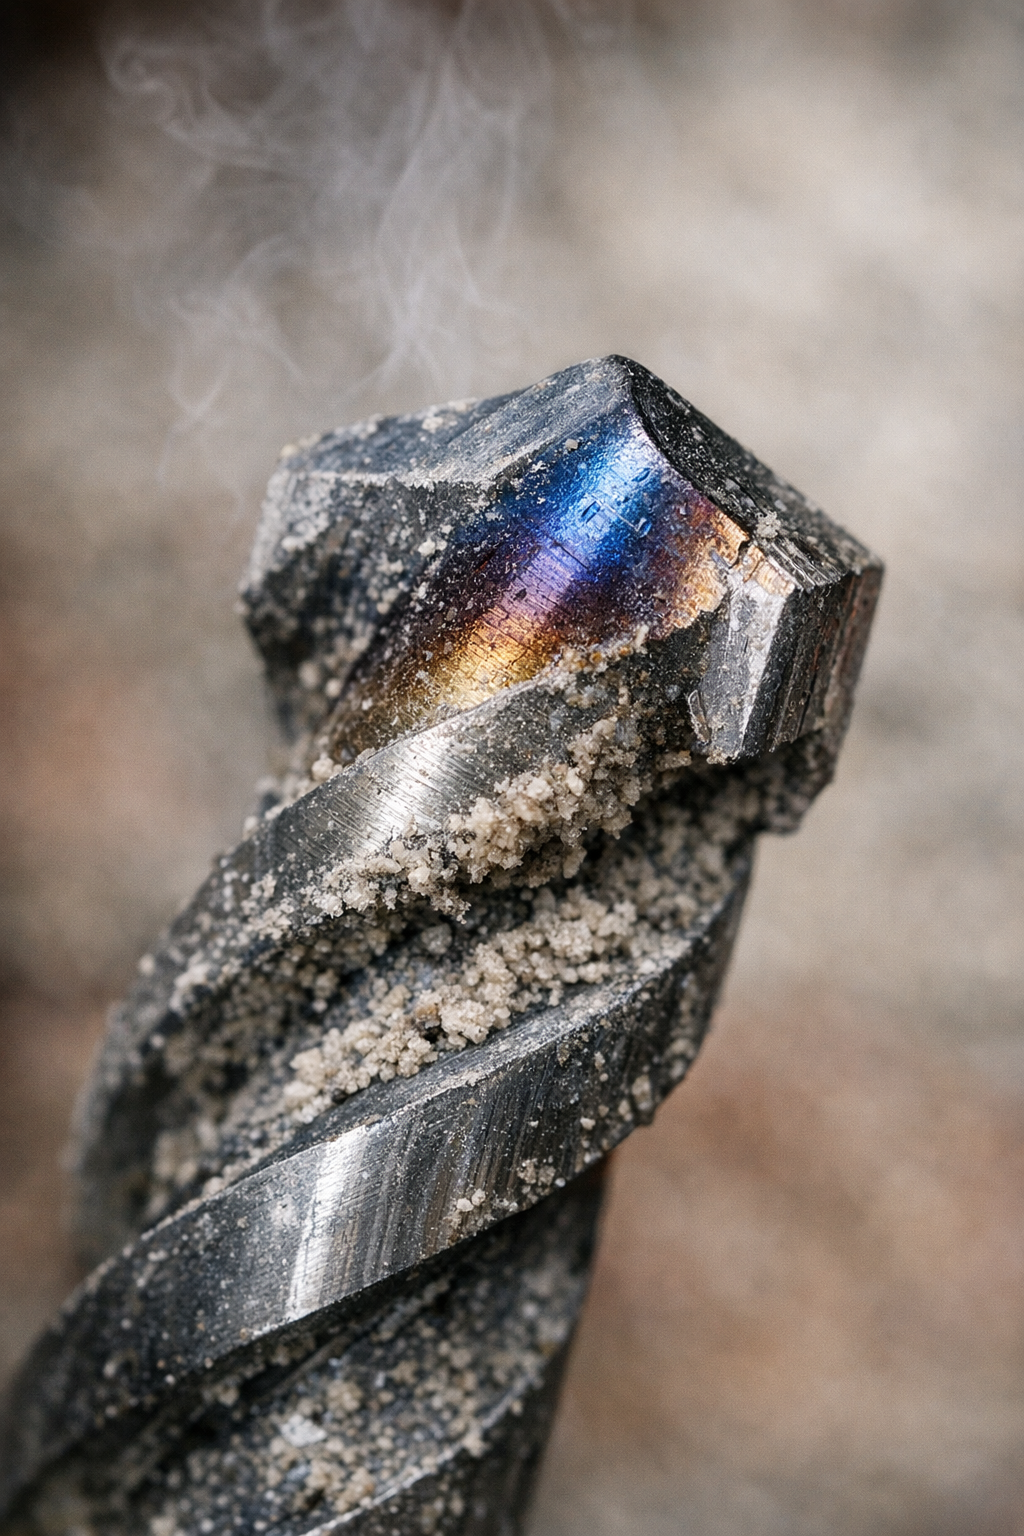
    1. Sparks and Smoke Indicate Excessive Friction

    If you see sparks while cutting metal or notice smoke rising from the blade, you’re dealing with a dull blade producing too much friction. This often occurs with fine-tooth blades (18–24 teeth per inch, or TPI) on steel or coarse-tooth blades (6–10 TPI) on wood. When overheating happens, it’s a clear warning that the blade’s cutting efficiency has sharply declined.

    2. Jagged, Sloppy, or Burned Cuts

    New or well-maintained blades cut cleanly, producing precise, smooth edges. Conversely, a dull blade will yield uneven or splintered cuts, leaving the material frayed or burned. If you notice the kerf (cut width) widens, or edges darken with scorch marks, your blade is past its prime.

    3. Noticeable Drop in Cutting Speed

    Is each cut taking significantly longer than before? Since typical reciprocating saws operate around 2,500–3,000 strokes per minute (SPM), a slowdown suggests resistance caused by blade wear. Rather than blaming your technique, it’s usually a sign to refresh the blade.

    4. Increased Vibration and Tool Chatter

    All reciprocating saws have some vibration, but excessive shaking or erratic movement during cuts often signals a blade that no longer tracks straight. Not only does this affect cut accuracy, but it also accelerates wear on your saw’s motor and internal components.

    Common Pitfalls of Using a Worn Blade

    A frequent mistake is applying extra pressure or raising the orbital action setting to push a dull blade through the material. This only generates more heat, wears out both motor and blade faster, and increases the risk of losing control or damaging your workpiece.

    Additionally, using the wrong blade type or quality for your material expedites blade wear. For example, blades designed for wood won’t last in demolition work involving nails or metal pipes. Selecting high-quality bi-metal or carbide-tipped blades specifically rated for your task will save you time and frustration.

    Blade Life Varies by Material and Blade Type

    The lifespan of a reciprocating saw blade depends largely on what you’re cutting and the blade’s design:

    • Wood Cutting: Straight wood blades can remain sharp for dozens of cuts on softwood like pine.
    • Mixed Demolition: Blades with variable pitch teeth (e.g., alternating 10/14 TPI) are built for durability across wood, metal, and composite materials but will dull quicker with intense use.
    • Metal Cutting: Fine-tooth blades specialized for thin sheet metal may only last for a few cuts during heavy use.
    • Heavy-Duty Demolition: Cutting through cast iron, conduit, or thick composites can wear blades down fast—sometimes within a single workday.

    Real-World Example: The Cost of Pushing Blades Too Far

    Consider this scenario: while demolishing old deck railings, the blade began to struggle halfway through. Cuts became jagged, the saw bucked unpredictably, and the blade’s shoe started gouging the surrounding wood. Simply switching to a fresh 14 TPI bi-metal blade transformed the experience—progress resumed smoothly, with cleaner cuts and less effort. This swap reduced total cutting time by over 50%, illustrating how blade maintenance directly affects efficiency and safety.

    How to Develop a Blade Replacement Routine

    Rather than waiting for failure, embedding blade inspection and replacement into your workflow ensures reliable performance. Here’s a practical approach:

    Pre-Job Inspection Steps

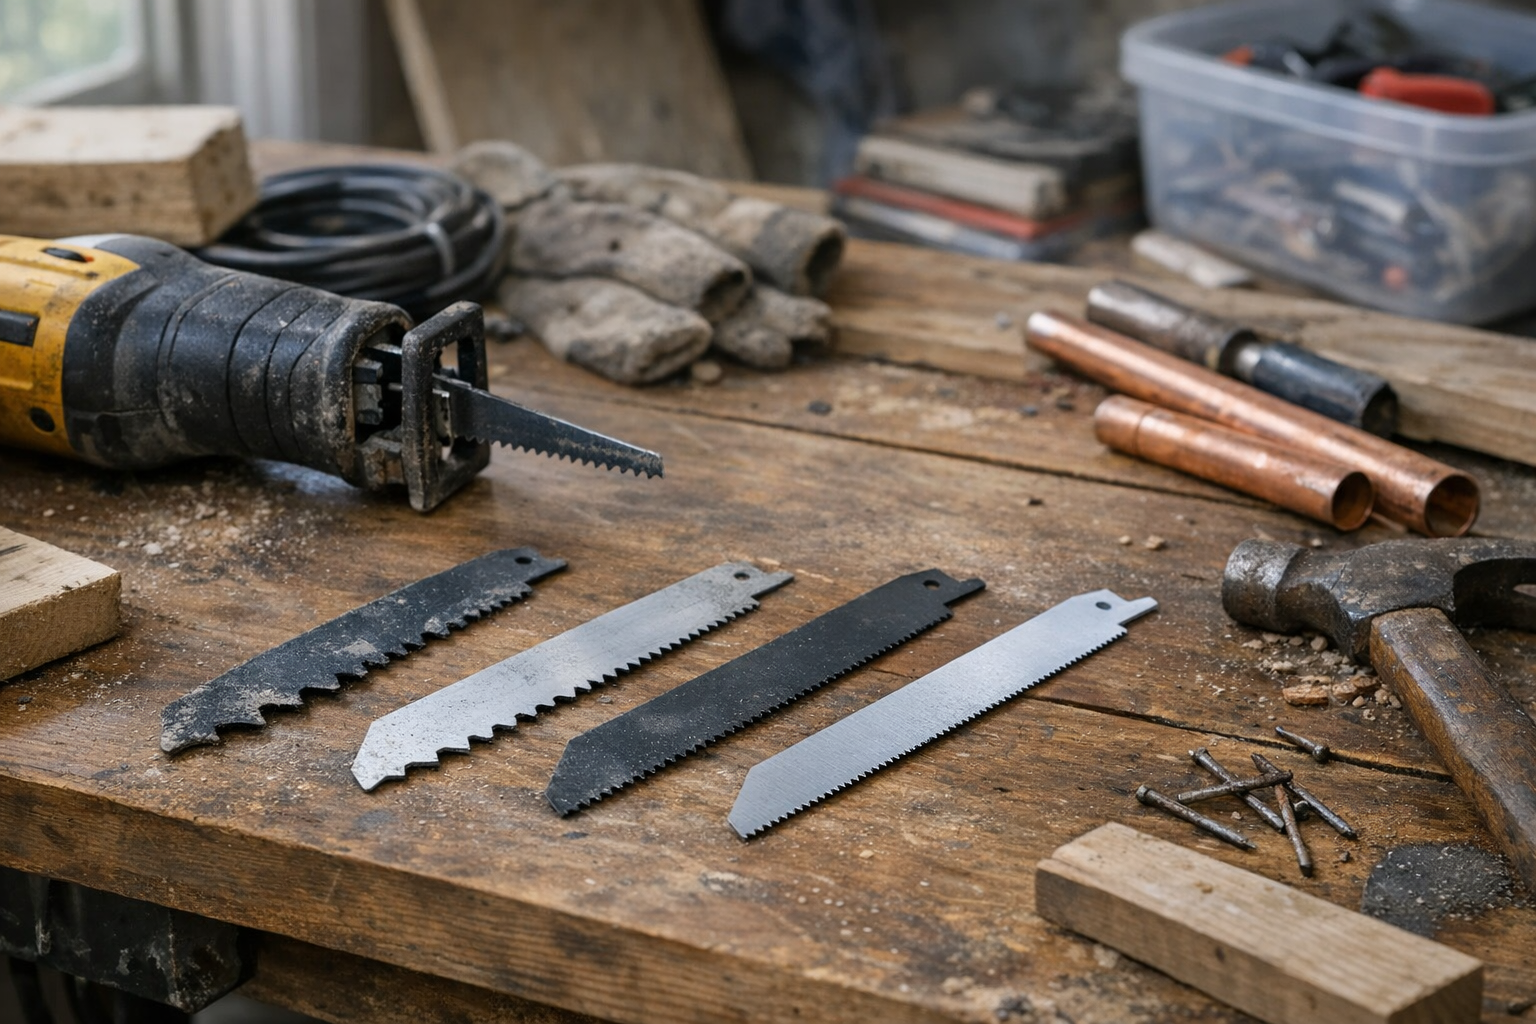
    • Visual Check: Look for rounded, missing, bent, or discolored teeth. Blue or black tints indicate overheating and compromise blade integrity.
    • Feel the Teeth: Gently run a finger along the blade’s edge (carefully to avoid injury). Sharp teeth should feel rough and grabby. Smooth or dull-feeling teeth need replacement.
    • Check Straightness: Lay the blade flat to detect warping or kinks. A blade that bends out of alignment affects cut precision and risks tool damage.

    Replace blades that fail any of these tests before starting your cuts.

    Refresh Tip: Take Short Breaks to Extend Blade Life

    When working on tough materials, try cutting in shorter bursts—about 20 to 30 seconds per pass for metals—then pause to let the blade cool. This simple habit reduces overheating and prolongs sharpness, especially during extended demolition work.

    Benefits of Timely Blade Replacement

    Regularly swapping out your saw blade preserves all aspects of your work: cleaner cuts, reduced material waste, less chance of injury, and longer saw life. It also makes your workdays smoother, minimizes frustration, and helps maintain a professional standard of quality.

    By setting aside a moment each day or before major projects to inspect and replace blades, you ensure your reciprocating saw is always ready to perform at its best. This habit builds discipline into your tool care routine, saving you time and money in the long run.

    Final Thoughts: Make Blade Checks Part of Your Prep

    The difference between struggling through a project and finishing efficiently can often come down to the condition of your blade. Rather than ignoring warning signs or “getting your money’s worth” by pushing a dull blade, consider the cost of lost productivity and damaged materials.

    Next time you gear up for a big cut, take a moment to inspect your blade. A simple swap out before you start keeps you cutting clean, working safely, and maintaining momentum.

    When did you last change your reciprocating saw blade?

  • How Tooth Count Transforms Your Saw’s Speed and Precision

    Why Tooth Count Matters in Reciprocating Saw Blades

    When it comes to demolition or renovation, the power of your reciprocating saw is only part of the equation. The blade’s teeth per inch (TPI) profoundly affects how fast and smooth your cuts will be. Recognizing how TPI influences performance can save time, energy, and unnecessary blade wear on the job.

    Understanding Teeth Per Inch (TPI)

    TPI refers to the number of teeth on the blade within one inch. This simple measure reveals a lot about the blade’s cutting profile:

    • Low TPI (6–10 teeth per inch): These blades have fewer, larger teeth, ideal for fast and aggressive cuts through wood and softer demolition materials.
    • Medium TPI (10–14 teeth per inch): Offering a balance, these blades suit situations with mixed materials, including wood with embedded nails.
    • High TPI (14 teeth and above): Designed for cutting metals, PVC, and finer finish work where smooth, snag-free cuts are essential.

    Matching TPI to Your Material and Task

    Choosing the right tooth count based on your cutting material can dramatically improve efficiency and blade longevity.

    Wood and Fast Demolition Jobs

    For framing, plywood, and soft demolition tasks, lower TPI blades (6–10) excel. With larger teeth, these blades bite deep and cut quickly, helping you blaze through wood and composite materials. They’re especially effective in wood that contains nails when you opt for bi-metal blades, which provide enhanced durability against hard fasteners.

    Mixed Materials and Renovation Tasks

    When you encounter a blend of wood, nails, and other materials, choosing a medium TPI blade (10–14) balances cutting speed with control. These blades reduce vibration compared to coarser blades, helping you maintain precision in renovation scenarios.

    Metal, PVC, and Fine Finish Work

    High TPI blades (14 and above) shine when you’re cutting metal pipes, conduit, or materials requiring a clean finish. Blades with 18 to 24 TPI and a narrow kerf (around .035″) minimize friction and heat buildup, extending blade life and providing smoother cuts that reduce post-cut cleanup.

    The Interaction Between TPI, Stroke Speed, and Pressure

    The number of teeth isn’t the only factor controlling speed and efficiency. Your saw’s stroke per minute (SPM) and how firmly you push the blade also matter:

    • Low TPI blades perform best at high SPM (around 2,800 to 3,000 strokes per minute). Applying steady, moderate pressure lets the teeth slice through material cleanly without overheating.
    • High TPI blades require slower, smoother strokes with less pressure to avoid tooth damage and excessive wear.

    For example, forcing a coarse blade with excessive pressure may cause teeth to dull prematurely due to heat and friction.

    Practical Experience: The Impact of Choosing the Correct TPI

    Picture cutting an old pine window frame. Starting with a 14 TPI metal blade, the saw buzzes but barely makes headway. Switching to an 8 TPI demolition blade transforms the experience: the saw glides effortlessly, finishing the cut in a fraction of the time and with less strain on your arms.

    This illustrates a key point — even the most powerful saw struggles if the blade isn’t right for the task. Adjusting tooth count can turn hours of effort into minutes of efficient work.

    Balancing Speed and Finish Quality

    While low TPI blades bite fast, their cuts tend to be rougher and cause more splintering. A simple two-step technique can raise your finish quality:

    1. Use a low TPI blade for the initial fast, rough cut.
    2. Follow up with a high TPI blade to smooth the edges and reduce tear-out.

    This approach saves time overall and delivers cleaner results for visible cuts or finish carpentry tasks.

    Refresh Tip: Let the Blade Work for You

    One of the most common mistakes is forcing the saw blindly. Instead, try easing your grip and allowing the blade to cut at its own pace. Letting it glide steadily reduces wear, decreases vibration, and often speeds up the job. You’ll feel the difference between fighting the tool and collaborating with it. This subtle adjustment can be surprisingly powerful, especially when paired with the appropriate TPI blade.

    Additional Recommendations for Blade Selection and Use

    • Use bi-metal blades for demolition when nails or other fasteners are common, as these blades resist wear better.
    • If using a reciprocating saw with orbital action, keep the orbital setting engaged for wood cutting, and turn it off when cutting metal — this improves blade longevity.
    • Maintain an organized blade rack, so the right TPI blade is always within easy reach. Frequent blade changes aligned with material types pay dividends in cutting speed and blade life.

    Conclusion

    Your reciprocating saw is only as fast and effective as the blade it’s equipped with. Selecting the right tooth count based on your cutting material and adjusting your cutting technique unlock faster, cleaner cuts with less frustration. Whether demolishing old framing, slicing through pipes, or fine-tuning trim, understand your TPI—and let your blades work smarter, not harder.

    Remember: start coarse for speed, shift finer for precision, and respect your blade to keep it sharp and ready.

  • How the Right Driver Bit Can Save Your Screws—and Sanity

    Understanding the Root Causes of Stripped Screws

    If you frequently use drills or impact drivers, you’ve likely encountered the frustrating whine and slip of a driver bit spinning out of a screw head. Stripped screws aren’t merely an inconvenience—they cost you time, increase frustration, and sometimes even damage your project materials.

    More often than not, stripping results from a mismatch between the driver bit and screw head, worn tools, or poor technique. Recognizing these factors is the first step toward addressing the problem.

    Common Reasons Screws Get Stripped

    • Incorrect bit type or size: Driver bits must match the screw head profile and size precisely for optimal grip.
    • Worn or poor-quality bits: Rounded edges or fatigue reduce contact and increase the chance of cam-out.
    • Inferior screws: Soft metals or previously damaged screw heads strip more easily.
    • Excessive torque or angled pressure: Applying too much force or screwing at an angle encourages the bit to slip out.

    How Bit Design Influences Stripping

    Choosing the right driver bit type matters as much as technique. Let’s explore four popular bit profiles and how their designs reduce stripping:

    Torx Bits: The Star Performer

    Torx bits are shaped like a 6-pointed star, offering increased surface contact with the screw head. This design minimizes cam-out, even under high torque, which is why Torx has become standard in many applications requiring durability.

    For example, when driving 3” structural screws at high RPMs using an impact driver, Torx bits hold the screw firmly without slipping. Using the correct size—usually T20 or T25 for heavy wood screws—is critical to maintaining a tight fit. Any undersizing will lead to cam-out and potential strip-out.

    Owners should also ensure their Torx bits have crisp edges and replace them at the first sign of wear to retain grip advantages.

    Square (Robertson) Bits: Reliability in Construction

    Common in North America, square driver bits feature a robust square tip that offers deep, positive engagement with the screw head. The snug fit allows you to even start screws one-handed, making them incredibly effective for repetitive tasks such as subflooring or decking.

    In my experience, driving long deck screws into wet timber becomes noticeably easier with #2 Robertson bits—the bit stays firmly planted without slipping even as fatigue sets in. Choosing the correct size (#1, #2, or #3) is essential to avoid spin-outs caused by poor fit.

    Pozidriv Bits: The Improved Phillips

    While often confused with Phillips, Pozidriv (PZ) bits include extra ribs that prevent cam-out common in Phillips screws. Mainly used in European furniture assembly, these bits deliver better control even in particle board or composite materials.

    Recognizing Pozidriv screws is easy—they have additional “tick marks” on the head. A common mistake is to use a Phillips bit (PH) on a Pozidriv screw, which leads to stripping due to poor fit. Sizes like PZ2 are prevalent in flat-pack furniture.

    Hex (Allen) Bits: Simple, Slippage Resistant

    Hex bits are common in bicycle repair and some furniture assembly. Their six flat sides prevent cam-out because there are no “rises” to cause the bit to slip out under torque. Using exact metric sizes is crucial; mixing imperial and metric can damage the screw head.

    For deep-set screws, opting for long-shank Allen bits avoids wobbling and ensures even pressure on the fastener.

    Practical Tips to Avoid Stripping Every Time

    Tip 1: Always Pause and Match Bit Profile and Size

    Before driving any screw, take a moment to verify both the bit type and size. Similar-looking bits can feel close but differ subtly enough to cause slippage. I’ve learned that dropping the bit into the screw head before starting—feeling for a tight, wobble-free fit—saves enormous frustration later.

    Even under time pressure, committing to this habit drastically reduces stripped screws and saves time spent on screw extraction.

    Tip 2: Maintain and Replace Your Bits

    Worn or rounded bits are a silent enemy. If you feel the bit slip or hear clicking noises while driving screws, it’s a sign the bit edge has lost integrity. Keep commonly used sizes marked and regularly inspect their condition before starting projects.

    Additionally, for heavy-duty jobs that use impact drivers delivering up to 200 Nm of torque, invest in impact-rated bits specifically designed to resist twisting and shearing.

    A Fresh Approach: Shift Your Mindset on Fastening

    Here’s a subtle but powerful mindset refresh: rather than rushing to drive screws fast, treat screw driving as a direct dialogue between your tool and the material. Paying attention, even briefly, to the fit of your bit turns your work from a race against time into a controlled process. This shift reduces mistakes and makes your projects more enjoyable.

    Eventually, this mental shift becomes automatic, and you’ll find yourself instinctively reaching for the right bit and torque setting without breaking pace.

    Conclusion: Precision Matters for Cleaner, Safer Builds

    Stripped screws are rarely just bad luck—they usually signal a need to reconsider your choice of driver bits and maintenance habits. Whether you choose Torx, Square, Pozidriv, or Hex bits, each offers design advantages that minimize slippage and strip-out when paired with proper technique.

    By prioritizing exact bit profiles and sizes, inspecting tool wear, and shifting your approach to screw driving, you’ll reduce frustration and achieve cleaner results. After all, smooth, reliable fastener installation is foundational to professional, high-quality workmanship.

    So next time you reach for your drill, spend a moment checking your bit. Your fasteners—and your finished project—will thank you for it.

  • Why Do Masonry Drill Bits Overheat? The Surprising Reason

    Understanding Overheating in Masonry Drilling

    Drilling into masonry such as concrete, brick, or cinder blocks is a common task, yet it presents unique challenges compared to softer materials like wood or drywall. One frequent issue is the rapid overheating of drill bits during these jobs, which can lead to dulling, damage, and slower progress.

    But why exactly do drill bits heat up so quickly when working with masonry? Unlike softer surfaces, masonry is dense and abrasive. The drill bit is subjected to intense friction as it grinds through stone or mortar particles, and if this friction isn’t managed properly, it generates heat almost immediately.

    The Role of Friction and Debris in Bit Overheating

    Friction occurs when two surfaces rub against each other—in this case, the drill bit’s cutting edges and the gritty masonry material. The spiral flutes of a masonry bit are designed to help remove dust and debris from the hole as you drill. However, masonry dust is fine and tends to compact quickly inside the drilled hole, especially if the bit doesn’t clear it frequently.

    When dust accumulates near the drill tip, it increases friction even further and traps heat. Without the ability to dissipate that heat efficiently, the bit’s temperature spikes rapidly. This can cause discoloration of the steel (blue or brown hues), dull the cutting edges, and send burning odors into the air.

    Speed and Feed Rate Impact

    Another critical factor is the drill’s speed (typically measured in RPM or strokes per minute) and the pressure applied. Masonry drilling generally performs best at low to moderate speeds—commonly between 500 and 1,500 strokes per minute when using a hammer drill mode. Running the drill at excessively high speeds can multiply friction and cause heat to build too fast for the bit to handle.

    Similarly, applying too much force throws the bit into overdrive, pressing the flutes tightly against the wall and increasing contact friction. The ideal approach is a steady, moderate feed combined with controlled speed to balance efficient cutting with heat management.

    Real-World Experience: A Lesson in Drilling Technique

    In practice, I’ve witnessed firsthand how drilling technique determines bit longevity. On one renovation project, two brand-new masonry bits were ruined by overheating in stubborn basement concrete. Initially, I drilled continuously with firm pressure and high speed, causing the bit tips to discolor and the drill to stall.

    Switching strategies to a “pecking” technique—drilling for a couple of seconds, then pulling the bit out to clear debris and let the tool cool down —produced dramatically better results. The bits stayed cooler, we drilled faster overall, and the holes were cleaner and more accurate.

    Key Reasons Bits Overheat So Fast in Masonry

    • Compaction of Dust: Fine masonry dust clogs the hole quickly and trapped dust raises friction and heat.
    • Inappropriate Speed: High RPMs increase heat production exponentially during cutting.
    • Excessive Pressure: Overloading the bit presses it tightly against the surface, increasing friction beyond optimal levels.

    Choosing the Right Bit

    The type of bit matters too. Carbide-tipped masonry bits provide better heat resistance than standard High Carbon Steel (HCS) bits. However, no bit can withstand sustained overheating if speed, pressure, and dust removal are neglected.

    Practical Tips to Prevent Overheating

    1. Use the Pecking Drilling Method

    Drill for 2–4 seconds, then pause and pull the bit out to clear accumulated dust. This continuous clearing ensures the tip doesn’t get buried in compacted debris, reducing friction and heat buildup.

    2. Regulate Speed and Pressure

    Keep your drill speed moderate (around 500–1,500 SPM in hammer mode). Adjust the pressure so the bit advances steadily but does not stall or bind. Aim for a comfortable force roughly between 12–18 kilograms, enough to bite smoothly without loading excessively.

    3. Select the Correct Drill Setting for Material

    Soft bricks and mortar respond well at lower orbital settings (1–2 on a 4-level scale), while plain concrete requires higher power but still controlled application (levels 3–4). Adapting settings prevents overexertion of the bit.

    Mid-Project Refresh: Change Your Perspective on Drilling

    Drilling masonry is a dance of technique rather than sheer force. Resist the urge to power through in one continuous motion, even when time is tight. Instead, think of it as a measured rhythm—bite, pause, clear. Recognizing overheating signs early (like color changes, odors, or stalling) allows you to adjust instantly and protect your bits before damage becomes permanent.

    Taking time to monitor your bit temperature and drilling cadence can feel slower initially but leads to faster, cleaner holes and longer bit life overall. This mindset shift can refresh your approach and turn frustrating masonry drilling into a smoother, more predictable process.

    Recognizing Signs of Bit Overheating

    • Discoloration: A blue, brown, or purple tint at the bit tip is a classic heat signature.
    • Burning Smell: A faint metallic or burning odor often accompanies excess heat.
    • Sluggish Drilling: The tool feels like it’s stalling or binding unexpectedly.
    • Visible Dust Smoke: Occasionally, dust may smolder slightly due to heat.

    If you notice any of these signs, stop drilling immediately, back the bit out, and allow it to cool. Then dial back your drill speed, lighten pressure, and resume using the pecking technique.

    Long-Term Benefits of Proper Technique

    By adjusting how you approach masonry drilling, you not only protect your bits but also improve job quality. Holes are cleaner, anchors fit better, and you spend less time swapping broken bits mid-project. A good rhythm reduces tool wear and even lowers the risk of operator fatigue.

    Consider rotating bits during large jobs or employing a cool-down pass for deep holes. Keeping a keen eye on drill performance and bit condition pays dividends in efficiency and durability.

    Conclusion

    Overheating drill bits in masonry drilling are a common yet avoidable problem rooted primarily in friction and poor dust management. Employing a thoughtful drilling technique—moderate speed, controlled pressure, and frequent dust clearing—dramatically reduces heat buildup and prolongs bit life.

    Mastering this rhythm requires patience but rewards you with smoother drilling, better-quality anchor holes, and less downtime caused by bit failure. Next time you pick up your hammer drill for masonry work, remember: a little technique goes a long way.

  • Why Impact Ratings Matter More Than You Think for Eye Safety

    Stepping onto a busy workshop floor for the first time, one of the first things you might notice is how different safety glasses really are. Some feel light and flimsy—almost just clear plastic—while others have robust frames and lenses that suggest real durability. But what truly distinguishes effective eye protection isn’t just how they look or feel; it’s their impact rating.

    Impact ratings are technical standards that specify exactly how much force safety glasses can endure without breaking or failing to protect your eyes. Unlike guesswork or assumptions, these ratings come from rigorous testing procedures designed to simulate real hazards workers face every day.

    Why Impact Ratings Matter

    When working in construction, manufacturing, or even home improvement, flying debris can go from an unnoticed risk to a serious eye injury in seconds. A small metal fragment, wood chip, or splinter can travel at high speeds and cause permanent damage if your eye protection isn’t up to the task.

    That’s where impact ratings come in. They tell you that the glasses you’re wearing have passed stringent tests where objects are propelled at the lenses at defined speeds and sizes, confirming whether the eyewear can absorb or deflect the impact without breaking or ejecting the lens.

    Common Eye Protection Standards Explained

    ANSI Z87.1 (United States)

    The American National Standards Institute (ANSI) sets one of the most widely recognized standards for safety eyewear in the U.S., called ANSI Z87.1. Within this standard, you’ll find two key levels:

    • Basic Impact (Z87): Glasses must survive a 1-inch (25.4 mm) steel ball weighing roughly 2.4 ounces, dropped from a height of 50 inches (about 1.27 meters). This simulates medium-speed debris you might encounter during light tasks.
    • High Impact (Z87+): The “plus” designation indicates higher protection. Glasses must withstand a 1/4-inch (6.35 mm) steel ball shot at 150 feet per second (about 45.7 meters per second) without the lenses breaking or coming loose. This rating is crucial for heavy-duty jobs like grinding, cutting, or any task generating high-speed particles.

    EN 166 (Europe)

    Over in Europe, safety glasses follow the EN 166 standard, which prioritizes impact resistance as well. Markings on eyewear indicate the level:

    • F (Low Energy Impact): Tested against particles traveling at 45 meters per second.
    • B (Medium Energy Impact): Tested against higher speed projectiles at 120 meters per second.

    Choosing glasses with the right EN 166 rating gives you confidence that your protection will hold up under similar real-world conditions.

    Matching Impact Ratings to Your Task

    Using the right eyewear for the specific hazards you face is critical. Here’s a practical snapshot:

    • Grinding, Cutting, or Using Rotary Tools: Opt for glasses labeled with ANSI Z87+ or EN 166 B. These higher impact ratings provide the durability to withstand faster, harder strikes.
    • Painting, Dusty Environments, or Light Debris: Basic ANSI Z87 rated glasses may suffice, but it’s essential to stay alert to the possibility of accidental slips or higher-impact incidents.

    One common mistake I encountered was colleagues using just regular prescription or sunglasses during quick jobs — a risky practice since those lenses usually lack any impact certification and can shatter on impact.

    The Real-Life Difference Impact Ratings Make

    Personal experience is the best teacher. Once, while working on a renovation, a coworker accidentally tossed me a crowbar. It missed my face but struck my glasses squarely. Thanks to their ANSI Z87+ rating, the lenses absorbed the impact and got scratched but didn’t break or come loose. Had I been wearing anything less protective—or nothing at all—the result could have been a serious eye injury.

    That close call reshaped my approach to eye safety: I started keeping my high-impact safety glasses right next to my frequently used tools instead of tucked away in a drawer. That simple placement helped remind me—and others on site—to put them on consistently. Because in fast-paced environments, convenience often wins over good intentions.

    Choosing and Maintaining Protective Eyewear

    What to Look For

    • Certification Marks: Flip your glasses over and look for clear markings such as “Z87” or “Z87+” (ANSI) or “EN 166 F” / “EN 166 B” (Europe). These are assurances that your glasses have undergone rigorous testing.
    • Lens Quality: Avoid lenses with distortion, cracks, or pitting. Even micro-cracks can weaken protective properties and cause failure during an impact.
    • Proper Fit: Glasses should fit snugly but comfortably against your brow and cheeks, with no large gaps around the edges that can let debris in. Temples should hold the frames firmly without causing headaches or pressure points.

    Why Fit Matters

    Safety glasses that don’t fit well are more likely to be removed mid-task or slip out of place, exposing your eyes exactly when protection is needed the most. Loose glasses can slide down your nose, allowing particles to sneak inside, while overly tight ones cause discomfort that wears you down over time.

    Refresh Your Perspective: The Small Habit That Makes a Big Difference

    Wearing eye protection is often about habit as much as it is about equipment quality. Here’s a simple mindset tweak I recommend:

    Instead of thinking of safety glasses as an extra step or an inconvenience, make them the first tool you reach for before starting any task.

    Try mentally marking the glasses as an extension of your hand—a tool you wouldn’t work without. By placing them in a visible, easy-to-grab spot near your main workbench or tool box, you create a visual cue to put them on each time.

    This adjustment often overcomes that stubborn temptation to “skip them for a minute” and keeps you consistently protected, especially during quick jobs or jobs with changing risks.

    Final Thoughts on Eye Safety and Impact Ratings

    Understanding and respecting impact ratings turns guesswork into smart, informed decisions that protect your eyesight. Whether you’re cleaning up drywall dust or grinding metal, the right rated glasses can be the difference between a close call and a life-altering injury.

    Next time you gear up, spend an extra moment checking those etched markings and adjusting your glasses for comfort and fit. It’s a small effort with a big payoff that helps you keep working safely and confidently—day after day.

  • How Adjusting Your Safety Gear Can Quietly Fight Fatigue

    Understanding the Hidden Impact of Fatigue on Job Sites

    Anyone who has spent long hours on a job site or in a busy workshop knows the creeping exhaustion that can set in well before lunch. You may feel dull headaches, persistent aches in your back and shoulders, and a slow but relentless drain on your energy. This fatigue isn’t simply a discomfort; it’s a risk factor that can compromise your safety and performance.

    While personal protective equipment (PPE) is often viewed strictly as compliance gear—something to wear so you don’t break safety protocols—the reality is that PPE plays a vital role in how your body copes with the physical demands of your workday. Properly chosen and correctly fitted gear supports your body and helps prevent the gradual energy drain that leads to fatigue and accident risk.

    Why Fatigue Matters: More Than Just Feeling Tired

    Fatigue affects more than just your mood—it has serious implications for your safety and efficiency. A tired worker has slower reaction times, impaired coordination, and reduced concentration. These factors contribute to a higher likelihood of mistakes and accidents. Over time, fatigue can lead to chronic issues such as repetitive strain injuries, muscle disorders, and slower recovery after shifts.

    Even if your workload or shift hours aren’t flexible, you can influence the way your body interacts with your work environment through your protective equipment.

    Choosing and Adjusting PPE to Combat Fatigue

    It’s common to underestimate how much poorly fitted or low-quality PPE adds to physical strain. For example, gloves that are too stiff or bulky reduce hand dexterity, making routine tasks feel harder and increasing muscle fatigue. Safety glasses that slip down force constant adjustments, leading to neck stiffness and distraction. Harnesses that don’t fit properly shift weight unevenly, causing muscle tension and cutting circulation—ultimately exhausting you faster.

    Gloves: Protect Without Sacrificing Dexterity

    Selecting gloves for specific tasks like flooring installation should balance protection and flexibility. Opt for gloves that offer mechanical protection at abrasion level 3 or higher, such as those compliant with EN388 standards. Lightweight nitrile-coated gloves that meet ISO 13997 cut levels A2–A3 provide excellent grip and cut resistance while allowing natural hand movements.

    Safety Glasses: A Clear View Without the Fuss

    Choosing safety glasses that meet ANSI Z87.1 standards ensures they provide durable impact resistance without sacrificing comfort. Quality glasses stay put without frequent repositioning, keeping your focus on the task—not on adjusting slipping frames.

    Harnesses: Fit Is More Than Comfort

    When it comes to harnesses, proper adjustment is critical not only for your safety but for reducing fatigue. Leg and shoulder straps that are too loose or positioned incorrectly can cause the harness to ride up during movement or a fall, transferring load unevenly. This can result in over 60% of the weight pressing on your shoulders instead of distributing evenly across your pelvis and thighs.

    Properly fitted harnesses designed to meet EN 361 or ANSI Z359.11 standards distribute arrest forces safely through the dorsal D-ring between the shoulder blades and support straps. This minimizes muscle strain and reduces risks such as circulation problems or nerve compression.

    Practical Tips for Daily Gear Adjustments

    To get the most out of your protective equipment, incorporate regular gear checks into your routine. Stand tall and gently adjust your harness straps so they rest on strong points like the top of your shoulders and the upper thighs—not too tight to restrict blood flow, but snug enough to prevent shifting.

    Check that the harness D-ring sits centered between your shoulder blades. This optimal position ensures fall forces are directed down your spine, reducing the chance of injury and unnecessary fatigue.

    For gloves and glasses, test mobility and comfort by performing typical work movements—bend, reach, grip—and note any resistance or slipping. If your gear causes you to compensate your movements, consider switching to better-fitting or more ergonomic options.

    Recharge Your Energy Through Smart PPE Choices

    Modern safety equipment offers innovations designed to reduce fatigue, such as lightweight helmets with improved ventilation and moisture-wicking liners. For example, switching from a 400-gram helmet to a 280-gram ventilated model can significantly reduce neck strain and headaches over a long shift.

    Breathable fabrics in gloves and harness straps help regulate temperature and reduce sweat build-up that can quickly sap your energy. Keeping cool and dry enhances endurance on demanding days.

    Mid-Shift Refresh Tip: Brief Movement Breaks and Gear Checks

    During breaks, take a moment to reassess your equipment fit. Stand, stretch, and check if straps have loosened or shifted. Small micro-adjustments can restore comfort and help maintain circulation, reducing the accumulation of fatigue. Pair this with simple stretching exercises for your neck, shoulders, and legs to refresh circulation and ease muscle tension.

    The Long-Term Benefits of Proper PPE

    Fatigue doesn’t just impact immediate safety; it also influences long-term health and job satisfaction. Equipment that supports your body effectively decreases the wear-and-tear on muscles and joints. Over time, this reduces chronic pain, improves recovery, and helps you stay consistent in your performance.

    Small changes like switching to ergonomic work boots with proper arch support or choosing gloves that fit your hand shape can prevent everyday aches from becoming debilitating conditions.

    Final Thoughts: PPE as a Vital Element of Work Wellness

    Accidents and fatigue often result from overlooked factors—hidden strain, ineffective equipment, or bad habits—not from a lack of effort or skill. Viewing your protective gear as an extension of your health investment is a powerful shift in mindset.

    Spend time each season evaluating and adjusting your PPE. Prioritize fit, material quality, and task-specific features with measurable standards in mind. This helps you work smarter, stay safer, and feel better day after day.

    Remember: the right protective equipment isn’t just a job site requirement—it’s a key part of preserving your energy, focus, and wellbeing throughout every workday.

  • How the Right Safety Gear Quietly Protects You All Day

    Understanding the True Importance of Safety Gear for Outdoor Work

    Spending long hours working outdoors under the sun or sky can silently drain your energy and focus. Whether you’re repairing a fence on a lazy afternoon or enduring a scorching day replacing a roof, safety gear becomes more than just compliance—it acts as your essential line of defense when fatigue creeps in and concentration fades.

    What qualifies as “essential” safety equipment can vary widely among experienced workers. Some swear by their boots, others by their gloves. But a handful of pieces consistently prove their worth across many jobsites, helping professionals complete their work safely and intact.

    1. Reliable Head Protection: Comfort Meets Critical Safety

    Wearing a hard hat might feel excessive, especially on slow or less chaotic days, but it is a crucial safeguard. A hard hat’s protective benefit is only as good as the comfort level allows you to wear it consistently throughout the day. An uncomfortable hat is often discarded after a break, increasing risk.

    Choosing one with a built-in sweatband and ratchet-adjustable suspension makes a big difference. These features promote comfort by providing a snug fit without pressure points, making you less inclined to remove it.

    Look for helmets certified to standards such as EN397 or ANSI Z89.1. These certifications guarantee impact and penetration resistance, with the shell and suspension tested to withstand drops of weights about 5 kg from 1 meter. Proper adjustment is key: maintain a 1-2 finger gap above the eyebrows and use a secure chinstrap to prevent rocking or pinching, especially on windy or active job sites.

    In my experience removing old ridge caps on metal roofs, a glancing blow to the head was absorbed effectively by a well-fitted hard hat with an appropriate chinstrap. Such incidents highlight how crucial the fit and retention system is—not just the shell itself.

    2. Eye Protection Designed for All-Day Wear

    Safety glasses must not only meet standards but be comfortable enough to remain on through fogging, sweat, and glare. Anti-fog coatings, UV protection, and adjustable nose pads can greatly improve wearability.

    Certifications like EN166 or ANSI Z87.1 ensure lenses will endure impacts such as gravel thrown up by brush cutters or flying debris from grinding tasks. Side shields add valuable peripheral coverage, protecting the side vision from stray particles.

    Always keep a spare pair handy. Nothing derails productivity faster than a cracked lens when the workload is high and the deadline urgent. Avoid the common pitfall of propping glasses on your cap—this routine almost always ends in scratched or broken lenses.

    For regular cutting or grinding work outdoors, opt for lenses that block at least 99% of UV rays to protect your eyes from cumulative sun damage.

    3. Gloves That Work As Hard As You Do

    Cheap or ill-fitting gloves rarely last beyond an hour of heavy outdoor work. The right gloves enable grip and dexterity while managing breathability and protection throughout long shifts.

    Leather-palmed work gloves often strike a balance, providing abrasion resistance and comfort. If you find your fingers turning numb when gloves are too tight, sizing up or breaking in a new pair before a big job prevents discomfort and loss of feeling.

    For tougher jobs involving heavy lifting or fence repairs, look for gloves rated EN 388: 2122X. This standard signifies reliable protection against abrasion, blade cuts, tears, and punctures, significantly reducing injury risk without sacrificing flexibility.

    However, avoid insulated gloves on hot days. Excess insulation causes sweat accumulation, reducing grip and increasing the chance of blisters during repetitive hammering or wire tensioning tasks.

    4. High-Visibility Clothing Is Essential Beyond Roadwork

    Hi-vis gear may feel unnecessary on a quiet lot, but diminished visibility due to weather changes, dust, or fading daylight puts you at risk. Lightweight reflective vests are a simple addition that enhances your presence not just to passing vehicles but also to machinery operators, colleagues, and even pets roaming the property.

    ANSI/ISEA 107 Type R, Class 2 vests meet practical requirements for outdoor visibility, with a minimum of about 775 square inches of background material and 201 square inches of reflective striping. These specifications ensure you remain visible in variable environments. Worn or faded vests can become nearly invisible under low light, negating their safety benefits.

    5. Hearing Protection: An Often Overlooked Must-Have

    Prolonged exposure to chainsaws, mowers, and circular saws can lead to ear ringing or long-term hearing damage. Earmuffs with pivoting cups allow easy on/off during breaks, promoting consistent use. Breathable cushions minimize sweat build-up, which encourages wearing them for extended periods.

    Keep your hearing protectors within easy reach—resting them around your neck rather than tossing them in a tool bag helps you remember to put them back on quickly. Look for ear defenders rated with a Noise Reduction Rating (NRR) of at least 25-30 dB to effectively reduce harmful noise levels.

    Check regularly that ear cushions remain intact and well-shaped. Pads that are split or compressed drastically reduce sound attenuation, so replace them seasonally or when damaged.

    6. Durable Boots That Support You Through Long Days

    Protecting feet requires more than a steel toe—it demands comfort and support across hours of terrain and activity. Wide toe boxes, moisture-wicking liners, and rugged treads all contribute to sustained comfort and safety.

    Look for ASTM F2413-rated boots, which provide minimum impact and compression resistance—typically around 75 foot-pounds—ensuring protection from sharp objects like nails or heavy materials.

    Slip-resistant soles certified to SRC or ASTM F3445 standards help prevent falls on inclined or uneven surfaces, an important factor when fatigue sets in and footing becomes less certain.

    Consider rotating two pairs of boots each season—alternating wet and dry use extends midsole life and delays leather cracking, which commonly signals the end of boot durability.

    Small But Impactful Gear You Shouldn’t Overlook

    Beyond the main protective gear, smaller items dramatically improve comfort and safety. Sweatbands and sun-blocking neck gaiters protect your skin and help regulate temperature. Slip-on arm sleeves shield against cuts and sunburn, while ventilated knee pads with no less than 15 mm of closed-cell foam cushion repetitive kneeling tasks and reduce discomfort.

    A Fresh Perspective: The “Set-and-Review” Safety Routine

    One practical habit that transforms long outdoor workdays is performing a quick self-inspection at regular breaks—like when you pause for water. Scan yourself from head to toe:

    • Is your helmet properly seated and adjusted?
    • Have your glasses slipped or fogged?
    • Are your gloves sweaty or torn?
    • Is your vest still visible and intact?
    • Are your boots or ear defenders fitting correctly?

    Addressing a single equipment issue each break prevents small problems from escalating into injuries or lost time. This routine resets your awareness through the day, making safety an integral part of your workflow rather than an interruption.

    For example, keeping gloves snug and sweat-free can prevent painful blisters, one of the most common complaints on manual jobs. By taking two minutes to adjust gear regularly, you maintain better control and comfort.

    How Fatigue Influences Safety and How Gear Counters It

    Fatigue rarely hits suddenly; it creeps up, causing distraction and risk-taking tendencies. Well-selected safety gear doesn’t just provide physical protection—it supports your ability to notice and respond as your focus wanes.

    When your helmet is comfortable enough to stay on, your boots reliably support tired feet, and gloves protect without squeezing, you’re more likely to spot uneven footing or a tool slipping from your grip. The right equipment acts as both armor and an extension of your senses.

    Choosing Gear That Fits Your Unique Work Style

    Every jobsite has unique demands and every worker has preferences. No checklist can cover every nuance. The one universal truth is that safety equipment works best when it fits well and gets worn consistently.

    Before your next long outdoor shift, take stock not only of what’s available but what you actually wear. If something feels uncomfortable or you catch yourself removing it frequently, invest time in finding alternatives that suit you better. Comfort and usability trump brand or price every time.

    This practical approach transforms personal protective equipment from a neglected burden into your trusted companion—your silent advantage from first light through the last punch-out.

    Practical Resources

    For an overview of protective gear that meets safety standards and real-world needs, explore comprehensive collections tailored for long outdoor hours and various job environments.

  • How Simple Habits Keep Your Air Tools Dry and Reliable

    There’s a familiar sharp hiss as you squeeze the trigger on a pneumatic tool, and a perfectly driven nail slides into the wood. But if you’ve ever relied on air-powered tools for even a few projects, you know there’s a hidden challenge lurking beneath that burst of compressed air: moisture.

    Unchecked water vapor in compressed air not only leads to visible puddles under the drain valve, but more dangerously, it causes corrosion inside hoses, damages your tools, and ruins delicate finishes. It took me one ruined paint job and a corroded impact wrench to finally understand just how important managing moisture really is.

    Why Moisture Is a Hidden Threat in Air Compressor Lines

    Compressing air naturally condenses water vapor. Humidity in the air—no matter how dry it might seem—gets squeezed into your system. When the compressed air cools while passing through hoses, water droplets form and travel downstream, reaching every tool you connect.

    What’s the real damage caused by this moisture?

    • Rust and corrosion inside tools and tanks: Prolonged exposure to moisture creates corrosion on steel parts inside your tools and compressor tank, leading to pitted ratchets, stuck triggers, and rusted fittings that need frustrating repairs.
    • Damage to painted surfaces: When moisture spits from the line during tasks like spray painting, it causes imperfections such as fish-eyes and gritty finishes. These flaws usually require sanding and costly rework.
    • Reduced tool performance: Water acts as a barrier or inappropriate lubricant inside pneumatic motors, resulting in weaker impact power or slower cycling in nail guns.
    • Premature wear on seals and valves: Moisture deteriorates rubber O-rings and gaskets, leading to leaks and loss of pressure efficiency.

    A Personal Wake-Up Call: When My Air Ratchet Clogged With Muddy Water

    My realization came unexpectedly. While assembling a steel frame, my trusty air ratchet started sputtering and nearly slipped from my hand. Unscrewing the quick connect, a few drops of brown, muddy water dribbled out. Within days, the inside of the tool was corroded and sluggish.

    It was tempting to blame the tool’s age, but a seasoned mechanic told me bluntly: “You let water ride shotgun too long.” That moment led me to adopt better moisture control habits—here’s what truly worked.

    Effective Strategies to Prevent Moisture Buildup in Air Lines

    1. Drain Your Compressor Tank After Every Use

    While this seems obvious, it’s often overlooked. I used to drain my tank once a week, assuming that was enough. One humid week changed that—just two days in, water sloshed inside my tank. Now I drain it after every session, no exceptions.

    Practical tip: Attach a clear plastic bottle under your drain valve to collect condensation. Seeing real water accumulate is a constant reminder to keep that valve open. It’s easy to ignore a closed valve; it’s impossible to ignore a filling bottle.

    If your drain valve sticks or clogs, upgrade to a ball valve or a quick-release drain for smoother maintenance.

    2. Install a Water Separator Filter Right at the Compressor Outlet

    A simple inline water separator is an inexpensive, effective upgrade. Screwed in directly after your pressure regulator, it traps liquid water before it enters your hoses.

    Choose a separator rated for at least 150 PSI, matching your compressor’s output and fittings—usually 1/4″ NPT for workshop compressors producing 4 to 12 CFM. Remember, these separators do collect water and must be emptied regularly; my own needs draining even after short, 20-minute jobs.

    3. Keep Your Hose Layout Optimized to Minimize Water Traps

    Condensation is encouraged by cool spots; hoses that sag hold water like a reservoir. I stopped letting my air hoses lie flat on the floor. Instead, I loop them with a gentle, consistent slope so any moisture naturally flows back toward the compressor or toward a drain point.

    Elevating hoses on wall hooks or racks also helps. Even raising a hose a few feet makes gravity your ally, reducing internal water pooling. Consider adding quick-disconnect couplers every 30–50 feet if you use very long hoses—this lets you clear out water without taking apart the whole system.

    4. Add a Secondary Moisture Filter Near Your Tools for Sensitive Jobs

    For tasks like spray painting or electronics cleaning, add a mini moisture filter just before your tool. These small inline filters capture residual moisture that bypasses upstream separation. Having one in place saved me from countless ruined finishes.

    Note that these fine inline filters often have lower pressure ratings (about 80–125 PSI) and need periodic replacement, usually after 20–40 hours of use in damp environments.

    5. Adopt Good Hose Storage Habits to Let Moisture Drain

    When you finish your work, disconnect your hose and hang it vertically with both ends open. This allows trapped water to drain naturally. Coiling hoses on the floor with closed ends traps water inside, encouraging corrosion and compromising hose life.

    Installing a wall-mounted rack about 4 feet off the ground is a small investment in longevity. Flexible polyurethane hoses are especially forgiving to this practice, but even traditional rubber hoses benefit significantly.

    Refreshing Your Approach: Small Habits, Big Impact

    Sometimes, a subtle shift in mindset can make all the difference in the workshop. Instead of thinking of moisture control as an occasional or tedious chore, treat it as part of your tool care ritual—just like sharpening blades or oiling moving parts.

    Consistent check-ins and maintenance after every job keep problems small or eliminated. Even small visible signs of moisture are indicators to act immediately rather than a reason to delay. This mindset shift transforms maintenance from a burden into a natural part of your workflow, extending the life of your tools and improving every project.

    The Results: Reliable Tools and Flawless Finishes

    Since making these moisture management habits routine, my air tools run cleaner and last longer. No more sputtering ratchets, no more blotchy paint surfaces. The peace of mind that my pneumatic system delivers dry, dependable air is worth every extra second spent on maintenance.

    In Summary

    Moisture in compressed air lines is a silent saboteur, causing everything from rust and premature tool failures to poor finish quality and lost productivity. Preventing it doesn’t require complicated gear—just consistent habits:

    • Drain your tank after every use.
    • Use water separators at the compressor outlet.
    • Keep hoses arranged to avoid water traps.
    • Add inline filters near sensitive tools.
    • Store hoses vertically with open ends to drain liquids.

    These simple steps shield your investment and quality outcomes. Start with something easy, like putting a bottle under the drain valve and observing your water output. This awareness is often the turning point in tackling moisture problems before they cost you downtime or expensive repairs.

    Adopting these practical moisture prevention tactics will help keep your workshop efficient, your tools reliable, and your projects flawless.

  • How to Find the Perfect Air Compressor PSI for Flawless Nailing

    If you’ve spent even a day using a nail gun powered by an air compressor, you’ve likely noticed there’s a “sweet spot” for pressure—where every nail sinks just right, smoothly and cleanly. Dialing in the correct air compressor PSI (pounds per square inch) for your nailer isn’t simply about matching numbers; it’s a subtle art that determines whether your work looks professional or ends up frustrating you with jams, proud nails, or damaged wood.

    Understanding Why PSI Is Critical for Nailing Tools

    The interaction between a nailer and its air compressor boils down to pressure, not horsepower. Each pneumatic nailer is designed to function optimally within a specified PSI range. If the pressure is too low, nails won’t drive fully—leaving them protruding or causing the nailer to jam. Too high, and you risk driving nails deep enough to damage your workpiece or even blow through thin materials.

    Typically, finish and brad nailers perform well between 70 and 110 PSI, while framing nailers require a bit more, usually in the 100 to 130 PSI range. However, these ranges are starting points, not fixed rules. The type of wood or material you’re fastening plays a big role. For example, driving nails into hard maple baseboards often requires pushing pressure toward the higher end of the finish nailer range—around 110 PSI—while softer woods like pine might only need 80 PSI.

    Professional carpenters typically pair an 18-gauge brad nailer with about 85 PSI for precise trim work, using fine-finish blades with 16–18 teeth per inch for clean cuts. On the other hand, framing tasks with heavier nailers and thicker nails—such as a 0.131-inch shank—commonly require 120 to 125 PSI for full penetration without material damage.

    It’s also important to respect the manufacturer’s pressure specifications. Operating a tool well outside its recommended PSI risks jams, misfires, and damage to both tool and material. Understanding this balance enables more consistent, quality results.

    Real-World Examples Highlighting PSI Challenges

    Consider a straightforward baseboard installation I helped a friend with recently. The job should have been quick, but the nails wouldn’t set flush. It took some troubleshooting to spot the issue: the compressor was set at 65 PSI, below the 70–80 PSI sweet spot a finish nailer typically needs. After increasing the pressure to about 80 PSI, the tool drove nails beautifully, eliminating the need to hand-tap partially sunk nails and preventing damage to the trim.

    A common pitfall is relying on compressor settings that worked “last time” without adjusting for the specifics of each job—such as material hardness or nail length. For instance, driving 2-inch nails into MDF at pressures under 75 PSI frequently results in nails that sit proud or cause jams, which in turn slows the work and can accelerate wear on the trigger mechanism.

    Typical Nailers and Their PSI Requirements

    • Brad Nailers (18 Gauge): Generally operate around 70–100 PSI. Limiting shots per minute (SPM) to under 60 helps maintain consistent pressure and precision. Use carbide tipped or high carbon steel blades to handle return cuts without dulling quickly.
    • Finish Nailers (15–16 Gauge): Ideal range is 80–110 PSI. For hardwoods like maple or oak, start near 100 PSI and adjust downward if nail heads show deformation or crushing.
    • Framing Nailers: Need 100–130 PSI. Engineered lumber often requires full-depth nail penetration at around 125 PSI, but watch for blow-through risks, which can be mitigated by reducing firing speed or using thicker, clipped-head nails.
    • Pin Nailers: Typically operate between 60–100 PSI. In hardwoods, high pressures or SPM can shear thin pins, so test carefully before starting hard jobs.

    Always use your tool’s manual as a baseline, but finalize settings by testing on scrap pieces that closely match your work material. For example, a 16-gauge finish nailer at 85 PSI suits softwood trim, but harsher materials may push the requirement toward 105 PSI for clean seating without damage.

    Testing Pressure Under Realistic Conditions

    An adjustment many professionals overlook is measuring the compressor’s output pressure at the moment the tool fires—not just when it’s idling. Under load, pressure can drop 5 to 10 PSI, especially with smaller compressors or during rapid firing. If you only adjust the regulator while the compressor is resting, you might unknowingly set the tool to underperform during actual use.

    To precisely dial in pressure, watch the gauge on the compressor’s regulator while firing 3 to 5 nails consecutively. Significant pressure dips may necessitate increasing the baseline setting to maintain consistent nail depth. This issue is amplified by longer hoses or when multiple users share the compressor.

    Here’s a practical tip: shoot test nails into scrap and check depth after every 2 or 3 small pressure adjustments—never more than 5 PSI at a time. This gradual approach helps you zero in on the perfect balance, compensating for hose loss, compressor lag, and minor air leaks.

    Helpful Signs Your PSI Needs Tweaking

    • Nails sticking out: Usually caused by too-low pressure or dull nail tips.
    • Blow-through: Nails exit the piece unexpectedly or sink too deeply; often a sign of excessive PSI or nails too thin for the material.
    • Jamming at startup: Especially in framing nailers, can indicate insufficient pressure compounded by long or narrow air hoses.

    These problems rarely require drastic changes. Often, adjusting pressure by 5 to 10 PSI and retesting resolves the issues quickly.

    Managing Compressor Limits and Recovery

    If you’re using a small compressor, it’s important to factor in its recovery time. During continuous nailing, a compact unit often struggles to maintain pressure, causing the PSI to drop between shots and resulting in inconsistent driving depth.

    For example, a pancake-style compressor with a 1–2 gallon tank can handle light trim work with 18-gauge brads, but may stall on longer runs such as installing baseboards or door jambs. To maintain consistent performance, take brief pauses allowing the compressor to recover to 90–100 PSI. Attempting to shoot when pressure falls below 70 PSI risks semi-driven nails and potential heat buildup inside the nail gun’s mechanism.

    Don’t Underestimate the Impact of Hose Length and Fittings

    Many users focus only on the compressor’s reading, neglecting the effects of hose length and couplers. Long or narrow air lines cause pressure loss before the air reaches your tool. When using hoses 50 feet or longer, or low-bore quick-connect fittings, you may need to increase compressor output by an extra 5–10 PSI to compensate.

    This is especially critical in fine carpentry or cabinetry, where even a 5 PSI drop can make the difference between a perfectly flush nail and one that sticks out. Upgrading to larger-bore hoses (3/8 inch or greater) and high-flow connectors reduces pressure loss and improves tool response, especially on runs over 25 feet.

    A Refresh Tip: Approach Each Project With Fresh Tests

    Even if you’re experienced with your tools, approach each project as a new puzzle requiring its own setup calibration. Changes in wood species, humidity, nail type, or even compressor wear can subtly shift pressure needs. Starting with fresh, incremental tests on project-specific scrap material—rather than relying on past settings—helps uncover hidden variables and ensures your pressure setup suits every circumstance.

    This mindset shift from “set it and forget it” to “test and adjust” transforms how you approach pneumatic nailing, boosting both quality and confidence before you commit your nailer to the workpiece.

    Conclusion: Fine-Tuning PSI for Smooth, Professional Results

    Proper air compressor PSI tuning for your nailer goes beyond strict adherence to specifications. It requires attention to material type, nail size, tool characteristics, hose length, and compressor capabilities under load. Paying attention to subtle signals—like nails not seating properly, blow-through, or tool jams—and methodically adjusting pressure in small increments leads to consistent, clean results.

    Testing on scrap material, monitoring pressure during actual use, and factoring in equipment limitations will save time, reduce frustration, and help you avoid common pitfalls. With the right approach, the difference between an average job and a professional finish lies within just a few pounds per square inch.

  • How Choosing the Right Rivet Gun Eases Repetitive Work Pain

    Understanding the Core Differences Between Manual and Electric Rivet Guns

    When it comes to riveting, the choice between a manual and an electric rivet gun shapes not just the task’s pace but also your physical comfort and accuracy over a long day. Manual rivet guns rely entirely on your grip strength and arm power, requiring approximately 40 to 60 pounds of handle force with every squeeze. This force adds up quickly if you’re setting rivets repeatedly across a full work shift. Quality manual guns typically have hardened steel jaws and work best paired with a fine-threaded mechanism—often between 16 to 20 threads per inch—to allow a smoother, more controlled pull.

    By contrast, electric rivet guns automate the setting process using motor-driven mechanisms. Most operate around 1,500 to 2,000 cycles per minute (SPM) and set rivets with just a quick press, significantly easing the operator’s effort. Battery-powered models equipped with at least 2.0Ah battery packs are common, and they absorb the repetitive strain that wears hands down during large jobs.

    At face value, it might seem like a mere convenience, but the difference unfolds across comfort, consistency, and workflow efficiency, especially when dozens or hundreds of rivets are involved.

    When Manual Rivet Guns Are Still the Right Tool

    Manual rivet guns have undeniable benefits. Their simplicity makes them extremely durable—no concerns about power failures or electronic malfunctions. They’re self-contained, reliable, and can offer greater precision and control in tight or awkward spaces where an electric gun’s bulk may be a disadvantage.

    They’re well suited for occasional, light-duty use, especially when working with softer rivet materials like aluminum or mild steel. For example, when dealing with oddly angled joints or tight crawl spaces, a low-profile manual gun can fit where electric counterparts cannot.

    However, it’s essential to select a manual gun matched to your task. Insufficient leverage on a model for harder materials leads to fatigue, incomplete sets, and even damage to the tool or mandrels. Generally, handle length matters a lot; a 10-inch handle provides better mechanical advantage for tougher materials such as stainless rivets. An example from a recent project involved reattaching support brackets in a confined attic space where only a slim, single-hand manual gun fit—but even then, fatigue started setting in after around a dozen rivets due to repeated squeezing.

    Why Electric Rivet Guns Are a Game-Changer for High-Volume Work

    Electric rivet tools don’t just speed up rivet installation; they dramatically reduce user fatigue. A typical electric rivet gun can fully set a standard rivet in 1 to 2 seconds and deliver a consistent pulling force, around 10 kN (2,250 lbf), ensuring clean, reliable fastenings on a variety of materials, including harder metals.

    Consistency is key when executing repetitive tasks. Fatigue often causes errors such as misaligned rivets or dropped mandrels; electric tools help reduce these mistakes by standardizing each cycle. However, one operational caution is necessary: avoid running the gun nonstop at maximum pace. Continuous rapid-fire use can overheat the motor and strain lithium-ion batteries. To prolong tool life and preserve battery health, take a 1 to 2 minute break after approximately 50 rivets, especially when working on thicker or heavier materials.

    Additionally, plan your battery swaps smartly. Carry a fully charged spare and consider swapping when your battery charge hits 30% to avoid unexpected downtime. It’s a simple practice that many overlook but prevents frustrating delays that can disrupt project flow.

    A Real-World Tip for Streamlining Your Riveting Workflow

    One surprisingly effective workflow adjustment that benefits users of both manual and electric rivet guns is pre-staging your rivets and prepping holes in batches before continuity of installation. Gather 10 to 20 rivets at once and keep them within easy reach. Also, inspect and clear holes of burrs or debris with a countersink or reamer beforehand. This setup keeps you focused during the installation run without multiple disruptive motions to fetch rivets or troubleshoot fittings.

    This setup improves pace and reduces hand strain with manual guns since you avoid frequent pauses. For electric tools, it aids consistent pacing and makes better use of each battery charge, ultimately reducing fatigue and mistakes.

    How Switching to Electric Tools Changes the Installer’s Experience

    Aside from speed and reduced effort, what strikes many is the noticeable drop in dread by the time they reach the end of a job. The cumulative hand fatigue from a manual gun tends to build gradually, often leaving operators with soreness and exhaustion at the finish. Moving to an electric rivet gun can almost vanish this weariness.

    In one recent duct installation, technicians began manually setting rivets but switched to electric halfway through. The differences were clear: more consistent, error-free results and significantly less hand soreness reported by the end of the shift. Even those skeptical of powered tools ultimately adopted electric guns for routine jobs, reserving manual guns strictly for difficult, tight access areas.

    Still, budget-conscious workers or those with infrequent riveting needs may find manual tools perfectly adequate. The key is recognizing job volume and matching the tool accordingly.

    Listening to Your Hands: Practical Advice for Choosing the Right Rivet Gun

    Rather than deciding solely based on speed or initial cost, pay attention to how your hands and body feel as the job progresses. Test both manual and electric rivet guns on typical tasks and check in with yourself toward the end of the run. Are your hands cramping? Is fatigue affecting your accuracy or enthusiasm? These clues often matter more than specs or brand hype.

    For occasional or small-scale projects, a manual rivet gun can feel almost meditative and give you total control. But once your work shifts to repetitive assembly, electric rivet guns offer a meaningful boost in comfort, consistency, and ultimately, productivity.

    Refresh Tip: Change Your Environment Between Runs to Maintain Focus

    To combat mental and physical fatigue during long riveting stretches, try briefly changing your working position or environment between batches. Stepping outside for fresh air, stretching your hands and forearms, or doing simple wrist rotations can reset muscle tension and improve circulation. This subtle shift not only rejuvenates your body but also sharpens mental focus, reducing the risk of errors when you return to the task.

    By integrating thoughtful breaks and workspace prep into your routine, each rivet set feels less like a grind and more like steady progress.

    Wrapping Up: Matching Your Rivet Gun to Your Workload

    Ultimately, the best rivet gun choice depends on the quantity and frequency of your riveting needs. Manual rivet guns excel in simplicity, reliability, and control for small or challenging jobs. They’re favorites when working in cramped spaces or with softer materials.

    Electric rivet guns shine when volume, speed, and consistency matter most—offering a tangible reduction in physical strain that preserves your hands and keeps quality high throughout long shifts. Smart battery management and intentional workflow planning heighten these benefits.

    Stay tuned to your body’s response through the day rather than just the initial ease of use. This approach ensures your tool choices support your health and productivity long-term.

    Explore the full Gumboll collection to find compatible tools and accessories tailored to diverse riveting needs.