
The Versatile Heat Gun and Its Subtle Risks
Whether you’re stripping paint, loosening adhesive, drying surfaces, or softening materials, the heat gun is an indispensable tool in any workshop or job site. Its ability to quickly apply controlled heat makes tasks easier, but improper use can cause problems that don’t show up immediately. One of the most common hidden issues is warping—materials becoming distorted or bowed after cooling down. These changes often appear hours or even a day later, creating frustrating challenges when you think the job is done.
Why does this happen? The culprit is uneven heating that causes differential expansion and contraction within the material. This undervalued phenomenon can ruin hours of work if not managed properly. Understanding how heat interacts with wood, plastics, and composites is key to avoiding these silent pitfalls.
How Heat Causes Warping in Wood and Other Materials
When you apply heat to a piece of wood or plastic, that external surface heats and expands faster than the inner core. For example, if the surface reaches 90°C while the core is still around 40°C, the outer fibers stretch out more rapidly. The interior resists this expansion, and that creates internal stress.
Once you remove the heat, the material cools and shrinks unevenly. Since different parts of the piece expanded at different rates, the contraction doesn’t balance out nicely, and permanent deformation results. In a 1-meter length of three-quarter-inch pine molding, even a short thirty-second imbalance can cause a bow of several millimeters—enough to cause installation headaches or cosmetic flaws.
Unfortunately, repairing warp caused this way is difficult. Conventional clamping or steaming rarely brings the piece back to its original shape because the wood fibers and resins have been stressed and “set” in a new position. Prevention through careful technique is the smarter solution.
Common Mistakes That Lead to Warping
One frequent error is overheating a focused small area for too long. For example, you might hold your heat gun only 1 to 2 inches away at full temperature on a stubborn spot to get paint bubbling or glue melting faster. Although it looks like progress, you’re setting up uneven temperature gradients. The surrounding cooler material cannot keep up, and tensions form.
Another mistake is using the maximum temperature setting by default, rather than dialing down to the lowest effective heat. Many jobs don’t need the gun’s full blast; lower temperatures produce gentle and more uniform heating.
Additionally, neglecting nozzle size or distance can contribute. Small, concentrated nozzles focus heat in a tight area, increasing risk. Holding the gun too close—less than 4 inches for broader surfaces—also invites uneven heating.
Proven Techniques for Preventing Warping
Maintain Proper Distance and Movement
The key to an even, warp-free application is distance and sweep. Hold the heat gun about 4 to 6 inches from the surface instead of right up close. Move the gun back and forth steadily at a pace that avoids overheating any single spot—doubling your usual sweep rate from, say, three seconds per inch to one and a half seconds per inch often works well.
Use the Appropriate Temperature and Fan Setting
Rather than maxing out heat, reduce it to the minimum effective range—often between 350 and 450°C for paint removal and adhesive softening. Some heat guns also allow airflow adjustment. Selecting a moderate airflow helps distribute heat more evenly without blasting a focused hot spot.
Choose the Right Nozzle Attachment
Wide fan or flat nozzles spread heat more gently across wood panels or molding, minimizing the risk of localized overheating. Narrow or concentrator nozzles can be reserved for very specific tasks but should not be used extensively on flat trim.
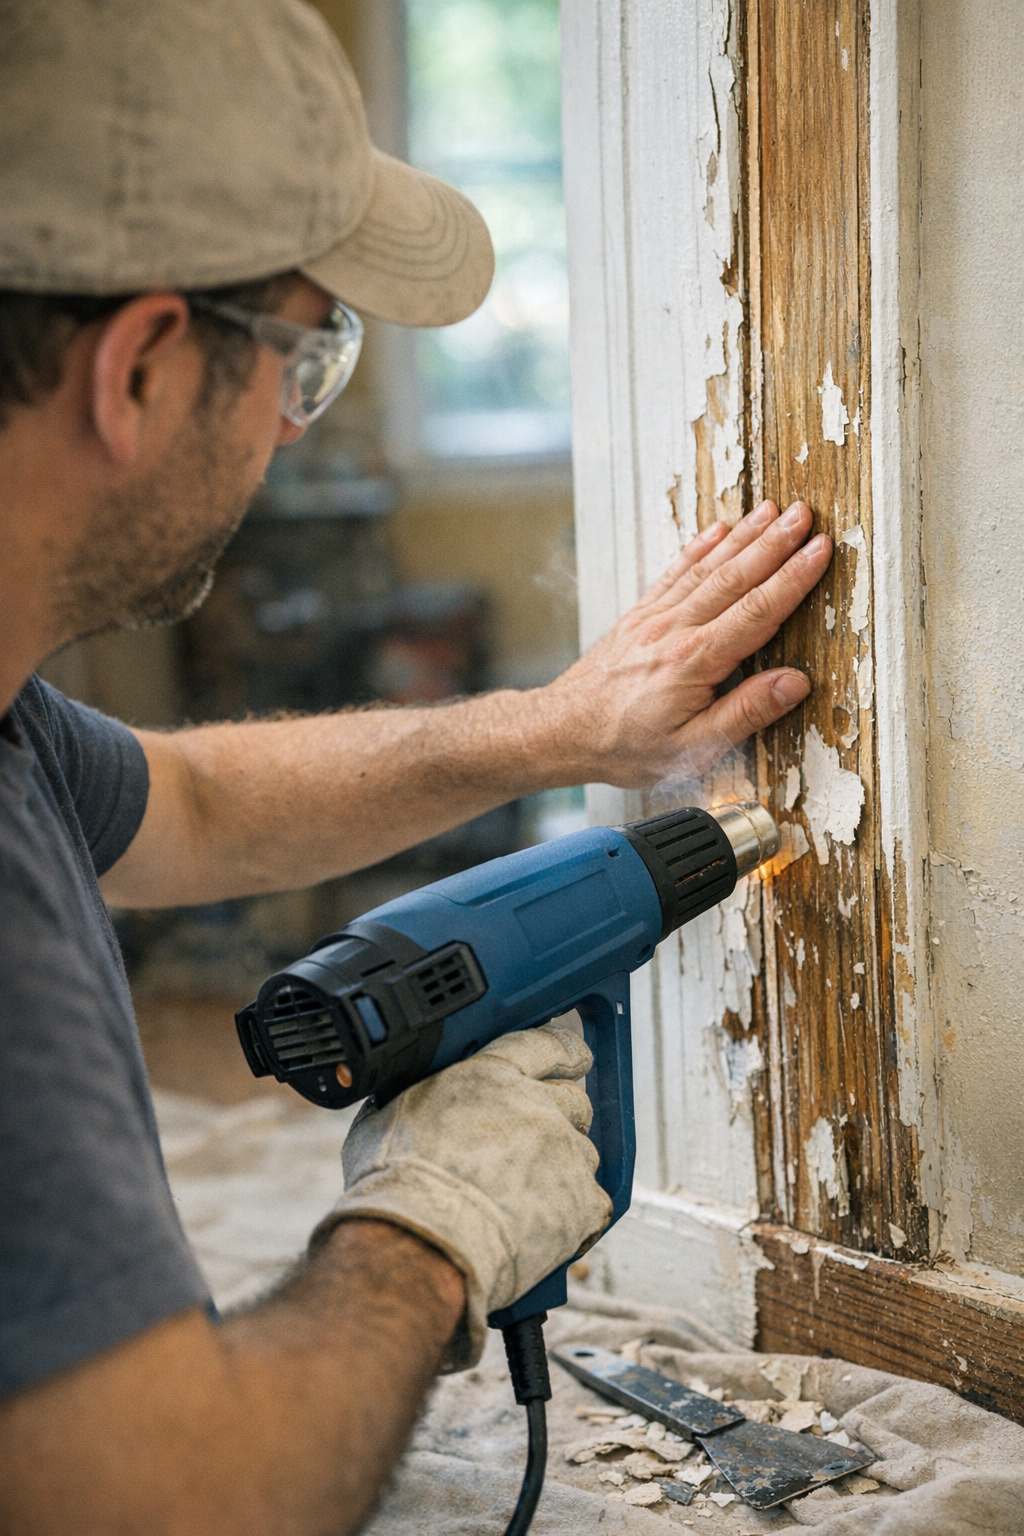
Monitor Material Temperature Physically
One underrated trick—borrowed from professional flooring installers—is to place your free hand lightly on the reverse side of the wood. Once that side feels noticeably warm, about 30°C above ambient temperature, pause heating and allow the piece to cool or even out before continuing. This tactile feedback prevents accumulation of hidden internal stresses.
What Not to Do: Why Clamping Often Fails
It might be tempting to assume that if wood warps after heating, you can simply clamp it flat afterward. In reality, materials like pine or MDF baseboards won’t reliably return to their original shape without prolonged, controlled heat and pressure treatment—something impractical on most job sites.
This is because fibers, once stretched and “set,” resist bending back. Clamping them tightly may reduce visible bows temporarily but can introduce other problems, such as splits or creases along the fiber grain.
Refresh Tip: Slow Down to Speed Up Quality
It’s tempting to rush a heat gun job when paint isn’t peeling or adhesive won’t budge fast enough. But slowing your pace and applying heat consistently over broader areas prevents warp, saves time spent on redoing warped pieces, and improves finish quality.
You don’t need to overheat. Think of it like baking a cake—you don’t want to burn the edges before the middle is cooked. Scanning gently and monitoring temperature ensures the entire material heats evenly.
Practical Example: Avoiding Warp on Pine Molding
When stripping paint from pine molding, I use a 1500W heat gun set at medium (about 550°C max, but dialed down to 400–450°C where possible). Holding the nozzle roughly 4 inches away with a wide fan tip, I move across the molding steadily at about 1.5 seconds per linear inch.
I check warmth by touching the backside of the molding every 15 or 20 seconds. If it starts getting too hot, I pause and let it cool. This avoids the warped, bowed sections I’ve seen when focusing intensively on small stubborn spots for longer than 30 seconds.
The result: paint loosens without permanent distortion, and the molding fits back in place without force or fuss.
Summary: How to Use Heat Guns Without Warping Your Work
- Keep your heat gun at least 4 inches away when heating broad surfaces.
- Use the lowest effective temperature setting and moderate airflow.
- Move the heat gun steadily, keeping sweep rates brisk to avoid overheating.
- Choose wide fan or flat nozzles for greater heat distribution.
- Use your hand on the reverse side to monitor heat buildup and pause before temperatures get too high.
- Avoid lingering over single spots to prevent internal stress buildup and warp.
- Don’t rely on clamping warped pieces to fix distortion—prevention is better than correction.
By staying mindful of these techniques, you’ll preserve the integrity of wood, plastics, and composites in your projects. Whether you’re a DIY enthusiast or a professional craftsman, incorporating an informed, measured approach to heat gun work improves long-term results and avoids costly mistakes.
Adjust your heating habits today to keep your next project straight, flat, and beautiful for years to come.