
Some tools sit quietly in the back of your toolbox, waiting for the moment when you need reliable muscle to tackle tough materials. Hammer drills and their regular drill counterparts are perfect examples of versatile tools that require a bit of know-how to use effectively. If your drill offers a toggle between hammer and drill modes, understanding when and why to switch is essential—not just for getting the job done, but for working smarter and preserving your equipment.
Understanding the Difference Between Drill and Hammer Modes
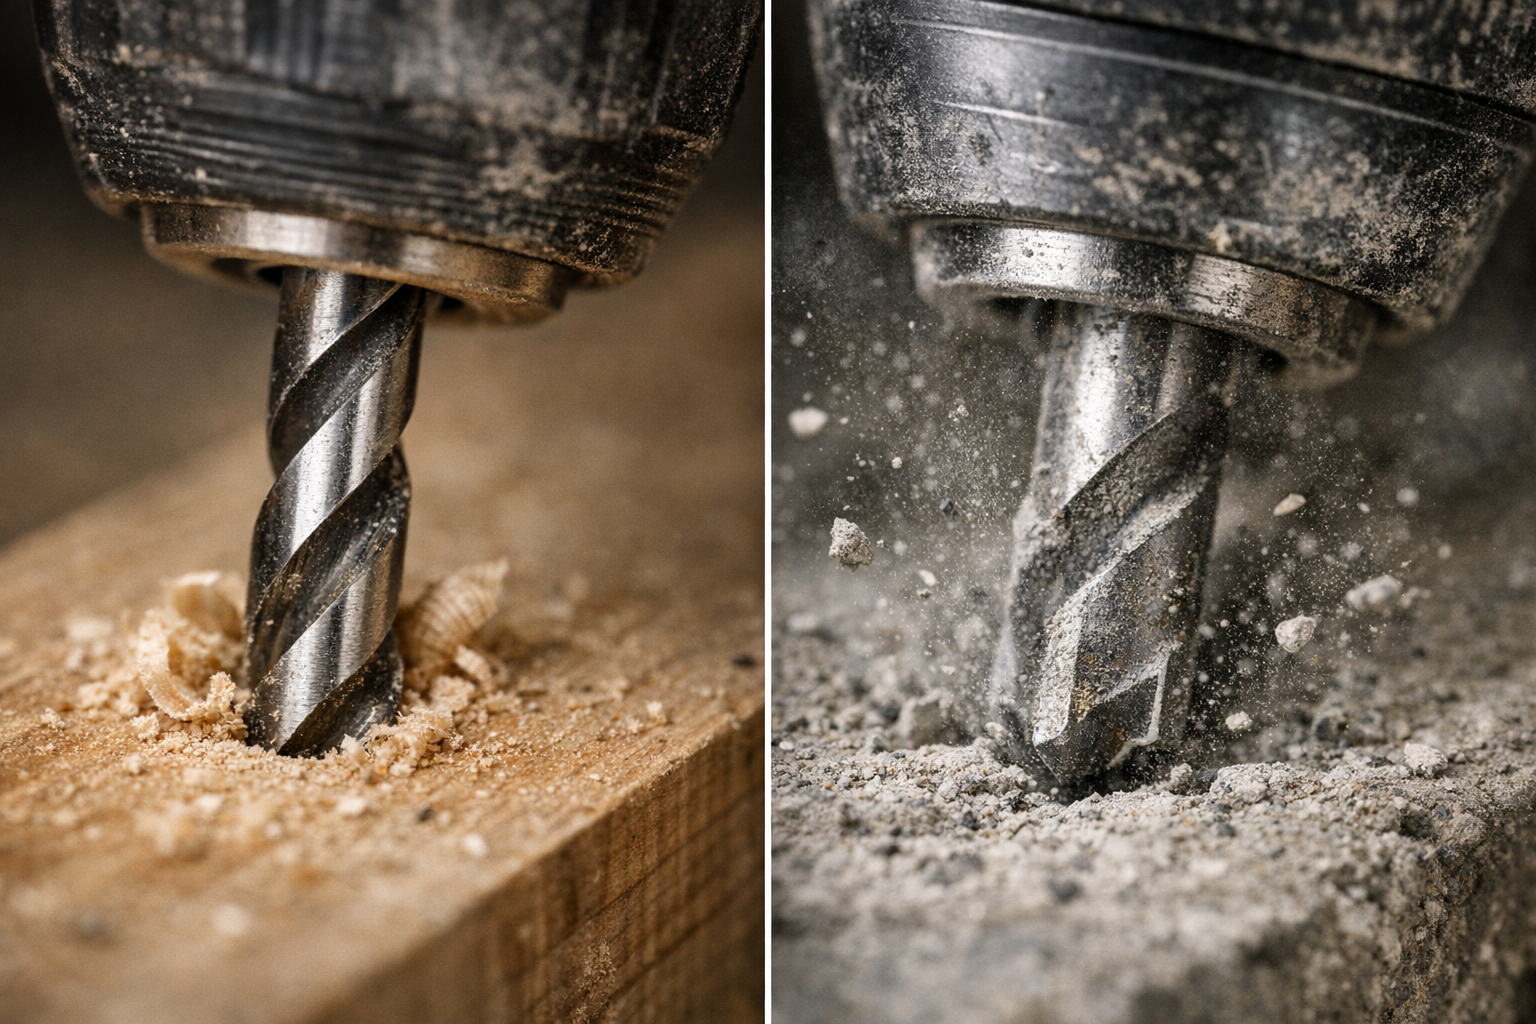
At a glance, the distinction seems simple: drill mode rotates the bit, while hammer mode adds a percussive hammering action alongside the rotation. However, the implications of this difference extend far beyond a simple toggle.
Drill Mode Explained
Drill mode causes the bit to spin continuously without any forward impact. This mode works best on softer or more delicate materials, such as wood, plastics, thin metals, and when driving screws. The steady, controlled rotation helps create clean holes without unnecessary vibration or damage. For instance, using a sharp, purpose-made wood or metal drill bit at speeds around 800 to 1,200 SPM often yields excellent results.
Hammer Mode in Action
Hammer mode adds rapid, forceful blows along the axis of the drill bit, effectively hammering the material as it rotates. This action helps break up hard, brittle surfaces like masonry, brick, concrete, or natural stone. Because these materials resist pure rotational drilling, the impact bursts the surface, allowing quicker progress. In hammer mode, carbide-tipped masonry bits are essential. Hammer drills often operate at high impact rates—from about 4,000 up to 48,000 blows per minute—depending on the model.
Identifying which mode to employ isn’t just about sparking drills or overheated bits; it’s about reading the material and adapting your approach for efficiency and tool longevity.
Real-World Experience: The Impact of Using the Right Mode
One memorable project involved hanging a heavy garage storage system on an uneven brick wall. Initially, I kept the drill in standard drill mode by habit. The bit overheated, drilling stalled repeatedly, and the brick resisted every inch. Switching to hammer mode changed everything—drilling became smoother, faster, and noticeably less strenuous. Holes were cleaner, the carbide bit stayed cooler, and the drill itself felt less taxed.
This experience highlights how choosing the right setting can preserve both your drill bits and your physical energy. For example, drilling a 6mm hole into concrete in drill mode could take over a minute, risking damage to standard high-speed steel (HSS) bits, whereas hammer mode could accomplish the same hole in under 10 seconds.
Choosing the Right Mode for Materials: A Practical Guide
| Material | Use Drill Mode | Use Hammer Mode |
|---|---|---|
| Drywall | ✓ | |
| Wood | ✓ | |
| Plastic | ✓ | |
| Thin metal | ✓ | |
| Brick, block masonry | ✓ | |
| Concrete | ✓ | |
| Stone | ✓ | |
| Tile | ✓ (with caution) |
Important Considerations for Delicate Surfaces
Never use hammer mode on delicate surfaces like drywall or ceramic tile unless you want to risk cracks or splits. For tiles, select a sharp spear-point bit and reduce the speed to maintain control and reduce heat buildup. Patience and precision trump brute force here.
Developing Good Habits: Avoiding Common Mistakes
Check Your Drill Mode Every Time
A surprisingly common error—especially on busy worksites—is neglecting to verify the drill’s mode before starting. If you’re driving screws with the drill left in hammer mode, you risk damaging screw heads and the material, not to mention suddenly jerking yourself off balance. Conversely, attempting to drill masonry in drill mode can lead to blown bits and wasted time.
Quick Preventative Tip: Before putting the bit to work, press the trigger lightly for a split second and listen. Hammer mode produces a distinct rattling or hammering sound. Verify the mode indicator visually to ensure you’ve got the right setting. This quick check prevents heat build-up, damaged bits, and ruined surfaces.
Match Your Bits to the Mode
Using a standard high-carbon steel (HCS) bit in hammer mode is a fast track to dulling or breaking bits. Always use carbide-tipped masonry bits for hammer mode, especially on brick and concrete. Similarly, for wood or metal, use appropriately shaped and sharpened bits designed for those materials.
Key Indicators for Switching Modes
Here are clear signs that will help you decide if you need to switch:
- Switch to hammer mode when:
- The drill bit stalls immediately against hard material.
- You hear a high-pitched whine with minimal progress.
- The bit heats up rapidly without effective drilling.
- Fine dust escapes rather than larger chips.
- Stick to drill mode when:
- Working with fragile materials like drywall or tile.
- When precise, clean holes are required.
- Working on soft materials such as wood, plastic, or sheet metal.
- Driving screws, where hammer action can cause cam-out.
Refresh Your Perspective: Listening and Feeling Your Drill
Beyond toggling switches and matching bits, developing an intuitive understanding of how your drill reacts can elevate your skills. Listen to the noise your drill makes—the smooth hum of drill mode versus the rhythmic pounding of hammer mode—and feel the vibration through the handle. Early recognition of these cues lets you adapt on the fly, avoiding damage and improving efficiency.
Also, an often overlooked habit is periodically pausing during extensive drilling in masonry to let your bit cool. Run the drill briefly off the workpiece at low speed or simply rest for 30 seconds. This practice helps prevent overheating, preserves the carbide tip, and extends bit life.
Final Thoughts: Making the Most of Your Hammer Drill
The difference between hammer and drill modes is more than mechanical—it’s about how you respect the materials, your tools, and yourself. Armed with knowledge, a bit of practice, and attentiveness, you’ll find your hammer drill becomes less of a guessing game and more a natural extension of your hand. Remember to always:
- Match the mode to your material and task.
- Use the correct drill bits designed for the mode.
- Check your drill’s mode setting every time before starting.
- Pay attention to feedback: sounds, feel, dust, and progress.
- Pause during long masonry tasks to cool your bits.
By adopting these habits, every drilling job becomes smoother, safer, and more enjoyable.