
Completing a DIY project indoors with the help of a heat gun can bring a sense of quiet satisfaction—whether it’s stripping old paint, softening adhesive, or accelerating drying times on paint and finishes. The steady hum of the tool, the subtle scent of warmed materials, and the small victories of things going smoothly all contribute to that rewarding feeling. Yet, beneath this straightforward utility lies a layer of risk that many users don’t fully consider. Using a heat gun indoors demands respect for its power and thoughtful precautions, because a simple slip can quickly turn from productive to problematic.
Why Heat Guns Are Essential for Indoor DIY Work
Heat guns have become staples in many toolkits because they combine precision, versatility, and controlled heat delivery. Unlike open flames or chemical strippers, heat guns provide a safer alternative for tasks like paint removal, vinyl repair, or tubing shrinkage. Their ability to offer variable temperature settings—from gentle warmth to intense heat—makes them adaptable across many surfaces and materials.
However, when working indoors, those very benefits can introduce new challenges. Confined rooms mean less airflow to dissipate heat or fumes and increase the chance of encountering flammable materials like old insulation, wooden trims, or loose debris. In such environments, a moment’s carelessness can lead to scorched surfaces, smoke alarms, or worse. Recognizing these risks is the first step toward mastering safe and effective heat gun use.
The Risks Hidden Indoors
- Limited Ventilation: Fumes from heated paint or adhesives linger indoors longer, posing health risks and potentially igniting if mixed with sparks.
- Flammable Materials Nearby: Dust, curtains, cardboard, and insulation can easily ignite or melt unexpectedly if exposed to stray heat.
- Hidden Hazards: Wiring behind walls or old wooden surfaces might get damaged or catch fire if heat isn’t carefully controlled.
All these factors mean that even routine projects need an extra layer of mindfulness indoors.
Common Mistakes and How to Prevent Them
Nearly every DIYer who has worked indoors with a heat gun can recall a small misstep or near miss. These incidents often boil down to a few key oversights that are completely avoidable with proper preparation and technique.
1. Failing to Clear the Workspace
One of the simplest but most overlooked steps is prepping the immediate area. Soft plastics, paper, loose dust or sawdust, and fabric near your work zone can all turn into unexpected hazards under high heat. Take the time to sweep or vacuum dust, move magazines and papers away, and secure curtains or drapes before switching on your heat gun.
2. Ignoring Temperature and Fan Speed Controls
Not every heat gun is created equal, and many offer adjustable temperature dials and fan speeds for a reason. Choosing the right setting—typically between 200°C and 600°C depending on your task—prevents overheating. For example, delicate vinyl flooring repairs usually require lower temperatures with controlled airflow to avoid burning or warping. Using the highest setting when it’s not needed can lead to rapid material damage and even ignite underlying surfaces.
3. Letting the Power Cord Get Too Close to the Heat Source
The heat gun’s nozzle can surpass 600°C (over 1,000°F), which instantly melts or damages anything in direct contact. A common rookie error is letting the power cord droop near the nozzle. This can cause plastic insulation to melt, short out the tool, or spark electrical hazards. Always secure and route the cord well away from your working area.
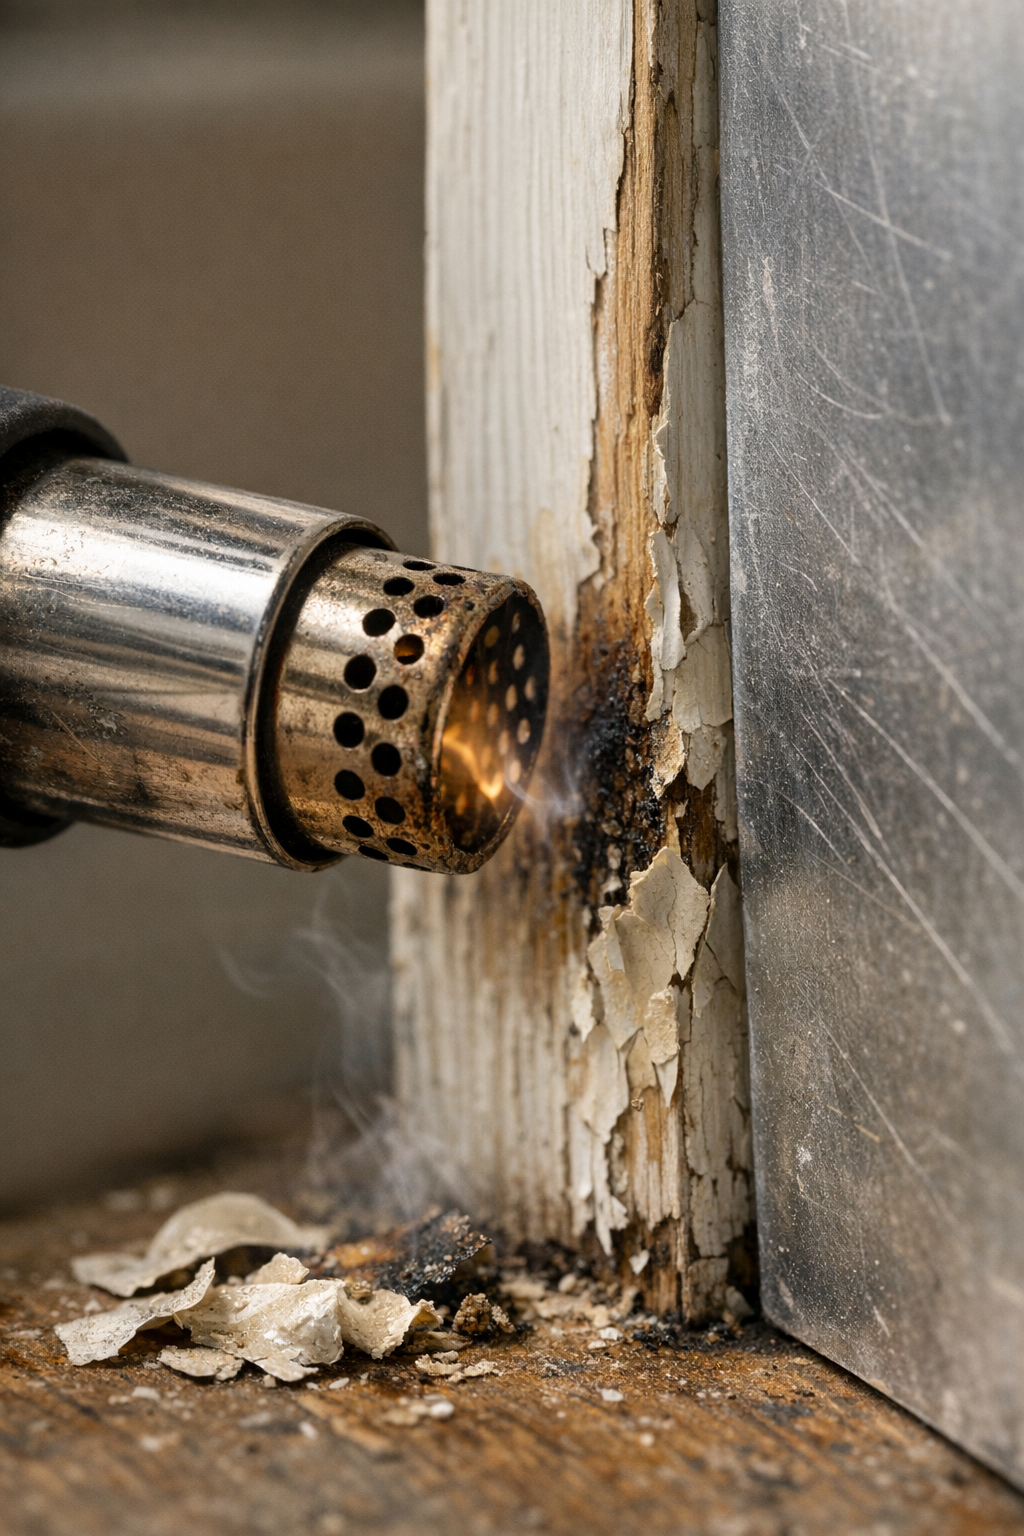
A Game-Changing Setup Tip: The Metal Heat Shield
Years ago, while stripping paint near some wooden kitchen shelves, I discovered a simple modification saved me from scorched walls and nerves. Placing a large lightweight metal sheet—like a clean baking tray or an old aluminum clipboard—upright behind the section I was working on acted as a heat shield. This reflects excess heat and catches softened debris that might otherwise damage surfaces or cause drips.
This technique is easy to implement yet highly effective. The shield should be slightly larger than the target surface and positioned just a few inches behind it. It doesn’t add fuss or time but provides a physical barrier that helps keep surrounding areas safe. For narrow trim paint stripping, pairing this setup with holding the gun at a 30–45 degree angle and using short, overlapping passes keeps heat concentrated and controlled, avoiding warping or deep burns.
Keeping Safe and Comfortable When Things Heat Up
Knowing that heat guns can easily reach temperatures of 600°C (around 1000°F) or more underscores why caution is paramount indoors. Several simple habits can maintain workspace safety and lower stress during your DIY sessions.
- Use a Stand or Non-Flammable Surface: When not actively heating surfaces, rest your heat gun on a dedicated stand or a metal surface. Never set it nozzle-down on wood, fabric, or piles of paper.
- Ventilate Generously: Always crack a window, switch on a fan, or open a door to circulate air. Fumes from paint and melted plastics accumulate quickly and degrade indoor air quality.
- Limit Heat Application Time: Apply heat in short bursts or quick sweeps rather than a prolonged blast. This controlled approach lessens the chance of overexposure and potential damage.
- Unplug When Not in Use: For safety and peace of mind, disconnect the heat gun when you take breaks or finish work to prevent accidental activation or curious pets touching the tool.
Another tip related to distance: hold the gun approximately 25mm (about 1 inch) away from the surface. Being too close risks burning the material and reduces your ability to distribute heat evenly, which can damage paints, plastics, and conceivably wiring behind panels. I personally find setting a kitchen timer for 30–45 second intervals helps remind me to move the gun or pause and reassess the surface temperature to prevent damage.
Refreshing Your Perspective: Take Short Breaks to Reassess
Amid focused work, it’s easy to get tunnel vision and unintentionally apply heat too long or miss subtle signs of scorching. A practical technique to refresh your perspective is to deliberately step back every few minutes—literally take a short break from the task to inspect your work and surroundings with fresh eyes. This pause not only helps catch problems early but keeps you mentally alert and reduces stress during tedious jobs.
During these short breaks, grab a quick breath of fresh air by stepping near an open window or door. This simple habit enhances ventilation and renews your concentration, making the overall process safer and more enjoyable.
The Small Details that Make the Biggest Difference
In many ways, the secret to safe and effective indoor heat gun use lies in the minor adjustments and habits you develop. Double-checking your workspace, protecting nearby surfaces, carefully controlling temperature and distance, and pacing your work with intentional breaks can transform what might feel like a risky operation into a smooth, confident process.
Even seasoned professionals approach heat gun work indoors with a blend of respect and caution. That slight increase in heart rate before flipping the switch isn’t paranoia—it’s recognition of the tool’s power and the responsibility to keep both the home and yourself safe.
Final Thoughts
Using a heat gun indoors need not be nerve-wracking. With thoughtful preparation, controlled temperature settings typically between 350–450°C for paint stripping, and simple protective measures like heat shields and good ventilation, you can tackle your projects with greater precision and far less risk. Remember: it’s the small things—the extra couple of minutes prepping your space, the right angle, the shield strategically placed behind your work area—that help keep your tools, your home, and your nerves intact.
Before you start your next indoor DIY heat gun project, ask yourself: Have I cleared the area, set the optimal temperature, planned for quick passes, and positioned a heat shield? These steps will make all the difference between an efficient, satisfying job and an unexpected mishap.